15cm sIG 33 B Sfl

From War Thunder Wiki
Jump to: navigation, search
VTOL | Rank 5 USA
AV-8A Harrier Pack
15cm sIG 33 B Sfl
germ_sturmpanzer_ii.png
GarageImage 15cm sIG 33 B Sfl.jpg
ArtImage 15cm sIG 33 B Sfl.png
15cm sIG 33 B Sfl
AB RB SB
1.0 1.0 1.0
Research:2 900 Specs-Card-Exp.png
Purchase:700 Specs-Card-Lion.png
Show in game

Description

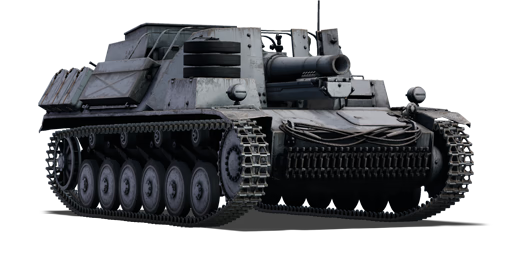
The 15 cm sIG 33 auf Fahrgestell Panzerkampfwagen II (Sf), also known as the Sturmpanzer II Bison during World War II, is a German assault gun built primarily for infantry support and anti-fortification roles. Several prototypes were built, with the final one based on a standard Panzer II Ausf. B chassis. The chassis was extended by 60 cm, necessitating the addition of a sixth roadwheel, and widened by 32 cm to better fit the cannon while maintaining its low silhouette. A total of twelve units were built between December 1941 and January 1942. They were deployed to North Africa, where they formed schwere Infanteriegeschütz-Kompanien (mot.S.) 707 and 708 as close support mobile artillery. Both companies fought in Tunisia until the Axis surrendered in May 1943.

Introduced in Update 1.67 "Assault", the 15cm sIG 33 B Sfl is the largest calibre cannon available to German Army ground forces at rank I. The massive 15 cm calibre assault gun is capable of firing both high explosive (HE) and high explosive anti-tank (HEAT) rounds, which can completely cripple, if not destroy, any enemy tank it strikes. The vehicle, however, is completely exposed, leaving it extremely vulnerable to anything from machine gun fire to artillery strikes to aircraft strafing. Because of the low velocity and significant reload time, players should only fire when they are certain the shell will hit. Nonetheless, the 15cm sIG 33 B Sfl provided a highly unique and enjoyable experience in the German Army's beginner ranks.

General info

Survivability and armour

Armourfront / side / back
Hull20 / 14 / 14
Turret14 / 14 / 14
Crew4 people
Visibility69 %

Armour type:

  • Rolled homogeneous armour
Armour Front (Slope angle) Sides Rear Roof
Hull 35 mm (11°) Front plate
20 mm (73°) Front glacis
35 mm (14°) Lower glacis
15 mm 15 mm
Superstructure 30 mm (12°) Gun mantlet 15 mm 15 mm

Notes:

  • Suspension wheels are 10 mm thick while tracks are 15 mm thick.
  • Hull underside right above tracks is 15 mm thick and belly armour is 5 mm thick.

The Sturmpanzer II does have enough armour to stop low BR tank rounds, however it should not be relied upon to stop high velocity or high penetration rounds, especially from other SPGs. It is an open-topped vehicle, and since it has no machine guns, it is very vulnerable to air attack.

Despite having very little armour, it does have a lot of empty space in the tank to resist multiple penetrating hits before being destroyed. However, it is hull-breakable against 75 mm or larger guns with sufficient AP velocity or HE capability.

Mobility

Speedforward / back
AB49 / 10 km/h
RB and SB46 / 9 km/h
Number of gears6 forward
1 back
Weight15.9 t
Engine power
AB296 hp
RB and SB155 hp
Power-to-weight ratio
AB18.6 hp/t
RB and SB9.7 hp/t
Game Mode Max Speed (km/h) Weight (tons) Engine power (horsepower) Power-to-weight ratio (hp/ton)
Forward Reverse Stock Upgraded Stock Upgraded
Arcade 49 10 15.9 220 296 13.84 18.62
Realistic 46 9 137 155 8.62 9.75

The Sturmpanzer II can go up to 45 km/h, but due to the low power-to-weight ratio, the practical top speed is significantly less. Reverse speed is decent, up to -8.4 km/h. It has a decent turning capability when moving at higher speeds, but when stopped it can barely turn due to its weight.

Modifications and economy

Repair costBasic → Reference
AB90 → 111 Sl icon.png
RB112 → 138 Sl icon.png
SB126 → 155 Sl icon.png
Total cost of modifications2 970 Rp icon.png
895 Sl icon.png
Talisman cost190 Ge icon.png
Crew training200 Sl icon.png
Experts1 000 Sl icon.png
Aces20 Ge icon.png
Research Aces96 000 Rp icon.png
Reward for battleAB / RB / SB
10 / 20 / 20 % Sl icon.png
100 / 100 / 100 % Rp icon.png
Modifications
Mobility Protection Firepower
Mods new tank traks.png
Tracks
Research:
200 Rp icon.png
Cost:
60 Sl icon.png
45 Ge icon.png
Mods new tank suspension.png
Suspension
Research:
165 Rp icon.png
Cost:
50 Sl icon.png
40 Ge icon.png
Mods new tank break.png
Brake System
Research:
165 Rp icon.png
Cost:
50 Sl icon.png
40 Ge icon.png
Mods new tank filter.png
Filters
Research:
250 Rp icon.png
Cost:
75 Sl icon.png
60 Ge icon.png
Mods new tank transmission.png
Transmission
Research:
480 Rp icon.png
Cost:
145 Sl icon.png
110 Ge icon.png
Mods new tank engine.png
Engine
Research:
480 Rp icon.png
Cost:
145 Sl icon.png
110 Ge icon.png
Mods tank tool kit.png
Improved Parts
Research:
200 Rp icon.png
Cost:
60 Sl icon.png
45 Ge icon.png
Mods extinguisher.png
Improved FPE
Research:
165 Rp icon.png
Cost:
50 Sl icon.png
40 Ge icon.png
Mods tank reinforcement ger.png
Crew Replenishment
Research:
250 Rp icon.png
Cost:
75 Sl icon.png
60 Ge icon.png
Mods new tank horizontal aiming.png
Horizontal Drive
Research:
200 Rp icon.png
Cost:
60 Sl icon.png
45 Ge icon.png
Mods tank cannon.png
Adjustment of Fire
Research:
165 Rp icon.png
Cost:
50 Sl icon.png
40 Ge icon.png
Mods new tank vertical aiming.png
Elevation Mechanism
Research:
250 Rp icon.png
Cost:
75 Sl icon.png
60 Ge icon.png

Armaments

Main armament

Ammunition18 rounds
Reloadbasic crew → aces
14.4 → 11.1 s
Vertical guidance-4° / 40°
Horizontal guidance-1° / 6°
Main article: s.I.G.33 (150 mm)

The Sturmpanzer II mounts a s.I.G.33 infantry support cannon, which can fire HEAT or HE rounds. The shell velocity is very slow (240 m/s), so slow that it can be awkward to target moving targets or those at long ranges, especially with HE rounds. The calibre of the gun is 15 cm (150 mm / 5.9 in).

150 mm s.I.G.33 Turret rotation speed (°/s) Reloading rate (seconds)
Mode Capacity Vertical Horizontal Stabilizer Stock Upgraded Full Expert Aced Stock Full Expert Aced
Arcade 18 -4°/+40° -1°/+6° N/A 5.3 7.3 8.9 9.8 10.4 14.43 12.77 11.77 11.10
Realistic 3.6 4.2 5.1 5.6 6.0

Ammunition

  • I.Gr.38 (HE): This round is extremely powerful, and can destroy pretty much every tank at the same battle rating as the 15cm sIG 33 B Sfl. It requires only a hit on the tank, underneath it, or in close proximity to be effective. It completely ignores the armour of most tanks you will face, and is very good at destroying a tank with a single shot. It is likely that you will knock out several crew members and/or detonate their ammunition.
  • I.Gr.39 HI/A (HEAT): This round is effective, just as is the high-explosive round, but unless you are up-tiering the vehicle, the HEAT round is likely a worse choice. It has more penetration, but that penetration is unlikely to be useful at this BR. Plus, the HEAT does not have near as much post-penetration damage as the HE round, meaning you may waste 2 shots on 1 tank, whereas the HE round may have knocked it out with a single shot. As such, unless you are up-tiering the tank you will not need HEAT, and you should probably only take a few rounds (if any), just in case you run across something like a B1 Bis.

The I.Gr.38 HE shell penetrates 61 mm against all armour angles. The 8.6 kg TNT equivalent ensure that anything that gets penetrated is instantly knocked out or is so badly crippled that a follow-up shot is guaranteed. The HE shell is so powerful that it can even knock out top-tier tanks with a single shot reliably through overpressure, but due to the huge mobility disadvantage, this is not recommended unless you know exactly what you are getting yourself into.

The I.Gr.39 HI/A HEAT shell penetrates 185 mm against vertical armour and still has a 5.3 kg TNT equivalent of explosives behind it, giving it the possibility to inflict overpressure damage from the explosion splash on top of the HEAT superplastic copper jet penetration.

Penetration statistics
Ammunition Type of
warhead
Penetration @ 0° Angle of Attack (mm)
10 m 100 m 500 m 1,000 m 1,500 m 2,000 m
I.Gr.38 HE 61 61 61 61 61 61
I.Gr.39 HI/A HEAT 185 185 185 185 185 185
Shell details
Ammunition Type of
warhead
Velocity
(m/s)
Projectile
mass (kg)
Fuse delay
(m)
Fuse sensitivity
(mm)
Explosive mass
(TNT equivalent) (kg)
Ricochet
0% 50% 100%
I.Gr.38 HE 240 38 0 0.1 8.6 79° 80° 81°
I.Gr.39 HI/A HEAT 280 24.58 0.05 0.1 5.32 62° 69° 73°

Ammo racks

Ammo racks of the 15cm sIG 33 B Sfl
Full
ammo
Ammo
part
1st
rack empty
2nd
rack empty
3rd
rack empty
Visual
discrepancy
18 Projectiles
Propellants
9 (+9)
10 (+8)
5 (+13)
6 (+12)
0 (+18)
0 (+18)
No

The most recommended ammo loadout would probably either be 18 shells or 9 shells. If you expect a long lasting battle a full loadout should be preferred. 9 shells would be the choice if fast action combat is in sight. Taking only 9 shells removes all the ammo from the right side of the tank, reducing the risk of ammo rack detonation. Packing 9 shells is probably the most balanced ammunition loadout in terms of survivability and endurance, while packing a full loadout is suited for high/risk-high-reward gameplay.

At higher BRs 3.0 or more consider taking always a full loadout, because at this BR the chances of being destroyed with one hit is very high, leaving the pro of having more ammo (in theory more kills) outdoing the risk of an ammo rack explosion.

Usage in battles

The 15cm SIG can only played in mainly three ways:

The Sturmpanzer has no air defence weapons, therefore partnering with an SPAA tank at the back of the map is a viable option. For those operators who prefer to close-range brawl with other low-tier tanks, then sticking with another tank is a good idea, mainly due to the long reload time, allowing your partner tank to help fend off any enemy advancing tanks. It has the capability to knock out much higher battle rated tanks, so if you're uptiered, there is still a good chance of survival. However, it is imperative to get a shot off first, because if you come across a higher tier tank, there may not be a second chance. Stay on the move after firing, fall back to safety to reload and then re-engage.

Another tactic is to try facing down a street while partly undercover. The Sturmpanzer is a relatively small vehicle and many beginning players will not notice the tank, especially if only part of the vehicle is exposed. Patiently wait for an easy target to turn onto the street then fire before they realize where they are being fired from. It is critical to remember the shell drop of the tank cannon after being fired, compared to other tanks, the shell drop is significant over any distance. It is advisable to always fire just above where other tanks would typically target to allow for shell drop and hit the enemy vehicle where intended instead of lower than expected.

Due to the huge HE splash ability and sheer calibre of the gun, it can even be used to battle high-rank IFVs. It does the same thing to BMP-2s, M3 Bradleys, Warriors, Centauros, and many other vehicles. The HE splash, however, is strong enough that it can knock out light tanks such as the M41A1 Bulldog, any AMX-13 variation, Crusaders in lower ranks, and many others. Purposely up-tiering it can be a very effective way to earn Silver Lions with the "God Mode!" award - destroying an enemy vehicle 5.0 BR ranks higher (BR 6.0+) than you which nets 20,000 Silver Lions.

Enemies worth noting
  • B1 bis: This is one of the few tanks that you will face while playing at your original BR that you may struggle to destroy. These tanks are heavily armoured and much of their hulls can withstand a shot from your gun, even from the side. If you are facing one of these tanks, aim for the turret. The turret is one of the only places you can reliably do damage to the B1 bis, and you can often get a single-shot knock-out if you hit the turret. Note: The B1 bis looks extremely similar to its much more heavily armoured successor, the B1 ter, and it can be incredibly hard to tell which variety it is except at closer ranges. The B1 ter has thicker armour and so both HE and HEAT shells must be aimed much more carefully in order to cause damage.

Pros and cons

Pros:

  • Deadly HE with 61 mm penetration and 8.6 kg TNT filler destroys anything at its rank (e.g. B1 bis, M5A1, T-50) or even in a purposely uptiered battle
  • HEAT offers 185 mm penetration, posing a great threat against WW2 heavy targets like M4A3E2, IS-1, KV-1E, etc.
  • Adequate mobility: moderate top speed and fast hull traverse when driving allows it to deliver heavy blows from unexpected positions
  • Low and small profile makes it easy to hide behind bushes or covers
  • Can withstand a few hits on certain parts of frontal armour, which may bounce low-penetrating tanks like M16 MGMC or P.7.T AA

Cons:

  • Very long reload impedes close-range combat. 14 second reload requires cover from allies if in crowded position.
  • Limited gun traverse and extremely curved trajectory means it's hard to track and hit moving/distant targets
  • HE and HEAT get detonated by various obstacles like fences and brick walls, making some positions difficult to shoot from
  • Poor survivability overall: thin armour can get penetrated by anything, especially heavy MG found on M16 MGMC, and the open top means it is vulnerable to strafing aircraft, nearby bombs and exploding artillery shells
  • Very slow, spastic at turning on the spot, might not be able to get gun on target in time
  • Although speed is decent, most opponents still outrun it easily, for example M5A1, T-50, M22

History

Design

The Sturmpanzer I Bison was a self-propelled gun, consisting of a 150 mm sIG 33 heavy infantry gun mounted on top of a Panzer I chassis, together with a lightly armoured casemate to protect the gun servants. It was stop-gap vehicle used as an infantry support vehicle and showed its limits during the invasion of France and the Low Countries. The weight of the gun and the additional armour strongly hindered the mobility of the tank and caused premature mechanical wear. The gun installed very high on the chassis together with the casemate made the Sturmpanzer I a target of choice on the battlefield due to its very tall silhouette. The casemate did not protect all gun servants: the gunner and the commander were protected but loaders were extremely exposed as the casemate wasn't designed long enough to cover the rear of the vehicle. The extremely cramped layout of the vehicle made it impossible to stow ammunition: it had to be brought by a separate dedicated tank.

The need for the Sturmpanzer II was born early in 1941 when Rommel requested self-propelled guns to support his armoured divisions in North Africa. This led the German Army to consider mounting the heavy gun sIG 33 on a vehicle chassis more fit to the task. The requirements for the new vehicle were to provide a less cramped layout for the gun and the crew to operate in optimal conditions, to give a silhouette as small as possible and to carry its own ammunition onboard, while maintaining the crew count, operational range and top speed of the previous Sturmpanzer.

Development

After the battle of France, the German Army focused on equipping their tank divisions with Panzer III and IV. The Panzer II tanks were recycled into other vehicles to assume different combat roles: tank destroyers, self-propelled guns, training vehicles or reconnaissance tanks. The availability of the Panzer II made it a natural successor of the Panzer I for the project. The first prototype used the standard chassis of a Panzer II, which revealed a similarly cramped layout. To remedy the issue, the chassis was widened by 32 cm, lengthened by 60 cm and a 6th roadwheel added along with track links. The new casemate was open-topped but effectively surrounded the crew compartment, with a reinforced frontal gun shield. The 15cm sIG 33 B Sfl also carried 30 rounds. The loaders were still slightly exposed to gun fire when fetching ammunition around the vehicle but the emphasis was put on keeping a silhouette as small as possible. The operational range was increased and the crew count of 4 maintained together with the top speed. 12 vehicles were built in November and December 1941.

Combat action

The 15cm sIG 33 B Sfl served in North Africa, in the German 707th and 708th Heavy Infantry Gun Companies Heavy Infantry Gun Company until their destruction or surrender in 1943.

Media

Skins
Videos

See also

Vehicles equipped with the same chassis
Other vehicles of similar configuration and role

External links


Germany tank destroyers
Pz. I Derivatives  Panzerjäger I
Pz. II Derivatives  15cm sIG 33 B Sfl
Pz. 38(t) Derivatives  Marder III · Marder III H · Jagdpanzer 38(t)
Pz. III Derivatives  StuG III A · StuG III F · StuG III G · StuH 42 G
Pz. IV Derivatives  Jagdpanzer IV · Panzer IV/70(A) · Panzer IV/70(V) · Dicker Max · Nashorn · Brummbär · VFW
Pz. V Derivatives  Jagdpanther G1 · Bfw. Jagdpanther G1
Pz. VI Derivatives  Sturer Emil · Elefant · Ferdinand · 38 cm Sturmmörser · Jagdtiger
Wheeled/Half-track  8,8 cm Flak 37 Sfl. · Sd.Kfz.251/9 · Sd.Kfz.251/10 · Sd.Kfz.251/22 · Sd.Kfz.234/3 · Sd.Kfz.234/4 · 15 cm Pz.W.42
ATGM Carrier  RakJPz 2 · RakJPz 2 (HOT) · Wiesel 1A2
Other  Waffenträger · M109G · JPz 4-5 · Raketenautomat · VT1-2