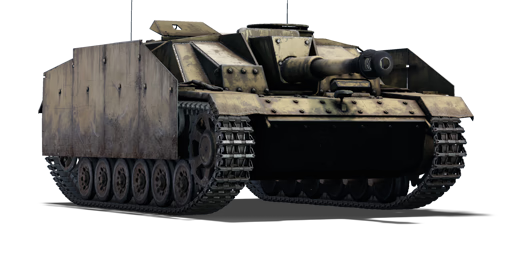
StuH 42 G

From War Thunder Wiki
Jump to: navigation, search
Rank IV USSR | Premium | Golden Eagles
Tu-1 Pack
germ_stuh_iii_ausf_g.png
GarageImage StuH 42 G.jpg
ArtImage StuH 42 G.png
ArtImage2 StuH 42 G.png
StuH 42 G
AB RB SB
3.0 3.0 3.0
Research:4 600 Specs-Card-Exp.png
Purchase:16 000 Specs-Card-Lion.png
Show in game

Description

The Sturmhaubitze 42 Ausf. G (German armoury designation: Sd.Kfz. 142/2) is a rank II German tank destroyer with a battle rating of 3.0 (AB/RB/SB). It was introduced in Update 1.49 "Weapons of Victory".

While the StuH 42 bears much resemblance to the StuG III G, its playstyle is much, much different. While later StuGs (Ausf. F - G) are most effective at medium to long range combat, StuH is much more suitable for medium to very close range (mostly in RB).

The reason is its gun - it is equipped with a large 10.5 cm howitzer, hence the abbreviation StuH – Sturm Haubitze. The shell velocity is lesser than that of StuG, but they can cause crippling damage with a single hit. Due to low muzzle velocity, shells often fail to hit moving tanks, often requiring to get closer to the opponents. Fortunately, StuH frontal armour is reasonably good, being mostly 80 mm with several weakspots of 30 mm thickness, and good mobility of Panzer III chassis now becomes even more useful.

General info

Survivability and armour

Armourfront / side / back
Hull80 / 30 / 30
Turret80 / 30 / 30
Crew4 people
Visibility74 %

The armour of StuH 42 G is semi-reliable. It has a very strong frontal armour of 80 mm RHA, but there are quite visible angled plates of only 30 mm thickness, which only become more vulnerable when fighting tall tanks. The cupola is 50 mm thick and will generally deflect stray shots. Generally, at 600 m range while being on a high ground or slightly angled upwards, StuH can mostly ignore tanks firing at the front. It is important to avoid angling the hull downwards, as this makes weakspots to be penetrable even with autocannons.

Technically, the frontal weakspots can be made stronger with "add-on armour" in form of tracks, but at point blank range this won't be much of help.

The greatest vulnerability of StuH 42 G is its roof, which is only 11 mm thick. While most tanks only have 9 mm of penetration with their HE shells, pretty much any enemy with a big gun can breach the roof by hitting the cupola, with SPGs also often being able to overpressure even the angled frontal plates.

The sides protection is overall terrible and even reserve tanks can take out this SPG by flanking it, so it is of utmost importance to control the entirety of the space enemy tanks can fire from. But, the sides do have the side skirts, which will stop HESH and might derail HEAT.

Armour type:

  • Rolled homogeneous armour
Armour Front (Slope angle) Sides Rear (Slope angle) Roof
Hull 30 mm (86°), 80 mm (50°) Front glacis
80 mm (19°) Lower glacis
30 + 5 mm 30 mm (77°) Tlop
50 mm (15-42°) Middle
50 mm Bottom
16 mm
Superstructure 80 mm (10-11°), 30 mm (50-69°) 30 (9°) + 5 mm Left
30 (11°) + 5 mm Right
30 mm 11 mm
Cupola 50 mm 50 mm 50 mm 11 mm

Notes:

  • Suspension wheels are 15 mm thick while tracks are 20 mm thick.
  • Sides of the tank are covered by additional 5 mm thick armour plates, protecting the tank against HEAT and HE shells, as well as reducing damage from nearby explosions.
  • Some areas of the front armour are still only 30 mm thick. With a bit of luck they can be penetrated even by much weaker guns
  • Belly armour is 30 mm thick.

Mobility

Speedforward / back
AB44 / 9 km/h
RB and SB41 / 8 km/h
Number of gears6 forward
1 back
Weight24.4 t
Engine power
AB572 hp
RB and SB300 hp
Power-to-weight ratio
AB23.4 hp/t
RB and SB12.3 hp/t
Game Mode Max Speed (km/h) Weight (tons) Engine power (horsepower) Power-to-weight ratio (hp/ton)
Forward Reverse Stock AoA Stock Upgraded Stock Upgraded
Arcade 44 9 23.9 0.45 426 572 17.79 23.44
Realistic 41 8 265 300 11.06 12.3

Modifications and economy

Repair costBasic → Reference
AB545 → 738 Sl icon.png
RB645 → 873 Sl icon.png
SB756 → 1 024 Sl icon.png
Total cost of modifications8 420 Rp icon.png
9 500 Sl icon.png
Talisman cost640 Ge icon.png
Crew training4 500 Sl icon.png
Experts16 000 Sl icon.png
Aces160 Ge icon.png
Research Aces190 000 Rp icon.png
Reward for battleAB / RB / SB
40 / 60 / 70 % Sl icon.png
118 / 118 / 118 % Rp icon.png
Modifications
Mobility Protection Firepower
Mods new tank traks.png
Tracks
Research:
340 Rp icon.png
Cost:
380 Sl icon.png
65 Ge icon.png
Mods new tank traks.png
Ostketten
Research:
340 Rp icon.png
Cost:
380 Sl icon.png
65 Ge icon.png
Mods new tank suspension.png
Suspension
Research:
380 Rp icon.png
Cost:
430 Sl icon.png
70 Ge icon.png
Mods new tank break.png
Brake System
Research:
380 Rp icon.png
Cost:
430 Sl icon.png
70 Ge icon.png
Mods new tank filter.png
Filters
Research:
700 Rp icon.png
Cost:
790 Sl icon.png
135 Ge icon.png
Mods new tank transmission.png
Transmission
Research:
680 Rp icon.png
Cost:
770 Sl icon.png
130 Ge icon.png
Mods new tank engine.png
Engine
Research:
680 Rp icon.png
Cost:
770 Sl icon.png
130 Ge icon.png
Mods tank tool kit.png
Improved Parts
Research:
340 Rp icon.png
Cost:
380 Sl icon.png
65 Ge icon.png
Mods extinguisher.png
Improved FPE
Research:
380 Rp icon.png
Cost:
430 Sl icon.png
70 Ge icon.png
Mods tank reinforcement ger.png
Crew Replenishment
Research:
700 Rp icon.png
Cost:
790 Sl icon.png
135 Ge icon.png
Mods tank additional armor.png
Add-on Armor
Research:
680 Rp icon.png
Cost:
770 Sl icon.png
130 Ge icon.png
Mods new tank horizontal aiming.png
Horizontal Drive
Research:
340 Rp icon.png
Cost:
380 Sl icon.png
65 Ge icon.png
Mods tank ammo.png
105mm_germany_HEAT_B_ammo_pack
Research:
340 Rp icon.png
Cost:
380 Sl icon.png
65 Ge icon.png
Mods tank cannon.png
Adjustment of Fire
Research:
380 Rp icon.png
Cost:
430 Sl icon.png
70 Ge icon.png
Mods tank ammo.png
105mm_germany_HEAT_C_ammo_pack
Research:
380 Rp icon.png
Cost:
430 Sl icon.png
70 Ge icon.png
Mods new tank vertical aiming.png
Elevation Mechanism
Research:
700 Rp icon.png
Cost:
790 Sl icon.png
135 Ge icon.png
Mods tank ammo.png
105mm_ger_Smoke_ammo_pack
Research:
680 Rp icon.png
Cost:
770 Sl icon.png
130 Ge icon.png

Armaments

Main armament

Ammunition36 rounds
Reloadbasic crew → aces
13.0 → 10.0 s
Vertical guidance-6° / 20°
Horizontal guidance-10° / 10°
Main article: StuH42 (105 mm)
105 mm StuH42 Turret rotation speed (°/s) Reloading rate (seconds)
Mode Capacity Vertical Horizontal Stabilizer Stock Upgraded Full Expert Aced Stock Full Expert Aced
Arcade 36 -6°/+20° ±10° N/A 10.6 14.6 17.8 19.6 20.9 13.00 11.50 10.60 10.00
Realistic 7.1 8.4 10.2 11.3 12.0

Ammunition

  • PzGr, Armour Piercing High Explosive round - It has awesome post-penetration damage but penetrates armour poorly making it, difficult to use against the front armour of most enemies. It has about the same velocity as chemical shells, so it's not useful as a backup sniper shell; instead it is very good to finish off enemies from the side.
  • F.H.Gr. - Can be used to great effect by skilled players (particularly in AB), as it can penetrate almost any roof at the BR, but it doesn't have enough explosive mass to obliterate tanks by hitting them virtually anywhere, unlike with heavier rounds of the KV-2, SU-122 or the Sturmpanzer II. It is also quite difficult to hit Soviet and American tanks into their weakspots with this shell.
  • Gr.39 rot Hl/B, High-Explosive Anti-Tank round - This one should be just skipped, it has no advantage over the better HI.Gr.38C.
  • Gr.39 rot Hl/C, High Explosive Anti-Tank round - For beginners HEAT is a good option as it wont struggle to penetrate most tanks and will destroy the lightly-armoured and open-topped foes with overpressure and easily detonate ammo racks of the rest. They are usually effective at any range, as long as they land on enemy tanks.
  • F.H.Gr.Nb, Smoke round - Useful to blind a sight line that you want to cross or cover an escape.

Many players will ask themselves which round to main, for newer players, considering the inaccuracy of the stock gun, HEAT is a good choice as it will penetrate most armour and is easy to use.

In order to maximize survivability, bring in only 25 shells, as otherwise almost any penetration on the right side becomes fatal. About 12 HEAT, 5 APHE and two smoke rounds is a good idea for general melee combat, while 23 HE and 2 HEAT (for enemy heavy howitzers) can be loaded when all accuracy upgrades were researched and the safety of the flanks is guaranteed.

Penetration statistics
Ammunition Type of
warhead
Penetration @ 0° Angle of Attack (mm)
10 m 100 m 500 m 1,000 m 1,500 m 2,000 m
PzGr APHE 72 70 63 55 48 42
F.H.Gr. HE 22 22 22 22 22 22
Gr.39 rot Hl/B HEAT 105 105 105 105 105 105
Gr.39 rot Hl/C HEAT 115 115 115 115 115 115
Shell details
Ammunition Type of
warhead
Velocity
(m/s)
Projectile
mass (kg)
Fuse delay
(m)
Fuse sensitivity
(mm)
Explosive mass
(TNT equivalent) (g)
Ricochet
0% 50% 100%
PzGr APHE 480 14 1.2 19 304.64 47° 60° 65°
F.H.Gr. HE 472 14.81 0.2 0.1 1,750 79° 80° 81°
Gr.39 rot Hl/B HEAT 495 12.35 0.05 0.1 2,530 62° 69° 73°
Gr.39 rot Hl/C HEAT 495 12.35 0.05 0.1 2,550 62° 69° 73°
Smoke shell characteristics
Ammunition Velocity
(m/s)
Projectile
mass (kg)
Screen radius
(m)
Screen deploy
time (s)
Screen hold
time (s)
Explosive mass
(TNT equivalent) (g)
F.H.Gr.Nb. 480 14 16 5 25 50

Ammo racks

Ammo racks of the StuH 42 G
Full
ammo
Ammo
part
1st
rack empty
2nd
rack empty
3rd
rack empty
Visual
discrepancy
36 Projectiles
Propellants
25 (+11)
31 (+5)
19 (+17)
(+29)
13 (+23)
(+35)
No

Notes:

  • The StuH 42 G uses two-piece ammunition, composed of projectiles (yellow) and propellant bags (orange). Both have separate racks.
  • Racks disappear after you've fired all shells in the rack.
  • Left side empty: 19 (+17) shells.

Usage in battles

The StuH 42 G boasts a front armour which, if used correctly, can become impenetrable to most enemies it encounters at its battle rating. With the Add-on armour modification, the StuH's armour is brought up to a minimum of ~40 mm and maximum of ~90 mm RHA with quite good angles, when this armour is supplemented with medium range or slight angling, only SPG and several medium tanks will manage to crack through its defences without using HE. The Sturmhaubitze 42 performs best in urban or spaced hills environment, where the poor gun depression and low shell velocity won't matter as much and it can just terminate any tank trying to get past or attempting to fight it.

The StuH can also do very well at close range as a "Heavies Killer" as its strong frontal armour will protect it against the guns carried by heavy tanks around this BR and the HEAT round will defeat even thicker armour, making the StuH a real headache to Matilda, Churchill and KV-1 tankers. Another strategy for close-quarters engagements is to wiggle the tank from side to side while engaged in a 1-vs-1 frontal battle. This will make it more difficult for stationary enemies to hit any weak spots on the front plate as they cannot get an accurate shot off.

A very important thing to keep in mind is to never expose the StuH's weak sides to the enemy as they are only 35 mm thick (with the side skirts), so even the weakest guns and SPAAG autocannons can take you out from the side. Therefore, avoid crossing a long sightline as any enemy covering it will easily destroy the StuH 42 G with a well aimed shot at the side. Against multiple tanks, with thoroughly planned out positioning it becomes possible to fire over cover by using a rangefinder or AB aim assist to avoid being shot by 3 tanks from multiple directions at once, particularly if they also have SPG on their side.

When facing a tank from the side, especially if you don't know the tank layouts, it is recommended to aim for the engine first (particularly if HEAT is loaded) this way the enemy won't be able to flank you or escape. After that, retreat into cover and load APHE and fire in the side to destroy the enemy with the massive explosive filler (or just use HE, if you know how to aim it).

When facing a tank from the front use HEAT to disable their driver and/or gunner and/or transmission then aim for ammo or other crew members.

Where to shoot common foes:

  • M4 Sherman - Aim for the driver first then shoot in the one of the upper corners off the front plate as that is where ammo is stored.
  • T-34 - Aim for the left middle (right from your perspective) part of the front plate that will disable the gunner and driver leaving the tank completely debilitated, then shoot the other side of the UFP to disable the other two crews (a round in the middle of the UFP will often knock out the T-34 with a single shot, but that depends on crew vitality).
  • KV-1 - If it doesn't angle you can penetrate the front. Aim for the left side to knock out the driver then the turret cheeks are good ways of disabling turret crew.
Enemies worth noting
  • M4A3 (105) and SU-122 - Those two foes are quite similar to each other and to the StuH in multiple regards. They both have heavy calibre howitzers, firing high penetrating HEAT rounds (130 mm and 160 mm respectively) that will rip through your armour with ease. They are also extremely likely to carry an enormous amount of high-power HE, which can simply obliterate StuH. Secondly they are not open-topped and cannot be merely counter-shot, both boast above average frontal armour, but weak sides. However the StuH can easily penetrate their armour with HEAT, thus when facing them the winner is usually whoever gets the first shot with correct ammo off. It is worth mentioning that sometimes in RB the StuH can use its side skirts against those foes - by angling heavily StuH will expose the sides which will tempt most of HEAT users to take a shot at them, but the skirts will set off the sensitive HEAT fuse prematurely thus causing a non-penetration once the HEAT jet reaches the actual armour, leaving the StuH a 15-second window to shoot them. This will never work against dedicated HE users, and it is even less likely to work in AB, as the enemy will see gray crosshair upon aiming at sideskirts if they can't penetrate them.
  • Very mobile tanks e.g. M22, M3 and M5 Stuart, Crusaders, Cromwell's, etc - Those can flank the StuH with ease and destroy it. Your best bet with those is to detect them as early as possible and expose your front armour, that is either invulnerable to their guns or will delay the fatal shot for a split second, so you can fire first.
  • Soviet tanks - Despite the high variety of firepower at the BR, their shells generally deal with angles exceptionally well, thus a shot to even heavily angled 30 mm plates above the driver's hatch will often penetrate. Luckily the Add-on Armour modification adds 20 mm of track armour (adds 10-15 mm RHA depending on angle of attack and what they use), making this kind of penetration much rarer. Most of them will also resist HE, so it is safer to just load HEAT at first.
  • Achilles, Archer and M10 GMC, other kinetic SPG - The former two boast the infamous British 17-pounder 76 mm gun which will rip through your armour in all places. The latter is equipped with the American M7 76 mm cannon, while having less penetration this gun won't penetrate you everywhere but it still can at a lot of angles, and has some HE filler, making the penetration fatal. They all can easily be crushed by firing HEAT or HE at them - regardless of where you hit them, they will implode, even if you hit their tracks.

Counter tactics:

Technically, if your gun supports HE shells and they can penetrate more than 12 mm of RHA, then you can just fire it at its cupola and the fearsome tank destroyer will explode. This is easier said than done when the said SPG is looking at you and awaits for your move, particularly in AB, so try to blindside it. In AB, if you are using any SPG which has shells of muzzle velocity below 475 m/s, you can simply use aim prediction to attack it like a mortar out of cover without exposing the hull (by aiming white crosshair at it or simply setting the gun zero to the enemy position), which will allow you to either destroy them without being put in danger, or at the very least concern the enemy and make them move away.

If your gun is too weak to deal with the StuH's front or roof armour (which most are), and the StuH is unaware of your presence, it is best to wait for it to expose its side, then take a shot at the rear part, in order to knock out the engine - preventing them from swinging their hull around and positioning their thick front armour and fearsome 105 mm howitzer. Then it is just a matter of finishing it off: from the left side simply fire at the front/middle section, to decimate the three crew members there, thus destroying the StuH.

From the right (after disabling the engine), try to shoot the very front upper section, hitting the frontal ammo rack and very likely detonating it.

If a head-on encounter is inevitable, aim for the driver's port, a penetration there will knock out 3 out of 4 crew members - instant destruction. However, few guns can penetrate a well prepared StuH, especially on a sniper position, so a head-on encounter should be avoided at all costs.

Pros and cons

Pros:

  • HE can penetrate nearly any roof at the rank (extremely deadly in AB)
  • Good at destroying heavy tanks (which often cause a lot of trouble to weaker allies) due to having a reasonably strong HEAT shell
  • Frontal armour can render a lot of weapons useless
  • Good mobility, especially for a tank with such armour
  • With all upgrades, can quickly turn around, very useful for a turretless tank
  • Side skirts can be used to protect against HEAT/HESH projectiles, very useful when attacked by a plane with rockets

Cons:

  • Very weak sides make it vulnerable to flanking, lack of a turret means reacting to flanking enemies after the fact is impossible
  • Cupola and machine gun shield on superstructure roof are weak points that can be targeted with HE to penetrate through the 11 mm roof top
  • 105 mm howitzer performance is lacking compared to 75 mm StuK 40 in penetration and muzzle velocity (less than 500 m/s)
  • HEAT post-penetration damage is lacking compared to APHE, and HE is difficult to aim in RB
  • Low reload speed, maximum of 13 seconds. If the loader dies, the vehicle's reload rate decreases dramatically and the StuH becomes rather useless in close range combat
  • Low gun depression of -6° makes it incapable of angling on a high hill, at close range must partially or completely expose itself to fire
  • Low stock accuracy (even at close range) makes weak spot targeting harder
  • Huge ammo rack on the right side of the tank (and loader behind it); even with just 25 shells carried, the charges still remain there.
  • Very bad at protecting itself if loader is knocked out or if cannon is damaged

History

Development

The Alkett factory producing both StuG III (right) and StuH 42 (left).

The role of a self-propelled gun came from combat experiences in World War I. During the German offensives on the Allied front, infantry lacked artillery support against fortifications in places out-ranged by their heavy artillery behind the lines. A need for a mobile artillery piece was necessary to keep up with the German infantry and fight enemy fortifications with a direct-fire assault role. The father of this concept was German General Erich von Manstein and was coined as the Sturmartillerie (assault artillery), and these units were to be embedded in infantry divisions.

The result of this concept was a vehicle known as the StuG III, a vehicle built on the Panzer III chassis that fits the role of a support vehicle in the artillery branch. It was meant to give close support to advancing infantry against fortifications or other lightly armoured oppositions. As such, it was initially armed with a 75 mm StuK 37 L/24 howitzer. However, as World War II progressed, the appearance of newer and better tanks such as the T-34 and the KV-1 tanks forced the Germans to upgun their existing StuG IIIs in order to be able to combat these tanks. This resulted in the StuG III design being armed with a 75 mm StuK 40 L/43 and L/48 cannon in the StuG III Ausf. F and Ausf. G respectively, turning the design into something of a tank destroyer.

StuH 42 Ausf. G

The StuG III designs are now bona fide tank destroyer, but an infantry support role was still needed from these assault gun to support the advancing infantry. In 1942, some StuG III Ausf. F were equipped with the 105 mm leFH 18 howizter rather than the usual 75 mm cannons. This variant was designated the StuH 42 (Sturmhaubitze 42, or "assault howitzer") and was meant to support the infantry with heavier artillery power than the 75 mm could provide. The StuH 42 was made from the StuG III Ausf. G chassis (though the first 12 were built on refurbished StuG Fs). About 1,300 of these StuH 42 were built between March 1943 to 1945.


Archive of the in-game description

A modified version of the StuG self-propelled assault mount adapted to strike undefended targets, including those beyond direct firing range. The first models of the vehicle armed with 105 mm howitzers were assembled in October, 1942, and on November 22 they were used in combat by the 185th Assault Artillery Division.

The first vehicles were based on the StuG.III Ausf.F8. However, all other vehicles were assembled on the basis of the StuG.40 Ausf.G, whose chassis was a better fit for the 105 mm howitzer. The vehicles with this modification were built at Alkett's factories right up until April, 1945.


Media

Skins
Videos

See also

Related development

External links

Paste links to sources and external resources, such as:

  • topic on the official game forum;
  • other literature.


Germany tank destroyers
Pz. I Derivatives  Panzerjäger I
Pz. II Derivatives  15cm sIG 33 B Sfl
Pz. 38(t) Derivatives  Marder III · Marder III H · Jagdpanzer 38(t)
Pz. III Derivatives  StuG III A · StuG III F · StuG III G · StuH 42 G
Pz. IV Derivatives  Jagdpanzer IV · Panzer IV/70(A) · Panzer IV/70(V) · Dicker Max · Nashorn · Brummbär · VFW
Pz. V Derivatives  Jagdpanther G1 · Bfw. Jagdpanther G1
Pz. VI Derivatives  Sturer Emil · Elefant · Ferdinand · 38 cm Sturmmörser · Jagdtiger
Wheeled/Half-track  8,8 cm Flak 37 Sfl. · Sd.Kfz.251/9 · Sd.Kfz.251/10 · Sd.Kfz.251/22 · Sd.Kfz.234/3 · Sd.Kfz.234/4 · 15 cm Pz.W.42
ATGM Carrier  RakJPz 2 · RakJPz 2 (HOT) · Wiesel 1A2
Other  Waffenträger · M109G · JPz 4-5 · Raketenautomat · VT1-2