Difference between revisions of "Type 74 (C)"
(Removed "Copy-Pasted" Info) |
(Edits. Removed c&p from Type 74 (E).) |
||
| Line 10: | Line 10: | ||
== Description == | == Description == | ||
| − | <!-- ''In the description, the first part should be about the history of the creation and combat usage of the vehicle, as well as its key features. In the second part, tell the reader about the ground vehicle in the game. Insert a screenshot of the vehicle, so that if the novice player does not remember the vehicle by name, he will immediately understand what kind of vehicle the article is talking about.'' | + | <!-- ''In the description, the first part should be about the history of the creation and combat usage of the vehicle, as well as its key features. In the second part, tell the reader about the ground vehicle in the game. Insert a screenshot of the vehicle, so that if the novice player does not remember the vehicle by name, he will immediately understand what kind of vehicle the article is talking about.'' --> |
The '''{{Specs|name}}''' is a rank {{Specs|rank}} Japanese medium tank {{Battle-rating}}. It was introduced in [[Update "Direct Hit"]]. | The '''{{Specs|name}}''' is a rank {{Specs|rank}} Japanese medium tank {{Battle-rating}}. It was introduced in [[Update "Direct Hit"]]. | ||
| Line 17: | Line 17: | ||
{{Specs-Tank-Armour}} | {{Specs-Tank-Armour}} | ||
<!-- ''Describe armour protection. Note the most well protected and key weak areas. Appreciate the layout of modules as well as the number and location of crew members. Is the level of armour protection sufficient, is the placement of modules helpful for survival in combat? If necessary use a visual template to indicate the most secure and weak zones of the armour.'' --> | <!-- ''Describe armour protection. Note the most well protected and key weak areas. Appreciate the layout of modules as well as the number and location of crew members. Is the level of armour protection sufficient, is the placement of modules helpful for survival in combat? If necessary use a visual template to indicate the most secure and weak zones of the armour.'' --> | ||
| + | |||
'''Armour type:''' | '''Armour type:''' | ||
| Line 37: | Line 38: | ||
* Suspension wheels and tracks are both 20 mm thick. | * Suspension wheels and tracks are both 20 mm thick. | ||
| + | * Has additional 10 mm mounting plates scattered on the front hull | ||
* The Type 74's hydropneumatic suspension means it could vary the sloped angle of its armour towards the enemy. | * The Type 74's hydropneumatic suspension means it could vary the sloped angle of its armour towards the enemy. | ||
* Hull roof is rated to be 25 mm effective against HE. | * Hull roof is rated to be 25 mm effective against HE. | ||
| Line 84: | Line 86: | ||
| M392A2 || APDS || 303 || 302 || 296 || 277 || 257 || 252 | | M392A2 || APDS || 303 || 302 || 296 || 277 || 257 || 252 | ||
|- | |- | ||
| − | | Type | + | | Type 75 || HESH || 127 || 127 || 127 || 127 || 127 || 127 |
|- | |- | ||
| − | | | + | | M456 || HEATFS || 400 || 400 || 400 || 400 || 400 || 400 |
|- | |- | ||
|} | |} | ||
| Line 104: | Line 106: | ||
|- | |- | ||
| M392A2 || APDS || 1,478 || 4 || N/A || N/A || N/A || 75° || 78° || 80° | | M392A2 || APDS || 1,478 || 4 || N/A || N/A || N/A || 75° || 78° || 80° | ||
| − | |||
| − | |||
|- | |- | ||
| Type 75 || HESH || 760 || 10.8 || 0.05 || 0.1 || 3,890 || 73° || 77° || 80° | | Type 75 || HESH || 760 || 10.8 || 0.05 || 0.1 || 3,890 || 73° || 77° || 80° | ||
|- | |- | ||
| − | | | + | | M456 || HEATFS || 1,173 || 10.5 || 0.05 || 0.1 || 1,270 || 65° || 72° || 77° |
| − | |||
| − | |||
| − | | | ||
| − | |||
| − | |||
| − | |||
| − | |||
| − | |||
| − | |||
| − | |||
| − | | | ||
| − | | | ||
|- | |- | ||
|} | |} | ||
==== [[Ammo racks]] ==== | ==== [[Ammo racks]] ==== | ||
| − | [[File: | + | <!-- [[File:Ammoracks_{{PAGENAME}}.png|right|thumb|x250px|[[Ammo racks]] of the {{PAGENAME}}]] --> |
<!-- '''Last updated:''' --> | <!-- '''Last updated:''' --> | ||
{| class="wikitable" style="text-align:center" | {| class="wikitable" style="text-align:center" | ||
| Line 134: | Line 122: | ||
! 2nd<br>rack empty | ! 2nd<br>rack empty | ||
! 3rd<br>rack empty | ! 3rd<br>rack empty | ||
| + | ! 4th<br>rack empty | ||
| + | ! 5th<br>rack empty | ||
| + | ! 6th<br>rack empty | ||
! Visual<br>discrepancy | ! Visual<br>discrepancy | ||
|- | |- | ||
| − | | '''50''' || | + | | '''50''' || __ ''(+__)'' || __ ''(+__)'' || __ ''(+__)'' || __ ''(+__)'' || __ ''(+__)'' || __ ''(+__)'' || __ |
|- | |- | ||
|} | |} | ||
| − | + | === Machine guns === | |
| − | + | {{Specs-Tank-Weapon|2}} | |
| − | + | {{Specs-Tank-Weapon|3}} | |
| + | <!-- ''Offensive and anti-aircraft machine guns not only allow you to fight some aircraft but also are effective against lightly armoured vehicles. Evaluate machine guns and give recommendations on its use.'' --> | ||
| + | {{main|M2HB (12.7 mm)|Type 74 (7.62 mm)}} | ||
| − | + | {| class="wikitable" style="text-align:center" width="50%" | |
| − | {| class="wikitable" style="text-align:center" | + | |- |
| − | ! colspan=" | + | ! colspan="5" | [[M2HB (12.7 mm)|12.7 mm M2HB]] |
|- | |- | ||
| − | ! | + | ! Mount !! Capacity (Belt) !! Fire rate !! Vertical !! Horizontal |
| − | ! | ||
| − | ! | ||
|- | |- | ||
| − | + | | Pintle || 600 (200) || 577 || -10°/+40° || ±120° | |
| − | |||
| − | |||
|- | |- | ||
| − | + | |} | |
| − | + | {| class="wikitable" style="text-align:center" width="50%" | |
| − | |||
|- | |- | ||
| − | ! | + | ! colspan="5" | [[Type 74 (7.62 mm)|7.62 mm Type 74]] |
| − | |||
|- | |- | ||
| − | ! | + | ! Mount !! Capacity (Belt) !! Fire rate !! Vertical !! Horizontal |
| − | |||
|- | |- | ||
| − | + | | Coaxial || 4,500 (250) || 500 || N/A || N/A | |
| − | | | ||
|- | |- | ||
|} | |} | ||
| − | |||
| − | |||
| − | |||
| − | |||
| − | |||
== Usage in battles == | == Usage in battles == | ||
| − | <!-- ''Describe the tactics of playing in the vehicle, the features of using vehicles in the team and advice on tactics. Refrain from creating a "guide" - do not impose a single point of view but instead give the reader food for thought. Describe the most dangerous enemies and give recommendations on fighting them. If necessary, note the specifics of the game in different modes (AB, RB, SB).'' | + | <!-- ''Describe the tactics of playing in the vehicle, the features of using vehicles in the team and advice on tactics. Refrain from creating a "guide" - do not impose a single point of view but instead give the reader food for thought. Describe the most dangerous enemies and give recommendations on fighting them. If necessary, note the specifics of the game in different modes (AB, RB, SB).'' --> |
''Describe the tactics of playing in the vehicle, the features of using vehicles in the team and advice on tactics. Refrain from creating a "guide" - do not impose a single point of view but instead give the reader food for thought. Describe the most dangerous enemies and give recommendations on fighting them. If necessary, note the specifics of the game in different modes (AB, RB, SB).'' | ''Describe the tactics of playing in the vehicle, the features of using vehicles in the team and advice on tactics. Refrain from creating a "guide" - do not impose a single point of view but instead give the reader food for thought. Describe the most dangerous enemies and give recommendations on fighting them. If necessary, note the specifics of the game in different modes (AB, RB, SB).'' | ||
| − | |||
| − | |||
| − | |||
| − | |||
| − | |||
| − | |||
| − | |||
| − | |||
| − | |||
| − | |||
| − | |||
| − | |||
| − | |||
| − | |||
| − | |||
| − | |||
=== Pros and cons === | === Pros and cons === | ||
<!-- ''Summarise and briefly evaluate the vehicle in terms of its characteristics and combat effectiveness. Mark its pros and cons in a bulleted list. Try not to use more than 6 points for each of the characteristics. Avoid using categorical definitions such as "bad", "good" and the like - use substitutions with softer forms such as "inadequate" and "effective".'' --> | <!-- ''Summarise and briefly evaluate the vehicle in terms of its characteristics and combat effectiveness. Mark its pros and cons in a bulleted list. Try not to use more than 6 points for each of the characteristics. Avoid using categorical definitions such as "bad", "good" and the like - use substitutions with softer forms such as "inadequate" and "effective".'' --> | ||
| + | ''Summarise and briefly evaluate the vehicle in terms of its characteristics and combat effectiveness. Mark its pros and cons in a bulleted list. Try not to use more than 6 points for each of the characteristics. Avoid using categorical definitions such as "bad", "good" and the like - use substitutions with softer forms such as "inadequate" and "effective".'' | ||
'''Pros:''' | '''Pros:''' | ||
| − | + | * | |
| − | * | ||
| − | |||
| − | |||
| − | |||
'''Cons:''' | '''Cons:''' | ||
| − | + | * | |
| − | * | ||
| − | |||
| − | |||
== History == | == History == | ||
<!-- ''Describe the history of the creation and combat usage of the vehicle in more detail than in the introduction. If the historical reference turns out to be too long, take it to a separate article, taking a link to the article about the vehicle and adding a block "/History" (example: <nowiki>https://wiki.warthunder.com/(Vehicle-name)/History</nowiki>) and add a link to it here using the <code>main</code> template. Be sure to reference text and sources by using <code><nowiki><ref></ref></nowiki></code>, as well as adding them at the end of the article with <code><nowiki><references /></nowiki></code>. This section may also include the vehicle's dev blog entry (if applicable) and the in-game encyclopedia description (under <code><nowiki>=== In-game description ===</nowiki></code>, also if applicable).'' --> | <!-- ''Describe the history of the creation and combat usage of the vehicle in more detail than in the introduction. If the historical reference turns out to be too long, take it to a separate article, taking a link to the article about the vehicle and adding a block "/History" (example: <nowiki>https://wiki.warthunder.com/(Vehicle-name)/History</nowiki>) and add a link to it here using the <code>main</code> template. Be sure to reference text and sources by using <code><nowiki><ref></ref></nowiki></code>, as well as adding them at the end of the article with <code><nowiki><references /></nowiki></code>. This section may also include the vehicle's dev blog entry (if applicable) and the in-game encyclopedia description (under <code><nowiki>=== In-game description ===</nowiki></code>, also if applicable).'' --> | ||
| − | + | ''Describe the history of the creation and combat usage of the vehicle in more detail than in the introduction. If the historical reference turns out to be too long, take it to a separate article, taking a link to the article about the vehicle and adding a block "/History" (example: <nowiki>https://wiki.warthunder.com/(Vehicle-name)/History</nowiki>) and add a link to it here using the <code>main</code> template. Be sure to reference text and sources by using <code><nowiki><ref></ref></nowiki></code>, as well as adding them at the end of the article with <code><nowiki><references /></nowiki></code>. This section may also include the vehicle's dev blog entry (if applicable) and the in-game encyclopedia description (under <code><nowiki>=== In-game description ===</nowiki></code>, also if applicable).'' | |
| − | |||
| − | |||
| − | |||
| − | |||
| − | === | ||
| − | |||
| − | |||
| − | |||
== Media == | == Media == | ||
<!-- ''Excellent additions to the article would be video guides, screenshots from the game, and photos.'' --> | <!-- ''Excellent additions to the article would be video guides, screenshots from the game, and photos.'' --> | ||
| − | + | ''Excellent additions to the article would be video guides, screenshots from the game, and photos.'' | |
| − | |||
| − | |||
| − | |||
| − | |||
| − | |||
== See also == | == See also == | ||
| Line 237: | Line 182: | ||
* ''reference to the series of the vehicles;'' | * ''reference to the series of the vehicles;'' | ||
* ''links to approximate analogues of other nations and research trees.'' --> | * ''links to approximate analogues of other nations and research trees.'' --> | ||
| − | + | ''Links to the articles on the War Thunder Wiki that you think will be useful for the reader, for example:'' | |
| − | ; | + | * ''reference to the series of the vehicles;'' |
| − | + | * ''links to approximate analogues of other nations and research trees.'' | |
| − | * | ||
| − | |||
| − | |||
| − | |||
| − | |||
| − | |||
| − | |||
| − | |||
| − | |||
== External links == | == External links == | ||
| Line 254: | Line 190: | ||
* ''topic on the official game forum;'' | * ''topic on the official game forum;'' | ||
* ''other literature.'' --> | * ''other literature.'' --> | ||
| − | + | ''Paste links to sources and external resources, such as:'' | |
| + | * ''topic on the official game forum;'' | ||
| + | * ''other literature.'' | ||
{{Japan medium tanks}} | {{Japan medium tanks}} | ||
Revision as of 20:57, 8 September 2021
| This page is about the Japanese medium tank Type 74 (C). For other versions, see Type 74 (Family). |
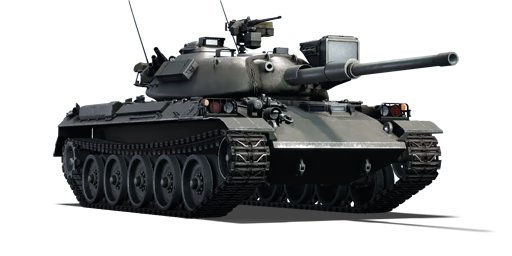
.jpg)
Contents
Description
The Type 74 (C) is a rank V Japanese medium tank with a battle rating of 8.3 (AB/RB/SB). It was introduced in Update "Direct Hit".
General info
Survivability and armour
Armour type:
- Rolled homogeneous armour
- Cast homogeneous armour (Gun mantlet)
| Armour | Front (Slope angle) | Sides | Rear | Roof |
|---|---|---|---|---|
| Hull | 40 mm (74°), 80 mm (65°) Front glacis 80 mm (57°) Lower glacis |
35 mm (44°) Top 30 mm, 10 mm (55-56°) Bottom |
20 mm Top 25 mm (47-48°) Bottom |
25 mm |
| Turret | 132 mm (27-53°) Turret front 200 mm (34-73°) , 150 + 170 mm (0-44°) Gun mantlet |
132 mm (5-57°) Front 67 mm (37-47°) Rear |
37 mm (17-39°) | 67 mm Front 37 mm Rear |
| Cupola | 80 mm | 80 mm | ||
Notes:
- Suspension wheels and tracks are both 20 mm thick.
- Has additional 10 mm mounting plates scattered on the front hull
- The Type 74's hydropneumatic suspension means it could vary the sloped angle of its armour towards the enemy.
- Hull roof is rated to be 25 mm effective against HE.
Mobility
| Game Mode | Max Speed (km/h) | Weight (tons) | Engine power (horsepower) | Power-to-weight ratio (hp/ton) | |||
|---|---|---|---|---|---|---|---|
| Forward | Reverse | Stock | Upgraded | Stock | Upgraded | ||
| Arcade | 59 | 9 | 38 | 1,116 | 1,660 | 29.37 | 43.68 |
| Realistic | 54 | 8 | 637 | 870 | 16.76 | 22.89 | |
Modifications and economy
| Mobility | Protection | Firepower | ||||||||||||||||||||||||
|---|---|---|---|---|---|---|---|---|---|---|---|---|---|---|---|---|---|---|---|---|---|---|---|---|---|---|
|
|
|
Armaments
Main armament
| 105 mm L7A3 | Turret rotation speed (°/s) | Reloading rate (seconds) | |||||||||||
|---|---|---|---|---|---|---|---|---|---|---|---|---|---|
| Mode | Capacity | Vertical | Horizontal | Stabilizer | Stock | Upgraded | Full | Expert | Aced | Stock | Full | Expert | Aced |
| Arcade | 50 | -6°/+9° | ±180° | Two-plane | 22.8 | 31.6 | 38.4 | 42.5 | 45.2 | 8.71 | 7.70 | 7.10 | 6.70 |
| Realistic | 14.3 | 16.8 | 20.4 | 22.6 | 24.0 | ||||||||
Ammunition
| Penetration statistics | |||||||
|---|---|---|---|---|---|---|---|
| Ammunition | Type of warhead |
Penetration @ 0° Angle of Attack (mm) | |||||
| 10 m | 100 m | 500 m | 1,000 m | 1,500 m | 2,000 m | ||
| M392A2 | APDS | 303 | 302 | 296 | 277 | 257 | 252 |
| Type 75 | HESH | 127 | 127 | 127 | 127 | 127 | 127 |
| M456 | HEATFS | 400 | 400 | 400 | 400 | 400 | 400 |
| Shell details | |||||||||
|---|---|---|---|---|---|---|---|---|---|
| Ammunition | Type of warhead |
Velocity (m/s) |
Projectile Mass (kg) |
Fuse delay (m) |
Fuse sensitivity (mm) |
Explosive Mass (TNT equivalent) (g) |
Ricochet | ||
| 0% | 50% | 100% | |||||||
| M392A2 | APDS | 1,478 | 4 | N/A | N/A | N/A | 75° | 78° | 80° |
| Type 75 | HESH | 760 | 10.8 | 0.05 | 0.1 | 3,890 | 73° | 77° | 80° |
| M456 | HEATFS | 1,173 | 10.5 | 0.05 | 0.1 | 1,270 | 65° | 72° | 77° |
Ammo racks
| Full ammo |
1st rack empty |
2nd rack empty |
3rd rack empty |
4th rack empty |
5th rack empty |
6th rack empty |
Visual discrepancy |
|---|---|---|---|---|---|---|---|
| 50 | __ (+__) | __ (+__) | __ (+__) | __ (+__) | __ (+__) | __ (+__) | __ |
Machine guns
| 12.7 mm M2HB | ||||
|---|---|---|---|---|
| Mount | Capacity (Belt) | Fire rate | Vertical | Horizontal |
| Pintle | 600 (200) | 577 | -10°/+40° | ±120° |
| 7.62 mm Type 74 | ||||
|---|---|---|---|---|
| Mount | Capacity (Belt) | Fire rate | Vertical | Horizontal |
| Coaxial | 4,500 (250) | 500 | N/A | N/A |
Usage in battles
Describe the tactics of playing in the vehicle, the features of using vehicles in the team and advice on tactics. Refrain from creating a "guide" - do not impose a single point of view but instead give the reader food for thought. Describe the most dangerous enemies and give recommendations on fighting them. If necessary, note the specifics of the game in different modes (AB, RB, SB).
Pros and cons
Summarise and briefly evaluate the vehicle in terms of its characteristics and combat effectiveness. Mark its pros and cons in a bulleted list. Try not to use more than 6 points for each of the characteristics. Avoid using categorical definitions such as "bad", "good" and the like - use substitutions with softer forms such as "inadequate" and "effective".
Pros:
Cons:
History
Describe the history of the creation and combat usage of the vehicle in more detail than in the introduction. If the historical reference turns out to be too long, take it to a separate article, taking a link to the article about the vehicle and adding a block "/History" (example: https://wiki.warthunder.com/(Vehicle-name)/History) and add a link to it here using the main template. Be sure to reference text and sources by using <ref></ref>, as well as adding them at the end of the article with <references />. This section may also include the vehicle's dev blog entry (if applicable) and the in-game encyclopedia description (under === In-game description ===, also if applicable).
Media
Excellent additions to the article would be video guides, screenshots from the game, and photos.
See also
Links to the articles on the War Thunder Wiki that you think will be useful for the reader, for example:
- reference to the series of the vehicles;
- links to approximate analogues of other nations and research trees.
External links
Paste links to sources and external resources, such as:
- topic on the official game forum;
- other literature.
| Japan medium tanks | |
|---|---|
| Type 97 | Chi-Ha · Chi-Ha Kai · Chi-Ha Kai TD · Chi-Ha Short Gun |
| Type 1 | Chi-He · Chi-He (5th Regiment) · Ho-I |
| Type 3 | Chi-Nu · Chi-Nu II |
| Type 4 | Chi-To · Chi-To Late |
| Type 5 | Chi-Ri II |
| Type 61 MBT | ST-A1* · ST-A2* · ST-A3* · Type 61 |
| Type 74 MBT | ST-B2* · Type 74 (C) · Type 74 (E) · Type 74 (F) · Type 74 (G) |
| Type 90 MBT | Type 90 · Type 90 (B) · Type 90B "Fuji" |
| Type 10 MBT | TKX (P)* · TKX* · Type 10 |
| Other | Ka-Chi |
| USA | ▅M4A3 (76) W · ▅M47 |
| *Prototype | |

.jpg)