Difference between pages "A6M5 otsu" and "Lancaster B Mk I"
(→Pros and cons: updated sl repair) (Tag: Visual edit) |
(→External links: Citations for the History section) (Tag: Visual edit) |
||
| Line 1: | Line 1: | ||
| − | {{Specs-Card|code= | + | {{Specs-Card|code=lancaster_mk1}} |
{{About | {{About | ||
| − | | about = | + | | about = British heavy bomber '''{{PAGENAME}}''' |
| − | | usage = other | + | | usage = the other version |
| − | | link = | + | | link = Lancaster B Mk III |
}} | }} | ||
== Description == | == Description == | ||
| − | <!--''In the description, the first part should be about the history of and the creation and combat usage of the aircraft, as well as its key features. In the second part, tell the reader about the aircraft in the game. Insert a screenshot of the vehicle, so that if the novice player does not remember the vehicle by name, he will immediately understand what kind of vehicle the article is talking about.''--> | + | <!-- ''In the description, the first part should be about the history of and the creation and combat usage of the aircraft, as well as its key features. In the second part, tell the reader about the aircraft in the game. Insert a screenshot of the vehicle, so that if the novice player does not remember the vehicle by name, he will immediately understand what kind of vehicle the article is talking about.'' --> |
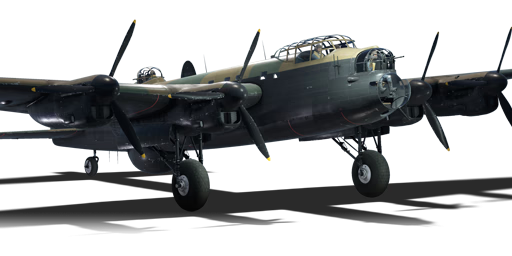
| − | [[File: | + | [[File:GarageImage_{{PAGENAME}}.jpg|420px|thumb|left]] |
{{break}} | {{break}} | ||
| − | The '''{{ | + | The '''{{Specs|name}}''' is a rank {{Specs|rank}} British bomber {{Battle-rating}}. It was introduced in [[Update 1.43]]. |
| − | + | The Avro Lancaster B Mk. I is a long-range heavy bomber optimised for destroying stationary targets such as pillboxes, bases, and airfields with bombs from high altitude. | |
| − | + | == General info == | |
| + | === Flight performance === | ||
| + | ''Describe how the aircraft behaves in the air. Speed, manoeuvrability, acceleration and allowable loads - these are the most important characteristics of the vehicle.'' | ||
| − | |||
| − | |||
| − | |||
| − | |||
{| class="wikitable" style="text-align:center" | {| class="wikitable" style="text-align:center" | ||
|- | |- | ||
| Line 26: | Line 24: | ||
! colspan="8" | ''Stock'' | ! colspan="8" | ''Stock'' | ||
|- | |- | ||
| − | ! colspan="2" | Max Speed<br>(km/h at | + | ! colspan="2" | Max Speed<br>(km/h at 3,048 m) |
! rowspan="2" | Max altitude<br>(meters) | ! rowspan="2" | Max altitude<br>(meters) | ||
! colspan="2" | Turn time<br>(seconds) | ! colspan="2" | Turn time<br>(seconds) | ||
! colspan="2" | Rate of climb<br>(meters/second) | ! colspan="2" | Rate of climb<br>(meters/second) | ||
| − | ! rowspan="2" |Take-off run<br>(meters) | + | ! rowspan="2" | Take-off run<br>(meters) |
|- | |- | ||
| − | ! AB | + | ! AB !! RB !! AB !! RB !! AB !! RB |
| − | ! RB | ||
| − | ! AB | ||
| − | ! RB | ||
| − | ! AB | ||
| − | ! RB | ||
|- | |- | ||
| − | | | + | | 437 || 423 || {{Specs|ceiling}} || 43.2 || 44.4 || 7 || 6.8 || 750 |
|- | |- | ||
! colspan="8" | ''Upgraded'' | ! colspan="8" | ''Upgraded'' | ||
|- | |- | ||
| − | ! colspan="2" | Max Speed<br>(km/h at | + | ! colspan="2" | Max Speed<br>(km/h at 3,048 m) |
| − | ! rowspan="2" |Max altitude (meters) | + | ! rowspan="2" | Max altitude<br>(meters) |
| − | ! colspan="2" | Turn time (seconds) | + | ! colspan="2" | Turn time<br>(seconds) |
! colspan="2" | Rate of climb<br>(meters/second) | ! colspan="2" | Rate of climb<br>(meters/second) | ||
| − | ! rowspan="2" |Take-off run (meters) | + | ! rowspan="2" | Take-off run<br>(meters) |
|- | |- | ||
| − | ! AB | + | ! AB !! RB !! AB !! RB !! AB !! RB |
| − | ! RB | ||
| − | ! AB | ||
| − | ! RB | ||
| − | ! AB | ||
| − | ! RB | ||
|- | |- | ||
| − | | | + | | 465 || 451 || {{Specs|ceiling}} || 40.9 || 42.0 || 10.4 || 8.6 || 750 |
|- | |- | ||
|} | |} | ||
| − | ====Details==== | + | ==== Details ==== |
{| class="wikitable" style="text-align:center" | {| class="wikitable" style="text-align:center" | ||
|- | |- | ||
! colspan="5" | Features | ! colspan="5" | Features | ||
|- | |- | ||
| − | ! Combat | + | ! Combat flaps |
| − | ! Take-off | + | ! Take-off flaps |
| − | ! Landing | + | ! Landing flaps |
! Air brakes | ! Air brakes | ||
! Arrestor gear | ! Arrestor gear | ||
|- | |- | ||
| − | | ✓ || ✓ || ✓ || X || ✓ | + | | ✓ || ✓ || ✓ || X || X <!-- ✓ --> |
|- | |- | ||
|} | |} | ||
| Line 81: | Line 69: | ||
! rowspan="2" | Wing-break speed<br>(km/h) | ! rowspan="2" | Wing-break speed<br>(km/h) | ||
! rowspan="2" | Gear limit<br>(km/h) | ! rowspan="2" | Gear limit<br>(km/h) | ||
| − | ! rowspan="2" | Combat | + | ! rowspan="2" | Combat flaps<br>(km/h) |
! colspan="2" | Max Static G | ! colspan="2" | Max Static G | ||
|- | |- | ||
| Line 87: | Line 75: | ||
! - | ! - | ||
|- | |- | ||
| − | | | + | | {{Specs|destruction|constructions}} || {{Specs|destruction|chassis}} || 440 || ~4 || ~3 |
|- | |- | ||
|} | |} | ||
| Line 100: | Line 88: | ||
! Radiator<br>(km/h) | ! Radiator<br>(km/h) | ||
|- | |- | ||
| − | | < | + | | < 400 || < 350 || < 350 || > 350 |
|- | |- | ||
|} | |} | ||
| Line 114: | Line 102: | ||
! WEP Engine power | ! WEP Engine power | ||
|- | |- | ||
| − | | | + | | 1,500 m || 1,400 hp || N/A |
|- | |- | ||
! colspan="3" | Setting 2 | ! colspan="3" | Setting 2 | ||
| Line 122: | Line 110: | ||
! WEP Engine power | ! WEP Engine power | ||
|- | |- | ||
| − | | | + | | 3,600 m || 1,305 hp || 1,398 hp |
| − | |||
| − | |||
| − | |||
| − | |||
| − | |||
| − | |||
| − | |||
| − | |||
| − | |||
| − | |||
| − | |||
| − | |||
| − | |||
| − | |||
| − | |||
| − | |||
| − | |||
| − | |||
| − | |||
| − | |||
| − | |||
| − | |||
| − | |||
| − | |||
| − | |||
| − | |||
| − | |||
| − | |||
| − | |||
| − | |||
| − | |||
| − | |||
| − | |||
| − | |||
| − | |||
| − | |||
| − | |||
| − | |||
| − | |||
| − | |||
| − | |||
| − | |||
| − | |||
| − | |||
| − | |||
| − | |||
| − | |||
| − | |||
| − | |||
| − | |||
| − | |||
|- | |- | ||
|} | |} | ||
=== Survivability and armour === | === Survivability and armour === | ||
| − | <!--''Examine the survivability of the aircraft. Note how vulnerable the structure is and how secure the pilot is, whether the fuel tanks are armoured, etc. Describe the armour, if there is any, and also mention the vulnerability of other critical aircraft systems.''--> | + | <!-- ''Examine the survivability of the aircraft. Note how vulnerable the structure is and how secure the pilot is, whether the fuel tanks are armoured, etc. Describe the armour, if there is any, and also mention the vulnerability of other critical aircraft systems.'' --> |
| − | * | + | * 8 mm Steel plate on each pilot's headrest. |
| − | * | + | * 6.35 mm Steel plate behind each engine. |
== Armaments == | == Armaments == | ||
| − | |||
| − | |||
| − | |||
| − | |||
| − | |||
| − | |||
| − | |||
| − | |||
| − | |||
| − | |||
| − | |||
| − | |||
| − | |||
| − | |||
| − | |||
| − | |||
| − | |||
| − | |||
=== Suspended armament === | === Suspended armament === | ||
| − | <!--''Describe the aircraft's suspended armament: additional cannons under the wings, bombs, rockets and torpedoes. This section is especially important for bombers and attackers. If there is no suspended weaponry remove this subsection.''--> | + | <!-- ''Describe the aircraft's suspended armament: additional cannons under the wings, bombs, rockets and torpedoes. This section is especially important for bombers and attackers. If there is no suspended weaponry remove this subsection.'' --> |
| − | {{main| | + | {{main|G.P. 250 lb Mk.IV (250 lb)|G.P. 500 lb Mk.IV (500 lb)|M.C. 1,000 lb Mk.I (1,000 lb)|G.P. 1,000 lb Mk.I (1,000 lb)|H.C. 4,000 lb Mk.II (4,000 lb)}} |
The '''''{{PAGENAME}}''''' can be outfitted with the following ordnance: | The '''''{{PAGENAME}}''''' can be outfitted with the following ordnance: | ||
| − | * | + | * 14 x 250 lb G.P. 250 lb Mk.IV bombs (3,500 lb total) |
| − | * 2 | + | * 6 x 500 lb G.P. 500 lb Mk.IV bombs + 8 x 250 lb G.P. 250 lb Mk.IV bombs (5,000 lb total) |
| − | * 1 | + | * 14 x 500 lb G.P. 500 lb Mk.IV bombs (7,000 lb total) |
| + | * 1 x 1,000 lb G.P. 1,000 lb Mk.I bomb + 6 x 500 lb G.P. 500 lb Mk.IV bombs + 2 x 250 lb G.P. 250 lb Mk.IV bombs (4,500 lb total) | ||
| + | * 6 x 1,000 lb G.P. 1,000 lb Mk.I bombs + 3 x 250 lb G.P. 250 lb Mk.IV bombs (6,750 lb total) | ||
| + | * 14 x 1,000 lb M.C. 1,000 lb Mk.I bombs (14,000 lb total) | ||
| + | * 1 x 4,000 lb H.C. 4,000 lb Mk.II bomb + 6 x 1,000 lb M.C. 1,000 lb Mk.I bombs + 2 x 250 lb G.P. 250 lb Mk.IV bombs (10,500 lb total) | ||
| + | * 2 x 4,000 lb H.C. 4,000 lb Mk.II bombs (8,000 lb total) | ||
| − | == | + | === Defensive armament === |
| − | <!--'' | + | <!-- ''Defensive armament with turret machine guns or cannons, crewed by gunners. Examine the number of gunners and what belts or drums are better to use. If defensive weaponry is not available, remove this subsection.'' --> |
| − | + | {{main|Browning .303 (7.7 mm)}} | |
| − | + | The '''''{{PAGENAME}}''''' is defended by: | |
| − | |||
| − | |||
| − | + | * 2 x 7.7 mm Browning .303 machine guns, nose turret (1,000 rpg = 2,000 total) | |
| + | * 2 x 7.7 mm Browning .303 machine guns, dorsal turret (1,000 rpg = 2,000 total) | ||
| + | * 4 x 7.7 mm Browning .303 machine guns, tail turret (2,500 rpg = 10,000 total) | ||
| − | + | == Usage in battles == | |
| − | + | <!-- ''Describe the tactics of playing in an aircraft, the features of using aircraft in a team and advice on tactics. Refrain from creating a "guide" - do not impose a single point of view, but instead, give the reader food for thought. Examine the most dangerous enemies and give recommendations on fighting them. If necessary, note the specifics of the game in different modes (AB, RB, SB).'' --> | |
| − | + | The Lancaster carries the heaviest bomb load of any bomber before the American [[B-29A-BN|Boeing B-29 Superfortress]], at a fantastic 14,000 lb (6,363 kg), and the heaviest of any British bomber in the game. It can quickly end games if left to go about its business. The Lancaster also has relatively good performance and agility for a four-engined heavy bomber, significantly better than both the American B-17 and B-24 bombers. | |
| − | |||
| − | + | Unfortunately, the Lancaster is extremely vulnerable if intercepted by enemy fighters. Its defensive armament consists only of .303 in Browning machine guns; while they have a high rate-of-fire, they are not very lethal to enemy fighters outside of a lucky fire set by the incendiary bullets. In addition, the Lancaster has no ventral turret covering attacks from below due to H2S radar unit (a useless feature in the game). The aircraft itself is not very durable as well and is extremely vulnerable to cannons of 20 mm calibre and larger. | |
| − | |||
| − | The | ||
| − | ===Manual Engine Control=== | + | === Manual Engine Control === |
{| class="wikitable" style="text-align:center" | {| class="wikitable" style="text-align:center" | ||
|- | |- | ||
! colspan="7" | MEC elements | ! colspan="7" | MEC elements | ||
|- | |- | ||
| − | ! rowspan="2" |Mixer | + | ! rowspan="2" | Mixer |
| − | ! rowspan="2" |Pitch | + | ! rowspan="2" | Pitch |
| − | ! colspan="3" |Radiator | + | ! colspan="3" | Radiator |
| − | ! rowspan="2" |Supercharger | + | ! rowspan="2" | Supercharger |
| − | ! rowspan="2" |Turbocharger | + | ! rowspan="2" | Turbocharger |
|- | |- | ||
! Oil | ! Oil | ||
! Water | ! Water | ||
| − | ! Type | + | ! Type |
|- | |- | ||
| − | | Controllable || | + | | Not controllable || Controllable<br>Not auto controlled || Controllable<br>Auto control available || Controllable<br>Auto control available || Separate || Controllable<br>2 gears || Not controllable |
| + | |- | ||
| + | |} | ||
| + | |||
| + | === Modules === | ||
| + | {| class="wikitable" | ||
| + | ! Tier | ||
| + | ! colspan="2" | Flight performance | ||
| + | ! Survivability | ||
| + | ! colspan="2" | Weaponry | ||
| + | |- | ||
| + | | I | ||
| + | | Fuselage repair | ||
| + | | Radiator | ||
| + | | Protective vest | ||
| + | | | ||
| + | | | ||
| + | |- | ||
| + | | II | ||
| + | | | ||
| + | | Compressor | ||
| + | | Airframe | ||
| + | | Turret 7 mm | ||
| + | | AUBC No.1 Mark II | ||
| + | |- | ||
| + | | III | ||
| + | | Wings repair | ||
| + | | Engine | ||
| + | | | ||
| + | | New 7 mm MGs (turret) | ||
| + | | | ||
| + | |- | ||
| + | | IV | ||
| + | | | ||
| + | | Engine injection | ||
| + | | Cover | ||
| + | | | ||
| + | | AUBC No.1 Mark I | ||
|- | |- | ||
|} | |} | ||
=== Pros and cons === | === Pros and cons === | ||
| − | <!--'' | + | <!-- ''Summarise and briefly evaluate the vehicle in terms of its characteristics and combat effectiveness. Mark its pros and cons in the bulleted list. Try not to use more than 6 points for each of the characteristics. Avoid using categorical definitions such as "bad", "good" and the like - use substitutions with softer forms such as "inadequate" and "effective".'' --> |
| + | |||
'''Pros:''' | '''Pros:''' | ||
| − | * | + | * Massive bombload |
| − | * | + | * Powerful Merlin engines providing good performance |
| − | * | + | * Excellent handling and manoeuvrability |
| − | |||
| − | |||
| − | |||
'''Cons:''' | '''Cons:''' | ||
| − | * | + | * Very low durability |
| − | * | + | * Pathetic defensive armament |
| − | * | + | * Easily damaged elevators and tail controls |
| − | |||
| − | |||
| − | |||
| − | |||
== History == | == History == | ||
| − | + | ''Describe the history of the creation and combat usage of the aircraft in more detail than in the introduction. If the historical reference turns out to be too long, take it to a separate article, taking a link to the article about the vehicle and adding a block "/ History" (example: <nowiki>https://wiki.warthunder.com/(Vehicle-name)/History</nowiki>) and add a link to it here using the <code>main</code> template. Be sure to reference text and sources by using <code><nowiki><ref></ref></nowiki></code>, as well as adding them at the end of the article with <code><nowiki><references /></nowiki></code>. This section may also include the vehicle's dev blog entry (if applicable) and the in-game encyclopedia description (under <code><nowiki>=== In-game description ===</nowiki></code>, also if applicable).'' | |
| − | The | + | |
| + | The Lancaster first Lancasters were built and designed by A.V.Roe and Company (or Avro) as a long-range heavy bomber. It was developed as an "upgrade" from the Avro Manchester which was disliked by crews for its difficulty to fly and underpowered engines. | ||
| + | |||
| + | The Lancaster was designed by Roy Chadwick and first flew on 9th January 1941; entering service in 1942. It was produced by Avro, Armstrong Whitworth, Austin Motors, Metropolitan-Vickers, Vickers Armstrong and Victory Aircraft (for the RCAF) | ||
| + | |||
| + | The Lancaster's long, unobstructed bomb bay enabled it to carry the largest bombs the RAF used (including, 4000, 8000, 12,000 and - when modified - 22,000lb bombs). Because of this, it soon became the most widely used British bomber of the 2nd World War. | ||
| + | |||
| + | No. 617 squadron famously used modified Lancasters during Operation Chastise in raids dams in the Ruhr Valley using Barnes Wallace's Upkeep Mine (or "Bouncing Bomb" as it became known as). This gave 617 squadron the nickname "The Dambusters", sparking the creation of a film by the same name. | ||
| + | |||
| + | === In-game description === | ||
| + | With RAF Bomber Command's focus being centred on the strategic bombing campaign against German industry, the RAF desperately required a force of heavy bombers to increase the capability provided by their medium bomber fleet. A twin engine Avro Manchester bomber was converted to be powered by four engines and first flown in January 1941. This and subsequent prototypes were deemed to be so successful that the first production variant of the new bomber, now named the Lancaster, was flown in October 1941. | ||
| + | |||
| + | Powered by four Rolls Royce Merlin XX engines rated at 1280 hp, (later upgraded to Merlin 22 or 24s) the Lancaster B.I was capable of reaching speeds of up to 275 mph. With a standard fuel load it could carry 10,000 lbs of bombs over 1000 miles. The maximum ordinance capacity of the Lancaster was one of the highest of any heavy bomber in World War II: 14,000 lb (6,356 kg). Besides standard bombs, the aircraft could carry an 8,000 lb (3,632 kg) "blockbuster" or two 4,000 lb (1,816 kg) high-explosive "cookie" bombs. Special modifications of the bomber could carry even larger bombs, such as the 22,000 lb 'Grand Slam' bomb. For defence, the Lancaster had eight 0.303 inch Colt-Browning Mk.II machine guns located in three turrets: two guns were located in the nose, two in the dorsal turret, and four in the tail turret. This defensive armament was considerably lighter than that of the Lancaster's US counterparts; it relied on darkness for protection rather than firepower. However, even though on paper the Lancaster was an impressive strategic asset, it still had its weaknesses: whereas the Halifax and Stirling could both claim a crew survival rate of 25% in the event of destruction, the Lancaster could only claim a survival rate of 15% for its crews. 58% of all RAF Lancasters were destroyed in combat; a higher loss percentage than any other British aircraft during the entire war. | ||
| + | |||
| + | The Lancaster was first used operationally in March 1942 by No. 44 Squadron. It soon became the backbone of RAF Bomber Command's offensive against the heart of Germany, but was also used against targets all across occupied Europe. The majority of Lancaster operations took place at night due to RAF Bomber Command's policy of night bombing whilst the bombers of the United States Army Air Force tackled targets by day. The Lancaster became legendary on the night of May 17th 1943 when bombers of No 617 Squadron breached the Mohne and Eder dams in Germany with Barnes Wallis' genius 'bouncing bomb'. Lancasters of Nos 9 and 617 Squadrons also sank the German battleship 'Tirpitz' with 12,000 lb 'Tallboy' bombs, also designed by Wallis. | ||
| + | |||
| + | Over 3400 Lancaster B.Is were manufactured between November 1941 and March 1946, making it the most numerous of the Avro Lancaster variants. In addition to RAF operations, the Lancaster was also used by the RAAF and RCAF. | ||
== Media == | == Media == | ||
| − | + | ''Excellent additions to the article would be video guides, screenshots from the game, and photos.'' | |
| − | |||
== See also == | == See also == | ||
| − | + | ''Links to the articles on the War Thunder Wiki that you think will be useful for the reader, for example:'' | |
| + | |||
* ''reference to the series of the aircraft;'' | * ''reference to the series of the aircraft;'' | ||
| − | * ''links to approximate analogues of other nations and research trees.'' | + | * ''links to approximate analogues of other nations and research trees.'' |
| − | + | == External links == | |
| + | ''Paste links to sources and external resources, such as:'' | ||
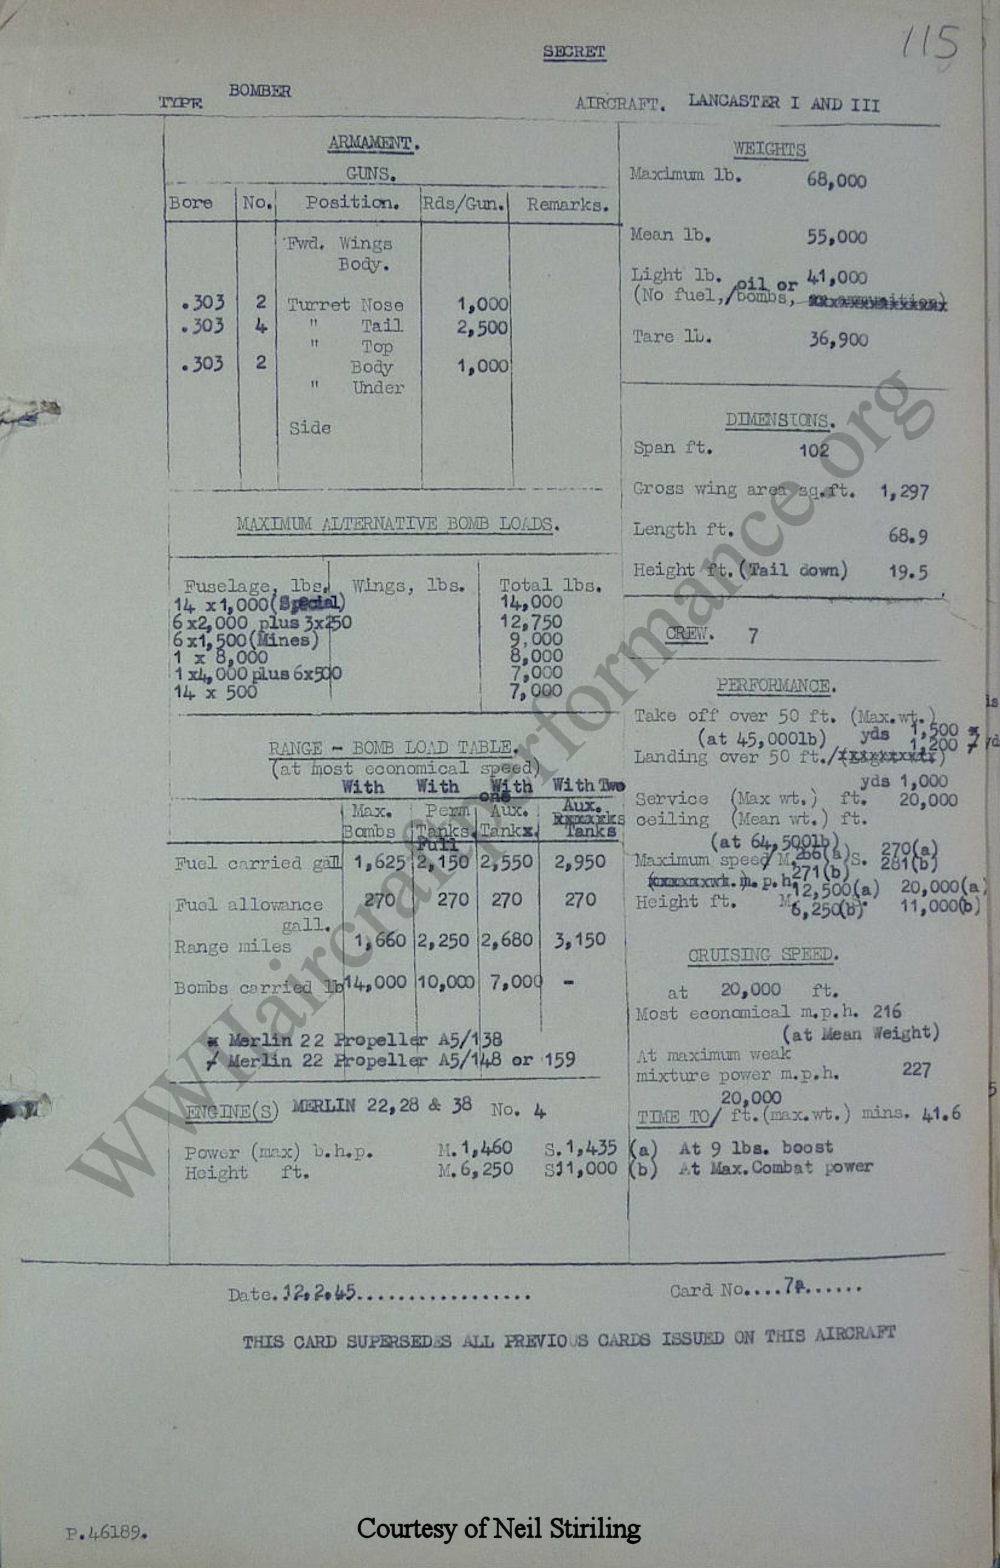
| − | * | + | * Video on "Grand Slam" bomb (History section) https://www.youtube.com/watch?v=R-Mm-zFW_nA&feature=relmfu |
| + | * Lancaster "Data Card" (History section) http://www.wwiiaircraftperformance.org/Lancaster/Lancaster_I_III_ADS-b.jpg | ||
| + | * Heavy Bombs (History Section) https://www.iwm.org.uk/collections/item/object/205210816 | ||
| + | * General Information (History Section) https://books.google.co.uk/books?id=0SkDAAAAMBAJ&pg=PA48-IA3&redir_esc=y#v=onepage&q&f=false | ||
| − | |||
| − | |||
| − | |||
| − | |||
| − | |||
| − | |||
| − | |||
| − | |||
| − | |||
| − | |||
| − | |||
| − | |||
| − | |||
| − | |||
| − | |||
* ''topic on the official game forum;'' | * ''topic on the official game forum;'' | ||
* ''encyclopedia page on the aircraft;'' | * ''encyclopedia page on the aircraft;'' | ||
| − | * ''other literature.'' | + | * ''other literature.'' |
| − | |||
| − | {{AirManufacturer | + | {{AirManufacturer Avro}} |
| − | {{ | + | {{Britain bombers}} |
Revision as of 13:22, 13 July 2020
Contents
| This page is about the British heavy bomber Lancaster B Mk I. For the other version, see Lancaster B Mk III. |
Description

The Lancaster B Mk I is a rank IV British bomber
with a battle rating of 5.0 (AB), 5.3 (RB), and 5.7 (SB). It was introduced in Update 1.43.
The Avro Lancaster B Mk. I is a long-range heavy bomber optimised for destroying stationary targets such as pillboxes, bases, and airfields with bombs from high altitude.
General info
Flight performance
Describe how the aircraft behaves in the air. Speed, manoeuvrability, acceleration and allowable loads - these are the most important characteristics of the vehicle.
| Characteristics | |||||||
|---|---|---|---|---|---|---|---|
| Stock | |||||||
| Max Speed (km/h at 3,048 m) |
Max altitude (meters) |
Turn time (seconds) |
Rate of climb (meters/second) |
Take-off run (meters) | |||
| AB | RB | AB | RB | AB | RB | ||
| 437 | 423 | 7800 | 43.2 | 44.4 | 7 | 6.8 | 750 |
| Upgraded | |||||||
| Max Speed (km/h at 3,048 m) |
Max altitude (meters) |
Turn time (seconds) |
Rate of climb (meters/second) |
Take-off run (meters) | |||
| AB | RB | AB | RB | AB | RB | ||
| 465 | 451 | 7800 | 40.9 | 42.0 | 10.4 | 8.6 | 750 |
Details
| Features | ||||
|---|---|---|---|---|
| Combat flaps | Take-off flaps | Landing flaps | Air brakes | Arrestor gear |
| ✓ | ✓ | ✓ | X | X |
| Limits | ||||
|---|---|---|---|---|
| Wing-break speed (km/h) |
Gear limit (km/h) |
Combat flaps (km/h) |
Max Static G | |
| + | - | |||
| 440 | ~4 | ~3 | ||
| Optimal velocities | |||
|---|---|---|---|
| Ailerons (km/h) |
Rudder (km/h) |
Elevators (km/h) |
Radiator (km/h) |
| < 400 | < 350 | < 350 | > 350 |
| Compressor (RB/SB) | ||
|---|---|---|
| Setting 1 | ||
| Optimal altitude | 100% Engine power | WEP Engine power |
| 1,500 m | 1,400 hp | N/A |
| Setting 2 | ||
| Optimal altitude | 100% Engine power | WEP Engine power |
| 3,600 m | 1,305 hp | 1,398 hp |
Survivability and armour
- 8 mm Steel plate on each pilot's headrest.
- 6.35 mm Steel plate behind each engine.
Armaments
Suspended armament
The Lancaster B Mk I can be outfitted with the following ordnance:
- 14 x 250 lb G.P. 250 lb Mk.IV bombs (3,500 lb total)
- 6 x 500 lb G.P. 500 lb Mk.IV bombs + 8 x 250 lb G.P. 250 lb Mk.IV bombs (5,000 lb total)
- 14 x 500 lb G.P. 500 lb Mk.IV bombs (7,000 lb total)
- 1 x 1,000 lb G.P. 1,000 lb Mk.I bomb + 6 x 500 lb G.P. 500 lb Mk.IV bombs + 2 x 250 lb G.P. 250 lb Mk.IV bombs (4,500 lb total)
- 6 x 1,000 lb G.P. 1,000 lb Mk.I bombs + 3 x 250 lb G.P. 250 lb Mk.IV bombs (6,750 lb total)
- 14 x 1,000 lb M.C. 1,000 lb Mk.I bombs (14,000 lb total)
- 1 x 4,000 lb H.C. 4,000 lb Mk.II bomb + 6 x 1,000 lb M.C. 1,000 lb Mk.I bombs + 2 x 250 lb G.P. 250 lb Mk.IV bombs (10,500 lb total)
- 2 x 4,000 lb H.C. 4,000 lb Mk.II bombs (8,000 lb total)
Defensive armament
The Lancaster B Mk I is defended by:
- 2 x 7.7 mm Browning .303 machine guns, nose turret (1,000 rpg = 2,000 total)
- 2 x 7.7 mm Browning .303 machine guns, dorsal turret (1,000 rpg = 2,000 total)
- 4 x 7.7 mm Browning .303 machine guns, tail turret (2,500 rpg = 10,000 total)
Usage in battles
The Lancaster carries the heaviest bomb load of any bomber before the American Boeing B-29 Superfortress, at a fantastic 14,000 lb (6,363 kg), and the heaviest of any British bomber in the game. It can quickly end games if left to go about its business. The Lancaster also has relatively good performance and agility for a four-engined heavy bomber, significantly better than both the American B-17 and B-24 bombers.
Unfortunately, the Lancaster is extremely vulnerable if intercepted by enemy fighters. Its defensive armament consists only of .303 in Browning machine guns; while they have a high rate-of-fire, they are not very lethal to enemy fighters outside of a lucky fire set by the incendiary bullets. In addition, the Lancaster has no ventral turret covering attacks from below due to H2S radar unit (a useless feature in the game). The aircraft itself is not very durable as well and is extremely vulnerable to cannons of 20 mm calibre and larger.
Manual Engine Control
| MEC elements | ||||||
|---|---|---|---|---|---|---|
| Mixer | Pitch | Radiator | Supercharger | Turbocharger | ||
| Oil | Water | Type | ||||
| Not controllable | Controllable Not auto controlled |
Controllable Auto control available |
Controllable Auto control available |
Separate | Controllable 2 gears |
Not controllable |
Modules
| Tier | Flight performance | Survivability | Weaponry | ||
|---|---|---|---|---|---|
| I | Fuselage repair | Radiator | Protective vest | ||
| II | Compressor | Airframe | Turret 7 mm | AUBC No.1 Mark II | |
| III | Wings repair | Engine | New 7 mm MGs (turret) | ||
| IV | Engine injection | Cover | AUBC No.1 Mark I | ||
Pros and cons
Pros:
- Massive bombload
- Powerful Merlin engines providing good performance
- Excellent handling and manoeuvrability
Cons:
- Very low durability
- Pathetic defensive armament
- Easily damaged elevators and tail controls
History
Describe the history of the creation and combat usage of the aircraft in more detail than in the introduction. If the historical reference turns out to be too long, take it to a separate article, taking a link to the article about the vehicle and adding a block "/ History" (example: https://wiki.warthunder.com/(Vehicle-name)/History) and add a link to it here using the main template. Be sure to reference text and sources by using <ref></ref>, as well as adding them at the end of the article with <references />. This section may also include the vehicle's dev blog entry (if applicable) and the in-game encyclopedia description (under === In-game description ===, also if applicable).
The Lancaster first Lancasters were built and designed by A.V.Roe and Company (or Avro) as a long-range heavy bomber. It was developed as an "upgrade" from the Avro Manchester which was disliked by crews for its difficulty to fly and underpowered engines.
The Lancaster was designed by Roy Chadwick and first flew on 9th January 1941; entering service in 1942. It was produced by Avro, Armstrong Whitworth, Austin Motors, Metropolitan-Vickers, Vickers Armstrong and Victory Aircraft (for the RCAF)
The Lancaster's long, unobstructed bomb bay enabled it to carry the largest bombs the RAF used (including, 4000, 8000, 12,000 and - when modified - 22,000lb bombs). Because of this, it soon became the most widely used British bomber of the 2nd World War.
No. 617 squadron famously used modified Lancasters during Operation Chastise in raids dams in the Ruhr Valley using Barnes Wallace's Upkeep Mine (or "Bouncing Bomb" as it became known as). This gave 617 squadron the nickname "The Dambusters", sparking the creation of a film by the same name.
In-game description
With RAF Bomber Command's focus being centred on the strategic bombing campaign against German industry, the RAF desperately required a force of heavy bombers to increase the capability provided by their medium bomber fleet. A twin engine Avro Manchester bomber was converted to be powered by four engines and first flown in January 1941. This and subsequent prototypes were deemed to be so successful that the first production variant of the new bomber, now named the Lancaster, was flown in October 1941.
Powered by four Rolls Royce Merlin XX engines rated at 1280 hp, (later upgraded to Merlin 22 or 24s) the Lancaster B.I was capable of reaching speeds of up to 275 mph. With a standard fuel load it could carry 10,000 lbs of bombs over 1000 miles. The maximum ordinance capacity of the Lancaster was one of the highest of any heavy bomber in World War II: 14,000 lb (6,356 kg). Besides standard bombs, the aircraft could carry an 8,000 lb (3,632 kg) "blockbuster" or two 4,000 lb (1,816 kg) high-explosive "cookie" bombs. Special modifications of the bomber could carry even larger bombs, such as the 22,000 lb 'Grand Slam' bomb. For defence, the Lancaster had eight 0.303 inch Colt-Browning Mk.II machine guns located in three turrets: two guns were located in the nose, two in the dorsal turret, and four in the tail turret. This defensive armament was considerably lighter than that of the Lancaster's US counterparts; it relied on darkness for protection rather than firepower. However, even though on paper the Lancaster was an impressive strategic asset, it still had its weaknesses: whereas the Halifax and Stirling could both claim a crew survival rate of 25% in the event of destruction, the Lancaster could only claim a survival rate of 15% for its crews. 58% of all RAF Lancasters were destroyed in combat; a higher loss percentage than any other British aircraft during the entire war.
The Lancaster was first used operationally in March 1942 by No. 44 Squadron. It soon became the backbone of RAF Bomber Command's offensive against the heart of Germany, but was also used against targets all across occupied Europe. The majority of Lancaster operations took place at night due to RAF Bomber Command's policy of night bombing whilst the bombers of the United States Army Air Force tackled targets by day. The Lancaster became legendary on the night of May 17th 1943 when bombers of No 617 Squadron breached the Mohne and Eder dams in Germany with Barnes Wallis' genius 'bouncing bomb'. Lancasters of Nos 9 and 617 Squadrons also sank the German battleship 'Tirpitz' with 12,000 lb 'Tallboy' bombs, also designed by Wallis.
Over 3400 Lancaster B.Is were manufactured between November 1941 and March 1946, making it the most numerous of the Avro Lancaster variants. In addition to RAF operations, the Lancaster was also used by the RAAF and RCAF.
Media
Excellent additions to the article would be video guides, screenshots from the game, and photos.
See also
Links to the articles on the War Thunder Wiki that you think will be useful for the reader, for example:
- reference to the series of the aircraft;
- links to approximate analogues of other nations and research trees.
External links
Paste links to sources and external resources, such as:
- Video on "Grand Slam" bomb (History section) https://www.youtube.com/watch?v=R-Mm-zFW_nA&feature=relmfu
- Lancaster "Data Card" (History section)
- Heavy Bombs (History Section) https://www.iwm.org.uk/collections/item/object/205210816
- General Information (History Section) https://books.google.co.uk/books?id=0SkDAAAAMBAJ&pg=PA48-IA3&redir_esc=y#v=onepage&q&f=false
- topic on the official game forum;
- encyclopedia page on the aircraft;
- other literature.
| Avro Aircraft | |
|---|---|
| Bombers | Lancaster B Mk I · Lancaster B Mk III · Lincoln B Mk II · Shackleton MR.Mk.2 |
| Export/Licensed | Lancaster MR.7 |
| Britain bombers | |
|---|---|
| Torpedo | Swordfish Mk I · Swordfish Mk II · ▄Avenger Mk II |
| Dive | V-156-B1 |
| Hydroplanes | ▄Catalina Mk IIIa · Sunderland Mk IIIa · Sunderland Mk V |
| Light | Blenheim Mk IV · Beaufort Mk VIII · ▄Hudson Mk V · Brigand B 1 |
| Based on A20 | ▄Havoc Mk I · ▄Boston Mk I · ▄DB-7 |
| Hampden | Hampden Mk I · Hampden TB Mk I |
| Wellington | Wellington Mk Ic · Wellington Mk Ic/L · Wellington Mk III · Wellington Mk X |
| Halifax | Halifax B Mk IIIa |
| Stirling | Stirling B Mk I · Stirling B Mk III |
| Lancaster | Lancaster B Mk I · Lancaster B Mk III |
| Lincoln | Lincoln B Mk II |
| Shackleton | Shackleton MR.Mk.2 |
