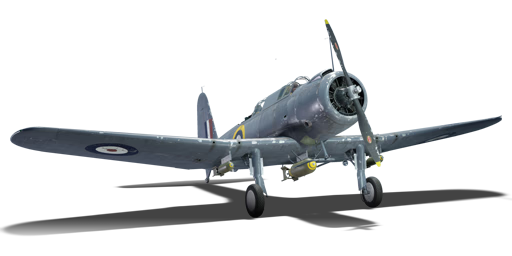
V-156-B1

From War Thunder Wiki
Jump to: navigation, search
Rank 6 USA
F-5C Pack
This page is about the British dive bomber V-156-B1. For the French version, see V-156-F.
V-156-B1
v_156_b1.png
GarageImage V-156-B1.jpg
ArtImage V-156-B1.png
V-156-B1
Research:2 900 Specs-Card-Exp.png
Purchase:700 Specs-Card-Lion.png
Show in game

Description

The V-156-B1 was an export version of the American SB2U bomber, various modifications of which were released from 1936-1941. Since 1941, the V-156-B1 had been transferred to Great Britain under the Lend-Lease program. The most important difference between the SB2U-2 and V-156-B1 is the armament. The V-156-B1 has four 7.7 mm machine guns, while the SB2U-2 has two. Due to the small number of such aircraft, they were not actively used in combat operations. Most of them were used as training aircraft. The last aircraft was withdrawn from service in Great Britain in 1944. A total of 49 V-156-B1 were produced.

It was introduced in Update 1.75 "La Résistance". The V-156-B1 is a slow but well-armed bomber. Due to the weak engine, which is not enough for such large two-seater bomber, its speed qualities are quite low. The aircraft has good armament that allows it to perform its tasks. Four offensive-mounted Brownings and one more as a defensive weapon that allows the V-156-B1 to attack most opponents on this BR. The V-156-B1 has good bomb armament, which allows it to attack ground targets. Dive bombers are hard to use against ground vehicles in realistic battles, but with practice it gets easier.

General info

Flight performance

Arrestor gear
Accelerates braking by grabbing the brake cable on the deck of the aircraft carrier
Max speed
at 4 084 m360 km/h
Turn time22 s
Max altitude6 800 m
EnginePratt & Whitney R-1535-2
TypeRadial
Cooling systemAir
Take-off weight4 t
Characteristics Max Speed
(km/h at 4,084 m)
Max altitude
(metres)
Turn time
(seconds)
Rate of climb
(metres/second)
Take-off run
(metres)
AB RB AB RB AB RB
Stock 343 328 6800 23.2 24.5 4.5 4.5 300
Upgraded 380 360 20.9 22.0 8.2 6.2
A V-156-B1, landed on a hill.

Details

Features
Combat flaps Take-off flaps Landing flaps Air brakes Arrestor gear
X X X
Limits
Wings (km/h) Gear (km/h) Flaps (km/h) Max Static G
Combat Take-off Landing + -
740 740 - - 700 ~15 ~8
Optimal velocities (km/h)
Ailerons Rudder Elevators Radiator
< 300 < 350 < 320 > 299

Survivability and armour

Crew2 people
Speed of destruction
Structural740 km/h
Gear740 km/h
  • 9.5 mm Steel plate between cockpit and turret
  • 3 mm Steel boxes behind the gunner
  • Self-sealing fuel tank located behind pilot

Modifications and economy

Repair costBasic → Reference
AB109 → 147 Sl icon.png
RB139 → 187 Sl icon.png
SB175 → 236 Sl icon.png
Total cost of modifications2 960 Rp icon.png
895 Sl icon.png
Talisman cost190 Ge icon.png
Crew training200 Sl icon.png
Experts1 000 Sl icon.png
Aces20 Ge icon.png
Research Aces96 000 Rp icon.png
Reward for battleAB / RB / SB
20 / 30 / 50 % Sl icon.png
100 / 100 / 100 % Rp icon.png
Modifications
Flight performance Survivability Weaponry
Mods aerodinamic fuse.png
Fuselage repair
Research:
150 Rp icon.png
Cost:
45 Sl icon.png
45 Ge icon.png
Mods radiator.png
Radiator
Research:
150 Rp icon.png
Cost:
45 Sl icon.png
45 Ge icon.png
Mods armor frame.png
Airframe
Research:
220 Rp icon.png
Cost:
65 Sl icon.png
65 Ge icon.png
Mods compressor.png
Compressor
Research:
220 Rp icon.png
Cost:
65 Sl icon.png
65 Ge icon.png
Mods aerodinamic wing.png
Wings repair
Research:
185 Rp icon.png
Cost:
55 Sl icon.png
55 Ge icon.png
Mods new engine.png
Engine
Research:
185 Rp icon.png
Cost:
55 Sl icon.png
55 Ge icon.png
Mods armor cover.png
Cover
Research:
240 Rp icon.png
Cost:
75 Sl icon.png
70 Ge icon.png
Mods metanol.png
Engine injection
Research:
240 Rp icon.png
Cost:
75 Sl icon.png
70 Ge icon.png
Mods engine extinguisher.png
EFS
Research:
240 Rp icon.png
Cost:
75 Sl icon.png
70 Ge icon.png
Mods ammo.png
bmg303_belt_pack
Research:
150 Rp icon.png
Cost:
45 Sl icon.png
45 Ge icon.png
Mod arrow 0.png
Mods pilon bomb.png
FSBC mk.5
Research:
150 Rp icon.png
Cost:
45 Sl icon.png
45 Ge icon.png
Mod arrow 1.png
Mods weapon.png
bmg303_new_gun
Research:
220 Rp icon.png
Cost:
65 Sl icon.png
65 Ge icon.png
Mods ammo.png
bmg303_turret_belt_pack
Research:
185 Rp icon.png
Cost:
55 Sl icon.png
55 Ge icon.png
Mod arrow 0.png
Mods pilon bomb.png
FLBC mk.1
Research:
185 Rp icon.png
Cost:
55 Sl icon.png
55 Ge icon.png
Mods turret gun.png
bmg303_turret_new_gun
Research:
240 Rp icon.png
Cost:
75 Sl icon.png
70 Ge icon.png

Weaponry upgrades and engine should be prioritized with this aircraft, due to its role as an attacker. Its two primary roles are lugging bombs where they need to be in the minimal amount of time possible and then using them to inflict maximum damage. The FSBC mk.5 gives quite an upgrade to the aircraft, replacing the 100 lb bombs (mediocre at best) with the more powerful 250 lb bombs. However, the FLBC mk 1 is a novelty, at best, and only really useful when lugging bombs onto bases in Operation mode in RB. However, the V-156-B1 is a very bad choice for such a role, and thus, it should be disregarded.

A good research pathway is FSBC mk.5 --> Offensive 7 mm Belts --> New 7 mm MGs --> Defensive 7 mm Belts --> Engine --> New 7 mm MGs (Turret) --> Engine Injection. Anything after that is fair game. However, the FLBC mk.1 should be left until last, due to its uselessness in battles.

Armaments

Offensive armament

Ammunition4 000 rounds
Fire rate1 000 shots/min
Main article: Browning (7.7 mm)
V-156-B1 vs BB-1 in frontal attack

The V-156-B1 is armed with:

  • 4 x 7.7 mm Browning machine guns, wing-mounted (1,000 rpg = 4,000 total).

Really good armament for a bomber. This weapon is enough to successfully destroy enemy aircraft in frontal attacks. The most effective belts are Universal and Stealth.

Suspended armament

List of setups (3)
Setup 12 x 100 lb AN-M30A1 bomb
1 x 500 lb AN-M64A1 bomb
Setup 22 x 250 lb AN-M57 bomb
1 x 500 lb AN-M64A1 bomb
Setup 31 x 1000 lb AN-M65A1 bomb

The V-156-B1 can be outfitted with the following ordnance:

  • 1 x 500 lb AN-M64A1 bomb + 2 x 100 lb AN-M30A1 bombs (700 lb total)
  • 1 x 500 lb AN-M64A1 bomb + 2 x 250 lb AN-M57 bombs (1,000 lb total)
  • 1 x 1,000 lb AN-M65A1 bomb (1,000 lb total)

For base-bombing, the 1 x 500 lb + 2 x 100 lb set-up is capable of destroying 70% of a base, while the 1 x 500 lb + 2 x 250 lb and 1 x 1,000 lb set-ups are capable of destroying one base.

Defensive armament

Turret7.7 mm Browning machine gun
Ammunition600 rounds
Fire rate1000 shots/min
Main article: Browning (7.7 mm)

The V-156-B1 is defended by:

  • 1 x 7.7 mm Browning machine gun, dorsal turret (600 rpg).

A standard defensive armament normally seen at the battle-rating, the one machine gun allows pilot some self-defense opportunities to destroy pursuing aircraft. The most effective belt is Universal.

Usage in battles

The V-156-B1 is easily one of the more powerful aircraft in the lower battle ratings and can be an absolute monster at low battle rated arcade matches due to its monoplane design, payload, and a large number of offensive machine guns. It is adequate for grinding at low ranks due to its low repair cost and versatility. It can gladly function as both a fighter and an attacker, and once dumping bombs, is capable of Boom & Zooming enemies in the vicinity. In addition, it has airbrakes in the form of dive brakes, which come in useful when landing, attacking ground targets or attempting to shake off an enemy. Although you have a turret, you should not rely on it to be able to destroy fighters on its own - it is good at fending off fighters and keeping newer and/or more cautious players at bay, but it will only be able to shoot down fighters on its own by sheer luck. Your frontal armament, however, is more powerful - and with the usage of airbrakes at critical moments in the fight, such as when the enemy is close to you and approaching from the rear, you can use your airbrakes while reducing your throttle to zero to induce what is known as an 'overshoot'- forcing the enemy behind you to zoom over you instead of staying on your tail by means of a sudden speed decrease. This puts the enemy in front of you and allows you to use your four frontal machine guns to shoot down the lightly-armoured enemies you face at this battle rating.

Arcade Ground Strike maps - where the aim is to destroy the enemy's ground troops, and often, dogfights happen over ground targets at low altitudes - are where this aircraft will excel most. A suggested strategy is to use the aircraft as a dive-bomber in arcade battles, using your superior altitude and therefore speed advantages (you start in the bomber spawn) to hit ground targets before zooming back towards friendlies, or waiting until the fighters have started engaging, and then attack ground targets. The aircraft (at stock payload) has two 100 lb bombs and one 500 lb bomb. At these low BRs, your bombs will annihilate enemy armoured car and AAA formations, and your guns are nigh-upon-unstoppable at this BR. Use "Universal" or "Tracer" belts for best effect.

While waiting for payload reload, go for enemy planes. British, German and Japanese aircraft are particularly vulnerable to your attacks due to their relatively low armament in a head-on engagement and lack of any and all armour protection. Soviet biplanes (the I-15s) will have heavier or equal armament, and American monoplanes will be harder to kill than biplanes due to robust construction and having similar speeds. At a BR of 1.3, the best opposition you will face are P-40s, Bf-109E-1s, Ki-43s and H-75s. All of these aircraft have large amounts of machine guns with exhaustive ammo pools, and if they can catch up to you, you're likely going to be shot down by the opposition, since you don't have the performance to fight them without assistance. If you feel lucky, you can duke it out by baiting them into a turn fight, where your good turn radius with landing flaps active can make you the victor in the situation. Never rely upon your single rear gun to keep you safe- at best it can only really function as a deterrent to keep fighters at bay. Always keep an eye on your six, and when you finish a ground attack run, look around and see if anything's coming before you go in again. If you see a fighter coming for you and can manage to turn towards them enough that you can get a firing solution on them, you can probably win. British 7.7 mm guns are among the best in the game in terms of raw fire chance values and penetration, and if loaded with the "Tracer" belt- a full mix of Incendiary Tracer (essentially a standard incendiary bullet with a tracer element) and Armour-Piercing Incendiary (Usually the most damaging type of bullet in any given gun) in 50% proportion to each other- they can shred through any air target at a battle rating of 1.3.

A suggested loadout is a minimum load of fuel (33 minutes, more than enough for arcade battles or realistic battles), Universal or Tracer 7 mm belts on both defensive and offensive 7 mm guns (maximal AP-I ammunition) and the payload of 2 x 250 lb bombs and 1 x 500 lb bomb.

Manual Engine Control

MEC elements
Mixer Pitch Radiator Supercharger Turbocharger
Oil Water Type
Controllable Controllable
Not auto controlled
Controllable
Not auto controlled
Controllable
Not auto controlled
Separate Not controllable
1 gear
Not controllable

Pros and cons

Pros:

  • Manoeuvrable
  • Dual role dive bomber/attacker
  • Good diver
  • Decent bomb load options
  • Four offensive machine guns can destroy unarmoured ground targets and other aircraft
  • Good payload- The 500 lbs and 250 lbs bombs are more than enough to penetrate and destroy enemy tanks
  • Defensive machine gun keeps enemy fighters at bay and has a lot of ammunition

Cons:

  • Large target
  • Slow speed
  • Weak defensive armament
  • Difficult to dogfight with
  • Rather long take off run
  • Not particularly fast, easy prey for low-rank monoplanes and even some biplanes
  • Not very manoeuvrable, especially with payloads equipped
  • Poor elevator response, especially at high speeds; this means diving attacks from a high altitude (e.g. in RB) are hard to pull off and will require some planning in order to avoid ripping your wings off and/or compressing
  • The bomber only has landing flaps, that cannot be activated when airbrakes are on, and vice-versa
  • Low cockpit visibility due to the "birdcage" construction and the fact that the rear cockpit view is quite limited due to the limited traverse of the rear gun
  • Stock payload has the weak 100 lbs bombs which have a low armour destruction radius (2 m) and require some skill to get on target without missing or not penetrating
  • Single .303 inch defensive machine gun is better than nothing, but only really serves as a deterrent as the plane will probably be dead by the time the gunner has the chance to knock out the enemy hostile since you only have the one gun

History

The V-156-B1 was an export variant of the American SBU Vindicator dive bomber that saw service with the Royal Navy.

The V-156F-3 was a variant in service with the French Navy, and 50 more were ordered in March 1940. Initial delivery was delayed as the SBU was in production for the US Marine Corps. Delivery was planned for March 1941, the delay due to ongoing production orders for the United States Marine Corps, but the fall of France in June 1940 caused the order to be shifted to the UK. In the Royal Navy's Fleet Air Arm (FAA), the V-156-B1 was known as the Chesapeake Mk.I. The first Chesapeake flew on February 26, 1941, and by the end of March, the British had accepted the V-156-B1.

In British service, the V-156-B1 was intended for anti-submarine patrols, but it became apparent that the aircraft lacked the performance to carry the ordnance necessary for that role, causing the British officials relegating to defensive roles such as carrier escort tasks. Eventually, they were removed from frontline service and used as a training aircraft until the Fairey Swordfish replaced it in that role.

Media

Skins

See also

Other planes in the V-156 Family:

Equivalents in other nations' trees:

External links


Chance Vought Aircraft
Fighters 
Corsair  F4U-1A · F4U-1A (USMC) · F4U-1C · F4U-1D · F4U-4 · F4U-4B · F4U-4B VMF-214
Float planes  OS2U-1 · OS2U-3
Attackers  AU-1
Bombers  SB2U-2 · SB2U-3
Jet aircraft 
Corsair II  A-7D · A-7E · A-7K
Crusader  F8U-2 · F-8E
Export  V-156-B1 · V-156-F · ▄Corsair F Mk II · F4U-7 · ▄F-8E(FN)
Captured  ▅F4U-1A

Britain bombers
Torpedo  Swordfish Mk I · Swordfish Mk II · ▄Avenger Mk II
Dive  V-156-B1
Hydroplanes  ▄Catalina Mk IIIa · Sunderland Mk IIIa · Sunderland Mk V
Light  Blenheim Mk IV · Beaufort Mk VIII · ▄Hudson Mk V · Brigand B 1
Based on A20  ▄Havoc Mk I · ▄Boston Mk I · ▄DB-7
Hampden  Hampden Mk I · Hampden TB Mk I
Wellington  Wellington Mk Ic · Wellington Mk Ic/L · Wellington Mk III · Wellington Mk X
Halifax  Halifax B Mk IIIa
Stirling  Stirling B Mk I · Stirling B Mk III
Lancaster  Lancaster B Mk I · Lancaster B Mk III
Lincoln  Lincoln B Mk II
Shackleton  Shackleton MR.Mk.2