Difference between revisions of "Merkava Mk.1 (USA)"
Colok76286 (talk | contribs) (Edits) |
(→Modules) (Tag: Visual edit) |
||
| (45 intermediate revisions by 15 users not shown) | |||
| Line 1: | Line 1: | ||
| − | |||
| − | |||
| − | |||
| − | |||
| − | |||
{{Specs-Card | {{Specs-Card | ||
|code=us_merkava_mk_1 | |code=us_merkava_mk_1 | ||
| − | |||
|market = Merkava Mk.1 (USA) | |market = Merkava Mk.1 (USA) | ||
}} | }} | ||
== Description == | == Description == | ||
| − | <!-- | + | <!--In the description, the first part should be about the history of the creation and combat usage of the vehicle, as well as its key features. In the second part, tell the reader about the ground vehicle in the game. Insert a screenshot of the vehicle, so that if the novice player does not remember the vehicle by name, he will immediately understand what kind of vehicle the article is talking about.--> |
| − | + | [[File:GarageImage Merkava Mk.1 (USA).jpg|420px|thumb|left]] | |
| + | {{Break}} | ||
| + | The '''{{Specs|name}}''' is a rank {{Specs|rank}} USA medium tank {{Battle-rating}}. It was introduced in [[Update 1.87 "Locked On"]] as a reward for the [https://warthunder.com/en/news/6145-special-battlefield-engineer-en "Battlefield Engineer"] event. | ||
| − | + | At a glance, one may mistake the vehicle's profile for the [[Centauro]], which is already infamous on its own, because they share similar traits - an extremely long vehicle with a turret on its back, that sports very long cannon. However, this vehicle has an even lower profile and drives on tracks instead of wheels. Due to this, it's significantly slower. The amount of damage it can cause, though, is similar. | |
== General info == | == General info == | ||
=== Survivability and armour === | === Survivability and armour === | ||
| − | + | <!--Describe armour protection. Note the most well protected and key weak areas. Appreciate the layout of modules as well as the number and location of crew members. Is the level of armour protection sufficient, is the placement of modules helpful for survival in combat? | |
| − | <!-- | + | |
| − | + | If necessary use a visual template to indicate the most secure and weak zones of the armour.--> | |
| − | + | This tank has an extremely low profile, sloped frontal armour that is extremely sloped everywhere and cannot be hull-broken. | |
| − | + | [[File:Internal shields merkava mk1.jpg|420px|thumb|right|Merkava Mk.1's secondary shields]] | |
| − | The hull is also quite | + | Even if anything penetrates the front of the hull, the shell will then have to go through an assortment of modules and protection beyond the initial hull. The first in the way is a fuel tank, which shields the engine. Even if that is penetrated, there is still a list of rolled homogenous armour behind it. Even if that is penetrated, the engine will take the entirety of shrapnel with seemingly no failure. This will often result in the tank catching fire with a destroyed transmission and/or engine but with no other damage the tank. If one tries to fire straight at the driver, the shell will most likely just ricochet, bounce off the turret and away unless it was APDS or APDSFS. Even then, any shell that hit directly from the front will likely only take down the driver. The hull is also quite proof against ATGM, as module placement absorbs as much damage as [[IPM1]] and [[M1A1 Abrams]] NERA, so missiles should be fired at the turret instead unless one tries to just burn down the vehicle. In Realistic battle mode, hitting turret with ATGM might actually destroy the vehicle in one hit. |
| − | + | Even the turret is well-protected, with its well-angled armour structure and layers of homogenous armour. As such, anything short of APDS from specifically sniper tanks like [[Chieftain_Mk_3|Chieftain Mk 3]] or APDSFS have a high chance of doing no damage. The only place with no protection is the turret ring. | |
| − | The side hull armour of the tank is considerably weaker though and can be penetrated by APDS-equipped SPAA and light tanks. Tracks still block some shots, but it's possible to destroy the entirety of turret compartment with a high enough rate-of-fire before tank turns around. AP-I belt would probably fail to penetrate it, though. | + | The ''side'' hull armour of the tank is considerably weaker though and can be penetrated even by APDS-equipped SPAA and light tanks. Tracks still block some shots, but it's possible to destroy the entirety of turret compartment with a high enough rate-of-fire before tank turns around. AP-I belt would probably fail to penetrate it, though. |
| − | The sides of the base of the turret seem to be a viable target for HESH, unlike the rest of the tank. Though, even there vehicle has a little fuel tank, which has a tendency to derail spalling away from last turret crew member. | + | The sides of the base of the turret seem to be a viable target for HESH, unlike the rest of the tank. Though, ''even there'' vehicle has a little fuel tank, which has a tendency to derail spalling away from last turret crew member. |
As such, Merkava should avoid exposing its sides, to protect its turret crew and ammunition. | As such, Merkava should avoid exposing its sides, to protect its turret crew and ammunition. | ||
| Line 38: | Line 34: | ||
In addition to the assortment of armour, the vehicle has smoke launchers and smoke shells to cover itself. | In addition to the assortment of armour, the vehicle has smoke launchers and smoke shells to cover itself. | ||
| − | Ammunition is stored in the very back of the vehicle, at the very bottom and is covered with even more armour lists. Most of the attacks from front of the vehicle or from above will inevitably hit side skirts, turret, or other modules in way of the shell and achieve nothing. In case enemy tank attacks from behind, even tank's back is protected with layers of spaced armour, rolled | + | Ammunition is stored in the very back of the vehicle, at the very bottom and is covered with even more armour lists. Most of the attacks from front of the vehicle or from above will inevitably hit side skirts, turret, or other modules in way of the shell and achieve nothing. In case enemy tank attacks from behind, even tank's back is protected with layers of spaced armour, rolled homogenous armour and fuel tanks, completely neutralizing weak chemical shells (such as HESH), or derailing HEAT-FS spall away from critical components. Only firing HEAT-FS diagonally through the shield in the middle of Merkava's rear seems to achieve hitting ammunition or crew. Using AP based ammunition instead is highly adviced. |
| − | |||
| − | |||
| − | |||
| − | |||
| − | |||
| − | |||
| − | |||
| − | |||
| − | |||
| − | |||
| − | |||
| − | |||
| − | |||
| − | |||
| − | |||
| − | |||
| − | |||
| − | |||
| − | |||
| − | |||
| − | |||
| − | |||
=== Mobility === | === Mobility === | ||
| − | + | <!--Write about the mobility of the ground vehicle. Estimate the specific power and manoeuvrability, as well as the maximum speed forwards and backwards.--> | |
| − | <!-- | + | In Arcade battles, the Merkava Mk.1 has a top speed of about 51 km/h forward. However, either due to extreme recklessness of its drivers, or better than average acceleration, it often gets to position faster than expected. Its reverse speed is quite low though, being about 10 km/h at best. |
| − | + | In Realistic mode, its top speed is supposed to be about 46 km/h forward and about 8 km/h in reverse. | |
| − | |||
| − | |||
| − | |||
| − | |||
| − | |||
== Armaments == | == Armaments == | ||
| − | |||
=== Main armament === | === Main armament === | ||
| − | + | <!--Give the reader information about the characteristics of the main gun. Assess its effectiveness in a battle based on the reloading speed, ballistics and the power of shells. Do not forget about the flexibility of the fire, that is how quickly the cannon can be aimed at the target, open fire on it and aim at another enemy. Add a link to the main article on the gun: <code><nowiki>{{main|Name of the weapon}}</nowiki></code>. Describe in general terms the ammunition available for the main gun. Give advice on how to use them and how to fill the ammunition storage.--> | |
| − | <!-- | ||
{{main|Sharir (105 mm)}} | {{main|Sharir (105 mm)}} | ||
| − | + | {| class="wikitable" style="text-align:center" | |
| − | + | |- | |
| − | + | ! colspan="6" | [[Sharir (105 mm)|105 mm Sharir]] | |
| + | |- | ||
| + | ! colspan="3" rowspan="1" style="width:5em" |Capacity | ||
| + | ! rowspan="1" | Vertical <br> guidance | ||
| + | ! rowspan="1" | Horizontal <br> guidance | ||
| + | ! rowspan="1" | Stabilizer | ||
| + | |- | ||
| + | | colspan="3" | 62 || -8°/+20° || ±180° || Two-plane | ||
| + | |- | ||
| + | ! colspan="6" | Turret rotation speed (°/s) | ||
| + | |- | ||
| + | ! style="width:4em" |Mode | ||
| + | ! style="width:4em" |Stock | ||
| + | ! style="width:4em" |Upgraded | ||
| + | ! style="width:4em" |Prior + Full crew | ||
| + | ! style="width:4em" |Prior + Expert qualif. | ||
| + | ! style="width:4em" |Prior + Ace qualif. | ||
| + | |- | ||
| + | | ''Arcade'' || 52.7 || __.__ || __.__ || __.__ || __.__ | ||
|- | |- | ||
| − | + | | ''Realistic'' || 28.0 || __.__ || __.__ || __.__ || __.__ | |
|- | |- | ||
| − | ! | + | ! colspan="4" | Reloading rate (seconds) |
| − | |||
| − | |||
|- | |- | ||
| − | ! | + | ! colspan="1" style="width:4em" |Stock |
| − | + | ! colspan="1" style="width:4em" |Prior + Full crew | |
| + | ! colspan="1" style="width:4em" |Prior + Expert qualif. | ||
| + | ! colspan="1" style="width:4em" |Prior + Ace qualif. | ||
|- | |- | ||
| − | + | | 8.70 || __.__ || __.__ || __.__ | |
| − | | | ||
|- | |- | ||
|} | |} | ||
| − | ==== Ammunition ==== | + | ===== Ammunition ===== |
| − | + | {| class="wikitable sortable" style="text-align:center" width="100%" | |
| − | + | ! colspan="8" | Penetration statistics | |
| − | + | |- | |
| − | + | ! rowspan="2" data-sort-type="text" | Ammunition | |
| − | + | ! rowspan="2" class="unsortable" | Type of <br /> warhead | |
| − | + | ! colspan="6" | '''Penetration''' '''''in mm''''' '''@ 0° Angle of Attack''' | |
| − | + | |- | |
| − | + | ! 10m | |
| − | + | ! 100m | |
| − | + | ! 500m | |
| − | + | ! 1000m | |
| − | + | ! 1500m | |
| − | + | ! 2000m | |
| + | |- | ||
| + | | M152 || HEATFS || 400 || 400 || 400 || 400 || 400 || 400 | ||
|- | |- | ||
| − | + | | M156 || HESH || 127 || 127 || 127 || 127 || 127 || 127 | |
| − | |||
| − | |||
| − | |||
| − | |||
|- | |- | ||
| − | | | + | | M111 || APFSDS || 337 || 335 || 330 || 322 || 314 || 306 |
|- | |- | ||
|} | |} | ||
| − | + | {| class="wikitable sortable" style="text-align:center" width="100%" | |
| − | + | ! colspan="11" | Shell details | |
| − | + | |- | |
| − | + | ! rowspan="2" data-sort-type="text" | Ammunition | |
| − | + | ! rowspan="2" class="unsortable" | Type of <br /> warhead | |
| − | + | ! rowspan="2" |Velocity <br /> in m/s | |
| − | === | + | ! rowspan="2" |Projectile<br />Mass in kg |
| − | + | ! rowspan="2" | ''Fuse delay'' | |
| − | + | ''in m:'' | |
| − | + | ! rowspan="2" | ''Fuse sensitivity'' | |
| − | + | ''in mm:'' | |
| − | <! | + | ! rowspan="2" | ''Explosive Mass in g<br /> (TNT equivalent):'' |
| − | + | ! rowspan="2" | ''Normalization At 30° <br> from horizontal:'' | |
| − | + | ! colspan="3" | ''Ricochet:'' | |
| − | |||
| − | |||
| − | |||
| − | |||
| − | |||
|- | |- | ||
| − | ! | + | ! 0% |
| + | ! 50% | ||
| + | ! 100% | ||
|- | |- | ||
| − | + | | M152 || HEATFS || 1173 || 10.5 || 0.0 || 0.1 || 1,270 || +0° || 65° || 72° || 75° | |
| + | |- | ||
| + | | M156 || HESH || 732 || 14.85 || 0.4 || 0.1 || 4,310 || +0° || 73° || 77° || 80° | ||
|- | |- | ||
| − | | | + | | M735 || APFSDS || 1455 || 3.79 || N/A || N/A || N/A || +1.5° || 78° || 80° || 81° |
|- | |- | ||
|} | |} | ||
| − | {| class="wikitable" style="text-align:center" | + | {| class="wikitable sortable" style="text-align:center" |
| + | ! colspan="7" | Smoke characteristic | ||
|- | |- | ||
| − | ! | + | ! Ammunition |
| + | ! Velocity <br /> in m/s | ||
| + | ! Projectile<br />Mass in kg | ||
| + | ! ''Screen radius <br /> in m'' | ||
| + | ! ''Screen time <br /> in s'' | ||
| + | ! ''Screen hold time <br /> in s:'' | ||
| + | ! ''Explosive Mass in g<br /> (TNT equivalent):'' | ||
|- | |- | ||
| − | + | | M416 || 730 || 11.4 || 20 || 5 || 25 || 50 | |
|- | |- | ||
| − | | | + | |} |
| + | |||
| + | ===== [[Ammo racks|Ammo racks]] ===== | ||
| + | {| class="wikitable sortable" style="text-align:center" | ||
|- | |- | ||
| − | | | + | ! class="wikitable unsortable" |Full<br /> ammo |
| + | ! class="wikitable unsortable" |1st<br /> rack empty | ||
| + | ! class="wikitable unsortable" |2nd<br /> rack empty | ||
| + | ! class="wikitable unsortable" |Visual<br /> discrepancy | ||
|- | |- | ||
| − | | | + | || '''62''' || XX ''(+XX)'' || XX ''(+XX)'' || style="text-align:left" | No |
|- | |- | ||
|} | |} | ||
| − | + | Merkava uses a [[Sharir_(105_mm)|105 mm Sharir cannon]]. It has a two-plane stabilizer. The default reload rate is 8.71 seconds and with crew training it will go down to 6.7 seconds. First-stage ammo stowage on the turret floor has 14 shells and the 48 remaining shells are in the back. | |
| − | + | ||
| + | Default ammo for this cannon is HEAT-FS M152, with 400 mm of penetration at 0° angle of attack (AOA). | ||
| + | |||
| + | Additionally, the gun can be loaded with: | ||
| + | |||
| + | * '''HESH M152''', which can penetrate armour about 127-142 mm thick for 260 Silver Lions per shot. | ||
| + | |||
| + | * '''APDSFS M111''', which can penetrate 337 mm at 0° AOA and 194 at 60° AOA at point blank for 390 Silver Lions per shot. | ||
| − | + | * '''Smoke M416''', with 20 m coverage range for 50 SL. | |
| − | + | === Machine guns === | |
| + | <!--Offensive and anti-aircraft machine guns not only allow you to fight some aircraft but also are effective against lightly armoured vehicles. Evaluate machine guns and give recommendations on its use.--> | ||
| + | {{main|M2HB (12.7 mm)|FN MAG 60-40 (7.62 mm)}} | ||
| + | As machine guns, Merkava Mk.1 has 12.7 mm [[M2HB_(12.7_mm)|M2HB]] and three 7.62 mm [[FN MAG 60-40 (7.62 mm)|FN MAG 60-40]] machine guns. | ||
| − | + | Their penetration statistics seem to be standard for their calibre. | |
| − | + | ==Usage in battles== | |
| + | ''Describe the tactics of playing in the vehicle, the features of using vehicles in the team and advice on tactics. Refrain from creating a "guide" - do not impose a single point of view but instead give the reader food for thought. Describe the most dangerous enemies and give recommendations on fighting them. If necessary, note the specifics of the game in different modes (AB, RB, SB).'' | ||
| − | + | ===Modules=== | |
| − | + | {| class="wikitable" | |
| − | + | ! Tier | |
| + | ! colspan="2" |Mobility | ||
| + | ! Protection | ||
| + | ! colspan="3" |Firepower | ||
| + | |- | ||
| + | | I | ||
| + | | Tracks|| | ||
| + | | Parts | ||
| + | | Horizontal Drive||M156|| | ||
| + | |- | ||
| + | | II | ||
| + | | Suspension||Brake System | ||
| + | | FPE | ||
| + | | Adjustment of Fire||NVD | ||
| + | | | ||
| + | |- | ||
| + | | III | ||
| + | | Filters|| | ||
| + | | Crew Replenishment | ||
| + | | Elevation Mechanism||M416||Smoke grenade | ||
| + | |- | ||
| + | | IV | ||
| + | | Transmission||Engine | ||
| + | | | ||
| + | | Artillery Support||M111||Laser rangefinder | ||
| + | |- | ||
| + | |} | ||
| − | === Pros and cons === | + | ===Pros and cons=== |
| − | <!-- | + | <!--Summarise and briefly evaluate the vehicle in terms of its characteristics and combat effectiveness. Mark its pros and cons in a bulleted list. Try not to use more than 6 points for each of the characteristics. Avoid using categorical definitions such as "bad", "good" and the like - use substitutions with softer forms such as "inadequate" and "effective".--> |
'''Pros:''' | '''Pros:''' | ||
* Armour is surprisingly effective, due to it being multi-layered | * Armour is surprisingly effective, due to it being multi-layered | ||
| + | * Sometimes capable of just driving into the capture point, as if it doesn't care | ||
| + | * Has weapons and ammunition similar to SPG [[Centauro]], which is enough for most encounters | ||
* Different ammunition types are cheap to use | * Different ammunition types are cheap to use | ||
| − | * ATGMs | + | * ATGMs may have problems destroying this vehicle, as well as small rockets and HESH |
'''Cons:''' | '''Cons:''' | ||
| − | * | + | * APDSFS does not care about module-based protection and will go straight through the entire vehicle |
| − | * Second layer of defence has a lot of openings, which can be exploited with side shots so the vehicle cannot be angled | + | * Second layer of defence has a lot of openings, which can be exploited with side shots so the vehicle cannot be angled a lot |
| − | * Turret ring and middle rear weak spots compromise vehicle's defences | + | * Turret ring and middle rear weak spots compromise vehicle's defences and make it vulnerable to APHE at close ranges |
| − | * Side hull armour is weak, can be destroyed by light tanks with +30 mm cannons | + | * Side hull armour is weak, can be destroyed by light tanks with +30 mm cannons, obversely, default ammo usually fails to penetrate |
| − | * | + | * In up-tier, it's going to be slower than most of the adversaries |
| − | * | + | * Can be simply burned, if it cannot be destroyed normally |
== History == | == History == | ||
| − | <!-- | + | <!--Describe the history of the creation and combat usage of the ground vehicle in more detail than in the introduction. If the historical reference turns out to be too long, take it to a separate article, taking a link to the article about the vehicle and adding a block "/ History" (example: <nowiki>https://wiki.warthunder.com/(Vehicle-name)/History</nowiki>) and add a link to it here using the <code>main</code> template. Be sure to reference text and sources by using <code><nowiki><ref></nowiki></code>, as well as adding them at the end of the article. This section may also include the vehicle's dev blog entry (if applicable) and the in-game encyclopedia description (under <code><nowiki>=== Encyclopedia Info ===</nowiki></code>, also if applicable).--> |
During the mid-1960s, Israel began researching the possibility of developing and manufacturing a domestically designed tank. The need for such a vehicle became even more emphasized after failed negotiations with Great Britain around the same time led to Israel not being permitted to licence produce the Chieftain MBT. Thus, during the late 1960s official development on a domestic Israeli tank began. | During the mid-1960s, Israel began researching the possibility of developing and manufacturing a domestically designed tank. The need for such a vehicle became even more emphasized after failed negotiations with Great Britain around the same time led to Israel not being permitted to licence produce the Chieftain MBT. Thus, during the late 1960s official development on a domestic Israeli tank began. | ||
| − | The Israeli tank was primarily designed around combat experiences gained during the Yom Kippur War, resulting in heavy emphasis being put on crew survivability. By 1974, first prototypes of the new | + | The Israeli tank was primarily designed around combat experiences gained during the Yom Kippur War, resulting in heavy emphasis being put on crew survivability. By 1974, first prototypes of the new “Merkava” tank were constructed and put through initial testing. After nearly a decade of development, the Merkava Mk.1 was adopted for service by the IDF in December 1979 and modernized versions continue to serve with Israeli forces today. |
| − | ''- From [ | + | ''- From [https://warthunder.com/en/news/6140-development-merkava-mk-1-chariot-of-fire-en Devblog]'' |
== Media == | == Media == | ||
| − | <!-- | + | <!--Excellent additions to the article would be video guides, screenshots from the game, and photos.--> |
| − | + | [[File:Merkava.JPG|420px|none|thumb|The Merkava Mk.1 on the battlefield]] | |
| − | |||
| − | |||
| − | |||
| − | |||
| − | |||
| − | |||
| − | |||
| − | |||
| − | |||
| − | |||
| − | |||
| − | |||
| − | |||
| − | File: | ||
| − | |||
| − | |||
| − | |||
| − | |||
== See also == | == See also == | ||
| Line 233: | Line 248: | ||
== External links == | == External links == | ||
| − | <!-- | + | <!--Paste links to sources and external resources, such as: |
* ''topic on the official game forum;'' | * ''topic on the official game forum;'' | ||
| − | * ''other literature.'' --> | + | * ''encyclopedia page on the tank;'' |
| + | * ''other literature.''--> | ||
| − | * [ | + | * [https://warthunder.com/en/news/6140-development-merkava-mk-1-chariot-of-fire-en [Devblog<nowiki>]</nowiki> Merkava Mk.1: Chariot of Fire] |
| − | |||
{{USA medium tanks}} | {{USA medium tanks}} | ||
Revision as of 18:47, 17 October 2019
Contents
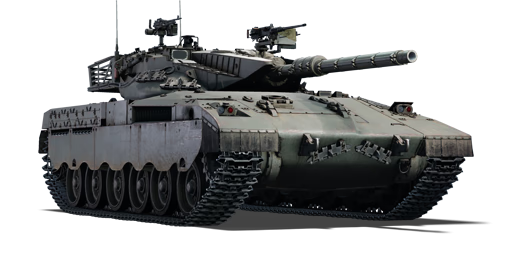
Description
.jpg)
The ▃Merkava Siman 1 is a rank VI USA medium tank
with a battle rating of 9.0 (AB/RB/SB). It was introduced in Update 1.87 "Locked On" as a reward for the "Battlefield Engineer" event.
At a glance, one may mistake the vehicle's profile for the Centauro, which is already infamous on its own, because they share similar traits - an extremely long vehicle with a turret on its back, that sports very long cannon. However, this vehicle has an even lower profile and drives on tracks instead of wheels. Due to this, it's significantly slower. The amount of damage it can cause, though, is similar.
General info
Survivability and armour
This tank has an extremely low profile, sloped frontal armour that is extremely sloped everywhere and cannot be hull-broken.

Even if anything penetrates the front of the hull, the shell will then have to go through an assortment of modules and protection beyond the initial hull. The first in the way is a fuel tank, which shields the engine. Even if that is penetrated, there is still a list of rolled homogenous armour behind it. Even if that is penetrated, the engine will take the entirety of shrapnel with seemingly no failure. This will often result in the tank catching fire with a destroyed transmission and/or engine but with no other damage the tank. If one tries to fire straight at the driver, the shell will most likely just ricochet, bounce off the turret and away unless it was APDS or APDSFS. Even then, any shell that hit directly from the front will likely only take down the driver. The hull is also quite proof against ATGM, as module placement absorbs as much damage as IPM1 and M1A1 Abrams NERA, so missiles should be fired at the turret instead unless one tries to just burn down the vehicle. In Realistic battle mode, hitting turret with ATGM might actually destroy the vehicle in one hit.
Even the turret is well-protected, with its well-angled armour structure and layers of homogenous armour. As such, anything short of APDS from specifically sniper tanks like Chieftain Mk 3 or APDSFS have a high chance of doing no damage. The only place with no protection is the turret ring.
The side hull armour of the tank is considerably weaker though and can be penetrated even by APDS-equipped SPAA and light tanks. Tracks still block some shots, but it's possible to destroy the entirety of turret compartment with a high enough rate-of-fire before tank turns around. AP-I belt would probably fail to penetrate it, though.
The sides of the base of the turret seem to be a viable target for HESH, unlike the rest of the tank. Though, even there vehicle has a little fuel tank, which has a tendency to derail spalling away from last turret crew member.
As such, Merkava should avoid exposing its sides, to protect its turret crew and ammunition.
In addition to the assortment of armour, the vehicle has smoke launchers and smoke shells to cover itself.
Ammunition is stored in the very back of the vehicle, at the very bottom and is covered with even more armour lists. Most of the attacks from front of the vehicle or from above will inevitably hit side skirts, turret, or other modules in way of the shell and achieve nothing. In case enemy tank attacks from behind, even tank's back is protected with layers of spaced armour, rolled homogenous armour and fuel tanks, completely neutralizing weak chemical shells (such as HESH), or derailing HEAT-FS spall away from critical components. Only firing HEAT-FS diagonally through the shield in the middle of Merkava's rear seems to achieve hitting ammunition or crew. Using AP based ammunition instead is highly adviced.
Mobility
In Arcade battles, the Merkava Mk.1 has a top speed of about 51 km/h forward. However, either due to extreme recklessness of its drivers, or better than average acceleration, it often gets to position faster than expected. Its reverse speed is quite low though, being about 10 km/h at best.
In Realistic mode, its top speed is supposed to be about 46 km/h forward and about 8 km/h in reverse.
Armaments
Main armament
| 105 mm Sharir | |||||
|---|---|---|---|---|---|
| Capacity | Vertical guidance |
Horizontal guidance |
Stabilizer | ||
| 62 | -8°/+20° | ±180° | Two-plane | ||
| Turret rotation speed (°/s) | |||||
| Mode | Stock | Upgraded | Prior + Full crew | Prior + Expert qualif. | Prior + Ace qualif. |
| Arcade | 52.7 | __.__ | __.__ | __.__ | __.__ |
| Realistic | 28.0 | __.__ | __.__ | __.__ | __.__ |
| Reloading rate (seconds) | |||||
| Stock | Prior + Full crew | Prior + Expert qualif. | Prior + Ace qualif. | ||
| 8.70 | __.__ | __.__ | __.__ | ||
Ammunition
| Penetration statistics | |||||||
|---|---|---|---|---|---|---|---|
| Ammunition | Type of warhead |
Penetration in mm @ 0° Angle of Attack | |||||
| 10m | 100m | 500m | 1000m | 1500m | 2000m | ||
| M152 | HEATFS | 400 | 400 | 400 | 400 | 400 | 400 |
| M156 | HESH | 127 | 127 | 127 | 127 | 127 | 127 |
| M111 | APFSDS | 337 | 335 | 330 | 322 | 314 | 306 |
| Shell details | ||||||||||
|---|---|---|---|---|---|---|---|---|---|---|
| Ammunition | Type of warhead |
Velocity in m/s |
Projectile Mass in kg |
Fuse delay
in m: |
Fuse sensitivity
in mm: |
Explosive Mass in g (TNT equivalent): |
Normalization At 30° from horizontal: |
Ricochet: | ||
| 0% | 50% | 100% | ||||||||
| M152 | HEATFS | 1173 | 10.5 | 0.0 | 0.1 | 1,270 | +0° | 65° | 72° | 75° |
| M156 | HESH | 732 | 14.85 | 0.4 | 0.1 | 4,310 | +0° | 73° | 77° | 80° |
| M735 | APFSDS | 1455 | 3.79 | N/A | N/A | N/A | +1.5° | 78° | 80° | 81° |
| Smoke characteristic | ||||||
|---|---|---|---|---|---|---|
| Ammunition | Velocity in m/s |
Projectile Mass in kg |
Screen radius in m |
Screen time in s |
Screen hold time in s: |
Explosive Mass in g (TNT equivalent): |
| M416 | 730 | 11.4 | 20 | 5 | 25 | 50 |
Ammo racks
| Full ammo |
1st rack empty |
2nd rack empty |
Visual discrepancy |
|---|---|---|---|
| 62 | XX (+XX) | XX (+XX) | No |
Merkava uses a 105 mm Sharir cannon. It has a two-plane stabilizer. The default reload rate is 8.71 seconds and with crew training it will go down to 6.7 seconds. First-stage ammo stowage on the turret floor has 14 shells and the 48 remaining shells are in the back.
Default ammo for this cannon is HEAT-FS M152, with 400 mm of penetration at 0° angle of attack (AOA).
Additionally, the gun can be loaded with:
- HESH M152, which can penetrate armour about 127-142 mm thick for 260 Silver Lions per shot.
- APDSFS M111, which can penetrate 337 mm at 0° AOA and 194 at 60° AOA at point blank for 390 Silver Lions per shot.
- Smoke M416, with 20 m coverage range for 50 SL.
Machine guns
As machine guns, Merkava Mk.1 has 12.7 mm M2HB and three 7.62 mm FN MAG 60-40 machine guns.
Their penetration statistics seem to be standard for their calibre.
Usage in battles
Describe the tactics of playing in the vehicle, the features of using vehicles in the team and advice on tactics. Refrain from creating a "guide" - do not impose a single point of view but instead give the reader food for thought. Describe the most dangerous enemies and give recommendations on fighting them. If necessary, note the specifics of the game in different modes (AB, RB, SB).
Modules
| Tier | Mobility | Protection | Firepower | |||
|---|---|---|---|---|---|---|
| I | Tracks | Parts | Horizontal Drive | M156 | ||
| II | Suspension | Brake System | FPE | Adjustment of Fire | NVD | |
| III | Filters | Crew Replenishment | Elevation Mechanism | M416 | Smoke grenade | |
| IV | Transmission | Engine | Artillery Support | M111 | Laser rangefinder | |
Pros and cons
Pros:
- Armour is surprisingly effective, due to it being multi-layered
- Sometimes capable of just driving into the capture point, as if it doesn't care
- Has weapons and ammunition similar to SPG Centauro, which is enough for most encounters
- Different ammunition types are cheap to use
- ATGMs may have problems destroying this vehicle, as well as small rockets and HESH
Cons:
- APDSFS does not care about module-based protection and will go straight through the entire vehicle
- Second layer of defence has a lot of openings, which can be exploited with side shots so the vehicle cannot be angled a lot
- Turret ring and middle rear weak spots compromise vehicle's defences and make it vulnerable to APHE at close ranges
- Side hull armour is weak, can be destroyed by light tanks with +30 mm cannons, obversely, default ammo usually fails to penetrate
- In up-tier, it's going to be slower than most of the adversaries
- Can be simply burned, if it cannot be destroyed normally
History
During the mid-1960s, Israel began researching the possibility of developing and manufacturing a domestically designed tank. The need for such a vehicle became even more emphasized after failed negotiations with Great Britain around the same time led to Israel not being permitted to licence produce the Chieftain MBT. Thus, during the late 1960s official development on a domestic Israeli tank began.
The Israeli tank was primarily designed around combat experiences gained during the Yom Kippur War, resulting in heavy emphasis being put on crew survivability. By 1974, first prototypes of the new “Merkava” tank were constructed and put through initial testing. After nearly a decade of development, the Merkava Mk.1 was adopted for service by the IDF in December 1979 and modernized versions continue to serve with Israeli forces today.
- From Devblog
Media
See also
Links to the articles on the War Thunder Wiki that you think will be useful for the reader, for example:
- reference to the series of the vehicles;
- links to approximate analogues of other nations and research trees.
External links
| USA medium tanks | |
|---|---|
| M2 | M2 |
| M3 | M3 Lee · ▃Grant I |
| M4 | M4 · Calliope · M4A1 · M4A1 (76) W · M4A2 · M4A2 (76) W · M4A3 (105) · M4A3 (76) W · M4/T26 |
| M26 Pershing | T20 · T25 · M26 · M26 T99 · M26E1 |
| M46/47/48 Patton | M46 · M46 "Tiger" · M47 · M48A1 · T54E1 · T54E2 |
| M60 | M60 · M60A1 (AOS) · M60A1 RISE (P) · M60A2 · M60A3 TTS · M728 CEV · 120S |
| MBT-70 | MBT-70 · XM803 |
| M1 Abrams | XM1 (Chrysler) · XM1 (GM) |
| M1 Abrams · M1 KVT · IPM1 | |
| M1A1 · M1A1 HC · M1A1 Click-Bait | |
| M1A2 Abrams · M1A2 SEP · M1A2 SEP V2 | |
| Other | T95E1 |
| Australia | M1A1 AIM |
| Canada | M4A5 |
| Israel | ▃Magach 3 (ERA) · ▃Merkava Mk.1 · ▃Merkava Mk.2B · ▃Merkava Mk.3D |
| Turkey | M60 AMBT |
