Difference between revisions of "M4 (WT Mobile)"
ieatglue124 (talk | contribs) (Added usage in battles) (Tag: Visual edit) |
Colok76286 (talk | contribs) (Edits) |
||
| Line 126: | Line 126: | ||
There will be concerns about certain vehicles: | There will be concerns about certain vehicles: | ||
| − | [[M4A2]] / [[M4A4 (1st PTG)|A4]] - These Sherman tanks are widely used by over 3 nations that spread across both the Allied and the Axis side, so no matter which nation you play they can be quite tough to destroy in the hands of a skilled tanker. Given the rather weak penetration of your short 75 mm gun, their hull can be almost impossible to penetrate when angled, hull down or 300 m away. For a M4A4, there are 2 apparent bulges on the upper front plate, a penetration through there can guarantee a knock-out most of the times. But in case the opponent covers them up or when it's a M4A2, aim for the middle parts of the gun mantlet or the turret armour unprotected by the mantlet, you can at least make them defenseless. Note that their guns are equally weak against you, so wiggle around to disrupt their aim while you reload, you have a good chance of bouncing some shells. | + | * [[M4A2]] / [[M4A4 (1st PTG)|A4]] - These Sherman tanks are widely used by over 3 nations that spread across both the Allied and the Axis side, so no matter which nation you play they can be quite tough to destroy in the hands of a skilled tanker. Given the rather weak penetration of your short 75 mm gun, their hull can be almost impossible to penetrate when angled, hull down or 300 m away. For a M4A4, there are 2 apparent bulges on the upper front plate, a penetration through there can guarantee a knock-out most of the times. But in case the opponent covers them up or when it's a M4A2, aim for the middle parts of the gun mantlet or the turret armour unprotected by the mantlet, you can at least make them defenseless. Note that their guns are equally weak against you, so wiggle around to disrupt their aim while you reload, you have a good chance of bouncing some shells. |
| − | [[ | + | * [[Churchill (Family)]] - The Churchills, with their complex hulls and sturdy turrets, can be quite hard to penetrate at range. Again, manoeuvre as close to them as possible, the idea distance being no more than 200 m. If they are angling their hull but facing their turret at you, only go for the turret. For the Mk I Churchills, aim at the near-vertical part of their rounded cheeks to ensure successful penetrations. For the Mk III and the German Churchill, also aim for their flat turret which is at most 89 mm. The shell should go in easily and knock out most, if not all of the crew. Only when you are facing their hull without any angles should you shoot the hull, otherwise shoot the turret only, as their big tracks can easily get in front of the frontal hull. The side hull have multiple layers of armour, some of which are weirdly angled and can absorb plenty of shells. |
| − | [[KV-1 (Family) | + | * [[KV-1 (Family)]] - A vehicle that the M4 Sherman will have trouble against is the KV-1. While the [[KV-1 (L-11)|L-11]] is underpowered, the [[KV-1 (ZiS-5)|ZiS-5]] is potent enough to punch through the Sherman's front, and the Sherman is unable to penetrate the KV-1's thick frontal armour. If this heavy tank is encountered, try to shoot it in its sides and rear, where its armour is thinner and unsloped, though it will still have to be at a close range to penetrate the armour. In addition, shots to the sides will most likely hit fuel tanks or ammunition storage, causing a fire or ammunition detonation and at best, time to reassess the situation. |
| − | [[Pz.IV | + | * [[Pz.IV (Family)]] - The historical nemesis of any Sherman, the Panzer IV is one of the Shermans biggest threats at this rank. The long barrel 75 mm gun will easily penetrate the Sherman from the front. The F2 variant is admittedly easy to deal with. A single APCBC to its hull or turret should end it pretty quickly, even at long range. The other variants are slightly harder to deal with. They have thicker hull armour, at 80 mm, which will be much harder to penetrate with the APCBC over 500 m. Luckily the turret armour remains the same at 50 mm. Either aim here with APCBC or sacrifice damage potential and use the AP round to penetrate the hull. |
| − | [[StuG III F]]/[[StuG III G|G]] - Another historical nemesis of the Sherman, and another big threat. The StuG III packs the same punch as the Panzer IV line with its long barrel 75 mm gun, whilst losing the turret, which turns out to be both an advantage and a disadvantage. Lacking a turret means that it will have to traverse the whole vehicle to target an enemy, but it also means that it has a lower profile. The StuG's armour profile is also more complex than the Panzer IV, with less flat areas. Certain areas are sloped and very bouncy. Luckily, there is a big weak spot. There are two flat plates on the front of the hull. The flat plate on the right is the drivers port. Shoot that and you are able to knock out the driver, gunner and loader in one go. This is a very efficient way to destroy this vehicle. With the F variant, you can use APCBC to instantly knock out this vehicle with a single shot. With the G variant, it is more reliable to use AP at ranges over 500 m to ensure penetration. | + | * [[StuG III F]]/[[StuG III G|G]] - Another historical nemesis of the Sherman, and another big threat. The StuG III packs the same punch as the Panzer IV line with its long barrel 75 mm gun, whilst losing the turret, which turns out to be both an advantage and a disadvantage. Lacking a turret means that it will have to traverse the whole vehicle to target an enemy, but it also means that it has a lower profile. The StuG's armour profile is also more complex than the Panzer IV, with less flat areas. Certain areas are sloped and very bouncy. Luckily, there is a big weak spot. There are two flat plates on the front of the hull. The flat plate on the right is the drivers port. Shoot that and you are able to knock out the driver, gunner and loader in one go. This is a very efficient way to destroy this vehicle. With the F variant, you can use APCBC to instantly knock out this vehicle with a single shot. With the G variant, it is more reliable to use AP at ranges over 500 m to ensure penetration. |
=== Pros and cons === | === Pros and cons === | ||
Revision as of 11:54, 16 March 2024
.jpg)
Contents
Description
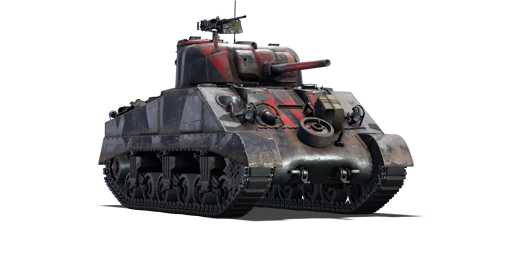
The Medium Tank M4 Sherman is a gift rank II American medium tank with a battle rating of 3.7 (AB/RB/SB). It was introduced during Update "La Royale" as a promotional reward for the release of War Thunder Mobile.
General info
Survivability and armour
Describe armour protection. Note the most well protected and key weak areas. Appreciate the layout of modules as well as the number and location of crew members. Is the level of armour protection sufficient, is the placement of modules helpful for survival in combat? If necessary use a visual template to indicate the most secure and weak zones of the armour.
Armour type:
| Armour | Front (Slope angle) | Sides | Rear | Roof |
|---|---|---|---|---|
| Hull | ___ mm | ___ mm Top ___ mm Bottom |
___ mm | ___ - ___ mm |
| Turret | ___ - ___ mm Turret front ___ mm Gun mantlet |
___ - ___ mm | ___ - ___ mm | ___ - ___ mm |
| Cupola | ___ mm | ___ mm | ___ mm | ___ mm |
Notes:
Mobility
Write about the mobility of the ground vehicle. Estimate the specific power and manoeuvrability, as well as the maximum speed forwards and backwards.
| Game Mode | Max Speed (km/h) | Weight (tons) | Engine power (horsepower) | Power-to-weight ratio (hp/ton) | |||
|---|---|---|---|---|---|---|---|
| Forward | Reverse | Stock | Upgraded | Stock | Upgraded | ||
| Arcade | 43 | 6 | 30.6 | 620 | 763 | 20.26 | 24.93 |
| Realistic | 38 | 5 | 354 | 400 | 11.57 | 13.07 | |
Modifications and economy
| Mobility | Protection | Firepower | ||||||||||||||||||||
|---|---|---|---|---|---|---|---|---|---|---|---|---|---|---|---|---|---|---|---|---|---|---|
|
|
|
Armaments
Main armament
| 75 mm M3 | Turret rotation speed (°/s) | Reloading rate (seconds) | |||||||||||
|---|---|---|---|---|---|---|---|---|---|---|---|---|---|
| Mode | Capacity | Vertical | Horizontal | Stabilizer | Stock | Upgraded | Full | Expert | Aced | Stock | Full | Expert | Aced |
| Arcade | 97 | -10°/+25° | ±180° | Vertical | 22.8 | 31.6 | 38.4 | 42.5 | 45.2 | 6.50 | 5.75 | 5.30 | 5.00 |
| Realistic | 14.3 | 16.8 | 20.4 | 22.6 | 24.0 | ||||||||
Ammunition
| Penetration statistics | |||||||
|---|---|---|---|---|---|---|---|
| Ammunition | Type of warhead |
Penetration @ 0° Angle of Attack (mm) | |||||
| 10 m | 100 m | 500 m | 1,000 m | 1,500 m | 2,000 m | ||
| M72 shot | AP | 91 | 88 | 78 | 67 | 57 | 49 |
| M48 shell | HE | 10 | 10 | 10 | 10 | 10 | 10 |
| M61 shot | APCBC | 104 | 102 | 93 | 84 | 75 | 68 |
| Shell details | ||||||||||||
|---|---|---|---|---|---|---|---|---|---|---|---|---|
| Ammunition | Type of warhead |
Velocity (m/s) |
Projectile mass (kg) |
Fuse delay (m) |
Fuse sensitivity (mm) |
Explosive mass (TNT equivalent) (g) |
Ricochet | |||||
| 0% | 50% | 100% | ||||||||||
| M72 shot | AP | 619 | 6.3 | - | - | - | 47° | 60° | 65° | |||
| M48 shell | HE | 463 | 6.3 | 0.2 | 0.1 | 666 | 79° | 80° | 81° | |||
| M61 shot | APCBC | 618 | 6.79 | 1.2 | 14 | 63.7 | 48° | 63° | 71° | |||
| Smoke shell characteristics | ||||||
|---|---|---|---|---|---|---|
| Ammunition | Velocity (m/s) |
Projectile mass (kg) |
Screen radius (m) |
Screen deploy time (s) |
Screen hold time (s) |
Explosive mass (TNT equivalent) (g) |
| M89 | 259 | 3 | 9 | 5 | 20 | 50 |
Ammo racks
| Full ammo |
1st rack empty |
2nd rack empty |
3rd rack empty |
4th rack empty |
5th rack empty |
6th rack empty |
Visual discrepancy |
|---|---|---|---|---|---|---|---|
| 97 | __ (+__) | __ (+__) | __ (+__) | __ (+__) | __ (+__) | __ (+__) | __ |
Machine guns
| 12.7 mm M2HB | ||||
|---|---|---|---|---|
| Mount | Capacity (Belt) | Fire rate | Vertical | Horizontal |
| Pintle | 600 (200) | 575 | -10°/+25° | ±60° |
| 7.62 mm M1919A4 | ||||
|---|---|---|---|---|
| Mount | Capacity (Belt) | Fire rate | Vertical | Horizontal |
| Coaxial | 3,000 (250) | 500 | - | - |
Usage in battles
The M4 Sherman is an effective medium-range combat tank. Equipped with a fast-firing 75 mm gun and with good handling characteristics, the M4 can be an extremely useful asset in most battles.
In battle the M4 performs well as an all-rounder; the thick turret front and 10 degrees of gun depression make the tank ideal for taking hull-down positions which protect the thinner hull armour from being penetrated by enemy fire. The sloped front upper glacis, when angled, also provides good protection against enemy fire. An unusual - and useful - difference is that the upper glacis is sloped at 56 degrees rather than the standard 45 degrees, making it more of a threat and more powerful due to improving the chances of a round ricochet. The only downfall may be the 2 crew member position in the front that protrudes out to form a flat surface, but both are covered with an additional 20 mm plate. The reasonable mobility of the Sherman makes flanking a viable tactic. The main weakness of the M4 is the side armour - not only is it vertical and thin, but behind it most of the ammunition is stowed. The tall silhouette of the tank also makes finding suitable cover difficult. Overall, the M4 Sherman can be considered as an armoured jack-of-all-trades - it will serve a tanker well, however it will not excel in any particular role.
In battle, try to use terrain as cover. Hull-down positions are especially strong in the M4 Sherman, as it has a good 10 degrees of gun depression. The gun mantlet and turret are reasonably strong, but avoiding shots is still the best strategy. In this respect, a hull-down position hides the vulnerable hull. If this is not available, then angling the hull armour to present a greater slope is often a good idea, as this can bounce some low-powered cannon at any range and at longer ranges, render the hull impenetrable.
Another way to play the M4 Sherman is to tap into its traditional cavalry role, its mobility. The M4 Sherman is a great flanker as it is fast enough to get the jump on the enemy's side. Defeat the enemy at their weak front lines or go around the entire enemy force. Once in position at their sides or rear, ambush them. Ideally, the enemy should be too busy focusing on allies attacking in the front to notice the M4 instantly. Take out the weaker light or medium tanks, the 75 mm gun is not very ideal against heavy tanks like the KV-1 so take out its friends to allow allies more room to outmanoeuvre the KV tank. An organized attack will increase the M4 chances on the battlefield and success.
The presence of a pivot-mounted .50 calibre machine gun gives the Sherman some flexibility. It can engage softer targets such as some tank destroyers and many SPAAGs at short ranges when loading a HE shell would be inconvenient. While not ideal, they provide the Sherman tank with some measure of protection against aircraft- sometimes enough to dissuade a pilot from making another pass. It can be an effective rang-finder for targets at longer ranges where the M1919 in the turret would be less effective. While it pales in comparison to the destructive effect of tank guns, it provides the Sherman with some flexibility over other comparable vehicles, who are restricted to their rifle-calibre coaxial machine guns.
There will be concerns about certain vehicles:
- M4A2 / A4 - These Sherman tanks are widely used by over 3 nations that spread across both the Allied and the Axis side, so no matter which nation you play they can be quite tough to destroy in the hands of a skilled tanker. Given the rather weak penetration of your short 75 mm gun, their hull can be almost impossible to penetrate when angled, hull down or 300 m away. For a M4A4, there are 2 apparent bulges on the upper front plate, a penetration through there can guarantee a knock-out most of the times. But in case the opponent covers them up or when it's a M4A2, aim for the middle parts of the gun mantlet or the turret armour unprotected by the mantlet, you can at least make them defenseless. Note that their guns are equally weak against you, so wiggle around to disrupt their aim while you reload, you have a good chance of bouncing some shells.
- Churchill (Family) - The Churchills, with their complex hulls and sturdy turrets, can be quite hard to penetrate at range. Again, manoeuvre as close to them as possible, the idea distance being no more than 200 m. If they are angling their hull but facing their turret at you, only go for the turret. For the Mk I Churchills, aim at the near-vertical part of their rounded cheeks to ensure successful penetrations. For the Mk III and the German Churchill, also aim for their flat turret which is at most 89 mm. The shell should go in easily and knock out most, if not all of the crew. Only when you are facing their hull without any angles should you shoot the hull, otherwise shoot the turret only, as their big tracks can easily get in front of the frontal hull. The side hull have multiple layers of armour, some of which are weirdly angled and can absorb plenty of shells.
- KV-1 (Family) - A vehicle that the M4 Sherman will have trouble against is the KV-1. While the L-11 is underpowered, the ZiS-5 is potent enough to punch through the Sherman's front, and the Sherman is unable to penetrate the KV-1's thick frontal armour. If this heavy tank is encountered, try to shoot it in its sides and rear, where its armour is thinner and unsloped, though it will still have to be at a close range to penetrate the armour. In addition, shots to the sides will most likely hit fuel tanks or ammunition storage, causing a fire or ammunition detonation and at best, time to reassess the situation.
- Pz.IV (Family) - The historical nemesis of any Sherman, the Panzer IV is one of the Shermans biggest threats at this rank. The long barrel 75 mm gun will easily penetrate the Sherman from the front. The F2 variant is admittedly easy to deal with. A single APCBC to its hull or turret should end it pretty quickly, even at long range. The other variants are slightly harder to deal with. They have thicker hull armour, at 80 mm, which will be much harder to penetrate with the APCBC over 500 m. Luckily the turret armour remains the same at 50 mm. Either aim here with APCBC or sacrifice damage potential and use the AP round to penetrate the hull.
- StuG III F/G - Another historical nemesis of the Sherman, and another big threat. The StuG III packs the same punch as the Panzer IV line with its long barrel 75 mm gun, whilst losing the turret, which turns out to be both an advantage and a disadvantage. Lacking a turret means that it will have to traverse the whole vehicle to target an enemy, but it also means that it has a lower profile. The StuG's armour profile is also more complex than the Panzer IV, with less flat areas. Certain areas are sloped and very bouncy. Luckily, there is a big weak spot. There are two flat plates on the front of the hull. The flat plate on the right is the drivers port. Shoot that and you are able to knock out the driver, gunner and loader in one go. This is a very efficient way to destroy this vehicle. With the F variant, you can use APCBC to instantly knock out this vehicle with a single shot. With the G variant, it is more reliable to use AP at ranges over 500 m to ensure penetration.
Pros and cons
Summarise and briefly evaluate the vehicle in terms of its characteristics and combat effectiveness. Mark its pros and cons in a bulleted list. Try not to use more than 6 points for each of the characteristics. Avoid using categorical definitions such as "bad", "good" and the like - use substitutions with softer forms such as "inadequate" and "effective".
Pros:
Cons:
History
Describe the history of the creation and combat usage of the vehicle in more detail than in the introduction. If the historical reference turns out to be too long, take it to a separate article, taking a link to the article about the vehicle and adding a block "/History" (example: https://wiki.warthunder.com/(Vehicle-name)/History) and add a link to it here using the main template. Be sure to reference text and sources by using <ref></ref>, as well as adding them at the end of the article with <references />. This section may also include the vehicle's dev blog entry (if applicable) and the in-game encyclopedia description (under === In-game description ===, also if applicable).
Media
Excellent additions to the article would be video guides, screenshots from the game, and photos.
See also
Links to the articles on the War Thunder Wiki that you think will be useful for the reader, for example:
- reference to the series of the vehicles;
- links to approximate analogues of other nations and research trees.
External links
Paste links to sources and external resources, such as:
- topic on the official game forum;
- other literature.
| USA medium tanks | |
|---|---|
| M2 | M2 |
| M3 | M3 Lee · ▃Grant I |
| M4 | M4 · Calliope · M4A1 · M4A1 (76) W · M4A2 · M4A2 (76) W · M4A3 (105) · M4A3 (76) W · M4/T26 |
| M26 Pershing | T20 · T25 · M26 · M26 T99 · M26E1 |
| M46/47/48 Patton | M46 · M46 "Tiger" · M47 · M48A1 · T54E1 · T54E2 |
| M60 | M60 · M60A1 (AOS) · M60A1 RISE (P) · M60A2 · M60A3 TTS · M728 CEV · 120S |
| MBT-70 | MBT-70 · XM803 |
| M1 Abrams | XM1 (Chrysler) · XM1 (GM) |
| M1 Abrams · M1 KVT · IPM1 | |
| M1A1 · M1A1 HC · M1A1 Click-Bait | |
| M1A2 Abrams · M1A2 SEP · M1A2 SEP V2 | |
| Other | T95E1 |
| Australia | M1A1 AIM |
| Canada | M4A5 |
| Israel | ▃Magach 3 (ERA) · ▃Merkava Mk.1 · ▃Merkava Mk.2B · ▃Merkava Mk.3D |
| Turkey | M60 AMBT |
