Difference between revisions of "M4/T26"
m (Fixed incorrect name for the hull, it is an M4, not an M4A3) (Tag: Visual edit) |
|||
| (19 intermediate revisions by 9 users not shown) | |||
| Line 11: | Line 11: | ||
== Description == | == Description == | ||
<!-- ''In the description, the first part should be about the history of the creation and combat usage of the vehicle, as well as its key features. In the second part, tell the reader about the ground vehicle in the game. Insert a screenshot of the vehicle, so that if the novice player does not remember the vehicle by name, he will immediately understand what kind of vehicle the article is talking about.'' --> | <!-- ''In the description, the first part should be about the history of the creation and combat usage of the vehicle, as well as its key features. In the second part, tell the reader about the ground vehicle in the game. Insert a screenshot of the vehicle, so that if the novice player does not remember the vehicle by name, he will immediately understand what kind of vehicle the article is talking about.'' --> | ||
| − | The | + | When the US Army came to the realization that the new German tanks, Panthers and Tigers, were not only getting progressively tougher and deadlier, but were also becoming more numerous on the battlefield, they began to search for solutions to adequately deal with the threat. The [[M1 (76 mm)|76 mm M1 gun]] was available and implemented onto their standard [[M4|M4 Sherman]] tank, but the 76 mm firepower proved to be disappointing against the German tank armour. The search for a bigger gun was needed for the US tanks, and one solution was to simply add the turret of the developing [[M26|M26 Pershing]] (then still known as T26) onto the M4 Sherman hull. The single prototype test in 1944 proved that the conversion could be done, however the overall project was cancelled once it was determined that the research and development time to test out the viability of the design in combat would not make the design come any faster than the newer M26 tank. |
| + | |||
| + | Introduced in [[Update "La Royale"]], the M4/T26 is a strange amalgamation of components from two tanks. On one hand, the T26 turret introduces the mighty 90 mm gun into the Sherman chassis, allowing better chances against more heavily armoured foes. On the other hand, all this is being performed on top of a M4 hull and components. Aside from the additional weight of the T26 affecting the tank body, the Sherman armour is no longer competitive against its opponents. In addition, the relatively tall Sherman hull raises the T26 turret higher than from the original M26 Pershing, so players need to be aware of accidentally exposing the M4 hull that would allow enemies with any sort of high-velocity cannon to quickly pierce through the Sherman's armour and knock out the tank. That said, players would benefit from their familiarity with the Sherman handling to continue playing as though they were the 76 mm armed version, with the 90 mm gun making even heavy tanks easy picking for the player. | ||
== General info == | == General info == | ||
| Line 17: | Line 19: | ||
{{Specs-Tank-Armour}} | {{Specs-Tank-Armour}} | ||
<!-- ''Describe armour protection. Note the most well protected and key weak areas. Appreciate the layout of modules as well as the number and location of crew members. Is the level of armour protection sufficient, is the placement of modules helpful for survival in combat? If necessary use a visual template to indicate the most secure and weak zones of the armour.'' --> | <!-- ''Describe armour protection. Note the most well protected and key weak areas. Appreciate the layout of modules as well as the number and location of crew members. Is the level of armour protection sufficient, is the placement of modules helpful for survival in combat? If necessary use a visual template to indicate the most secure and weak zones of the armour.'' --> | ||
| − | + | ||
| + | Sharing a similar hull with the M4A3 at its BR, little protection is offered against most guns it will face, even with proper angling. Additionally the lack of interior walls in the crew compartment means a single APHE shell from the front or sides will almost certainly knock out most or all crew members. With the use of the much larger 90 mm shells, ammo storage takes up large amounts of space in the hull and turret, making ammo hits more likely, further decreasing survivability. The T26 turret itself is better armoured than the 75 mm and 76 mm Shermans, with the mantlet offering the best chance at protection, however this can still relatively easily be penetrated by most large calibre AP shells at its BR, and when combined with the elevated profile of the tall Sherman hull, little protection is offered. | ||
| + | |||
| + | On the other hand, as with most Shermans, the transmission will provide some defence against AP shots to the transmission housing. The much larger 90 mm cannon breech can soak up damage from certain angles, especially shots to the mantlet, preventing crew knockouts and ammo detonations to provide a chance at getting to cover and repairing. From the rear, the large engine will absorb a lot of shell fragments which would otherwise enter the crew compartment, while the radio station can provide some protection to the driver and machine gunner from shots to the rear of the turret. | ||
'''Armour type:''' <!-- The types of armour present on the vehicle and their general locations --> | '''Armour type:''' <!-- The types of armour present on the vehicle and their general locations --> | ||
<!-- Example: * Rolled homogeneous armour (Front, Side, Rear, Hull roof) | <!-- Example: * Rolled homogeneous armour (Front, Side, Rear, Hull roof) | ||
* Cast homogeneous armour (Turret, Transmission area) --> | * Cast homogeneous armour (Turret, Transmission area) --> | ||
| + | |||
| + | * Rolled homogeneous armour (Hull, turret roof) | ||
| + | * Cast homogeneous armour (Turret, mantlet, transmission housing, MG port) | ||
{| class="wikitable" | {| class="wikitable" | ||
| Line 27: | Line 35: | ||
! Armour !! Front (Slope angle) !! Sides !! Rear !! Roof | ! Armour !! Front (Slope angle) !! Sides !! Rear !! Roof | ||
|- | |- | ||
| − | | Hull || | + | | Hull || 63.5 mm (47°) ''Upper Glacis'' <br> 63.5-107.9mm (2-57°) ''Transmission Housing'' <br> 25.4mm ''MG Port'' || 38.1 mm (0°) || 38.1 mm (5°) ''Top'' <br> 38.1 mm (11-89°) ''Bottom'' || 19.5 mm (0-21°) |
|- | |- | ||
| − | | Turret || | + | | Turret || 101.6 mm (1-55°) ''Turret front'' <br> 130-255 mm (1-79°) ''Gun mantlet'' || 76.2 mm (2-54°) || 76.2 mm (0-79°) || 25.4 mm |
|- | |- | ||
| − | | Cupola || | + | | Cupola || 76.2 mm (64°) || 76.2 mm (54°) || 76.2 mm (58°) || 25.4 mm |
|- | |- | ||
|} | |} | ||
| Line 37: | Line 45: | ||
'''Notes:''' <!-- Any additional notes which the user needs to be aware of --> | '''Notes:''' <!-- Any additional notes which the user needs to be aware of --> | ||
<!-- Example: * Suspension wheels are 20 mm thick, tracks are 30 mm thick, and torsion bars are 60 mm thick. --> | <!-- Example: * Suspension wheels are 20 mm thick, tracks are 30 mm thick, and torsion bars are 60 mm thick. --> | ||
| + | |||
| + | * Suspension members and wheels are 15mm of structural steel | ||
| + | * Track covers are 4mm thick, though shots to the right hand side front overhang track cover from 88mm+ HE shells at certain impact angles can potentially knock out crew members from overpressure. | ||
=== Mobility === | === Mobility === | ||
{{Specs-Tank-Mobility}} | {{Specs-Tank-Mobility}} | ||
<!-- ''Write about the mobility of the ground vehicle. Estimate the specific power and manoeuvrability, as well as the maximum speed forwards and backwards.'' --> | <!-- ''Write about the mobility of the ground vehicle. Estimate the specific power and manoeuvrability, as well as the maximum speed forwards and backwards.'' --> | ||
| − | |||
| − | {{tankMobility}} | + | The stated max speed is achievable over level ground albeit with reasonable acceleration, while the reverse gear is not particularly fast but not extremely slow either. Braking is sharp and stops the vehicle in a short enough distance from top speed to allow for fast reactions to enemies. The use of differential braking means the tank will crawl forward when turning in place, and the turn rate is not especially fast with significant speed losses from steering. |
| + | |||
| + | {{tankMobility|abMinHp=713|rbMinHp=407}} | ||
=== Modifications and economy === | === Modifications and economy === | ||
| Line 54: | Line 66: | ||
<!-- ''Give the reader information about the characteristics of the main gun. Assess its effectiveness in a battle based on the reloading speed, ballistics and the power of shells. Do not forget about the flexibility of the fire, that is how quickly the cannon can be aimed at the target, open fire on it and aim at another enemy. Add a link to the main article on the gun: <code><nowiki>{{main|Name of the weapon}}</nowiki></code>. Describe in general terms the ammunition available for the main gun. Give advice on how to use them and how to fill the ammunition storage.'' --> | <!-- ''Give the reader information about the characteristics of the main gun. Assess its effectiveness in a battle based on the reloading speed, ballistics and the power of shells. Do not forget about the flexibility of the fire, that is how quickly the cannon can be aimed at the target, open fire on it and aim at another enemy. Add a link to the main article on the gun: <code><nowiki>{{main|Name of the weapon}}</nowiki></code>. Describe in general terms the ammunition available for the main gun. Give advice on how to use them and how to fill the ammunition storage.'' --> | ||
{{main|M3 (90 mm)}} | {{main|M3 (90 mm)}} | ||
| − | |||
| − | |||
{| class="wikitable" style="text-align:center" width="100%" | {| class="wikitable" style="text-align:center" width="100%" | ||
| Line 66: | Line 76: | ||
|- | |- | ||
! ''Arcade'' | ! ''Arcade'' | ||
| − | | rowspan="2" | 76 || rowspan="2" | -10°/+20° || rowspan="2" | ±180° || rowspan="2" | - || | + | | rowspan="2" | 76 || rowspan="2" | -10°/+20° || rowspan="2" | ±180° || rowspan="2" | - || 20.0 || 27.7 || 33.6 || 37.2 || 39.5 || rowspan="2" | 9.75 || rowspan="2" | 8.62 || rowspan="2" | 7.95 || rowspan="2" | 7.50 |
|- | |- | ||
! ''Realistic'' | ! ''Realistic'' | ||
| − | | | + | | 12.5 || 14.7 || 17.8 || 19.7 || 21.0 |
|- | |- | ||
|} | |} | ||
| Line 77: | Line 87: | ||
==== [[Ammo racks]] ==== | ==== [[Ammo racks]] ==== | ||
| − | + | [[File:Ammoracks_M4-T26.png|right|thumb|x250px|[[Ammo racks]] of the {{PAGENAME}}]] | |
| − | <!-- '''Last updated:''' --> | + | <!-- '''Last updated: 2.27.1.54''' --> |
{| class="wikitable" style="text-align:center" | {| class="wikitable" style="text-align:center" | ||
|- | |- | ||
| Line 87: | Line 97: | ||
! 4th<br>rack empty | ! 4th<br>rack empty | ||
! 5th<br>rack empty | ! 5th<br>rack empty | ||
| − | |||
! Visual<br>discrepancy | ! Visual<br>discrepancy | ||
|- | |- | ||
| − | | '''76''' || | + | | '''76''' || 54 ''(+22)'' || 42 ''(+34)'' || 33 ''(+43)'' || 11 ''(+65)'' || 1 ''(+75)'' || No |
|- | |- | ||
|} | |} | ||
| + | '''Notes''': | ||
| + | |||
| + | * Shells are modeled individually and disappear after having been shot or loaded. | ||
| + | * Rack 5 is a first stage ammo rack. It totals 10 shells and gets filled first when loading up the tank. | ||
| + | * This rack is also emptied early: the rack depletion order at full capacity is: 5 - 1 - 2 - etc. until 4. | ||
| + | * Simply not firing when the gun is loaded will move ammo from racks 1-4 into rack 5. Firing will interrupt the restocking of the ready rack. | ||
=== Machine guns === | === Machine guns === | ||
| Line 99: | Line 114: | ||
<!-- ''Offensive and anti-aircraft machine guns not only allow you to fight some aircraft but also are effective against lightly armoured vehicles. Evaluate machine guns and give recommendations on its use.'' --> | <!-- ''Offensive and anti-aircraft machine guns not only allow you to fight some aircraft but also are effective against lightly armoured vehicles. Evaluate machine guns and give recommendations on its use.'' --> | ||
{{main|M2HB (12.7 mm)|M1919A4 (7.62 mm)}} | {{main|M2HB (12.7 mm)|M1919A4 (7.62 mm)}} | ||
| − | |||
| − | |||
{| class="wikitable" style="text-align:center" width="50%" | {| class="wikitable" style="text-align:center" width="50%" | ||
| Line 108: | Line 121: | ||
! Mount !! Capacity (Belt) !! Fire rate !! Vertical !! Horizontal | ! Mount !! Capacity (Belt) !! Fire rate !! Vertical !! Horizontal | ||
|- | |- | ||
| − | | || | + | | Pintle || 600 (200) || 575 || -10°/+30° || ±60° |
|- | |- | ||
|} | |} | ||
| Line 117: | Line 130: | ||
! Mount !! Capacity (Belt) !! Fire rate !! Vertical !! Horizontal | ! Mount !! Capacity (Belt) !! Fire rate !! Vertical !! Horizontal | ||
|- | |- | ||
| − | | || | + | | Coaxial || 3,000 (250) || 500 || - || - |
|- | |- | ||
|} | |} | ||
| Line 123: | Line 136: | ||
== Usage in battles == | == Usage in battles == | ||
<!-- ''Describe the tactics of playing in the vehicle, the features of using vehicles in the team and advice on tactics. Refrain from creating a "guide" - do not impose a single point of view but instead give the reader food for thought. Describe the most dangerous enemies and give recommendations on fighting them. If necessary, note the specifics of the game in different modes (AB, RB, SB).'' --> | <!-- ''Describe the tactics of playing in the vehicle, the features of using vehicles in the team and advice on tactics. Refrain from creating a "guide" - do not impose a single point of view but instead give the reader food for thought. Describe the most dangerous enemies and give recommendations on fighting them. If necessary, note the specifics of the game in different modes (AB, RB, SB).'' --> | ||
| − | + | The M4/T26 has a powerful 90mm gun, but very weak frontal armor. Enemies will have no trouble penetrating the armor, this tank should be a support tank and not a pure attack tank. This tank must never fight alone, it must always have a teammate if possible with heavier armor to be used as cover. | |
| + | |||
| + | The M4/T26 has a very visible profile, so it should be played carefully, if possible the turret shell should be visible as it has higher armor than the frontal armor. | ||
| + | |||
| + | This tank has no trouble breaking through the Tiger H1 and Tiger E, for other heavy tanks, play a little more strategically to break through their weak points but with a 90mm gun, they can fight off most enemies in its BR range. | ||
=== Pros and cons === | === Pros and cons === | ||
| − | <!-- ''Summarise and briefly evaluate the vehicle in terms of its characteristics and combat effectiveness. Mark its pros and cons in a bulleted list. Try not to use more than 6 points for each of the characteristics. Avoid using categorical definitions such as "bad", "good" and the like - use substitutions with softer forms such as "inadequate" and "effective".'' --> | + | <!-- ''Summarise and briefly evaluate the vehicle in terms of its characteristics and combat effectiveness. Mark its pros and cons in a bulleted list. Try not to use more than 6 points for each of the characteristics. Avoid using categorical definitions such as "bad", "good" and the like - use substitutions with softer forms such as "inadequate" and "effective".'' -->'''Pros:''' |
| − | '' | ||
| − | + | * Excellent gun depression of -10° plus the angled frontal turret allows it to utilise hills very well | |
| − | * | + | * Top-mounted .50 cal machine gun is useful against aircraft and open-topped or lightly-armoured vehicles |
| + | * The M82 shot has a high chance of knocking out most tanks in one shot | ||
| + | * Very fast turret traverse | ||
| + | * Turret armour can resist some shots, excels at a hull down position | ||
'''Cons:''' | '''Cons:''' | ||
| − | * | + | |
| + | * Hull armour is very weak against most cannons at its battle rating | ||
| + | * Its tall profile makes it a big target | ||
| + | * Slow top speed for a medium tank at its BR | ||
| + | * Lacks a vertical gun stabilizer compared to other Shermans, making it harder to take out targets on the move | ||
| + | * 90 mm gun has a long reload time | ||
== History == | == History == | ||
| Line 141: | Line 165: | ||
== Media == | == Media == | ||
<!-- ''Excellent additions to the article would be video guides, screenshots from the game, and photos.'' --> | <!-- ''Excellent additions to the article would be video guides, screenshots from the game, and photos.'' --> | ||
| − | '' | + | |
| + | ;Skins | ||
| + | |||
| + | * [https://live.warthunder.com/feed/camouflages/?vehicle=us_m4_t26 Skins and camouflages for the {{PAGENAME}} from live.warthunder.com.] | ||
| + | |||
| + | ;Videos | ||
| + | {{Youtube-gallery|NwtZninBT0I|'''The Shooting Range #368''' - ''Pages of History'' section at 03:21 discusses the {{PAGENAME}}.|92uvdnsp7Bk|'''The Shooting Range #365''' - ''Metal Beasts'' section at 00:24 discusses the {{PAGENAME}}.}} | ||
== See also == | == See also == | ||
| Line 148: | Line 178: | ||
* ''links to approximate analogues of other nations and research trees.'' --> | * ''links to approximate analogues of other nations and research trees.'' --> | ||
''Links to the articles on the War Thunder Wiki that you think will be useful for the reader, for example:'' | ''Links to the articles on the War Thunder Wiki that you think will be useful for the reader, for example:'' | ||
| + | |||
* ''reference to the series of the vehicles;'' | * ''reference to the series of the vehicles;'' | ||
* ''links to approximate analogues of other nations and research trees.'' | * ''links to approximate analogues of other nations and research trees.'' | ||
| Line 156: | Line 187: | ||
* ''other literature.'' --> | * ''other literature.'' --> | ||
| − | * [[wt:en/news/8308-development-m4-t26-a-sherman-and-a-half-en|[Devblog] M4/T26: a | + | * [[wt:en/news/8308-development-m4-t26-a-sherman-and-a-half-en|[Devblog] M4/T26: a "Sherman" and a half]] |
{{USA medium tanks}} | {{USA medium tanks}} | ||
Latest revision as of 05:40, 27 February 2024
| This page is about the American medium tank M4/T26. For other versions, see M4 Sherman (Family). |


Contents
Description
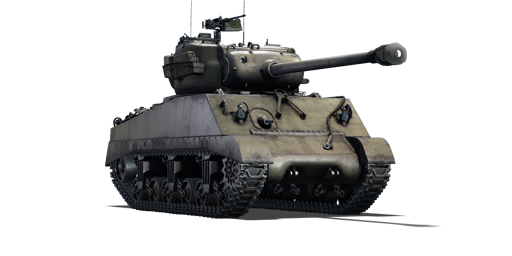
When the US Army came to the realization that the new German tanks, Panthers and Tigers, were not only getting progressively tougher and deadlier, but were also becoming more numerous on the battlefield, they began to search for solutions to adequately deal with the threat. The 76 mm M1 gun was available and implemented onto their standard M4 Sherman tank, but the 76 mm firepower proved to be disappointing against the German tank armour. The search for a bigger gun was needed for the US tanks, and one solution was to simply add the turret of the developing M26 Pershing (then still known as T26) onto the M4 Sherman hull. The single prototype test in 1944 proved that the conversion could be done, however the overall project was cancelled once it was determined that the research and development time to test out the viability of the design in combat would not make the design come any faster than the newer M26 tank.
Introduced in Update "La Royale", the M4/T26 is a strange amalgamation of components from two tanks. On one hand, the T26 turret introduces the mighty 90 mm gun into the Sherman chassis, allowing better chances against more heavily armoured foes. On the other hand, all this is being performed on top of a M4 hull and components. Aside from the additional weight of the T26 affecting the tank body, the Sherman armour is no longer competitive against its opponents. In addition, the relatively tall Sherman hull raises the T26 turret higher than from the original M26 Pershing, so players need to be aware of accidentally exposing the M4 hull that would allow enemies with any sort of high-velocity cannon to quickly pierce through the Sherman's armour and knock out the tank. That said, players would benefit from their familiarity with the Sherman handling to continue playing as though they were the 76 mm armed version, with the 90 mm gun making even heavy tanks easy picking for the player.
General info
Survivability and armour
Sharing a similar hull with the M4A3 at its BR, little protection is offered against most guns it will face, even with proper angling. Additionally the lack of interior walls in the crew compartment means a single APHE shell from the front or sides will almost certainly knock out most or all crew members. With the use of the much larger 90 mm shells, ammo storage takes up large amounts of space in the hull and turret, making ammo hits more likely, further decreasing survivability. The T26 turret itself is better armoured than the 75 mm and 76 mm Shermans, with the mantlet offering the best chance at protection, however this can still relatively easily be penetrated by most large calibre AP shells at its BR, and when combined with the elevated profile of the tall Sherman hull, little protection is offered.
On the other hand, as with most Shermans, the transmission will provide some defence against AP shots to the transmission housing. The much larger 90 mm cannon breech can soak up damage from certain angles, especially shots to the mantlet, preventing crew knockouts and ammo detonations to provide a chance at getting to cover and repairing. From the rear, the large engine will absorb a lot of shell fragments which would otherwise enter the crew compartment, while the radio station can provide some protection to the driver and machine gunner from shots to the rear of the turret.
Armour type:
- Rolled homogeneous armour (Hull, turret roof)
- Cast homogeneous armour (Turret, mantlet, transmission housing, MG port)
| Armour | Front (Slope angle) | Sides | Rear | Roof |
|---|---|---|---|---|
| Hull | 63.5 mm (47°) Upper Glacis 63.5-107.9mm (2-57°) Transmission Housing 25.4mm MG Port |
38.1 mm (0°) | 38.1 mm (5°) Top 38.1 mm (11-89°) Bottom |
19.5 mm (0-21°) |
| Turret | 101.6 mm (1-55°) Turret front 130-255 mm (1-79°) Gun mantlet |
76.2 mm (2-54°) | 76.2 mm (0-79°) | 25.4 mm |
| Cupola | 76.2 mm (64°) | 76.2 mm (54°) | 76.2 mm (58°) | 25.4 mm |
Notes:
- Suspension members and wheels are 15mm of structural steel
- Track covers are 4mm thick, though shots to the right hand side front overhang track cover from 88mm+ HE shells at certain impact angles can potentially knock out crew members from overpressure.
Mobility
The stated max speed is achievable over level ground albeit with reasonable acceleration, while the reverse gear is not particularly fast but not extremely slow either. Braking is sharp and stops the vehicle in a short enough distance from top speed to allow for fast reactions to enemies. The use of differential braking means the tank will crawl forward when turning in place, and the turn rate is not especially fast with significant speed losses from steering.
| Game Mode | Max Speed (km/h) | Weight (tons) | Engine power (horsepower) | Power-to-weight ratio (hp/ton) | |||
|---|---|---|---|---|---|---|---|
| Forward | Reverse | Stock | Upgraded | Stock | Upgraded | ||
| Arcade | 47 | 7 | 33 | 713 | 878 | 21.61 | 26.61 |
| Realistic | 43 | 6 | 407 | 460 | 12.33 | 13.94 | |
Modifications and economy
| Mobility | Protection | Firepower | ||||||||||||||||||||
|---|---|---|---|---|---|---|---|---|---|---|---|---|---|---|---|---|---|---|---|---|---|---|
|
|
|
Armaments
Main armament
| 90 mm M3 | Turret rotation speed (°/s) | Reloading rate (seconds) | |||||||||||
|---|---|---|---|---|---|---|---|---|---|---|---|---|---|
| Mode | Capacity | Vertical | Horizontal | Stabilizer | Stock | Upgraded | Full | Expert | Aced | Stock | Full | Expert | Aced |
| Arcade | 76 | -10°/+20° | ±180° | - | 20.0 | 27.7 | 33.6 | 37.2 | 39.5 | 9.75 | 8.62 | 7.95 | 7.50 |
| Realistic | 12.5 | 14.7 | 17.8 | 19.7 | 21.0 | ||||||||
Ammunition
| Penetration statistics | |||||||
|---|---|---|---|---|---|---|---|
| Ammunition | Type of warhead |
Penetration @ 0° Angle of Attack (mm) | |||||
| 10 m | 100 m | 500 m | 1,000 m | 1,500 m | 2,000 m | ||
| T33 shot | APBC | 175 | 172 | 160 | 146 | 134 | 122 |
| M71 shell | HE | 20 | 20 | 18 | 17 | 16 | 16 |
| M82 shot | APCBC | 185 | 182 | 169 | 155 | 142 | 130 |
| Shell details | ||||||||||||
|---|---|---|---|---|---|---|---|---|---|---|---|---|
| Ammunition | Type of warhead |
Velocity (m/s) |
Projectile mass (kg) |
Fuse delay (m) |
Fuse sensitivity (mm) |
Explosive mass (TNT equivalent) (g) |
Ricochet | |||||
| 0% | 50% | 100% | ||||||||||
| T33 shot | APBC | 853 | 10.91 | - | - | - | 47° | 60° | 65° | |||
| M71 shell | HE | 823 | 10.55 | 0.2 | 0.1 | 1,210 | 79° | 80° | 81° | |||
| M82 shot | APCBC | 853 | 10.91 | 1.2 | 14 | 137.2 | 48° | 63° | 71° | |||
| Smoke shell characteristics | ||||||
|---|---|---|---|---|---|---|
| Ammunition | Velocity (m/s) |
Projectile mass (kg) |
Screen radius (m) |
Screen deploy time (s) |
Screen hold time (s) |
Explosive mass (TNT equivalent) (g) |
| M313 | 821 | 10.7 | 9 | 5 | 20 | 50 |
Ammo racks

| Full ammo |
1st rack empty |
2nd rack empty |
3rd rack empty |
4th rack empty |
5th rack empty |
Visual discrepancy |
|---|---|---|---|---|---|---|
| 76 | 54 (+22) | 42 (+34) | 33 (+43) | 11 (+65) | 1 (+75) | No |
Notes:
- Shells are modeled individually and disappear after having been shot or loaded.
- Rack 5 is a first stage ammo rack. It totals 10 shells and gets filled first when loading up the tank.
- This rack is also emptied early: the rack depletion order at full capacity is: 5 - 1 - 2 - etc. until 4.
- Simply not firing when the gun is loaded will move ammo from racks 1-4 into rack 5. Firing will interrupt the restocking of the ready rack.
Machine guns
| 12.7 mm M2HB | ||||
|---|---|---|---|---|
| Mount | Capacity (Belt) | Fire rate | Vertical | Horizontal |
| Pintle | 600 (200) | 575 | -10°/+30° | ±60° |
| 7.62 mm M1919A4 | ||||
|---|---|---|---|---|
| Mount | Capacity (Belt) | Fire rate | Vertical | Horizontal |
| Coaxial | 3,000 (250) | 500 | - | - |
Usage in battles
The M4/T26 has a powerful 90mm gun, but very weak frontal armor. Enemies will have no trouble penetrating the armor, this tank should be a support tank and not a pure attack tank. This tank must never fight alone, it must always have a teammate if possible with heavier armor to be used as cover.
The M4/T26 has a very visible profile, so it should be played carefully, if possible the turret shell should be visible as it has higher armor than the frontal armor.
This tank has no trouble breaking through the Tiger H1 and Tiger E, for other heavy tanks, play a little more strategically to break through their weak points but with a 90mm gun, they can fight off most enemies in its BR range.
Pros and cons
Pros:
- Excellent gun depression of -10° plus the angled frontal turret allows it to utilise hills very well
- Top-mounted .50 cal machine gun is useful against aircraft and open-topped or lightly-armoured vehicles
- The M82 shot has a high chance of knocking out most tanks in one shot
- Very fast turret traverse
- Turret armour can resist some shots, excels at a hull down position
Cons:
- Hull armour is very weak against most cannons at its battle rating
- Its tall profile makes it a big target
- Slow top speed for a medium tank at its BR
- Lacks a vertical gun stabilizer compared to other Shermans, making it harder to take out targets on the move
- 90 mm gun has a long reload time
History
Describe the history of the creation and combat usage of the vehicle in more detail than in the introduction. If the historical reference turns out to be too long, take it to a separate article, taking a link to the article about the vehicle and adding a block "/History" (example: https://wiki.warthunder.com/(Vehicle-name)/History) and add a link to it here using the main template. Be sure to reference text and sources by using <ref></ref>, as well as adding them at the end of the article with <references />. This section may also include the vehicle's dev blog entry (if applicable) and the in-game encyclopedia description (under === In-game description ===, also if applicable).
Media
- Skins
- Videos
See also
Links to the articles on the War Thunder Wiki that you think will be useful for the reader, for example:
- reference to the series of the vehicles;
- links to approximate analogues of other nations and research trees.
External links
| USA medium tanks | |
|---|---|
| M2 | M2 |
| M3 | M3 Lee · ▃Grant I |
| M4 | M4 · Calliope · M4A1 · M4A1 (76) W · M4A2 · M4A2 (76) W · M4A3 (105) · M4A3 (76) W · M4/T26 |
| M26 Pershing | T20 · T25 · M26 · M26 T99 · M26E1 |
| M46/47/48 Patton | M46 · M46 "Tiger" · M47 · M48A1 · T54E1 · T54E2 |
| M60 | M60 · M60A1 (AOS) · M60A1 RISE (P) · M60A2 · M60A3 TTS · M728 CEV · 120S |
| MBT-70 | MBT-70 · XM803 |
| M1 Abrams | XM1 (Chrysler) · XM1 (GM) |
| M1 Abrams · M1 KVT · IPM1 | |
| M1A1 · M1A1 HC · M1A1 Click-Bait | |
| M1A2 Abrams · M1A2 SEP · M1A2 SEP V2 | |
| Other | T95E1 |
| Australia | M1A1 AIM |
| Canada | M4A5 |
| Israel | ▃Magach 3 (ERA) · ▃Merkava Mk.1 · ▃Merkava Mk.2B · ▃Merkava Mk.3D |
| Turkey | M60 AMBT |
