Difference between revisions of "BMP-2M"
m (Reverted edits by U128462229 (talk) to last revision by HugeDiamond89@live) |
(→Pros and cons) (Tag: Visual edit) |
||
| (55 intermediate revisions by 19 users not shown) | |||
| Line 1: | Line 1: | ||
{{About | {{About | ||
| about = squadron Soviet light tank '''{{PAGENAME}}''' | | about = squadron Soviet light tank '''{{PAGENAME}}''' | ||
| − | + | | usage = other uses | |
| − | + | | link = BMP (Disambiguation) | |
| − | |||
| − | | usage | ||
| − | | link | ||
}} | }} | ||
{{Specs-Card | {{Specs-Card | ||
|code=ussr_bmp_2m | |code=ussr_bmp_2m | ||
| − | |images={{Specs-Card-Image|GarageImage_{{PAGENAME}} | + | |images={{Specs-Card-Image|GarageImage_{{PAGENAME}}.jpg}} |
}} | }} | ||
== Description == | == Description == | ||
<!-- ''In the description, the first part should be about the history of the creation and combat usage of the vehicle, as well as its key features. In the second part, tell the reader about the ground vehicle in the game. Insert a screenshot of the vehicle, so that if the novice player does not remember the vehicle by name, he will immediately understand what kind of vehicle the article is talking about.'' --> | <!-- ''In the description, the first part should be about the history of the creation and combat usage of the vehicle, as well as its key features. In the second part, tell the reader about the ground vehicle in the game. Insert a screenshot of the vehicle, so that if the novice player does not remember the vehicle by name, he will immediately understand what kind of vehicle the article is talking about.'' --> | ||
| − | The '''{{Specs|name}}''' is a squadron rank {{Specs|rank}} Soviet light tank (infantry fighting vehicle) {{Battle-rating}}. It was introduced during [[Update "Starfighters"]] | + | The '''{{Specs|name}}''' is a squadron rank {{Specs|rank}} Soviet light tank (infantry fighting vehicle) {{Battle-rating}}. It was introduced during [[Update "Starfighters"]]. |
== General info == | == General info == | ||
| Line 20: | Line 17: | ||
{{Specs-Tank-Armour}} | {{Specs-Tank-Armour}} | ||
<!-- ''Describe armour protection. Note the most well protected and key weak areas. Appreciate the layout of modules as well as the number and location of crew members. Is the level of armour protection sufficient, is the placement of modules helpful for survival in combat? If necessary use a visual template to indicate the most secure and weak zones of the armour.'' --> | <!-- ''Describe armour protection. Note the most well protected and key weak areas. Appreciate the layout of modules as well as the number and location of crew members. Is the level of armour protection sufficient, is the placement of modules helpful for survival in combat? If necessary use a visual template to indicate the most secure and weak zones of the armour.'' --> | ||
| − | The vehicle's playstyle is relatively similar to the [[BMP-2]]s. The fast turret traverse speed, wide field of view, and thermals for the optics combined with a fast-firing 2A42 autocannon and four 9M133 ATGMs makes it an excellent close range combat IFV and good front line scout at open fields. Armour on this vehicle can only protect the crew from 7.62 mm fire at all angles and sometimes 12.7 mm or even 20 mm when being shot from the front. The BMP-2M | + | The vehicle's playstyle is relatively similar to the [[BMP-2]]'s. The fast turret traverse speed, wide field of view, and thermals for the optics combined with a fast-firing 2A42 autocannon and four 9M133 ATGMs makes it an excellent close range combat IFV and good front line scout at open fields. Armour on this vehicle can only protect the crew from 7.62 mm fire at all angles and sometimes 12.7 mm or even 20 mm when being shot from the front. The BMP-2M is prone to hull-break, but sometimes AP rounds such as APFSDS can penetrate the vehicle without significant damage due to its large empty space inside. The hull-break mechanics will mean that even a poorly placed shot may immediately destroy the vehicle. Overall, survivability is poor, and the BMP-2M should use its manoeuvrability to flank opponents and strike before the enemy can locate you and return fire. |
'''Armour type:''' | '''Armour type:''' | ||
| − | * High hardness rolled armour (hull and turret) | + | *High hardness rolled armour (hull and turret) |
| − | * Alloy ABT-101 (engine deck) | + | *Alloy ABT-101 (engine deck) |
{| class="wikitable" | {| class="wikitable" | ||
|- | |- | ||
| − | ! Armour !! Front (Slope angle) !! Sides !! Rear !! Roof | + | !Armour!!Front (Slope angle)!!Sides!!Rear!!Roof |
|- | |- | ||
| − | | Hull || 12 mm (81°) || 13 mm ''Top'' | + | |Hull||12 mm (81°)||13 mm ''Top'' |
| + | 15 mm ''Bottom'' | ||
| + | |16 mm ''Doors'' | ||
| + | 13 mm ''Door frame'' | ||
| + | |5 mm | ||
| + | 12 mm ''Engine deck'' | ||
|- | |- | ||
| − | | Turret || 20 mm ''Turret front'' | + | |Turret||20 mm ''Turret front'' |
| + | 25 mm ''Gun mantlet'' | ||
| + | |12 - 16 mm||10 mm||6 mm | ||
|- | |- | ||
|} | |} | ||
| Line 43: | Line 47: | ||
{{tankMobility|abMinHp=558|rbMinHp=318}} | {{tankMobility|abMinHp=558|rbMinHp=318}} | ||
| − | With 60 extra horsepower, the BMP-2M has excellent mobility compared to the BMP-2. The acceleration of the BMP-2M in off road conditions is excellent, and it is able to keep up with top tier MBTs like the [[T-80U]], [[M1A2 Abrams]] and [[Leopard 2A5]]. The reverse speed however is still | + | With 60 extra horsepower, the BMP-2M has excellent mobility compared to the BMP-2. The acceleration of the BMP-2M in off road conditions is excellent, and it is able to keep up with top tier MBTs like the [[T-80U]], [[M1A2 Abrams]] and [[Leopard 2A5]]. The reverse speed however is still 10 kilometers per hour and it still has no neutral steering. Its amphibious capabilities can be useful to cross deep water sections to reach places normally unreachable for other vehicles. |
=== Modifications and economy === | === Modifications and economy === | ||
{{Specs-Economy}} | {{Specs-Economy}} | ||
| − | |||
| − | |||
| − | |||
| − | |||
| − | |||
| − | |||
| − | |||
| − | |||
== Armaments == | == Armaments == | ||
{{Specs-Tank-Armaments}} | {{Specs-Tank-Armaments}} | ||
=== Main armament === | === Main armament === | ||
| − | {{Specs-Tank-Weapon| | + | {{Specs-Tank-Weapon|3}} |
<!-- ''Give the reader information about the characteristics of the main gun. Assess its effectiveness in a battle based on the reloading speed, ballistics and the power of shells. Do not forget about the flexibility of the fire, that is how quickly the cannon can be aimed at the target, open fire on it and aim at another enemy. Add a link to the main article on the gun: <code><nowiki>{{main|Name of the weapon}}</nowiki></code>. Describe in general terms the ammunition available for the main gun. Give advice on how to use them and how to fill the ammunition storage.'' --> | <!-- ''Give the reader information about the characteristics of the main gun. Assess its effectiveness in a battle based on the reloading speed, ballistics and the power of shells. Do not forget about the flexibility of the fire, that is how quickly the cannon can be aimed at the target, open fire on it and aim at another enemy. Add a link to the main article on the gun: <code><nowiki>{{main|Name of the weapon}}</nowiki></code>. Describe in general terms the ammunition available for the main gun. Give advice on how to use them and how to fill the ammunition storage.'' --> | ||
{{main|2A42 (30 mm)}} | {{main|2A42 (30 mm)}} | ||
| Line 65: | Line 61: | ||
As this tank has a similar playstyle to its 8.3 counterpart, the [[BMP-2]], the main armament of the Shipunov 2A42 30 mm autocannon is a very versatile weapon, considering its vertical guidance, traverse speed, and large selection of ammo belts. | As this tank has a similar playstyle to its 8.3 counterpart, the [[BMP-2]], the main armament of the Shipunov 2A42 30 mm autocannon is a very versatile weapon, considering its vertical guidance, traverse speed, and large selection of ammo belts. | ||
| − | It is not recommended to engage in long-term combat without ATGMs using only the autocannon with any tank heavier than a light tank or an Anti-Tank Missile Carrier unless using the APDS | + | It is not recommended to engage in long-term combat without ATGMs using only the autocannon with any tank heavier than a light tank or an Anti-Tank Missile Carrier unless using the APDS ammo selection. If not using APDS, for heavier tanks it is recommended to cripple it by shooting its tracks and the main armament. |
{| class="wikitable" style="text-align:center" width="100%" | {| class="wikitable" style="text-align:center" width="100%" | ||
| Line 76: | Line 72: | ||
|- | |- | ||
! ''Arcade'' | ! ''Arcade'' | ||
| − | | rowspan="2" | 500 ( | + | | rowspan="2" | 500 (340) || rowspan="2" | 550 || rowspan="2" | -4°/+74° || rowspan="2" | ±180° || rowspan="2" | Two-plane ||57.1|| 79.1 || 96.0 || __.__ || 112.0 || rowspan="2" |1.3|| rowspan="2" | 1.15 || rowspan="2" | 1.1 || rowspan="2" | 1.0 |
|- | |- | ||
! ''Realistic'' | ! ''Realistic'' | ||
| − | | 35.7 || 42.0 || 51.0 || | + | | 35.7 || 42.0 || 51.0 || __.__ || 60.0 |
|- | |- | ||
|} | |} | ||
| Line 89: | Line 85: | ||
* '''30 mm APT:''' {{Annotation|AP-T|Armour-piercing tracer}}{{-}}{{Annotation|AP-T|Armour-piercing tracer}}{{-}}{{Annotation|AP-T|Armour-piercing tracer}}{{-}}{{Annotation|HEF-T*|High-explosive fragmentation tracer (self-destroying)}} | * '''30 mm APT:''' {{Annotation|AP-T|Armour-piercing tracer}}{{-}}{{Annotation|AP-T|Armour-piercing tracer}}{{-}}{{Annotation|AP-T|Armour-piercing tracer}}{{-}}{{Annotation|HEF-T*|High-explosive fragmentation tracer (self-destroying)}} | ||
* '''30 mm APDS:''' {{Annotation|APDS|Armour-piercing discarding sabot}}{{-}}{{Annotation|APDS|Armour-piercing discarding sabot}}{{-}}{{Annotation|APDS|Armour-piercing discarding sabot}}{{-}}{{Annotation|APDS|Armour-piercing discarding sabot}}{{-}}{{Annotation|HEF-T*|High-explosive fragmentation tracer (self-destroying)}} | * '''30 mm APDS:''' {{Annotation|APDS|Armour-piercing discarding sabot}}{{-}}{{Annotation|APDS|Armour-piercing discarding sabot}}{{-}}{{Annotation|APDS|Armour-piercing discarding sabot}}{{-}}{{Annotation|APDS|Armour-piercing discarding sabot}}{{-}}{{Annotation|HEF-T*|High-explosive fragmentation tracer (self-destroying)}} | ||
| − | |||
| − | { | + | {| class="wikitable sortable" style="text-align:center" width="100%" |
| + | ! colspan="7" | Penetration statistics | ||
| + | |- | ||
| + | ! rowspan="2" data-sort-type="text" | Belt | ||
| + | ! colspan="6" | '''Penetration @ 0° Angle of Attack (mm)''' | ||
| + | |- | ||
| + | ! 10 m !! 100 m !! 500 m !! 1,000 m !! 1,500 m !! 2,000 m | ||
| + | |- | ||
| + | | Default || 65 || 62 || 50 || 38 || 29 || 22 | ||
| + | |- | ||
| + | | 30 mm HE || 65 || 62 || 50 || 38 || 29 || 22 | ||
| + | |- | ||
| + | | 30 mm APT || 65 || 62 || 50 || 38 || 29 || 22 | ||
| + | |- | ||
| + | | 30 mm APDS || 82 || 81 || 79 || 75 || 72 || 69 | ||
| + | |- | ||
| + | |} | ||
==== [[Ammo racks]] ==== | ==== [[Ammo racks]] ==== | ||
| Line 107: | Line 118: | ||
=== Additional armament === | === Additional armament === | ||
| − | {{Specs-Tank-Weapon| | + | {{Specs-Tank-Weapon|1}} |
<!-- ''Some tanks are armed with several guns in one or more turrets. Evaluate the additional weaponry and give advice on its use. Describe the ammunition available for additional weaponry. Give advice on about how to use them and how to fill the ammunition storage. If there is no additional weaponry remove this subsection.'' --> | <!-- ''Some tanks are armed with several guns in one or more turrets. Evaluate the additional weaponry and give advice on its use. Describe the ammunition available for additional weaponry. Give advice on about how to use them and how to fill the ammunition storage. If there is no additional weaponry remove this subsection.'' --> | ||
| − | {{main| | + | {{main|9M133}} |
| + | |||
| + | Unlike the BMP-2 which only has one ATGM launcher and takes some time to reload, the ATGMs on the BMP-2M are arranged in 4 slots, 2 on either side of the tank. If all 4 are expended, an extra 4 will be able to reload if chosen in the battle start up. | ||
| − | {{Notice|It is recommended to | + | {{Notice|It is strongly recommended to keybind "Fire from secondary guns" to something different to "Fire from the main calibre gun", or the ATGMs will fire each time you fire the 30 mm autocannon, therefore wasting your ATGMs.}} |
{| class="wikitable" style="text-align:center" width="100%" | {| class="wikitable" style="text-align:center" width="100%" | ||
|- | |- | ||
| − | ! colspan=" | + | ! colspan="4" | [[9M133]] missile || colspan="4" | Reloading rate (seconds) |
|- | |- | ||
| − | ! Capacity (Belt) | + | ! Capacity (Belt) !! Vertical !! Horizontal !! Stabilizer |
! Stock !! Full !! Expert !! Aced | ! Stock !! Full !! Expert !! Aced | ||
|- | |- | ||
| − | | | + | | 8 (4) || -5°/+10° || N/A || N/A || 6.0 || 6.0 || 6.0 || 6.0 |
|- | |- | ||
|} | |} | ||
==== Ammunition ==== | ==== Ammunition ==== | ||
| − | {{: | + | {| class="wikitable sortable" style="text-align:center" width="100%" |
| + | ! colspan="8" | Penetration statistics | ||
| + | |- | ||
| + | ! rowspan="2" data-sort-type="text" | Ammunition | ||
| + | ! rowspan="2" | Type of<br>warhead | ||
| + | ! colspan="6" | '''Penetration @ 0° Angle of Attack (mm)''' | ||
| + | |- | ||
| + | ! 10 m !! 100 m !! 500 m !! 1,000 m !! 1,500 m !! 2,000 m | ||
| + | |- | ||
| + | | 9M133 || ATGM (tandem) || 1,200 || 1,200 || 1,200 || 1,200 || 1,200 || 1,200 | ||
| + | |- | ||
| + | | 9M133FM-3 || ATGM-HE || 61 || 61 || 61 || 61 || 61 || 61 | ||
| + | |- | ||
| + | |} | ||
| + | {| class="wikitable sortable" style="text-align:center" width="100%" | ||
| + | ! colspan="11" | Shell details | ||
| + | |- | ||
| + | ! rowspan="2" data-sort-type="text" | Ammunition | ||
| + | ! rowspan="2" | Type of<br>warhead | ||
| + | ! rowspan="2" | Velocity<br>(m/s) | ||
| + | ! rowspan="2" | Range<br>(m) | ||
| + | ! rowspan="2" | Projectile<br>Mass (kg) | ||
| + | ! rowspan="2" | Fuse delay<br>(m) | ||
| + | ! rowspan="2" | Fuse sensitivity<br>(mm) | ||
| + | ! rowspan="2" | Explosive Mass<br>(TNT equivalent) (g) | ||
| + | ! colspan="3" | Ricochet | ||
| + | |- | ||
| + | ! 0% !! 50% !! 100% | ||
| + | |- | ||
| + | | 9M133 || ATGM (tandem) || 300 || 5,500 || 26 || 0.2 || 0.01 || 6,160 || 80° || 82° || 90° | ||
| + | |- | ||
| + | | 9M133FM-3 || ATGM-HE || 300 || 8,000 || 26 || 0.2 || 0.01 || 9,240 || 79° || 80° || 81° | ||
| + | |- | ||
| + | |} | ||
==== [[Ammo racks]] ==== | ==== [[Ammo racks]] ==== | ||
| Line 134: | Line 180: | ||
! Full<br>ammo | ! Full<br>ammo | ||
! 1st<br>rack empty | ! 1st<br>rack empty | ||
| + | ! 2nd<br>rack empty | ||
! Visual<br>discrepancy | ! Visual<br>discrepancy | ||
|- | |- | ||
| − | | '''1''' || 0 ''(+ | + | | '''2''' || 1 ''(+1)'' || 0 ''(+2)'' || No |
|- | |- | ||
|} | |} | ||
=== Additional armament === | === Additional armament === | ||
| − | {{Specs-Tank-Weapon| | + | {{Specs-Tank-Weapon|2}} |
<!-- ''Some tanks are armed with several guns in one or more turrets. Evaluate the additional weaponry and give advice on its use. Describe the ammunition available for additional weaponry. Give advice on about how to use them and how to fill the ammunition storage. If there is no additional weaponry remove this subsection.'' --> | <!-- ''Some tanks are armed with several guns in one or more turrets. Evaluate the additional weaponry and give advice on its use. Describe the ammunition available for additional weaponry. Give advice on about how to use them and how to fill the ammunition storage. If there is no additional weaponry remove this subsection.'' --> | ||
| − | {{main| | + | {{main|AG-30 (30 mm)}} |
| − | |||
| − | |||
{| class="wikitable" style="text-align:center" width="100%" | {| class="wikitable" style="text-align:center" width="100%" | ||
|- | |- | ||
| − | ! colspan=" | + | ! colspan="5" | [[AG-30 (30 mm)|30 mm AG-30]] || colspan="4" | Reloading rate (seconds) |
|- | |- | ||
| − | ! Capacity (Belt) !! Vertical !! Horizontal !! Stabilizer | + | ! Capacity (Belt) !! Fire rate !! Vertical !! Horizontal !! Stabilizer |
! Stock !! Full !! Expert !! Aced | ! Stock !! Full !! Expert !! Aced | ||
|- | |- | ||
| − | | | + | | 300 (300) || 400 || N/A || N/A || N/A || 1.8 || 1.8 || 1.8 || 1.8 |
|- | |- | ||
|} | |} | ||
==== Ammunition ==== | ==== Ammunition ==== | ||
| − | { | + | {| class="wikitable" style="text-align:center" width="100%" |
| + | ! colspan="8" | Penetration statistics | ||
| + | |- | ||
| + | ! rowspan="2" data-sort-type="text" | Ammunition | ||
| + | ! rowspan="2" | Type of<br>warhead | ||
| + | ! colspan="6" | '''Penetration @ 0° Angle of Attack (mm)''' | ||
| + | |- | ||
| + | ! 10 m !! 100 m !! 500 m !! 1,000 m !! 1,500 m !! 2,000 m | ||
| + | |- | ||
| + | | VOG-30 || VOG* || 3 || 3 || 3 || 3 || 3 || 3 | ||
| + | |- | ||
| + | |} | ||
| + | {| class="wikitable" style="text-align:center" width="100%" | ||
| + | ! colspan="10" | Shell details | ||
| + | |- | ||
| + | ! rowspan="2" data-sort-type="text" | Ammunition | ||
| + | ! rowspan="2" | Type of<br>warhead | ||
| + | ! rowspan="2" | Velocity<br>(m/s) | ||
| + | ! rowspan="2" | Projectile<br>Mass (kg) | ||
| + | ! rowspan="2" | Fuse delay<br>(m) | ||
| + | ! rowspan="2" | Fuse sensitivity<br>(mm) | ||
| + | ! rowspan="2" | Explosive Mass<br>(TNT equivalent) (g) | ||
| + | ! colspan="3" | Ricochet | ||
| + | |- | ||
| + | ! 0% !! 50% !! 100% | ||
| + | |- | ||
| + | | VOG-30 || VOG* || 185 || 0.28 || 0 || 0.1 || 55.44 || 79° || 80° || 81° | ||
| + | |- | ||
| + | |} | ||
==== [[Ammo racks]] ==== | ==== [[Ammo racks]] ==== | ||
| − | [[File:Ammoracks_{{PAGENAME}} | + | <!-- [[File:Ammoracks_{{PAGENAME}}.png|right|thumb|x250px|[[Ammo racks]] of the {{PAGENAME}}]] --> |
| − | <!-- '''Last updated: | + | <!-- '''Last updated:''' --> |
{| class="wikitable" style="text-align:center" | {| class="wikitable" style="text-align:center" | ||
|- | |- | ||
! Full<br>ammo | ! Full<br>ammo | ||
! 1st<br>rack empty | ! 1st<br>rack empty | ||
| − | |||
! Visual<br>discrepancy | ! Visual<br>discrepancy | ||
|- | |- | ||
| − | | ''' | + | | '''1''' || 0 ''(+1)'' || No |
|- | |- | ||
|} | |} | ||
| − | |||
| − | |||
| − | |||
| − | |||
=== Machine guns === | === Machine guns === | ||
| Line 195: | Line 263: | ||
== Usage in battles == | == Usage in battles == | ||
| − | + | '''Overview''' | |
| + | |||
| + | The BMP-2M is a light, mobile yet lethal light tank unlock-able for 520.000 squadron points. Although its survivability and amour are not worth mentionable, its armament and utility are unmatched at its battle-rating. Given its placement in the VII rank, it can effectively research every vehicle found on the same rank. | ||
| + | |||
| + | '''Gameplay and tactics''' | ||
| − | + | It is highly recommended to avoid frontal confrontation with vehicles of any kind, due to the very thin armour and hull-break in combination with the high density of ammunition and crew. There is a variety of different approaches to the game-play, all of which the BMP-2M well exceeds at. | |
| − | |||
| − | + | * '''Support and repair''' - This style of game-play is most useful in close quarters maps/engagements especially when the vehicle is in a stock layout, making use of the auto-cannon, seeking out flanks and assisting with fast repairs. Good communication about targets is possible through the scouting feature. Adding to the support role is the 9M133FM-3 missile equipped with a HE warhead and proximity most effective against helicopters in particular. | |
| − | + | * '''Flanking''' - The main feature of this strategy is the 30mm APDS belt which easily punches through the sides of any vehicle facing around its BR. The main focus is taking out crew members and possibly modules, as the post penetration damage can be fairly lacklustre unless directly hitting the crew/module. Basic knowledge about crew positions is most useful to get the most out of the vehicles rather limited 160 shells found in the APDS belt. | |
| + | * '''Long-range tank hunting''' - Unlike the tech-tree BMP-2, this improved variant carries a much more potent ATGM system. With a range of 5.5km, a speed of 300m/s and a lethal 1200mm tandem shaped warhead, this system can easily deal with any armour found on its battle-rating and even far above it. Furthermore, 4 out of the total 8 missiles can be simultaneously fired and controlled at any given time, allowing to engage multiple targets standing close by launching each missile in quick succession before the initial one impacted. This is only further reinforced through the ability to fire on the move at any speed, unlike almost all other ATGM carrying systems. Even in the case that only one missile is left, a 6 second reload will aid a quick re-engagement. | ||
| − | + | '''Research and unlocking''' | |
| − | + | For module research, the following order is most useful from left to right for each rank respectively (viable optional modifications in brackets); | |
| − | + | * Parts (Horizontal Drive, Airstrike or Tracks) | |
| + | * FPE, NVD either 9M133FM-3 or Adjustment of Fire (9M133FM-3) | ||
| + | * APDS, Filters and either Laser rangefinder or Crew replenishment (Elevation Mechanism) | ||
| + | * Engine, Smoke grenade or Transmission (ESS or Artillery support) | ||
| − | ''' | + | '''Conclusion''' |
| − | + | Is this vehicle worth researching? Absolutely! Although 520.000 squadron points are a long term investment of roughly 78 days at high activity, the BMP-2M makes for a great investment compared to other squadron vehicles and make for a great addition to any 8.7 or higher lineup. | |
=== Pros and cons === | === Pros and cons === | ||
| Line 218: | Line 293: | ||
'''Pros:''' | '''Pros:''' | ||
| − | * 2A42 autocannon can punch through most vehicles at its battle rating from the back, side and sometimes front | + | * 2A42 autocannon can punch through most vehicles at its battle rating from the back, side and sometimes front |
| − | * Fast turret traverse speed and | + | * Fast turret traverse speed, 35, 42, and 60 degrees per second at stock and full modifications respectively |
| − | * | + | * High-resolution thermal optics, wide field of view and 2.5 to 12 times zoom for gun sight, suitable for combat at any range |
* 1,200 mm penetration power for the standard 9M133 missile; can fire and guide all four missiles simultaneously while on the move | * 1,200 mm penetration power for the standard 9M133 missile; can fire and guide all four missiles simultaneously while on the move | ||
| − | * Can equip 9M133FM-3 HE | + | * Can equip 9M133FM-3 HE missile with proximity fuses, useful for SPAA purposes |
| − | |||
* Amphibious ability can be useful for crossing the water to areas hard-to-reach for other vehicles | * Amphibious ability can be useful for crossing the water to areas hard-to-reach for other vehicles | ||
| + | * Very cheap repair cost means easy Silver Lions profit from combat | ||
* Roof-mounted grenade launcher can clear obstacles that typically machine guns can not | * Roof-mounted grenade launcher can clear obstacles that typically machine guns can not | ||
| + | * Relatively easy stock grind | ||
* Can be played as a light tank, long range tank, CQB support vehicle, or SPAA | * Can be played as a light tank, long range tank, CQB support vehicle, or SPAA | ||
| − | |||
'''Cons:''' | '''Cons:''' | ||
| − | * Missiles mounted on the turret | + | * Missiles mounted on the turret has a chance to explode from shrapnel if too close to any form of explosion |
* Chassis can only protect the crew from 7.62 mm and with limited 12.7 mm or bigger calibre ammunition protection from the front | * Chassis can only protect the crew from 7.62 mm and with limited 12.7 mm or bigger calibre ammunition protection from the front | ||
| − | * No neutral steering, | + | * No neutral steering, the slow reverse speed maxes out at 10 kilometres per hour |
| − | * Grenade launcher has only | + | * While driving, thermal optics vision to the left of the chassis at 30 to 50 degrees are obscured from the engine exhaust gas |
| − | * ATGMs require discipline to use, as the urge to fire all four of them on contact is near irresistible. While firing all four ATGM ensures that the target tank is absolutely annihilated, it is a waste of ammunition if operator does not | + | * Grenade launcher has only 6 mm of pen and generally can't destroy opponents, instead being used against obstacles and clearing ERA at close range, sometimes damaging tracks or exposed ammo racks (eg ATGMs) at very close range |
| − | + | * ATGMs require discipline to use, as the urge to fire all four of them on contact is near irresistible. While firing all four ATGM ensures that the target tank is absolutely annihilated, it is a waste of ammunition if operator does not re-direct remaining missiles away from already destroyed tank towards next target | |
== History == | == History == | ||
<!-- ''Describe the history of the creation and combat usage of the vehicle in more detail than in the introduction. If the historical reference turns out to be too long, take it to a separate article, taking a link to the article about the vehicle and adding a block "/History" (example: <nowiki>https://wiki.warthunder.com/(Vehicle-name)/History</nowiki>) and add a link to it here using the <code>main</code> template. Be sure to reference text and sources by using <code><nowiki><ref></ref></nowiki></code>, as well as adding them at the end of the article with <code><nowiki><references /></nowiki></code>. This section may also include the vehicle's dev blog entry (if applicable) and the in-game encyclopedia description (under <code><nowiki>=== In-game description ===</nowiki></code>, also if applicable).'' --> | <!-- ''Describe the history of the creation and combat usage of the vehicle in more detail than in the introduction. If the historical reference turns out to be too long, take it to a separate article, taking a link to the article about the vehicle and adding a block "/History" (example: <nowiki>https://wiki.warthunder.com/(Vehicle-name)/History</nowiki>) and add a link to it here using the <code>main</code> template. Be sure to reference text and sources by using <code><nowiki><ref></ref></nowiki></code>, as well as adding them at the end of the article with <code><nowiki><references /></nowiki></code>. This section may also include the vehicle's dev blog entry (if applicable) and the in-game encyclopedia description (under <code><nowiki>=== In-game description ===</nowiki></code>, also if applicable).'' --> | ||
| − | In 2017, the Russian Ministry of Defense signed a contract with KBP Instrument Design (Konstruktorskoe Buro Priborostroeniya) for the modernization of BMP-2 and BMD-2 to the BMP-2M ICV "Berezhok" and "Bereg" (not to be confused with the BMP-2M made by Kurganmashzavod. The M is the general designator for modernized units). It is meant to be a cost-effective update which will augment a clear sophistication compared to the BMP-3 | + | In 2017, the Russian Ministry of Defense signed a contract with KBP Instrument Design ('''''Konstruktorskoe Buro Priborostroeniya)''''' for the modernization of BMP-2 and BMD-2 to the BMP-2M ICV "Berezhok" and "Bereg" (not to be confused with the BMP-2M made by Kurganmashzavod. The M is the general designator for modernized units). It is meant to be a cost-effective update which will augment a clear sophistication compared to the BMP-3 It equipped the B05Ya01 Berezhok turret keeping the same autocannon of the BMP-2, the 2A42 30 mm autocannon, a PKTM 7.62 mm coaxial machine gun (tank version of the PKM), an AGS-30 30 mm grenade launcher, 2 B05S011 guided weapon system which made the BMP-2M capable of firing 4 9M113M Kornet ATGM (2 launchers per turret side), new NVD from the BMD-4, 1PZ-13 commander's periscope, the BPK-3-42 gunner's primary sight (GPS), PL-1 laser illuminator, a 370-horsepower UDT-23 engine, new armament stabilizers, ballistics computer and a laser rangefinder. The "Berezhok" variant was preferred by Algeria while the Russian MoD decided for the BMP-2M made by Kurganmashzavod. Currently, the production of the BMP-2M is still kept with the first 18 units being delivered in 2020. |
=== [[wt:en/news/6758-development-squadron-vehicles-bmp-2m-berezhok-en|Devblog]] === | === [[wt:en/news/6758-development-squadron-vehicles-bmp-2m-berezhok-en|Devblog]] === | ||
| − | In the early 2000's, aside from the development of the new BMP-3, the Russian military had been looking into modernization of the widespread BMP-2 combat vehicles to face the challenges of the time. Amongst other projects proposed to the Russian Ministry of Defense under this program, an idea was raised to install the Berezhok combat complex on the BMP-2 chassis. Berezhok was a combat module created on the basis of the BMP-2 turret, but significantly increasing the overall fire potential of the vehicle. The main changes that Berezhok brought were the modern fire control system, the new highly capable Kornet ATGM, and the | + | In the early 2000's, aside from the development of the new BMP-3, the Russian military had been looking into modernization of the widespread BMP-2 combat vehicles to face the challenges of the time. Amongst other projects proposed to the Russian Ministry of Defense under this program, an idea was raised to install the Berezhok combat complex on the BMP-2 chassis. Berezhok was a combat module created on the basis of the BMP-2 turret, but significantly increasing the overall fire potential of the vehicle. The main changes that Berezhok brought were the modern fire control system, the new highly capable Kornet ATGM, and the 30mm automatic grenade launcher on the top of the turret. The BMP-2M with the Berezhok module was produced for export to the Algerian army, and also purchased by the Russian Ministry of Internal Affairs. |
== Media == | == Media == | ||
| Line 250: | Line 325: | ||
;Skins | ;Skins | ||
| − | * [https://live.warthunder.com/feed/camouflages/?vehicle=ussr_bmp_2m Skins and camouflages for the {{PAGENAME}} from live.warthunder.com.] | + | * [https://live.warthunder.com/feed/camouflages/?vehicleCountry=ussr&vehicleType=tank&vehicleClass=light_tank&vehicle=ussr_bmp_2m Skins and camouflages for the {{PAGENAME}} from live.warthunder.com.] |
;Images | ;Images | ||
| Line 263: | Line 338: | ||
;Videos | ;Videos | ||
| − | {{Youtube-gallery| | + | {{Youtube-gallery|3MvXhKo9llU|'''Should You Buy The {{PAGENAME}}?''' - ''Sako Sniper''|SXxz6_3D82w|'''{{PAGENAME}} - Squadron Effort to Top Tier''' - ''Napalmratte''|qSQ9o2nQdBg|'''{{PAGENAME}} - The Russian Death Kornet''' - ''JustinPlaysYT''}} |
== See also == | == See also == | ||
| Line 270: | Line 345: | ||
* ''links to approximate analogues of other nations and research trees.'' --> | * ''links to approximate analogues of other nations and research trees.'' --> | ||
| − | * [[BMP-2]] | + | * [[BMP-2]]: Base variant for the BMP-2M. |
== External links == | == External links == | ||
<!-- ''Paste links to sources and external resources, such as:'' | <!-- ''Paste links to sources and external resources, such as:'' | ||
* ''topic on the official game forum;'' | * ''topic on the official game forum;'' | ||
| + | * ''encyclopedia page on the tank;'' | ||
* ''other literature.'' --> | * ''other literature.'' --> | ||
| Line 281: | Line 357: | ||
{{USSR light tanks}} | {{USSR light tanks}} | ||
{{Squadron ground vehicles}} | {{Squadron ground vehicles}} | ||
| − | |||
Revision as of 21:31, 4 March 2021
| This page is about the squadron Soviet light tank BMP-2M. For other uses, see BMP (Disambiguation). |

Contents
Description
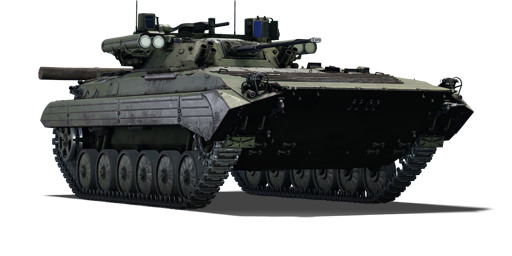
The BMP-2M is a squadron rank VII Soviet light tank (infantry fighting vehicle) with a battle rating of 10.0 (AB/RB/SB). It was introduced during Update "Starfighters".
General info
Survivability and armour
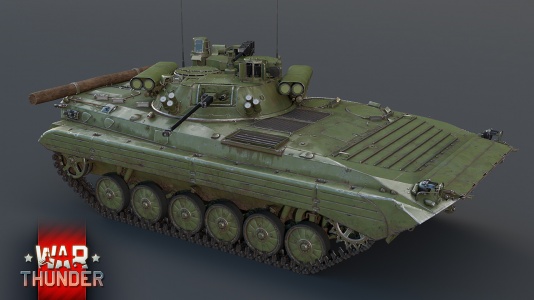
The vehicle's playstyle is relatively similar to the BMP-2's. The fast turret traverse speed, wide field of view, and thermals for the optics combined with a fast-firing 2A42 autocannon and four 9M133 ATGMs makes it an excellent close range combat IFV and good front line scout at open fields. Armour on this vehicle can only protect the crew from 7.62 mm fire at all angles and sometimes 12.7 mm or even 20 mm when being shot from the front. The BMP-2M is prone to hull-break, but sometimes AP rounds such as APFSDS can penetrate the vehicle without significant damage due to its large empty space inside. The hull-break mechanics will mean that even a poorly placed shot may immediately destroy the vehicle. Overall, survivability is poor, and the BMP-2M should use its manoeuvrability to flank opponents and strike before the enemy can locate you and return fire.
Armour type:
- High hardness rolled armour (hull and turret)
- Alloy ABT-101 (engine deck)
| Armour | Front (Slope angle) | Sides | Rear | Roof |
|---|---|---|---|---|
| Hull | 12 mm (81°) | 13 mm Top
15 mm Bottom |
16 mm Doors
13 mm Door frame |
5 mm
12 mm Engine deck |
| Turret | 20 mm Turret front
25 mm Gun mantlet |
12 - 16 mm | 10 mm | 6 mm |
Mobility
| Game Mode | Max Speed (km/h) | Weight (tons) | Engine power (horsepower) | Power-to-weight ratio (hp/ton) | |||
|---|---|---|---|---|---|---|---|
| Forward | Reverse | Stock | Upgraded | Stock | Upgraded | ||
| Arcade | 72 | 12 | 14.5 | 558 | 687 | 38.48 | 47.38 |
| Realistic | 65 | 11 | 318 | 360 | 21.93 | 24.83 | |
With 60 extra horsepower, the BMP-2M has excellent mobility compared to the BMP-2. The acceleration of the BMP-2M in off road conditions is excellent, and it is able to keep up with top tier MBTs like the T-80U, M1A2 Abrams and Leopard 2A5. The reverse speed however is still 10 kilometers per hour and it still has no neutral steering. Its amphibious capabilities can be useful to cross deep water sections to reach places normally unreachable for other vehicles.
Modifications and economy
| Mobility | Protection | Firepower | ||||||||||||||||||||||||||||
|---|---|---|---|---|---|---|---|---|---|---|---|---|---|---|---|---|---|---|---|---|---|---|---|---|---|---|---|---|---|---|
|
|
|
Armaments
Main armament
As this tank has a similar playstyle to its 8.3 counterpart, the BMP-2, the main armament of the Shipunov 2A42 30 mm autocannon is a very versatile weapon, considering its vertical guidance, traverse speed, and large selection of ammo belts.
It is not recommended to engage in long-term combat without ATGMs using only the autocannon with any tank heavier than a light tank or an Anti-Tank Missile Carrier unless using the APDS ammo selection. If not using APDS, for heavier tanks it is recommended to cripple it by shooting its tracks and the main armament.
| 30 mm 2A42 | Turret rotation speed (°/s) | Reloading rate (seconds) | ||||||||||||
|---|---|---|---|---|---|---|---|---|---|---|---|---|---|---|
| Mode | Capacity (Belt) | Fire rate | Vertical | Horizontal | Stabilizer | Stock | Upgraded | Full | Expert | Aced | Stock | Full | Expert | Aced |
| Arcade | 500 (340) | 550 | -4°/+74° | ±180° | Two-plane | 57.1 | 79.1 | 96.0 | __.__ | 112.0 | 1.3 | 1.15 | 1.1 | 1.0 |
| Realistic | 35.7 | 42.0 | 51.0 | __.__ | 60.0 | |||||||||
Ammunition
- Default: AP-T · HEF-I*
- 30 mm HE: HEF-I* · AP-T · HEF-I* · HEF-T*
- 30 mm APT: AP-T · AP-T · AP-T · HEF-T*
- 30 mm APDS: APDS · APDS · APDS · APDS · HEF-T*
| Penetration statistics | ||||||
|---|---|---|---|---|---|---|
| Belt | Penetration @ 0° Angle of Attack (mm) | |||||
| 10 m | 100 m | 500 m | 1,000 m | 1,500 m | 2,000 m | |
| Default | 65 | 62 | 50 | 38 | 29 | 22 |
| 30 mm HE | 65 | 62 | 50 | 38 | 29 | 22 |
| 30 mm APT | 65 | 62 | 50 | 38 | 29 | 22 |
| 30 mm APDS | 82 | 81 | 79 | 75 | 72 | 69 |
Ammo racks
| Full ammo |
1st rack empty |
Visual discrepancy |
|---|---|---|
| 2 | 0 (+2) | No |
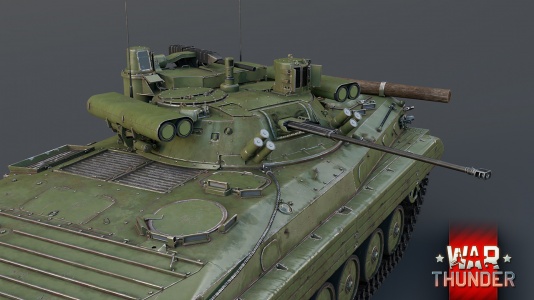
Additional armament
Unlike the BMP-2 which only has one ATGM launcher and takes some time to reload, the ATGMs on the BMP-2M are arranged in 4 slots, 2 on either side of the tank. If all 4 are expended, an extra 4 will be able to reload if chosen in the battle start up.
| It is strongly recommended to keybind "Fire from secondary guns" to something different to "Fire from the main calibre gun", or the ATGMs will fire each time you fire the 30 mm autocannon, therefore wasting your ATGMs. |
| 9M133 missile | Reloading rate (seconds) | ||||||
|---|---|---|---|---|---|---|---|
| Capacity (Belt) | Vertical | Horizontal | Stabilizer | Stock | Full | Expert | Aced |
| 8 (4) | -5°/+10° | N/A | N/A | 6.0 | 6.0 | 6.0 | 6.0 |
Ammunition
| Penetration statistics | |||||||
|---|---|---|---|---|---|---|---|
| Ammunition | Type of warhead |
Penetration @ 0° Angle of Attack (mm) | |||||
| 10 m | 100 m | 500 m | 1,000 m | 1,500 m | 2,000 m | ||
| 9M133 | ATGM (tandem) | 1,200 | 1,200 | 1,200 | 1,200 | 1,200 | 1,200 |
| 9M133FM-3 | ATGM-HE | 61 | 61 | 61 | 61 | 61 | 61 |
| Shell details | ||||||||||
|---|---|---|---|---|---|---|---|---|---|---|
| Ammunition | Type of warhead |
Velocity (m/s) |
Range (m) |
Projectile Mass (kg) |
Fuse delay (m) |
Fuse sensitivity (mm) |
Explosive Mass (TNT equivalent) (g) |
Ricochet | ||
| 0% | 50% | 100% | ||||||||
| 9M133 | ATGM (tandem) | 300 | 5,500 | 26 | 0.2 | 0.01 | 6,160 | 80° | 82° | 90° |
| 9M133FM-3 | ATGM-HE | 300 | 8,000 | 26 | 0.2 | 0.01 | 9,240 | 79° | 80° | 81° |
Ammo racks
| Full ammo |
1st rack empty |
2nd rack empty |
Visual discrepancy |
|---|---|---|---|
| 2 | 1 (+1) | 0 (+2) | No |
Additional armament
| 30 mm AG-30 | Reloading rate (seconds) | |||||||
|---|---|---|---|---|---|---|---|---|
| Capacity (Belt) | Fire rate | Vertical | Horizontal | Stabilizer | Stock | Full | Expert | Aced |
| 300 (300) | 400 | N/A | N/A | N/A | 1.8 | 1.8 | 1.8 | 1.8 |
Ammunition
| Penetration statistics | |||||||
|---|---|---|---|---|---|---|---|
| Ammunition | Type of warhead |
Penetration @ 0° Angle of Attack (mm) | |||||
| 10 m | 100 m | 500 m | 1,000 m | 1,500 m | 2,000 m | ||
| VOG-30 | VOG* | 3 | 3 | 3 | 3 | 3 | 3 |
| Shell details | |||||||||
|---|---|---|---|---|---|---|---|---|---|
| Ammunition | Type of warhead |
Velocity (m/s) |
Projectile Mass (kg) |
Fuse delay (m) |
Fuse sensitivity (mm) |
Explosive Mass (TNT equivalent) (g) |
Ricochet | ||
| 0% | 50% | 100% | |||||||
| VOG-30 | VOG* | 185 | 0.28 | 0 | 0.1 | 55.44 | 79° | 80° | 81° |
Ammo racks
| Full ammo |
1st rack empty |
Visual discrepancy |
|---|---|---|
| 1 | 0 (+1) | No |
Machine guns
| 7.62 mm PKT | ||||
|---|---|---|---|---|
| Mount | Capacity (Belt) | Fire rate | Vertical | Horizontal |
| Coaxial | 2,000 (250) | 700 | N/A | N/A |
Usage in battles
Overview
The BMP-2M is a light, mobile yet lethal light tank unlock-able for 520.000 squadron points. Although its survivability and amour are not worth mentionable, its armament and utility are unmatched at its battle-rating. Given its placement in the VII rank, it can effectively research every vehicle found on the same rank.
Gameplay and tactics
It is highly recommended to avoid frontal confrontation with vehicles of any kind, due to the very thin armour and hull-break in combination with the high density of ammunition and crew. There is a variety of different approaches to the game-play, all of which the BMP-2M well exceeds at.
- Support and repair - This style of game-play is most useful in close quarters maps/engagements especially when the vehicle is in a stock layout, making use of the auto-cannon, seeking out flanks and assisting with fast repairs. Good communication about targets is possible through the scouting feature. Adding to the support role is the 9M133FM-3 missile equipped with a HE warhead and proximity most effective against helicopters in particular.
- Flanking - The main feature of this strategy is the 30mm APDS belt which easily punches through the sides of any vehicle facing around its BR. The main focus is taking out crew members and possibly modules, as the post penetration damage can be fairly lacklustre unless directly hitting the crew/module. Basic knowledge about crew positions is most useful to get the most out of the vehicles rather limited 160 shells found in the APDS belt.
- Long-range tank hunting - Unlike the tech-tree BMP-2, this improved variant carries a much more potent ATGM system. With a range of 5.5km, a speed of 300m/s and a lethal 1200mm tandem shaped warhead, this system can easily deal with any armour found on its battle-rating and even far above it. Furthermore, 4 out of the total 8 missiles can be simultaneously fired and controlled at any given time, allowing to engage multiple targets standing close by launching each missile in quick succession before the initial one impacted. This is only further reinforced through the ability to fire on the move at any speed, unlike almost all other ATGM carrying systems. Even in the case that only one missile is left, a 6 second reload will aid a quick re-engagement.
Research and unlocking
For module research, the following order is most useful from left to right for each rank respectively (viable optional modifications in brackets);
- Parts (Horizontal Drive, Airstrike or Tracks)
- FPE, NVD either 9M133FM-3 or Adjustment of Fire (9M133FM-3)
- APDS, Filters and either Laser rangefinder or Crew replenishment (Elevation Mechanism)
- Engine, Smoke grenade or Transmission (ESS or Artillery support)
Conclusion
Is this vehicle worth researching? Absolutely! Although 520.000 squadron points are a long term investment of roughly 78 days at high activity, the BMP-2M makes for a great investment compared to other squadron vehicles and make for a great addition to any 8.7 or higher lineup.
Pros and cons
Pros:
- 2A42 autocannon can punch through most vehicles at its battle rating from the back, side and sometimes front
- Fast turret traverse speed, 35, 42, and 60 degrees per second at stock and full modifications respectively
- High-resolution thermal optics, wide field of view and 2.5 to 12 times zoom for gun sight, suitable for combat at any range
- 1,200 mm penetration power for the standard 9M133 missile; can fire and guide all four missiles simultaneously while on the move
- Can equip 9M133FM-3 HE missile with proximity fuses, useful for SPAA purposes
- Amphibious ability can be useful for crossing the water to areas hard-to-reach for other vehicles
- Very cheap repair cost means easy Silver Lions profit from combat
- Roof-mounted grenade launcher can clear obstacles that typically machine guns can not
- Relatively easy stock grind
- Can be played as a light tank, long range tank, CQB support vehicle, or SPAA
Cons:
- Missiles mounted on the turret has a chance to explode from shrapnel if too close to any form of explosion
- Chassis can only protect the crew from 7.62 mm and with limited 12.7 mm or bigger calibre ammunition protection from the front
- No neutral steering, the slow reverse speed maxes out at 10 kilometres per hour
- While driving, thermal optics vision to the left of the chassis at 30 to 50 degrees are obscured from the engine exhaust gas
- Grenade launcher has only 6 mm of pen and generally can't destroy opponents, instead being used against obstacles and clearing ERA at close range, sometimes damaging tracks or exposed ammo racks (eg ATGMs) at very close range
- ATGMs require discipline to use, as the urge to fire all four of them on contact is near irresistible. While firing all four ATGM ensures that the target tank is absolutely annihilated, it is a waste of ammunition if operator does not re-direct remaining missiles away from already destroyed tank towards next target
History
In 2017, the Russian Ministry of Defense signed a contract with KBP Instrument Design (Konstruktorskoe Buro Priborostroeniya) for the modernization of BMP-2 and BMD-2 to the BMP-2M ICV "Berezhok" and "Bereg" (not to be confused with the BMP-2M made by Kurganmashzavod. The M is the general designator for modernized units). It is meant to be a cost-effective update which will augment a clear sophistication compared to the BMP-3 It equipped the B05Ya01 Berezhok turret keeping the same autocannon of the BMP-2, the 2A42 30 mm autocannon, a PKTM 7.62 mm coaxial machine gun (tank version of the PKM), an AGS-30 30 mm grenade launcher, 2 B05S011 guided weapon system which made the BMP-2M capable of firing 4 9M113M Kornet ATGM (2 launchers per turret side), new NVD from the BMD-4, 1PZ-13 commander's periscope, the BPK-3-42 gunner's primary sight (GPS), PL-1 laser illuminator, a 370-horsepower UDT-23 engine, new armament stabilizers, ballistics computer and a laser rangefinder. The "Berezhok" variant was preferred by Algeria while the Russian MoD decided for the BMP-2M made by Kurganmashzavod. Currently, the production of the BMP-2M is still kept with the first 18 units being delivered in 2020.
Devblog
In the early 2000's, aside from the development of the new BMP-3, the Russian military had been looking into modernization of the widespread BMP-2 combat vehicles to face the challenges of the time. Amongst other projects proposed to the Russian Ministry of Defense under this program, an idea was raised to install the Berezhok combat complex on the BMP-2 chassis. Berezhok was a combat module created on the basis of the BMP-2 turret, but significantly increasing the overall fire potential of the vehicle. The main changes that Berezhok brought were the modern fire control system, the new highly capable Kornet ATGM, and the 30mm automatic grenade launcher on the top of the turret. The BMP-2M with the Berezhok module was produced for export to the Algerian army, and also purchased by the Russian Ministry of Internal Affairs.
Media
- Skins
- Images
- BMP-2M Devblog Images


- Videos
See also
- BMP-2: Base variant for the BMP-2M.
External links
| USSR light tanks | |
|---|---|
| T-26 | T-26 · T-26 (1st Gv.T.Br.) · T-26-4 · T-26E |
| BT | BT-5 · RBT-5 · BT-7 · BT-7 TD · BT-7M · BT-7A (F-32) |
| T-50 | T-126 · T-50 |
| T-70 | T-70 · T-80 |
| PT-76 | PT-76B · PT-76-57 · Object 906 |
| BMP | BMP-1 · BMP-2 · BMP-2M · BMP-3 |
| BMD | BMD-4 |
| 2S25 | 2S25 · 2S25M |
| Wheeled | BA-11 · BTR-80A |
| Other | T-60 · Object 685 · 2S38 |
| China | ▂Type 62 |
| Squadron ground vehicles | |
|---|---|
| USA | M901 · M1A1 AIM |
| Germany | Leopard 2 PL |
| USSR | BMP-2M · T-80UK |
| Britain | Bhishma TWMP |
| China | Object 122MT "MC" |
| Sweden | T 80 U |
| Israel | Magach 6B Gal |
- Ground vehicles
- USSR ground vehicles
- Seventh rank ground vehicles
- Squadron ground vehicles
- Light tanks
- Ground vehicles with smoke grenades
- Ground vehicles with engine smoke generating system
- Amphibious ground vehicles
- Ground vehicles with night vision device
- Ground vehicles with thermal sight
- Multi-weapon ground vehicles
- Ground vehicles with gun stabilizer
