Difference between revisions of "B-24D-25-CO"
(Added tables and basic info.) |
|||
| Line 2: | Line 2: | ||
== Description == | == Description == | ||
| − | ''In the description, the first part needs to be about the history of and the creation and combat usage of the aircraft, as well as its key features. In the second part, tell the reader about the aircraft in the game. Insert screenshot of the vehicle. If the novice player does not remember the vehicle by name, he will immediately understand what kind of vehicle it is talking about.'' | + | <!--''In the description, the first part needs to be about the history of and the creation and combat usage of the aircraft, as well as its key features. In the second part, tell the reader about the aircraft in the game. Insert screenshot of the vehicle. If the novice player does not remember the vehicle by name, he will immediately understand what kind of vehicle it is talking about.''--> |
| + | |||
| + | [[File:GarageImage_{{PAGENAME}}.jpg|420px|thumb|left]] | ||
| + | {{break}} | ||
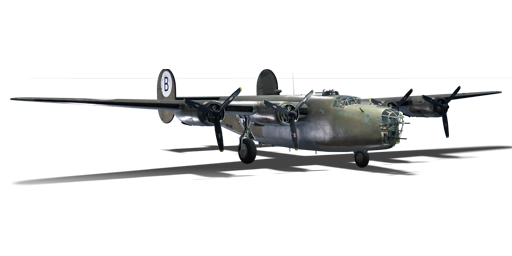
| + | The '''B-24D-25-CO Liberator''' is a Rank IV American bomber with a battle rating of 5.7 (AB) and 6.0 (RB/SB). It was in the game since the start of the Open Beta Test prior to Update 1.29. | ||
| + | |||
| + | The Consolidated B-24D Liberator was built to be a long-range four-engine heavy bomber. It is most efficiently used for bombing stationary targets like bases, airfields, and pillboxes from high altitude. | ||
| + | |||
| + | The Liberator can cruise somewhat faster than the Boeing B-17E Flying Fortress and can also carry a heavier payload. Unfortunately, its maneuverability and handling are significantly worse thanks to the Davis wing design, which is optimized for efficient level flight only. Evasive maneuvers are not easy to pull off and typically result in loss of altitude or going into a spin. | ||
| + | |||
| + | In line with the USAAF's philosophy during World War II, the Liberator is equipped with a relatively heavy defensive armament of eleven .50 cal AN/M2 heavy machine guns staffed by gunners. The theory behind this was intended that an American bomber would be able to defend itself from enemy fighters in daylight missions. These guns have excellent coverage and there is no angle from which attackers may come from on which no guns can be brought to bear. | ||
| + | |||
| + | Compared to the B-17E, the Liberator can carry an additional 2 x 1,000 lb (454 kg) bombs. However, this maximum payload of 8,000 lb (3,632 kg) compares very unfavorably against other heavy bombers like the [[Yer-2_ACh-30B/L|Yermolayev Yer-2 with ACh-30B engines]] (5,000 kg), [[Do_217_M-1|Dornier Do 217]] series (4,000 kg), and [[Lancaster_B_Mk_I|Lancaster]] series (14,000 lb or 6,363 kg), all of which have much lower battle ratings. On the flip side, while it's payload may not have been as great as other nation's bombers, over 18,500 B-25 bombers were built over the duration of the war (the most produced bomber) and were deployed in sheer numbers unmatched by any other bomber. | ||
== General info == | == General info == | ||
=== Flight Performance === | === Flight Performance === | ||
| − | ''Describe how the aircraft behaves in the air. Maximum speed, maneuverability, speed and allowable loads - these are the most important characteristics of the vehicle.'' | + | <!--''Describe how the aircraft behaves in the air. Maximum speed, maneuverability, speed and allowable loads - these are the most important characteristics of the vehicle.''--> |
| + | {| class="wikitable" style="text-align:center" | ||
| + | |- | ||
| + | ! colspan="8" | Characteristics | ||
| + | |- | ||
| + | ! colspan="8" | ''Stock'' | ||
| + | |- | ||
| + | ! colspan="2" | Max Speed<br>(km/h at 7,620 m) | ||
| + | ! rowspan="2" | Max altitude<br>(meters) | ||
| + | ! colspan="2" | Turn time<br>(seconds) | ||
| + | ! colspan="2" | Rate of climb<br>(meters/second) | ||
| + | ! rowspan="2" |Take-off run<br>(meters) | ||
| + | |- | ||
| + | ! AB | ||
| + | ! RB | ||
| + | ! AB | ||
| + | ! RB | ||
| + | ! AB | ||
| + | ! RB | ||
| + | |- | ||
| + | | 472 || 464 || 9,754 || 39.6 || 40.3 || 2.0 || 2.9 || 820 | ||
| + | |- | ||
| + | ! colspan="8" | ''Upgraded'' | ||
| + | |- | ||
| + | ! colspan="2" | Max Speed<br>(km/h at 7,620 m) | ||
| + | ! rowspan="2" |Max altitude (meters) | ||
| + | ! colspan="2" | Turn time (seconds) | ||
| + | ! colspan="2" | Rate of climb<br>(meters/second) | ||
| + | ! rowspan="2" |Take-off run (meters) | ||
| + | |- | ||
| + | ! AB | ||
| + | ! RB | ||
| + | ! AB | ||
| + | ! RB | ||
| + | ! AB | ||
| + | ! RB | ||
| + | |- | ||
| + | | ? || ? || 9,754 || ??.? || ??.? || ?.? || ?.? || 820 | ||
| + | |- | ||
| + | |} | ||
| + | |||
| + | ====Details==== | ||
| + | {| class="wikitable" style="text-align:center" | ||
| + | |- | ||
| + | ! colspan="5" | Features | ||
| + | |- | ||
| + | ! Combat flap | ||
| + | ! Take-off flap | ||
| + | ! Landing flap | ||
| + | ! Air brakes | ||
| + | ! Arrestor gear | ||
| + | |- | ||
| + | | ✓ || ✓ || ✓ || X || X <!-- ✓ --> | ||
| + | |- | ||
| + | |} | ||
| + | |||
| + | {| class="wikitable" style="text-align:center" | ||
| + | |- | ||
| + | ! colspan="5" | Limits | ||
| + | |- | ||
| + | ! rowspan="2" | Wing-break speed<br>(km/h) | ||
| + | ! rowspan="2" | Gear limit<br>(km/h) | ||
| + | ! rowspan="2" | Combat flap<br> (km/h) | ||
| + | ! colspan="2" | Max Static G | ||
| + | |- | ||
| + | ! + | ||
| + | ! - | ||
| + | |- | ||
| + | | 570 || 450 || 520 || ~1 || ~1 | ||
| + | |- | ||
| + | |} | ||
| + | |||
| + | {| class="wikitable" style="text-align:center" | ||
| + | |- | ||
| + | ! colspan="4" | Optimal velocities | ||
| + | |- | ||
| + | ! Ailerons<br>(km/h) | ||
| + | ! Rudder<br>(km/h) | ||
| + | ! Elevators<br>(km/h) | ||
| + | ! Radiator<br>(km/h) | ||
| + | |- | ||
| + | | < 280 || < 320 || < 290 || > 200 | ||
| + | |- | ||
| + | |} | ||
| + | |||
| + | {| class="wikitable" style="text-align:center" | ||
| + | |- | ||
| + | ! colspan="3" | Compressor (RB/SB) | ||
| + | |- | ||
| + | ! colspan="3" | Setting 1 | ||
| + | |- | ||
| + | ! Optimal altitude | ||
| + | ! 100% Engine power | ||
| + | ! WEP Engine power | ||
| + | |- | ||
| + | | 6,620 m || 4,400 hp || 4,752 hp | ||
| + | |- | ||
| + | <!--! colspan="3" | Setting 2 | ||
| + | |- | ||
| + | ! Optimal altitude | ||
| + | ! 100% Engine power | ||
| + | ! WEP Engine power | ||
| + | |- | ||
| + | | ?,??? m || ?,??? hp || ?,??? hp | ||
| + | |- | ||
| + | ! colspan="3" | Setting 3 | ||
| + | |- | ||
| + | ! Optimal altitude | ||
| + | ! 100% Engine power | ||
| + | ! WEP Engine power | ||
| + | |- | ||
| + | | ?,??? m || ?,??? hp || ?,??? hp | ||
| + | |- --> | ||
| + | |} | ||
=== Survivability and armour === | === Survivability and armour === | ||
| − | ''Examine the survivability of the aircraft. Note how vulnerable the structure is and how secure the pilot is, whether the fuel tanks are armoured. Describe the armour, if there is any, also mention the vulnerability of other critical aircraft systems.'' | + | <!--''Examine the survivability of the aircraft. Note how vulnerable the structure is and how secure the pilot is, whether the fuel tanks are armoured. Describe the armour, if there is any, also mention the vulnerability of other critical aircraft systems.''--> |
| + | * 9.5 mm Steel - Armor plates behind the pilots | ||
| + | * 9.5 mm Steel - Armor plates in front of dorsal gunner | ||
| + | * 9.5 mm Steel - Armor plate in front of ventral gunner | ||
| + | * 9.5 mm Steel - Armor plate behind beam gunners | ||
| + | * 9.5 mm Steel - Armor plates around tail gunner | ||
| + | * 38 mm Bulletproof glass - Tail gunner's rear facing window | ||
== Armaments == | == Armaments == | ||
| − | === Offensive armament === | + | <!--=== Offensive armament === |
''Describe the offensive armament of the aircraft, if any. Describe how effective the cannons and machine guns are in a battle, and also what belts or drums are better to use. If there is no offensive weaponry, delete this subsection.'' | ''Describe the offensive armament of the aircraft, if any. Describe how effective the cannons and machine guns are in a battle, and also what belts or drums are better to use. If there is no offensive weaponry, delete this subsection.'' | ||
| + | {{main|MAC 1934 (7.5 mm)}} | ||
| + | |||
| + | The '''''{{PAGENAME}}''''' is armed with: | ||
| + | |||
| + | * 4 x 7.5 mm [[MAC 1934 (7.5 mm)|MAC 1934]] machine guns (300 rpg = 1,200 total) | ||
| + | The four machine guns are arranged in bundles of two mounted on the underside of the upper wing. Each are armed with the same amount of ammunition, which means that all guns will fire with each other until empty.--> | ||
=== Suspended armament === | === Suspended armament === | ||
| − | ''Describe the aircraft's suspended armament: additional cannons under the wings, bombs, rockets and torpedoes. This section is especially important for bombers and attackers. If there is no suspended weaponry remove this subsection.'' | + | <!--''Describe the aircraft's suspended armament: additional cannons under the wings, bombs, rockets and torpedoes. This section is especially important for bombers and attackers. If there is no suspended weaponry remove this subsection.''--> |
| + | {{main|Bombs}} | ||
| + | |||
| + | The '''''{{PAGENAME}}''''' can be outfitted with the following ordinance: | ||
| + | |||
| + | * 8 x 500 lb AN-M64A1 bombs (4,000 lb total) | ||
| + | * 20 x 100 lb AN-M30A1 bombs (2,000 lb total) | ||
| + | * 12 x 500 lb AN-M64A1 bombs (6,000 lb total) | ||
| + | * 8 x 1000 lb AN-M65A1 bombs (8,000 lb total) | ||
=== Defensive armament === | === Defensive armament === | ||
| − | ''Defensive armament with turret machine guns or cannons, crewed by gunners. Examine the number of gunners and what belts or drums are better to use. If defensive weaponry is not available remove this subsection.'' | + | <!--''Defensive armament with turret machine guns or cannons, crewed by gunners. Examine the number of gunners and what belts or drums are better to use. If defensive weaponry is not available remove this subsection.''--> |
| + | {{main|Browning M2 (12.7 mm)}} | ||
| + | |||
| + | The '''''{{PAGENAME}}''''' is defended by: | ||
| + | |||
| + | * 2 x 12.7 mm Browning M2 machine gun, dorsal turret (200 rpg = 400 total) | ||
| + | * 2 x 12.7 mm Browning M2 machine gun, ventral turret (275 rpg = 550 total) | ||
| + | * 2 x 12.7 mm Browning M2 machine gun, tail turret (400 rpg = 800 total) | ||
| + | * 1 x 12.7 mm Browning M2 machine gun, 2 x beam turret (250 rpg = 500 total) | ||
| + | * 3 x 12.7 mm Browning M2 machine gun, nose turret (300 rpg = 900 total) | ||
== Usage in the battles == | == Usage in the battles == | ||
| − | ''Describe the tactics of playing in an aircraft, the features of using vehicles in a team and advice on tactics. Refrain from creating a "guide" - do not impose a single point of view but give the reader food for thought. Examine the most dangerous enemies and give recommendations on fighting them. If necessary, note the specifics of the game in different modes (AB, RB, SB).'' | + | <!--''Describe the tactics of playing in an aircraft, the features of using vehicles in a team and advice on tactics. Refrain from creating a "guide" - do not impose a single point of view but give the reader food for thought. Examine the most dangerous enemies and give recommendations on fighting them. If necessary, note the specifics of the game in different modes (AB, RB, SB).''--> |
| + | Due to its high battle rating, the Liberator will face many high-altitude dedicated bomber interceptors with 20–30 mm cannons, making for an extremely dangerous environment. The defensive guns should be treated as a last resort; combat with fighters should be avoided at all costs by the use of careful route planning and cloud cover, if available. | ||
| + | |||
| + | If pursued, attempt to maneuver the Liberator so that the enemy is forced into a tail-chase, where the Liberator's defensive guns are most effective. | ||
| + | |||
| + | Low level bombing is not recommended due to the limited maneuverability of the aircraft, the Liberator simply doesn't have the performance to get away with it and you will be an easy target for enemy fighters. | ||
| + | |||
| + | ====Counter-tactics==== | ||
| + | <!--What to expect, if it would be in command of the enemy and how to counter it. (i.e. They will most likely BnZ, etc.)--> | ||
| + | When going up against the B-24D, it is very important that the attacker must never underestimate the sheer defensive power this bomber holds. If not careful, your plane will either become critically damaged or a ball of fire from only a few hits from the 12.7 mm M2 Browning MGs. | ||
| + | |||
| + | The number one rule when fighting a bomber is to '''''never''''' engage it in front or the back; this applies heavily when engaging the B-24D since you will have 6 machine guns facing you. The best way to attack this bomber is from above or the sides. Attacking from below is highly discouraged since you will be forced to pull up in order to engage and end up above the bomber where 4 machine guns will be facing you automatically. Boom & Zoom tactics are highly recommended since it allows you to evade machine gun fire and be on the constant move at high speeds making it difficult for the gunners to get a bead on you. | ||
| + | |||
| + | When engaging the B-24D, you must always keep your momentum and never stall or bleed your speed. Losing speed means you are an easier target to hit, which means you are an easier target to shoot down. Aiming at the engines will also stress your opponent as it will cause the bomber to lose speed rapidly or even better, catch fire. If you wish for an easy kill without wasting precious time, it is recommended to aim for the bomber's wings. Damaging the wings of the plane will cause it to tilt to one side or snap. | ||
| + | |||
| + | The last thing a player should take note is the plane they plane they are flying. As bad as it sounds, a Japanese plane is more likely to be brought down than a German plane due to the difference in armour, it is better to bring an aircraft with some form of protection rather than a plane with no protection, this will determine your chances of survival by a great amount. | ||
| + | |||
| + | ===Manual Engine Control=== | ||
| + | {| class="wikitable" style="text-align:center" | ||
| + | |- | ||
| + | ! colspan="7" | MEC elements | ||
| + | |- | ||
| + | ! rowspan="2" |Mixer | ||
| + | ! rowspan="2" |Pitch | ||
| + | ! colspan="3" |Radiator | ||
| + | ! rowspan="2" |Supercharger | ||
| + | ! rowspan="2" |Turbocharger | ||
| + | |- | ||
| + | ! Oil | ||
| + | ! Water | ||
| + | ! Type | ||
| + | |- | ||
| + | | Controllable || rowspan="2" | Not controllable || rowspan="2" | Not controllable || rowspan="2" | Not controllable || rowspan="2" | Separate || rowspan="2" | Not ontrollable || rowspan="2" | Not controllable | ||
| + | |- | ||
| + | |} | ||
| + | |||
| + | ===Modules=== | ||
| + | {| class="wikitable" | ||
| + | !colspan = "1"| Tier | ||
| + | !colspan = "2"| Flight performance | ||
| + | !colspan = "1"| Survivability | ||
| + | !colspan = "2"| Weaponry | ||
| + | |- | ||
| + | | I | ||
| + | | Fuselage Repair | ||
| + | | Radiator | ||
| + | | Flak Vest | ||
| + | | | ||
| + | | | ||
| + | |- | ||
| + | | II | ||
| + | | | ||
| + | | Compressor | ||
| + | | Airframe | ||
| + | | | ||
| + | | | ||
| + | |- | ||
| + | | III | ||
| + | | Wings Repair | ||
| + | | Engine | ||
| + | | | ||
| + | | | ||
| + | | | ||
| + | |- | ||
| + | | IV | ||
| + | | | ||
| + | | Engine Injection | ||
| + | | Cover | ||
| + | | | ||
| + | | | ||
| + | |- | ||
| + | |} | ||
=== Pros and cons === | === Pros and cons === | ||
| − | ''Summarize and briefly evaluate the vehicle in terms of its characteristics and combat effectiveness. Mark its pros and cons in the bulleted list. Do not use more than 6 points for each of the characteristics. Avoid using categorical definitions such as "bad", "good" and the like - they have a substitution in the form of softer "inadequate", "effective".'' | + | <!--''Summarize and briefly evaluate the vehicle in terms of its characteristics and combat effectiveness. Mark its pros and cons in the bulleted list. Do not use more than 6 points for each of the characteristics. Avoid using categorical definitions such as "bad", "good" and the like - they have a substitution in the form of softer "inadequate", "effective".''--> |
'''Pros:''' | '''Pros:''' | ||
| − | * | + | * Heavy defensive armament, protected from every angle (deadly from frontal and rear attacks) |
| + | * Heavier payload than the [[B-17E/L|B-17E]], however comparable to [[B-17G-60-VE|B-17G]] | ||
| + | * Overall better flight performance than the [[B-17E/L|B-17E]] in level flight | ||
'''Cons:''' | '''Cons:''' | ||
| − | * | + | * Poor handling, built for top speed a level flight, not maneuvering |
| + | * Significantly lower payload compared to heavy bombers of other nations | ||
| + | * Twin tail configuration reduces maneuverability, rectified in [[PB4Y-2|PB4Y-2 ''Privateer'']] with a single tail | ||
== History == | == History == | ||
| − | ''Describe the history of the creation and combat usage of the aircraft in more detail than in the introduction. If the historical reference turns out to be too big, take it to a separate article, taking a link to an article about the vehicle and adding a block "/ historical reference" (example: https://wiki.warthunder.com/Name-vehicles/historical reference) and add a link to it here using the <code>main</code> template. Be sure to include links to sources at the end of the article.'' | + | <!--''Describe the history of the creation and combat usage of the aircraft in more detail than in the introduction. If the historical reference turns out to be too big, take it to a separate article, taking a link to an article about the vehicle and adding a block "/ historical reference" (example: https://wiki.warthunder.com/Name-vehicles/historical reference) and add a link to it here using the <code>main</code> template. Be sure to include links to sources at the end of the article.''--> |
| + | The B-24 was produced in several variants to fulfill operational and training needs. More Liberators were eventually built then any other US Warplane during World War II. The first B-24 prototype flew in December of 1943 named "XB-24". The aircraft was designed around the "Davis" wing, a long, thing, large area structure mounted high on the fuselage. The long wing span gave the B-24 excellent high altitude performance and allowed it to extend its range. The twin bomb-bays were called "roller shutter" doors. The doors rolled up into the aircraft. The purpose of this design was to reduce the drag while the bomb bay doors are open. The bomb-load was stored vertically with a catwalk down the middle, this gave crews easy access to the rear of the fuselage. The Liberator was powered by four 1,200 HP Pratt & Whitney R-1830 engines. The aircraft also included a twin tail design and tricycle landing gear. | ||
| + | |||
| + | The B-24 made its operational debut in June of 1942. It was tasked with long-range raids on the Germany's Romanian oilfields. The B-24 is commonly remembered for its service with the Eight Air Force but it filled a desperate roll for the navy as a long-range patrol aircraft. After huge losses of allied shipping the Navy was granted access to Liberators. These aircraft were operated under the designation PB4Y. They were equipped with air to surface radar and depth charges. The B-24 also quickly replaced the B-17 in the Pacific theater due to its long range capabilities. The B-24 was used to bring havoc to Japanese land installations and naval vessels. Liberators stayed in service until 1951, they were replaced by the Privateer. | ||
| + | |||
| + | The B-24 is often unfairly compared to the B-17. The B-24 was newer, more efficient, and much more versatile then Boeing's design. The B-24 saw action on all fronts, its most valuable work may have been against U-boats. The aircraft also saw work as a cargo plane, tanker, patrol, and reconnaissance. Even some were armed with additional guns as escorts. The B-24 was not as popular with it's crews as the B-17. The B-24 was known to catch fire in battle easier and at times was known to suffer from hydraulic problems. | ||
== Media == | == Media == | ||
| − | ''An excellent addition to the article will be video guides, as well as screenshots from the game and photos.'' | + | <!--''An excellent addition to the article will be video guides, as well as screenshots from the game and photos.''--> |
| + | [[File:BomberImage_B-24JCollings.JPG|350px|thumb|right|Collings Foundation B-24J "Witchcraft"]] | ||
== Read also == | == Read also == | ||
| Line 43: | Line 278: | ||
* ''reference to the series of the aircraft;'' | * ''reference to the series of the aircraft;'' | ||
* ''links to approximate analogues of other nations and research trees.'' | * ''links to approximate analogues of other nations and research trees.'' | ||
| − | ''ETC.'' | + | <!--''ETC.''--> |
== Sources == | == Sources == | ||
| Line 50: | Line 285: | ||
* ''page on aircraft encyclopedia;'' | * ''page on aircraft encyclopedia;'' | ||
* ''other literature.'' | * ''other literature.'' | ||
| + | |||
| + | {{USA bombers}} | ||
Revision as of 14:49, 28 November 2018
Contents
Description

The B-24D-25-CO Liberator is a Rank IV American bomber with a battle rating of 5.7 (AB) and 6.0 (RB/SB). It was in the game since the start of the Open Beta Test prior to Update 1.29.
The Consolidated B-24D Liberator was built to be a long-range four-engine heavy bomber. It is most efficiently used for bombing stationary targets like bases, airfields, and pillboxes from high altitude.
The Liberator can cruise somewhat faster than the Boeing B-17E Flying Fortress and can also carry a heavier payload. Unfortunately, its maneuverability and handling are significantly worse thanks to the Davis wing design, which is optimized for efficient level flight only. Evasive maneuvers are not easy to pull off and typically result in loss of altitude or going into a spin.
In line with the USAAF's philosophy during World War II, the Liberator is equipped with a relatively heavy defensive armament of eleven .50 cal AN/M2 heavy machine guns staffed by gunners. The theory behind this was intended that an American bomber would be able to defend itself from enemy fighters in daylight missions. These guns have excellent coverage and there is no angle from which attackers may come from on which no guns can be brought to bear.
Compared to the B-17E, the Liberator can carry an additional 2 x 1,000 lb (454 kg) bombs. However, this maximum payload of 8,000 lb (3,632 kg) compares very unfavorably against other heavy bombers like the Yermolayev Yer-2 with ACh-30B engines (5,000 kg), Dornier Do 217 series (4,000 kg), and Lancaster series (14,000 lb or 6,363 kg), all of which have much lower battle ratings. On the flip side, while it's payload may not have been as great as other nation's bombers, over 18,500 B-25 bombers were built over the duration of the war (the most produced bomber) and were deployed in sheer numbers unmatched by any other bomber.
General info
Flight Performance
| Characteristics | |||||||
|---|---|---|---|---|---|---|---|
| Stock | |||||||
| Max Speed (km/h at 7,620 m) |
Max altitude (meters) |
Turn time (seconds) |
Rate of climb (meters/second) |
Take-off run (meters) | |||
| AB | RB | AB | RB | AB | RB | ||
| 472 | 464 | 9,754 | 39.6 | 40.3 | 2.0 | 2.9 | 820 |
| Upgraded | |||||||
| Max Speed (km/h at 7,620 m) |
Max altitude (meters) | Turn time (seconds) | Rate of climb (meters/second) |
Take-off run (meters) | |||
| AB | RB | AB | RB | AB | RB | ||
| ? | ? | 9,754 | ??.? | ??.? | ?.? | ?.? | 820 |
Details
| Features | ||||
|---|---|---|---|---|
| Combat flap | Take-off flap | Landing flap | Air brakes | Arrestor gear |
| ✓ | ✓ | ✓ | X | X |
| Limits | ||||
|---|---|---|---|---|
| Wing-break speed (km/h) |
Gear limit (km/h) |
Combat flap (km/h) |
Max Static G | |
| + | - | |||
| 570 | 450 | 520 | ~1 | ~1 |
| Optimal velocities | |||
|---|---|---|---|
| Ailerons (km/h) |
Rudder (km/h) |
Elevators (km/h) |
Radiator (km/h) |
| < 280 | < 320 | < 290 | > 200 |
| Compressor (RB/SB) | ||
|---|---|---|
| Setting 1 | ||
| Optimal altitude | 100% Engine power | WEP Engine power |
| 6,620 m | 4,400 hp | 4,752 hp |
Survivability and armour
- 9.5 mm Steel - Armor plates behind the pilots
- 9.5 mm Steel - Armor plates in front of dorsal gunner
- 9.5 mm Steel - Armor plate in front of ventral gunner
- 9.5 mm Steel - Armor plate behind beam gunners
- 9.5 mm Steel - Armor plates around tail gunner
- 38 mm Bulletproof glass - Tail gunner's rear facing window
Armaments
Suspended armament
The B-24D-25-CO can be outfitted with the following ordinance:
- 8 x 500 lb AN-M64A1 bombs (4,000 lb total)
- 20 x 100 lb AN-M30A1 bombs (2,000 lb total)
- 12 x 500 lb AN-M64A1 bombs (6,000 lb total)
- 8 x 1000 lb AN-M65A1 bombs (8,000 lb total)
Defensive armament
The B-24D-25-CO is defended by:
- 2 x 12.7 mm Browning M2 machine gun, dorsal turret (200 rpg = 400 total)
- 2 x 12.7 mm Browning M2 machine gun, ventral turret (275 rpg = 550 total)
- 2 x 12.7 mm Browning M2 machine gun, tail turret (400 rpg = 800 total)
- 1 x 12.7 mm Browning M2 machine gun, 2 x beam turret (250 rpg = 500 total)
- 3 x 12.7 mm Browning M2 machine gun, nose turret (300 rpg = 900 total)
Usage in the battles
Due to its high battle rating, the Liberator will face many high-altitude dedicated bomber interceptors with 20–30 mm cannons, making for an extremely dangerous environment. The defensive guns should be treated as a last resort; combat with fighters should be avoided at all costs by the use of careful route planning and cloud cover, if available.
If pursued, attempt to maneuver the Liberator so that the enemy is forced into a tail-chase, where the Liberator's defensive guns are most effective.
Low level bombing is not recommended due to the limited maneuverability of the aircraft, the Liberator simply doesn't have the performance to get away with it and you will be an easy target for enemy fighters.
Counter-tactics
When going up against the B-24D, it is very important that the attacker must never underestimate the sheer defensive power this bomber holds. If not careful, your plane will either become critically damaged or a ball of fire from only a few hits from the 12.7 mm M2 Browning MGs.
The number one rule when fighting a bomber is to never engage it in front or the back; this applies heavily when engaging the B-24D since you will have 6 machine guns facing you. The best way to attack this bomber is from above or the sides. Attacking from below is highly discouraged since you will be forced to pull up in order to engage and end up above the bomber where 4 machine guns will be facing you automatically. Boom & Zoom tactics are highly recommended since it allows you to evade machine gun fire and be on the constant move at high speeds making it difficult for the gunners to get a bead on you.
When engaging the B-24D, you must always keep your momentum and never stall or bleed your speed. Losing speed means you are an easier target to hit, which means you are an easier target to shoot down. Aiming at the engines will also stress your opponent as it will cause the bomber to lose speed rapidly or even better, catch fire. If you wish for an easy kill without wasting precious time, it is recommended to aim for the bomber's wings. Damaging the wings of the plane will cause it to tilt to one side or snap.
The last thing a player should take note is the plane they plane they are flying. As bad as it sounds, a Japanese plane is more likely to be brought down than a German plane due to the difference in armour, it is better to bring an aircraft with some form of protection rather than a plane with no protection, this will determine your chances of survival by a great amount.
Manual Engine Control
| MEC elements | ||||||
|---|---|---|---|---|---|---|
| Mixer | Pitch | Radiator | Supercharger | Turbocharger | ||
| Oil | Water | Type | ||||
| Controllable | Not controllable | Not controllable | Not controllable | Separate | Not ontrollable | Not controllable |
Modules
| Tier | Flight performance | Survivability | Weaponry | ||
|---|---|---|---|---|---|
| I | Fuselage Repair | Radiator | Flak Vest | ||
| II | Compressor | Airframe | |||
| III | Wings Repair | Engine | |||
| IV | Engine Injection | Cover | |||
Pros and cons
Pros:
- Heavy defensive armament, protected from every angle (deadly from frontal and rear attacks)
- Heavier payload than the B-17E, however comparable to B-17G
- Overall better flight performance than the B-17E in level flight
Cons:
- Poor handling, built for top speed a level flight, not maneuvering
- Significantly lower payload compared to heavy bombers of other nations
- Twin tail configuration reduces maneuverability, rectified in PB4Y-2 Privateer with a single tail
History
The B-24 was produced in several variants to fulfill operational and training needs. More Liberators were eventually built then any other US Warplane during World War II. The first B-24 prototype flew in December of 1943 named "XB-24". The aircraft was designed around the "Davis" wing, a long, thing, large area structure mounted high on the fuselage. The long wing span gave the B-24 excellent high altitude performance and allowed it to extend its range. The twin bomb-bays were called "roller shutter" doors. The doors rolled up into the aircraft. The purpose of this design was to reduce the drag while the bomb bay doors are open. The bomb-load was stored vertically with a catwalk down the middle, this gave crews easy access to the rear of the fuselage. The Liberator was powered by four 1,200 HP Pratt & Whitney R-1830 engines. The aircraft also included a twin tail design and tricycle landing gear.
The B-24 made its operational debut in June of 1942. It was tasked with long-range raids on the Germany's Romanian oilfields. The B-24 is commonly remembered for its service with the Eight Air Force but it filled a desperate roll for the navy as a long-range patrol aircraft. After huge losses of allied shipping the Navy was granted access to Liberators. These aircraft were operated under the designation PB4Y. They were equipped with air to surface radar and depth charges. The B-24 also quickly replaced the B-17 in the Pacific theater due to its long range capabilities. The B-24 was used to bring havoc to Japanese land installations and naval vessels. Liberators stayed in service until 1951, they were replaced by the Privateer.
The B-24 is often unfairly compared to the B-17. The B-24 was newer, more efficient, and much more versatile then Boeing's design. The B-24 saw action on all fronts, its most valuable work may have been against U-boats. The aircraft also saw work as a cargo plane, tanker, patrol, and reconnaissance. Even some were armed with additional guns as escorts. The B-24 was not as popular with it's crews as the B-17. The B-24 was known to catch fire in battle easier and at times was known to suffer from hydraulic problems.
Media
Read also
Links to the articles on the War Thunder Wiki that you think will be useful for the reader, for example,
- reference to the series of the aircraft;
- links to approximate analogues of other nations and research trees.
Sources
Paste links to sources and external resources, such as:
- topic on the official game forum;
- page on aircraft encyclopedia;
- other literature.
| USA bombers | |
|---|---|
| Dive | SB2U-2 · SB2U-3 · SBD-3 · SB2C-1C · SB2C-4 |
| Torpedo | TBD-1 · PBY-5 Catalina · PBY-5A Catalina · TBF-1C · BTD-1 |
| Medium | B-10B · B-18A · B-34 · PV-2D · B-25J-1 · B-25J-20 · A-26C-45 · A-26C-45DT · B-26B |
| Heavy | B-17E · B-17E/L · B-17G-60-VE · PB4Y-2 · B-24D-25-CO · B-29A-BN |
| Hydroplanes | OS2U-1 · OS2U-3 · PBM-1 "Mariner" · PBM-3 "Mariner" |
