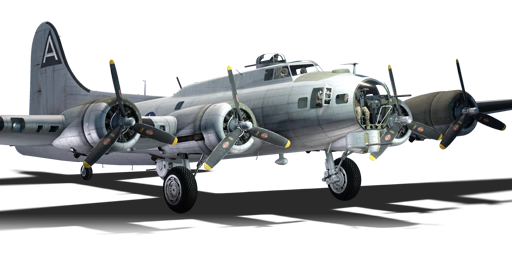
B-17G-60-VE

From War Thunder Wiki
Jump to: navigation, search
RANK 6 BRITAIN
Rooikat 105 PACK
This page is about the American bomber B-17G-60-VE. For other versions, see B-17 (Family).
B-17G-60-VE
b-17g.png
GarageImage B-17G-60-VE.jpg
ArtImage B-17G-60-VE.jpg
B-17G-60-VE
Research:46 000 Specs-Card-Exp.png
Purchase:155 000 Specs-Card-Lion.png
Show in game

Description

The Boeing B-17G is the main serial production variant of the famous "Flying Fortress" first produced in 1943. Using lessons learned from operating the previous B-17E/F models, several changes were made on the G model, with some carried from the troublesome F model. This include a pressurised cabin, the addition of a chin remote-controlled turret and improved cheek turret mount to counter frontal engagements, moving the right waist gunner position towards to front to increase the overall coverage, improved superchargers for high-altitude operation, and receiving the "Cheyenne" tail turret which increased protection and the field of fire for the tail gunner. Around 8,680 B-17Gs were built, with several airframes being converted as a testbed for various projects.

Being in the game since the start of the Open Beta Test prior to Update 1.27. The B-17G Flying Fortress, as the name suggests, is intended to be used as a high-altitude level bomber, designed to target enemy airfields and military bases. Compared to the early B-17E models, the B-17G is noticeably faster thanks to improved superchargers, allowing it to climb better and further at higher altitudes. The B-17G's defensive capabilities is also improved, with an addition of chin turret and revised gunner positions that effectively eliminating every blind spots around the plane. In addition, the B-17G also has an access to extra wing hardpoints that allowed it to carry an extra pair of 1,000 lb and 2,000 lb bombs. All of this allowed the B-17G to perform the same job that the B-17E excels at even better than before; destroying ground targets while evading most enemy using altitude advantage, and giving a tough fight to anyone who manages to reach it. However, the B-17G still retains the critical weakness of the "Flying Fortress" family, namely its relatively weak tail, excessive wing loading that restrict its manoeverability, and its tendency to catch fire.

General info

Flight performance

Max speed
at 7 680 m510 km/h
Turn time36 s
Max altitude11 156 m
Engine4 х Wright R-1820-97
Type
Cooling systemAir
Take-off weight31 t

As with earlier B-17 models, the B-17G's flight performance is nothing to write home about. The plane is quite slow to move around at higher speeds and suffers from excessive wing loading that prevents it from doing most aerobatic manoeuvres outside of Arcade mode. While the B-17G's top speed is decent for a heavy bomber, it is still quite slow compared to other fighters at its BR, which means the B-17G will not outrun any fighters or interceptors unless it has an altitude advantage.

Speaking about altitude, the B-17G gets a long range bomber spawn. When combined with the plane's improved higher altitude performance, the B-17G can climb up to a safer altitude from most fighters except some dedicated interceptors, thus allowing the B-17G to reach its target and safely drop its payload as long as the plane is not spotted or is far enough from most enemies.

Like the previous B-17 models, the B-17G has a great flight endurance. The plane is capable of flying even if two engines were disabled and it remains responsive even when its airframes and ailerons were damaged, so long as your tail or wingtips were not destroyed. And thus increases the chance of returning to the base after combat.

Characteristics Max Speed
(km/h at 7,680 m)
Max altitude
(metres)
Turn time
(seconds)
Rate of climb
(metres/second)
Take-off run
(metres)
AB RB AB RB AB RB
Stock 492 476 11156 37.2 38.2 2.2 2.2 600
Upgraded 535 510 34.9 36.0 7.7 4.6

Details

Features
Combat flaps Take-off flaps Landing flaps Air brakes Arrestor gear
X X
Limits
Wings (km/h) Gear (km/h) Flaps (km/h) Max Static G
Combat Take-off Landing + -
516 290 383 361 249 ~2 ~1
Optimal velocities (km/h)
Ailerons Rudder Elevators Radiator
< 330 < 310 < 270 > 300

Survivability and armour

Crew10 people
Speed of destruction
Structural0 km/h
Gear290 km/h
  • 6.35 mm Steel - Lower nose armour plate
  • 6.35 mm Steel - Back of pilot and co-pilot's seats
  • 6.35 mm Steel - Dorsal turret gunner protective plate
  • 6.35 mm Steel - Radio operator protective plate
  • 6.35 mm Steel - Beam gunner protective armour x 2
  • 6.35 mm Steel - Tail gunner protective plate
  • 38 mm Bulletproof glass - Ball turret
  • 38 mm Bulletproof glass - Tail gunner rear window

Like the previous B-17 models, the B-17G is a very tough nut to crack. The airframe is clad with several layers of armour protecting the pilots and gunner, and the airframe itself can take a lot of punishments even from 20 mm autocannons.

However, the B-17G still retains the same weakness at the wingtips and tail that can be relatively easy to destroy and effectively guaranteed a crash if that was the case. The B-17G's huge fuel tanks inside the wings is also very vulnerable to fire damage, though you can potentially put if off before it destroy your plane by turn off your engines and use the EFS system.

Modifications and economy

Repair costBasic → Reference
AB1 853 → 2 521 Sl icon.png
RB5 400 → 7 349 Sl icon.png
SB11 132 → 15 150 Sl icon.png
Total cost of modifications40 200 Rp icon.png
77 700 Sl icon.png
Talisman cost1 400 Ge icon.png
Crew training45 000 Sl icon.png
Experts155 000 Sl icon.png
Aces820 Ge icon.png
Research Aces440 000 Rp icon.png
Reward for battleAB / RB / SB
100 / 200 / 470 % Sl icon.png
160 / 160 / 160 % Rp icon.png
Modifications
Flight performance Survivability Weaponry
Mods aerodinamic fuse.png
Fuselage repair
Research:
1 600 Rp icon.png
Cost:
3 100 Sl icon.png
135 Ge icon.png
Mods radiator.png
Radiator
Research:
1 600 Rp icon.png
Cost:
3 100 Sl icon.png
135 Ge icon.png
Mods armor frame.png
Airframe
Research:
3 000 Rp icon.png
Cost:
5 800 Sl icon.png
260 Ge icon.png
Mods compressor.png
Compressor
Research:
3 000 Rp icon.png
Cost:
5 800 Sl icon.png
260 Ge icon.png
Mods aerodinamic wing.png
Wings repair
Research:
2 500 Rp icon.png
Cost:
4 800 Sl icon.png
210 Ge icon.png
Mods new engine.png
Engine
Research:
2 500 Rp icon.png
Cost:
4 800 Sl icon.png
210 Ge icon.png
Mods armor cover.png
Cover
Research:
3 300 Rp icon.png
Cost:
6 400 Sl icon.png
280 Ge icon.png
Mods metanol.png
Engine injection
Research:
3 300 Rp icon.png
Cost:
6 400 Sl icon.png
280 Ge icon.png
Mods bulletproof vest.png
Protective vest
Research:
1 600 Rp icon.png
Cost:
3 100 Sl icon.png
135 Ge icon.png
Mods engine extinguisher.png
EFS
Research:
3 300 Rp icon.png
Cost:
6 400 Sl icon.png
280 Ge icon.png
Mods ammo.png
bmg50_turret_belt_pack
Research:
1 600 Rp icon.png
Cost:
3 100 Sl icon.png
135 Ge icon.png
Mod arrow 1.png
Mods pilon bomb.png
LBC-17
Research:
1 600 Rp icon.png
Cost:
3 100 Sl icon.png
135 Ge icon.png
Mod arrow 0.png
Mods pilon bomb.png
SBC-17
Research:
3 000 Rp icon.png
Cost:
5 800 Sl icon.png
260 Ge icon.png
Mod arrow 0.png
Mods turret gun.png
bmg50_turret_new_gun
Research:
2 500 Rp icon.png
Cost:
4 800 Sl icon.png
210 Ge icon.png
Mods pilon bomb.png
MBC-17
Research:
2 500 Rp icon.png
Cost:
4 800 Sl icon.png
210 Ge icon.png
Mod arrow 0.png
Mods pilon bomb.png
M10 bomb rack
Research:
3 300 Rp icon.png
Cost:
6 400 Sl icon.png
280 Ge icon.png

This slow and lumbering heavy bomber relies entirely on its turrets for defence. Without it, the plane is target practice. Thus "Protective vests" should be the first unlock. Further survivability upgrades will make the fight easier, but do not think it will successfully face-off against enemy fighters. So upgrading the bomb payloads should be second priority. Performance modules can be considered the least necessary.

Armaments

Suspended armament

List of setups (8)
Setup 18 x 500 lb AN-M64A1 bomb
Setup 212 x 500 lb AN-M64A1 bomb
Setup 32 x 1600 lb AN-Mk 1 armor-piercing bomb
Setup 44 x 1000 lb A.P. AN-MK 33 bomb
Setup 56 x 1000 lb AN-M65A1 bomb
Setup 62 x 2000 lb AN-M66A2 bomb
Setup 78 x 1000 lb AN-M65A1 bomb
Setup 84 x 2000 lb AN-M66A2 bomb

The B-17G-60-VE can be outfitted with the following ordnance:

  • 8 x 500 lb AN-M64A1 bombs (4,000 lb total)
  • 12 x 500 lb AN-M64A1 bombs (6,000 lb total)
  • 2 x 1,600 lb AN-Mk 1 bombs (3,200 lb total)
  • 4 x 1,000 lb A.P. AN-MK 33 bombs (4,000 lb total)
  • 6 x 1,000 lb AN-M65A1 bombs (6,000 lb total)
  • 2 x 2,000 lb AN-M66A2 bombs (4,000 lb total)
  • 8 x 1,000 lb AN-M65A1 bombs (8,000 lb total)
  • 4 x 2,000 lb AN-M66A2 bombs (8,000 lb total)

While the most efficient payload weight-to-explosive wise is the 12 x 500 lb bombs, the B-17G has an option to equip an extra pair of 1,000 lb and 2,000 lb bombs on an external hardpoint below the wing root, thus increasing its capability against a group of ground targets or naval targets.

The B-17G also has an option to use an AP bombs, though due to the poor manoeability of the plane, it would be nearly impossible to hit any ground or naval target using these bombs, so it is advised to use the high explosive bombs instead.

Defensive armament

Ammunition800 rounds
Fire rate750 shots/min
Ammunition1000 rounds
Fire rate750 shots/min
Ammunition1150 rounds
Fire rate750 shots/min
Ammunition500 rounds
Fire rate750 shots/min
Ammunition600 rounds
Fire rate750 shots/min
Ammunition300 rounds
Fire rate750 shots/min
Main article: M2 Browning (12.7 mm)

The B-17G-60-VE is defended by:

  • 2 x 12.7 mm M2 Browning machine guns, chin turret (400 rpg = 800 total)
  • 1 x 12.7 mm M2 Browning machine gun, 2 x cheek turrets (300 rpg)
  • 2 x 12.7 mm M2 Browning machine guns, front dorsal turret (500 rpg = 1,000 total)
  • 1 x 12.7 mm M2 Browning machine gun, rear dorsal turret (500 rpg)
  • 2 x 12.7 mm M2 Browning machine guns, ventral turret (500 rpg = 1,000 total)
  • 1 x 12.7 mm M2 Browning machine gun, 2 x beam turrets (600 rpg)
  • 2 x 12.7 mm M2 Browning machine guns, tail turret (575 rpg = 1,150 total)

The B-17G has 13 x .50 Browning machine guns as its defensive armaments, all guns has a large amount of ammo available, and thus allowed you to spray it at any incoming enemy as you please, so long as you didn't hold the fire for several seconds and jam it. The Browning MG is also quite accurate, with a kill being achievable even from 1.75 km away. This means you can effectively deter the enemy from chasing you by firing at them at long ranges, potentially damage their engine and force them to retreat or even get a kill.

Compared to the B-17E, the B-17G has improved defensive gun arrangements, most notably the addition of a chin turret and an upgraded tail turret. With revised waist position, the B-17G can get more guns onto its tail and offers more coverage from sides and below, thus covered all the blindspots of the B-17E varaint. While the improved cheek gun mounts and chin turret offers more defense from frontal engagements, facing the enemy head-ons are still ill-advised as the cockpit lacks any armoured glass to protect the pilots and gunners. Thus, like the previous B-17E, you should face your tail at the enemy at all times to maximize your damage output.

Much like the late war B-17E, the B-17G has an access to the "late war" ammo belt, which swap the plain tracer shell with the dreaded M20 API-T shell. This means the B-17G has a better chance of lighting the enemy plane on fire, especially with the "Universal" belts that composed entirely of an incendiary rounds.

Usage in battles

When facing fighters and interceptors in Realistic Battles, it is best to use Omni-purpose or Armour-piercing/Ground Target ammunition belts for the 12.7 mm M2 Browning machine guns. These ammunition belts are effective at tearing through the engine block and hopefully resulting in an internal engine fire. You may be also able to score a pilot kill on your opponent.

Specific enemies worth noting

B-17s are notoriously hard to kill when compared to similar Soviet and German bombers. However, with the B-17 the best defence is to evade your opponent altogether. Your worst enemies will be almost all fighters due to the high BR (Fw 190 D, Ta-152, BF-109 G-10/K-4, F8F-1B, Tempest, etc.). Most fighters will have 2-4 cannons which can still make short work of the B-17.

B-17G dropping bombs in Europe

The weakest area of approach with the B-17G is the front. Only 1-2 MGs can be focused directly forward if a fighter head-ons you. The crew is also focused at the nose. If there is a fighter at your level, try to turn and expose the tail "barb". Diving may work as well. However, diving can put you into more danger as more fighters may swarm you.

Counter-tactics

When climbing to fight the B-17, you will most likely have a lower energy level depending on the plane you use. The F8F-1B, for example, has extremely good acceleration with WEP and can climb ridiculously quickly as well. If in a plane such as an F8F-1B, attempt to head on the B-17 as this is the weakest point. If the B-17 turns away, climb and chase the Flying Fortress at a higher altitude and then dive on it from an angle. Always avoid tailing a B-17, regardless of model. This just warrants a knocked-out pilot or fire.

Manual Engine Control

MEC elements
Mixer Pitch Radiator Supercharger Turbocharger
Oil Water Type
Controllable Controllable
Auto control available
Not controllable
Not auto controlled
Controllable
Not auto controlled
Combined Controllable
1 gear
Auto controlled

Pros and cons

Pros:

  • Large bomb payload
  • Powerful air defence capabilities, with effectively no blindspots
  • Accurate Browning MGs with large ammo pool, capable of engaging the enemy from up to 1.75 km away and also help leading the target easier
  • Multiple powerful engines increase the plane's endurance and acceleration
  • Decent climb rate for a bomber at higher altitudes
  • Very durable airframe and overall heavily armoured, capable of stay airborne provided that the tail were not destroyed
  • Nose gunner is very helpful in RB against bomber hunters

Cons:

  • Fairly slow compared to other aircraft at its rank
  • Big target, its huge wings and tail are vulnerable against 20 mm cannons
  • Nose is extremely vulnerable for the pilot and crew
  • Prone to fire damage
  • Excessive wing loading can cause the wings to rip while turning at higher speed (~400 km/h)
  • Awfully slow bomb bay door opening time, forcing the pilot to open it in advance or risks missing the base entirely

History

Due to direct experience from U.S. bomber crews in 1943, the B-17F revealed inadequate protection from head-on attacks by enemy fighters. To remedy this problem, a remote-controlled chin turret armed with two 12.7 mm M2 Browning machine guns was introduced on the final production block of Douglas-built B-17Fs, the B-17F-75-DL. This turret became standard on the B-17G, and proved to be more practical than manually operated guns initially fitted to the nose. The B-17G began delivery in September of 1943 and included various upgrades throughout its production. A total of 8,680 aircraft were built from three manufacturers until April of 1945. The B-17G could be considered the cornerstone of U.S. bombing efforts in the European theatre between 1944 and 1945.


Archive of the in-game description

The Boeing B-17G Flying Fortress was the first American all-metal heavy bomber. The plane was designed in 1934 in response to a design competition for a coastal anti-ship bomber. A year later the Boeing-299 prototype was built, equipped with four 750-HP Pratt & Whitney engines. It was first flown on June 28 of that year. Subsequent variants used the 1,200 HP Wright Cyclone engines. Boeing factories began mass producing B-17 Flying Fortresses for the US Army Air Corps exactly 12 months later. Throughout the production run, Boeing produced 6,981 B-17s of various variants and an additional 5,745 were built by Lockheed and Douglas giving a total of 12,726 aircraft.

The B-17 quickly became legendary due to its ability to withstand battle damage and to bring hole-ridden aircraft home safely. Nine, and later twelve, Browning .50-cal machine guns offered formidable defensive fire coverage. Nevertheless, the aircraft was not without its faults. For example, the tendency to catch fire was never overcome. Another weakness was the lack of protection against head-on attacks; out of 27 pieces of armour, none protected the crew from the front. Firing a cannon or even a machine gun at the cockpit would find the crew completely unprotected. Another famous part of the B-17 was its highly advanced Norden bombsight, which allowed for effective bomb aiming even at high altitudes.


Media

Skins

See also

Related development

External links

Paste links to sources and external resources, such as:

  • topic on the official game forum;
  • other literature.


Boeing Aircraft
Aircraft 
Fighters  P-26A-33 · P-26A-34 M2 · P-26B-35
Bombers  B-17E · B-17E/L · B-17G-60-VE
  B-29A-BN
Export  P-26A-34 · B-17G
Captured  ▅B-17E
Helicopters 
Attack  AH-64A · AH-64D
Export / Licensed  AH-64A (GR) · ▃AH-64A Peten · AH-64A Peten · ▅AH-64DJP · ▄AH Mk.1 · AHS
See Also  Tupolev Design Bureau · Westland Helicopters · Fuji Heavy Industries
  For Boeing-built ships, see Boeing Marine Branch

USA bombers
Dive  SB2U-2 · SB2U-3 · SBD-3 · SB2C-1C · SB2C-4
Torpedo  TBD-1 · PBY-5 Catalina · PBY-5A Catalina · TBF-1C · BTD-1
Medium  B-10B · B-18A · B-34 · PV-2D · B-25J-1 · B-25J-20 · A-26C-45 · A-26C-45DT · B-26B
Heavy  B-17E · B-17E/L · B-17G-60-VE · PB4Y-2 · B-24D-25-CO · B-29A-BN
Hydroplanes  OS2U-1 · OS2U-3 · PBM-1 "Mariner" · PBM-3 "Mariner"