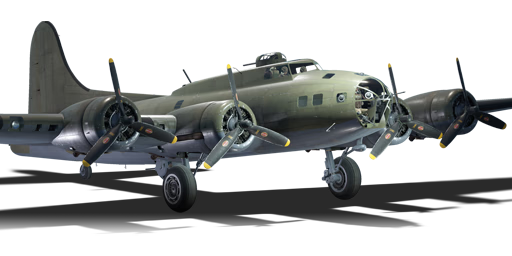
B-17E/L

From War Thunder Wiki
Jump to: navigation, search
VTOL | Rank 5 USA
AV-8A Harrier Pack
This page is about the American heavy bomber B-17E/L. For other versions, see B-17 (Family).
B-17E/L
b-17e_late.png
GarageImage B-17EL.jpg
B-17E/L
Research:17 000 Specs-Card-Exp.png
Purchase:105 000 Specs-Card-Lion.png
Show in game

Description

The B-17E Flying Fortress /Late is a rank III American bomber with a battle rating of 4.7 (AB), 5.0 (RB), and 5.7 (SB). It has been in the game since the start of the Open Beta Test prior to Update 1.27.

The B-17 Flying Fortress has the sole purpose of being a high-altitude bomber targeting land fortifications, airfields and bases. Despite its impressive bomb capacity, it is not recommended to target moving ground units, such as tanks or armoured cars, especially when they are travelling in tight columns due to the inaccuracy of your bombs at high altitudes and the ability for the AI on the ground to perform evasive manoeuvres when bombs are falling onto their position. When you first spawn in a game using the B-17, it is best if you find a formation of friendly bombers to maximize your chances of survival.

Unlike the preceding variant of the B-17, the B-17E/Late sports the Sperry Ball turret on the belly of the aircraft, thus ensuring complete protection of the belly of the aircraft. However, you still have the main drawback as the preceding B-17E: the lack of nose defences. While you do have .30 calibre guns on the nose, it is relatively inadequate at the battle rating, and nearly worthless in an uptier. On the other hand, this model of the B-17 does have more armour than its predecessors.

General info

Flight performance

Max speed
at 7 680 m510 km/h
Turn time36 s
Max altitude11 156 m
Engine4 х Wright R-1820-65
Type
Cooling systemAir
Take-off weight31 t
Characteristics Max Speed
(km/h at 7,680 m)
Max altitude
(metres)
Turn time
(seconds)
Rate of climb
(metres/second)
Take-off run
(metres)
AB RB AB RB AB RB
Stock 497 483 11156 36.9 37.9 5.7 5.6 600
Upgraded 523 510 35.1 36.0 8.7 7.2

Details

Features
Combat flaps Take-off flaps Landing flaps Air brakes Arrestor gear
X X
Limits
Wings (km/h) Gear (km/h) Flaps (km/h) Max Static G
Combat Take-off Landing + -
516 290 383 361 249 ~3 ~2
Optimal velocities (km/h)
Ailerons Rudder Elevators Radiator
< 330 < 310 < 270 > 300

Survivability and armour

Crew9 people
Speed of destruction
Structural0 km/h
Gear290 km/h
  • 6.35 mm Steel plate behind nose gunner.
  • 6.35 mm Steel plates behind pilots.
  • 6.35 mm Steel plates behind dorsal gunners.
  • 6.35 mm Steel plates in front of beam gunners.
  • 6.35 mm Steel plates in front of tail gunner.
  • 38 mm Bulletproof glass in front of tail gunner.
  • 38 mm Bulletproof glass ball turret.

Modifications and economy

Repair costBasic → Reference
AB1 225 → 1 653 Sl icon.png
RB3 132 → 4 228 Sl icon.png
SB6 157 → 8 311 Sl icon.png
Total cost of modifications30 000 Rp icon.png
58 400 Sl icon.png
Talisman cost1 200 Ge icon.png
Crew training30 000 Sl icon.png
Experts105 000 Sl icon.png
Aces590 Ge icon.png
Research Aces360 000 Rp icon.png
Reward for battleAB / RB / SB
90 / 200 / 370 % Sl icon.png
148 / 148 / 148 % Rp icon.png
Modifications
Flight performance Survivability Weaponry
Mods aerodinamic fuse.png
Fuselage repair
Research:
1 500 Rp icon.png
Cost:
2 900 Sl icon.png
150 Ge icon.png
Mods radiator.png
Radiator
Research:
1 500 Rp icon.png
Cost:
2 900 Sl icon.png
150 Ge icon.png
Mods armor frame.png
Airframe
Research:
1 700 Rp icon.png
Cost:
3 300 Sl icon.png
170 Ge icon.png
Mods compressor.png
Compressor
Research:
1 700 Rp icon.png
Cost:
3 300 Sl icon.png
170 Ge icon.png
Mods aerodinamic wing.png
Wings repair
Research:
1 900 Rp icon.png
Cost:
3 700 Sl icon.png
190 Ge icon.png
Mods new engine.png
Engine
Research:
1 900 Rp icon.png
Cost:
3 700 Sl icon.png
190 Ge icon.png
Mods armor cover.png
Cover
Research:
2 400 Rp icon.png
Cost:
4 700 Sl icon.png
240 Ge icon.png
Mods bulletproof vest.png
Protective vest
Research:
1 500 Rp icon.png
Cost:
2 900 Sl icon.png
150 Ge icon.png
Mods engine extinguisher.png
EFS
Research:
2 400 Rp icon.png
Cost:
4 700 Sl icon.png
240 Ge icon.png
Mods ammo.png
bmg30_turret_belt_pack
Research:
1 500 Rp icon.png
Cost:
2 900 Sl icon.png
150 Ge icon.png
Mod arrow 0.png
Mods turret gun.png
bmg30_turret_new_gun
Research:
1 700 Rp icon.png
Cost:
3 300 Sl icon.png
170 Ge icon.png
Mods pilon bomb.png
LBC-17
Research:
1 700 Rp icon.png
Cost:
3 300 Sl icon.png
170 Ge icon.png
Mod arrow 0.png
Mods ammo.png
bmg50_turret_belt_pack
Research:
1 900 Rp icon.png
Cost:
3 700 Sl icon.png
190 Ge icon.png
Mod arrow 0.png
Mods pilon bomb.png
SBC-17
Research:
1 900 Rp icon.png
Cost:
3 700 Sl icon.png
190 Ge icon.png
Mod arrow 0.png
Mods turret gun.png
bmg50_turret_new_gun
Research:
2 400 Rp icon.png
Cost:
4 700 Sl icon.png
240 Ge icon.png
Mods pilon bomb.png
MBC-17
Research:
2 400 Rp icon.png
Cost:
4 700 Sl icon.png
240 Ge icon.png

Armaments

Suspended armament

List of setups (4)
Setup 18 x 500 lb AN-M64A1 bomb
Setup 212 x 500 lb AN-M64A1 bomb
Setup 36 x 1000 lb AN-M65A1 bomb
Setup 42 x 2000 lb AN-M66A2 bomb

The B-17E/L can be outfitted with the following ordnance:

  • 8 x 500 lb AN-M64A1 bombs (4,000 lb total)
  • 12 x 500 lb AN-M64A1 bombs (6,000 lb total)
  • 6 x 1,000 lb AN-M65A1 bombs (6,000 lb total)
  • 2 x 2,000 lb AN-M66A2 bombs (4,000 lb total)

Defensive armament

Ammunition1000 rounds
Fire rate750 shots/min
Ammunition500 rounds
Fire rate750 shots/min
Ammunition400 rounds
Fire rate750 shots/min
Ammunition500 rounds
Fire rate1000 shots/min

The B-17E/L is defended by:

  • 2 x 12.7 mm M2 Browning machine guns, front dorsal turret (500 rpg = 1,000 total)
  • 2 x 12.7 mm M2 Browning machine guns, ventral turret (500 rpg = 1,000 total)
  • 2 x 12.7 mm M2 Browning machine guns, tail turret (500 rpg = 1,000 total)
  • 1 x 12.7 mm M2 Browning machine gun, rear dorsal turret (500 rpg)
  • 1 x 12.7 mm M2 Browning machine gun, 2 x beam turret (400 rpg)
  • 2 x 7.62 mm Browning machine gun, nose turret (500 rpg = 1,000 total)

Usage in battles

When using the B-17E/Late Flying Fortress, you are not invincible, but the B-17 is notorious for being able to take one serious punch and still get you home. However, at your battle rating, you aren't going to have too much room for error. Nonetheless, as mentioned earlier, you have minimal nose defences which leave the pilot and co-pilot dangerously exposed.

If you have the payload capability to destroy multiple bases, the first part to enhance your survival is one word: climb. You already start at the "Long Range Bombers" spawn, which is roughly at 4,500 m (14,763 ft). A sustained climb can put you at nearly 5,500 m (18,044 ft) in a matter of around a minute and a half. From there, maintain speed and a sustained climb to help put you out of reach of interceptors to buy you some time.

Do not try and bomb small targets such as pillboxes and moving armour. It is 1) Largely inaccurate due to the time it takes to reach the target from high altitude, and 2) not worth it as a whole, as moving armour columns can disperse after a bomb drop has been detected.

If you are under attack from enemy fighters/interceptors, Do not attempt to use evasive manoeuvres - you are mainly unmanoeuvrable to begin with and trying to pull evasive manoeuvres will bleed the speed, throw off your gunner's aim and possibly increase your chances of losing a vital control component.

Another method of reaching your targets is to side-climb / plotting a course that is furthest away from the action.

At your battle rating, it is very possible that you will be tiered, where almost any plane will tear you to shreds.

If the enemy is approaching directly towards you around 1 km, fire your turrets in the general direction of the enemy in small bursts, to get a feel for the aiming and to serve as warning shots.

German Aircraft - When facing the Germans, especially at the higher battle ratings, you will be vulnerable to the "Minengeschoß" rounds, which will punch through your armour, and explode inside the aircraft. The most dangerous opponents are going to be the Fw 190 D and any of the Focke Wulf Ta-152s, mainly due to their heavy-hitting weaponry. In addition, you also are confronted by the Bf 109 K-4, which has a 30 mm cannon through the propeller hub, which can make short work of you with a number of well-placed hits.

Soviet Aircraft - When facing Soviet planes, you have to pay close attention to any plane bearing the prefix "Yak". You especially need to pay attention to the Yak-9P and the Yak-9UT, which have a mix of 20 mm cannons and a combination of either a 37 mm cannon or a 45 mm cannon. The sheer size of the cannons they wield can obliterate the B-17 with just one or two well-placed hits. Another aircraft to pay attention to is the La-11, which has three 23 mm cannons that can land serious damage if the hits are placed well.

British Aircraft - While it is mainly uncommon to see one at high altitude, a Wyvern S4 has the capability to intercept you thanks to its extremely powerful engine. In addition, a Wyvern will cut you to shreds as a result of the four 20 mm Mk.V Hispano cannons. In addition, the Hornet will also have the capability to intercept you. Perhaps the biggest threats lie with the Griffon Spitfires, especially the Mk. 22 and Mk. 24 variants. Also, keep your eyes peeled for the Tempest fighters.

Japanese Aircraft - The Ki-87 is probably the single greatest threat to you at mid-rank battles due to the hard-hitting weaponry and its turbo-supercharged engine. In addition, (unlikely as it could be), the J7W will obliterate your plane due to the four 30 mm cannons in the nose. If not taken care of quickly, later models of the A7M "Reppu" can dispatch you if they have a good enough aim.

Counter-tactics

Repeat after me and take the time to memorize the following text: "Do not tail a B-17," even if you are flying something as heavily armed as a Messerschmitt 410 or a later Focke-Wulf 190 model. This just warrants either an engine fire, your aircraft being critically damaged, or even your pilot being knocked out. If you have the altitude advantage over a B-17, try to hit it from an angle, which can increase your chances of survival. The weakest point on a B-17E from a defensive standpoint is from the nose of the aircraft. This is due to only a .30 calibre machine gun defending the pilot and the co-pilot. If you do not have the capability to engage the B-17E from the nose, and you find yourself tailing a B-17E, aim for the wings of the bomber. This may allow you to set some of the fuel tanks on fire or even better yet shear one off.

For German planes, your Minengeschoß rounds give you a slight advantage, given your shells' ability to explode inside the bomber causing more extensive damage to the control surfaces. If a B-17E is present in a Battle Rating 6.7 match, they pose a lesser threat than something like the B-17G, which has only .50 cals but try not to tail a B-17E, as they still can punch through you if the .50 cals have the "Armoured targets" belts.

Manual Engine Control

MEC elements
Mixer Pitch Radiator Supercharger Turbocharger
Oil Water Type
Controllable Controllable
Auto control available
Not controllable
Not auto controlled
Controllable
Not auto controlled
Combined Controllable
1 gear
Auto controlled

Pros and cons

Pros:

  • Large bomb-load
  • Powerful air defence capabilities
  • Multiple engines can fly on one if necessary (but with a great loss in altitude and speed)
  • Rugged design allows for soaking up damage
  • Mostly unaffected by light machine gun fire, and to an extent, heavy machine guns
  • Good speed for a bomber of its peers
  • Multiple turrets covering almost all angles
  • Can quite often return to base with extensive damage
  • Pilot and co-pilot, if one of them is knocked out, you can still fly on
  • The original pivoting belly gun turret has been replaced with a Sperry Ball turret
  • Better .50 calibre rounds in the belts for its defensive guns compared to its predecessor, the B-17E

Cons:

  • Very large target
  • Quite slow when compared to fighters, and will always be outrun in level flight
  • Nose is extremely vulnerable, the only armour on the front is the front bulkhead, covering only the pilot and copilot's torso
  • The front of the aircraft is only covered by 2 x 7.62 mm Browning machine guns, which have different coverage areas
  • Vulnerable to German "Minengeschoß" and > 20 mm gunfire
  • Engine fires are common
  • Very unmanoeuvrable and effectively a sitting duck as all fighters at equivalent BR will be able to catch up to it with ease
  • Wings are big and thus commonly torn off by gunfire, in addition to being loaded with all of the plane's fuel, making fires extremely common as soon as the shooting begins
  • Nose protection is extremely limited, try to avoid frontal attacks as much as possible
  • Previously mentioned Sperry Ball turret leaves the gunner much more exposed, and as such is easier to knock out

History

The B-17E Flying Fortress was an improved version of the B-17D and earlier B-17 variants. It featured a tail gunner's position and a rotating dorsal turret behind the cockpit; both turret had an armament of two .50 cal M2 Browning machine guns. Previously, the B-17 had a blind spot at the rear, where no gunners could fire. The tail gunner's position allowed protection from the rear. To fit the new tail gunner's position, the fuselage had to be up-sized. A larger, redesigned vertical stabilizer was also added to the tail. Additionally, the teardrop shaped sliding panels at the waist gunners' stations were replaced by rectangular windows. This increased visibility from those positions. On the first 1/5 of the production run, the B-17E was equipped with a ventral remote-controlled Sperry turret.

The later rest of the B-17E production run featured a Sperry manned ball turret at the ventral position. The remote-controlled had disappointing results, and so it was replaced by the Sperry manned ball turret instead. These B-17Es are called the B-17E/L in War Thunder, for B-17E Late.

The production of the B-17E amounted to 512 aircraft, which gave the B-17E the distinction of being the first Flying Fortress variant to be mass produced. The production was too much for the Boeing factories to keep up with, so Lockheed and Douglas also produced the B-17E. Douglas built a new factory for the production of the Flying Fortress, and Boeing built an additional factory just for the production of the B-17.

45 B-17E Flying Fortresses were transferred to the Royal Air Force (RAF) in 1942. These were designated as the Fortress IIA, and they were used by the Coastal Command to carry out anti-submarine patrols.


Archive of the in-game description

The legendary B-17 American heavy bombers were rightly called Flying Fortresses. This four-engined heavy bomber was an all-metal hero, an extremely durable aircraft that could return to the airfield with just one engine, riddled with bullets.

But the early models of the B-17 had a significant blind spot in the rear, so fighter support was required. To solve this problem, the B-17E was produced, and a turret with two 12.7 mm machine guns was installed in the tail section of the aircraft. To do this, the fuselage size had to be increased. In addition, to improve control of the plane, the tail was broadened and a larger vertical fin was installed.

Although it lost some speed when compared to the B-17D, the new model fared favorably with its new protection and thus became the first truly mass-produced B-17. From September 5, 1941 to May 1942, 512 aircraft were made on the production line, before the development of the B-17F.


Media

Skins

See also

Links to the articles on the War Thunder Wiki that you think will be useful for the reader, for example:

  • reference to the series of the aircraft;
  • links to approximate analogues of other nations and research trees.

External links

Paste links to sources and external resources, such as:

  • topic on the official game forum;
  • other literature.


Boeing Aircraft
Aircraft 
Fighters  P-26A-33 · P-26A-34 M2 · P-26B-35
Bombers  B-17E · B-17E/L · B-17G-60-VE
  B-29A-BN
Export  P-26A-34 · B-17G
Captured  ▅B-17E
Helicopters 
Attack  AH-64A · AH-64D
Export / Licensed  AH-64A (GR) · ▃AH-64A Peten · AH-64A Peten · ▅AH-64DJP · ▄AH Mk.1 · AHS
See Also  Tupolev Design Bureau · Westland Helicopters · Fuji Heavy Industries
  For Boeing-built ships, see Boeing Marine Branch

USA bombers
Dive  SB2U-2 · SB2U-3 · SBD-3 · SB2C-1C · SB2C-4
Torpedo  TBD-1 · PBY-5 Catalina · PBY-5A Catalina · TBF-1C · BTD-1
Medium  B-10B · B-18A · B-34 · PV-2D · B-25J-1 · B-25J-20 · A-26C-45 · A-26C-45DT · B-26B
Heavy  B-17E · B-17E/L · B-17G-60-VE · PB4Y-2 · B-24D-25-CO · B-29A-BN
Hydroplanes  OS2U-1 · OS2U-3 · PBM-1 "Mariner" · PBM-3 "Mariner"