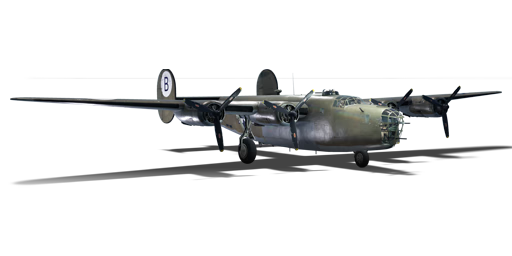
B-24D-25-CO

From War Thunder Wiki
Jump to: navigation, search
Rank VI Israel | Premium | Golden Eagles
Merkava Mk.2D Pack
B-24D-25-CO
b_24d.png
GarageImage B-24D-25-CO.jpg
ArtImage B-24D-25-CO.png
B-24D-25-CO
Research:27 000 Specs-Card-Exp.png
Purchase:185 000 Specs-Card-Lion.png
Show in game

Description

The B-24D-25-CO Liberator is a rank IV American bomber with a battle rating of 5.0 (AB), 5.7 (RB), and 6.0 (SB). It has been in the game since the start of the Open Beta Test prior to Update 1.27.

The Consolidated B-24D Liberator was built to be a long-range four-engine heavy bomber. It is most efficiently used for bombing stationary targets like bases, airfields, and pillboxes from high altitude.

The Liberator can cruise somewhat faster than the Boeing B-17E Flying Fortress and can also carry a heavier payload. Unfortunately, its manoeuvrability and handling are significantly worse thanks to the Davis wing design, which is optimized for efficient level flight only. Evasive manoeuvres are not easy to pull off and typically result in loss of altitude or going into a spin.

In line with the USAAF's philosophy during World War II, the Liberator is equipped with a relatively heavy defensive armament of eleven .50 cal AN/M2 heavy machine guns staffed by gunners. The theory behind this was intended that an American bomber would be able to defend itself from enemy fighters in daylight missions. These guns have excellent coverage and there is no angle from which attackers may come from on which no guns can be brought to bear.

Compared to the B-17E, the Liberator can carry an additional 2 x 1,000 lb (454 kg) bombs. However, this maximum payload of 8,000 lb (3,632 kg) compares very unfavourably against other heavy bombers like the Yermolayev Yer-2 with ACh-30B engines (5,000 kg), Dornier Do 217 series (4,000 kg), and Lancaster series (14,000 lb or 6,363 kg), all of which have much lower battle ratings. On the flip side, while its payload may not have been as great as other nation's bombers, over 18,500 B-24 bombers were built over the duration of the war (the most produced bomber) and were deployed in sheer numbers unmatched by any other bomber.

General info

Flight performance

Max speed
at 7 620 m494 km/h
Turn time38 s
Max altitude9 754 m
Engine4 х Pratt & Whitney R1830-65
TypeRadial
Cooling systemAir
Take-off weight29 t
Characteristics Max Speed
(km/h at 7,620 m)
Max altitude
(metres)
Turn time
(seconds)
Rate of climb
(metres/second)
Take-off run
(metres)
AB RB AB RB AB RB
Stock 477 465 9754 39.1 40.2 3.0 2.9 820
Upgraded 511 494 36.9 38.0 6.6 4.6

Details

Features
Combat flaps Take-off flaps Landing flaps Air brakes Arrestor gear
X X X
Limits
Wings (km/h) Gear (km/h) Flaps (km/h) Max Static G
Combat Take-off Landing + -
600 263 N/A 357 263 ~4 ~2
Optimal velocities (km/h)
Ailerons Rudder Elevators Radiator
< 200 < 180 < 180 > 300

Survivability and armour

Crew8 people
Speed of destruction
Structural0 km/h
Gear263 km/h
  • 9.5 mm Steel - Armour plates behind the pilots
  • 9.5 mm Steel - Armour plates in front of the dorsal gunner
  • 9.5 mm Steel - Armour plate in front of the ventral gunner
  • 9.5 mm Steel - Armour plate behind beam gunners
  • 9.5 mm Steel - Armour plates around the tail gunner
  • 38 mm Bulletproof glass - Tail gunner's rear facing window

Modifications and economy

Repair costBasic → Reference
AB2 266 → 3 084 Sl icon.png
RB6 785 → 9 234 Sl icon.png
SB13 282 → 18 076 Sl icon.png
Total cost of modifications47 100 Rp icon.png
85 600 Sl icon.png
Talisman cost1 500 Ge icon.png
Crew training52 000 Sl icon.png
Experts185 000 Sl icon.png
Aces940 Ge icon.png
Research Aces480 000 Rp icon.png
Reward for battleAB / RB / SB
110 / 200 / 510 % Sl icon.png
166 / 166 / 166 % Rp icon.png
Modifications
Flight performance Survivability Weaponry
Mods aerodinamic fuse.png
Fuselage repair
Research:
1 900 Rp icon.png
Cost:
3 500 Sl icon.png
160 Ge icon.png
Mods radiator.png
Radiator
Research:
1 900 Rp icon.png
Cost:
3 500 Sl icon.png
160 Ge icon.png
Mods armor frame.png
Airframe
Research:
2 600 Rp icon.png
Cost:
4 700 Sl icon.png
220 Ge icon.png
Mods compressor.png
Compressor
Research:
2 600 Rp icon.png
Cost:
4 700 Sl icon.png
220 Ge icon.png
Mods aerodinamic wing.png
Wings repair
Research:
3 900 Rp icon.png
Cost:
7 100 Sl icon.png
330 Ge icon.png
Mods new engine.png
Engine
Research:
3 900 Rp icon.png
Cost:
7 100 Sl icon.png
330 Ge icon.png
Mods armor cover.png
Cover
Research:
3 100 Rp icon.png
Cost:
5 600 Sl icon.png
260 Ge icon.png
Mods metanol.png
Engine injection
Research:
3 100 Rp icon.png
Cost:
5 600 Sl icon.png
260 Ge icon.png
Mods bulletproof vest.png
Protective vest
Research:
1 900 Rp icon.png
Cost:
3 500 Sl icon.png
160 Ge icon.png
Mods engine extinguisher.png
EFS
Research:
3 100 Rp icon.png
Cost:
5 600 Sl icon.png
260 Ge icon.png
Mods pilon bomb.png
SBC-24
Research:
1 900 Rp icon.png
Cost:
3 500 Sl icon.png
160 Ge icon.png
Mod arrow 0.png
Mods ammo.png
bmg50_turret_belt_pack
Research:
1 900 Rp icon.png
Cost:
3 500 Sl icon.png
160 Ge icon.png
Mod arrow 0.png
Mods pilon bomb.png
MBC-24
Research:
2 600 Rp icon.png
Cost:
4 700 Sl icon.png
220 Ge icon.png
Mod arrow 0.png
Mods turret gun.png
bmg50_turret_new_gun
Research:
2 600 Rp icon.png
Cost:
4 700 Sl icon.png
220 Ge icon.png
Mods pilon bomb.png
LBC-24
Research:
3 900 Rp icon.png
Cost:
7 100 Sl icon.png
330 Ge icon.png
Mod arrow 0.png
Mods pilon bomb.png
AN-Mk 1
Research:
3 100 Rp icon.png
Cost:
5 600 Sl icon.png
260 Ge icon.png
Mod arrow right 0.png
Mods pilon bomb.png
M66
Research:
3 100 Rp icon.png
Cost:
5 600 Sl icon.png
260 Ge icon.png

Armaments

Suspended armament

List of setups (6)
Setup 18 x 500 lb AN-M64A1 bomb
Setup 220 x 100 lb AN-M30A1 bomb
Setup 312 x 500 lb AN-M64A1 bomb
Setup 48 x 1000 lb AN-M65A1 bomb
Setup 54 x 1600 lb AN-Mk 1 armor-piercing bomb
Setup 64 x 2000 lb AN-M66A2 bomb

The B-24D-25-CO can be outfitted with the following ordnance:

  • 8 x 500 lb AN-M64A1 bombs (4,000 lb total)
  • 20 x 100 lb AN-M30A1 bombs (2,000 lb total)
  • 12 x 500 lb AN-M64A1 bombs (6,000 lb total)
  • 8 x 1,000 lb AN-M65A1 bombs (8,000 lb total)
  • 4 x 1,600 lb AN-Mk 1 bombs (6,400 lb total)
  • 4 x 2,000 lb AN-M66A2 bombs (8,000 lb total)

Defensive armament

Ammunition300 rounds
Fire rate750 shots/min
Ammunition800 rounds
Fire rate750 shots/min
Ammunition250 rounds
Fire rate750 shots/min
Ammunition783 rounds
Fire rate750 shots/min
Main article: M2 Browning (12.7 mm)

The B-24D-25-CO is defended by:

  • 3 x 12.7 mm M2 Browning machine gun, nose turret (300 rpg = 900 total)
  • 2 x 12.7 mm M2 Browning machine guns, dorsal turret (400 rpg = 800 total)
  • 2 x 12.7 mm M2 Browning machine guns, ventral turret (508 rpg = 1,016 total)
  • 1 x 12.7 mm M2 Browning machine gun, 2 x beam turrets (250 rpg)
  • 2 x 12.7 mm M2 Browning machine guns, tail turret (400 rpg = 800 total)

Usage in battles

The Liberator will face many high-altitude dedicated bomber interceptors with 20–30 mm cannons, making for an extremely dangerous environment. The defensive guns should be treated as a last resort; combat with fighters should be avoided at all costs by the use of careful route planning and cloud cover, if available.

If pursued, attempt to manoeuvre the Liberator so that the enemy is forced into a tail-chase, where the Liberator's defensive guns are most effective.

Low-level bombing is not recommended due to the limited manoeuvrability of the aircraft, the Liberator simply doesn't have the performance to get away with it and you will be an easy target for enemy fighters.

Counter-tactics

When going up against the B-24D, it is very important that the attacker must never underestimate the sheer defensive power this bomber holds. If not careful, your plane will either become critically damaged or a ball of fire from only a few hits from the 12.7 mm M2 Browning MGs.

The number one rule when fighting a bomber is to never engage it in front or the back; this applies heavily when engaging the B-24D since you will have 6 machine guns facing you. The best way to attack this bomber is from above or the sides. Attacking from below is highly discouraged since you will be forced to pull up in order to engage and end up above the bomber where 4 machine guns will be facing you automatically. Boom & Zoom tactics are highly recommended since it allows you to evade machine gun fire and be on the constant move at high speeds making it difficult for the gunners to get a bead on you.

When engaging the B-24D, you must always keep your momentum and never stall or bleed your speed. Losing speed means you are an easier target to hit, which means you are an easier target to shoot down. Aiming at the engines will also stress your opponent as it will cause the bomber to lose speed rapidly or even better, catch fire. If you wish for an easy kill without wasting precious time, it is recommended to aim for the bomber's wings. Damaging the wings of the plane will cause it to tilt to one side or snap.

The last thing a player should take note is the plane they plane they are flying. As bad as it sounds, a Japanese plane is more likely to be brought down than a German plane due to the difference in armour, it is better to bring an aircraft with some form of protection rather than a plane with no protection, this will determine your chances of survival by a great amount.

Manual Engine Control

MEC elements
Mixer Pitch Radiator Supercharger Turbocharger
Oil Water Type
Controllable Controllable
Auto control available
Not controllable
Not auto controlled
Controllable
Not auto controlled
Combined Controllable
1 gear
Auto controlled

Pros and cons

Pros:

  • Heavy defensive armament, protected from every angle (deadly from frontal and rear attacks)
  • Heavier payload than the B-17E/L, however comparable to B-17G
  • Overall better flight performance than the B-17E/L in level flight
  • Great defensive armament with almost full coverage from the turrets
  • Impressive rear, sideways, and top turret coverage makes it a very tough target in simulator
  • Has two pilots who are protected by multiple layers of armour behind, meaning it is hard to pilot snipe it from behind
  • Tricycle landing gear allows continuous breaking until full stop, without having to worry about flipping over
  • Critical parts such as gunners/cooling systems are quite spread out, which helps to soak up damage

Cons:

  • Poor handling, built for top speed and level flight, not manoeuvring
  • Significantly lower payload compared to heavy bombers of other nations
  • Twin tail configuration reduces manoeuvrability, rectified in PB4Y-2 Privateer with a single tail

History

The B-24 was produced in several variants to fulfil operational and training needs. More Liberators were eventually built than any other US Warplane during World War II. The first B-24 prototype flew in December of 1939 named "XB-24". The aircraft was designed around the "Davis" wing, a long, thin, large area structure mounted high on the fuselage. The long wingspan gave the B-24 excellent high altitude performance and allowed it to extend its range. The twin bomb-bays were called "roller shutter" doors. The doors rolled up into the aircraft. The purpose of this design was to reduce the drag while the bomb bay doors are open. The bomb-load was stored vertically with a catwalk down the middle, this gave crews easy access to the rear of the fuselage. The Liberator was powered by four 1,200 HP Pratt & Whitney R-1830 engines. The aircraft also included a twin tail design and tricycle landing gear.

The B-24 made its operational debut in June of 1942. It was tasked with long-range raids on Germany's Romanian oilfields. The B-24 is commonly remembered for its service with the Eighth Air Force but it filled a desperate roll for the navy as a long-range patrol aircraft. After huge losses of allied shipping, the Navy was granted access to Liberators. These aircraft were operated under the designation PB4Y. They were equipped with air to surface radar and depth charges. The B-24 also quickly replaced the B-17 in the Pacific theatre due to its long-range capabilities. The B-24 was used to bring havoc to Japanese land installations and naval vessels. Liberators stayed in service until 1951, they were replaced by the Privateer.

The B-24 is often unfairly compared to the B-17. The B-24 was newer, more efficient, and much more versatile then Boeing's design. The B-24 saw action on all fronts, its most valuable work may have been against U-boats. The aircraft also saw work as a cargo plane, tanker, patrol, and reconnaissance. Even some were armed with additional guns as escorts. The B-24 was not as popular with its crews as the B-17. The B-24 was known to catch fire in battle easier and at times was known to suffer from hydraulic problems.


Archive of the in-game description

The Consolidated B-24D "Liberator" heavy bomber was created as a part of "Project A" a program launched to enhance the USA's industrial capacity to meet the needs of the Air Force. The contract for the aircraft, which was to be an improved B-17, was received by Consolidated in March of 1939, with a prototype required by the end of the year. The prototype was finished and made its first flight just two days before the deadline on December 29.

The new aircraft, although more difficult to control, was superior to the B-17 in range, operational ceiling, and maximum speed. In addition, it could carry a significantly larger bomb load (up to 3629 kg), which largely determined its application: the first models delivered to England were mainly used for coastal protection from German submarines.

The first successful modification of the aircraft was the B-24D, which was mass-produced from 1940 to 1942. This model had four 1,200 hp engines, and its armament was modified over time, based on pilot feedback. Eventually, it was equipped with eleven 12.7 mm machine guns (three in the nose, two remote-controlled guns in the dorsal turret, two in the ventral ball turret, one machine gun in each side window, and two machine guns in the tail turret).

The B-24 was the most mass-produced Allied bomber in World War II - all in all, 18,482 B-24s were produced, 2,696 of which were B-24Ds. These bombers were made in several factories. The factory which produced the most was the Henry Ford plant in Willow Run, which in 1944 released a B-24 every hour, 650 planes per month.

The B-24 was actively used in the Pacific and European theaters of war.


Media

Skins
Videos

See also

External links

Paste links to sources and external resources, such as:

  • topic on the official game forum;
  • other literature.


Consolidated Aircraft Corporation
Bombers  PBY-5 Catalina · PBY-5A Catalina
  PB4Y-2
  B-24D-25-CO
Export  ▄Catalina Mk IIIa · ▂PBY-5A Catalina · ▄PBY-5A Late · ␗PB4Y-2 · ▄PB4Y-2

USA bombers
Dive  SB2U-2 · SB2U-3 · SBD-3 · SB2C-1C · SB2C-4
Torpedo  TBD-1 · PBY-5 Catalina · PBY-5A Catalina · TBF-1C · BTD-1
Medium  B-10B · B-18A · B-34 · PV-2D · B-25J-1 · B-25J-20 · A-26C-45 · A-26C-45DT · B-26B
Heavy  B-17E · B-17E/L · B-17G-60-VE · PB4Y-2 · B-24D-25-CO · B-29A-BN
Hydroplanes  OS2U-1 · OS2U-3 · PBM-1 "Mariner" · PBM-3 "Mariner"