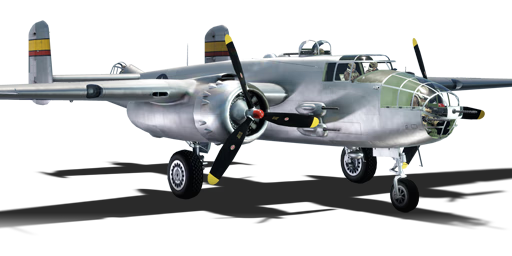
B-25J-1

From War Thunder Wiki
Jump to: navigation, search
Rank 6 USA
F-5C Pack
This page is about the American medium bomber B-25J-1. For other versions, see B-25 (Family).
B-25J-1
b_25j_1.png
GarageImage B-25J-1.jpg
B-25J-1
Research:9 200 Specs-Card-Exp.png
Purchase:16 000 Specs-Card-Lion.png
Show in game

Description

The B-25J-1 Mitchell is a rank II American bomber with a battle rating of 3.7 (AB/SB) and 4.0 (RB). It was introduced in Update 1.29.

Design of the B-25 was the result of years of work and failed bids to win contracts with the United States Army Air Corps (USAAC). Initially designed to meet requirements for a payload of 1,200 lb (540 kg), a range of 1,200 mi (1,900 km) and flying at speeds faster than 200 mph (320 km/h), prototypes were built, tested and refined. Although the original XB-21 and NA-40 never materialized into a production aircraft, requirements from the USAAC came out in March of 1939 for a medium bomber carrying a payload of 2,400 lb (1,100 kg) over 1,200 mi (1,900 km) at speeds around 300 mph (480 km/h), North American modified their design of NA-40 and developed the NA-62 which went into prototype testing as the YB-25 and then ordered into production as the B-25.

The B-25 turned out to be the archetype of the medium bomber, carrying upwards of 3,000 lb (1,361 kg) of bombs and could fly at speeds up to 340 mph (547 km/h). This twin-engine bomber was fast, it could carry a large payload for its size and had several defensive turrets and gunner stations at which it could defend itself from almost any angle. To increase its versatility, several models had forward-facing fixed machine guns fitted into the nose and the cheeks of the aircraft. Later models opted to removed the glazed nose and bombardier/nose-gunner station and outfit more machine guns and even a 75 mm autocannon for strafing ground targets and especially ships. This medium bomber at times acted more like a heavy attacker opting for low-level flights which would skim treetops and the ocean to sneak up on unwary targets. It was not uncommon for B-25s to fly just above the mast/smokestack height of enemy ships when attacking.

As later models moved from the dedicated bomber position and morphed into more of an attacker role, bomb payloads were reduced to allow for more armour around the cockpit and more offensive weapons and ammunition to fill the attacker mode it took on, especially under the command of U.S. Marine Corps squadrons. With more than 10,000 B-25 aircraft variants built, they saw action in all theatres of war and were even subject to part of the lend-lease program which China and the USSR benefitted from. So versatile was this aircraft that a flight of them were specifically outfitted and their crews trained to take off from an aircraft carrier and bomb mainland Japan in a daring raid. This historical mission was called the "Doolittle Raid". Impressive for an aircraft not meant to take off from an aircraft carrier.

The B-25 is a fantastic bomber, attacker or both and will suit many different pilots and their different approaches to the battlefields found in War Thunder. The tail gunner has been known to set many fighters alight with their dual .50 calibre machine guns and help to prolong the life of this bomber to allow the pilot to make it to their target whether it is to bomb it or strafe it.

General info

Flight performance

Max speed
at 3 049 m444 km/h
Turn time31 s
Max altitude7 500 m
Engine2 х Wright R-2600-29
TypeRadial
Cooling systemAir
Take-off weight16 t
Characteristics Max Speed
(km/h at 3,049 m)
Max altitude
(metres)
Turn time
(seconds)
Rate of climb
(metres/second)
Take-off run
(metres)
AB RB AB RB AB RB
Stock 420 407 7500 32.4 33.8 5.4 5.3 750
Upgraded 472 444 29.7 31.0 10.6 7.7
B-25J-1 releasing its bombs over a target.

Details

Features
Combat flaps Take-off flaps Landing flaps Air brakes Arrestor gear
X X
Limits
Wings (km/h) Gear (km/h) Flaps (km/h) Max Static G
Combat Take-off Landing + -
591 294 382 320 293 ~5 ~2
Optimal velocities (km/h)
Ailerons Rudder Elevators Radiator
< 270 < 320 < 350 > 330

Survivability and armour

Crew7 people
Speed of destruction
Structural0 km/h
Gear294 km/h
  • 9.5 mm Steel plates throughout the cockpit
  • 8 mm Steel plate behind the pilot
  • 8 mm Steel plate under nose gunner
  • 9.5 mm Steel plate behind the dorsal gunner
  • 6.35 mm Steel plate behind beam gunners
  • 38 mm Bulletproof glass in front of the tail gunner
  • 9.5 mm Steel plates in front of the tail gunner

Rugged, sturdy, though, the B-25 is all of those things. Featuring crew armour protection that outclasses the B-17 Flying Fortress in a handier, smaller design, the Mitchell is a tough nut to crack and even harder to devoid of the crew. Calibres above 20 mm are a must for a quick kill, otherwise, the B-25 will repay in kind. Forgoing all defence is good, but all offence, too? It is called overkill, of the pursuit fighter.

The two Wright R-2600 air-cooled radial engines are themself hard to destroy and with dropped payload, the Mitchell will just keep flying on a single damaged one. Denying under armed fighters the ability to lethally cripple it. Yet this aircraft has got one downside: fuel tanks. While present in all planes, the armour, crew and bomb bay take up all the fuselage. Leaving only space in the wings. A common cause of a crash of a B-25 is hence a fire and thus a structural failure of the wing spar.

Modifications and economy

Repair costBasic → Reference
AB547 → 755 Sl icon.png
RB1 071 → 1 479 Sl icon.png
SB1 892 → 2 612 Sl icon.png
Total cost of modifications8 430 Rp icon.png
9 490 Sl icon.png
Talisman cost640 Ge icon.png
Crew training4 500 Sl icon.png
Experts16 000 Sl icon.png
Aces180 Ge icon.png
Research Aces190 000 Rp icon.png
Reward for battleAB / RB / SB
40 / 80 / 140 % Sl icon.png
118 / 118 / 118 % Rp icon.png
Modifications
Flight performance Survivability Weaponry
Mods aerodinamic fuse.png
Fuselage repair
Research:
340 Rp icon.png
Cost:
380 Sl icon.png
75 Ge icon.png
Mods radiator.png
Radiator
Research:
340 Rp icon.png
Cost:
380 Sl icon.png
75 Ge icon.png
Mods armor frame.png
Airframe
Research:
470 Rp icon.png
Cost:
530 Sl icon.png
100 Ge icon.png
Mods compressor.png
Compressor
Research:
470 Rp icon.png
Cost:
530 Sl icon.png
100 Ge icon.png
Mods aerodinamic wing.png
Wings repair
Research:
700 Rp icon.png
Cost:
790 Sl icon.png
150 Ge icon.png
Mods new engine.png
Engine
Research:
700 Rp icon.png
Cost:
790 Sl icon.png
150 Ge icon.png
Mods armor cover.png
Cover
Research:
550 Rp icon.png
Cost:
620 Sl icon.png
120 Ge icon.png
Mods metanol.png
Engine injection
Research:
550 Rp icon.png
Cost:
620 Sl icon.png
120 Ge icon.png
Mods bulletproof vest.png
Protective vest
Research:
340 Rp icon.png
Cost:
380 Sl icon.png
75 Ge icon.png
Mods engine extinguisher.png
EFS
Research:
550 Rp icon.png
Cost:
620 Sl icon.png
120 Ge icon.png
Mods ammo.png
bmg50_belt_pack
Research:
340 Rp icon.png
Cost:
380 Sl icon.png
75 Ge icon.png
Mod arrow 0.png
Mods pilon bomb.png
SBC-25
Research:
340 Rp icon.png
Cost:
380 Sl icon.png
75 Ge icon.png
Mod arrow 0.png
Mods weapon.png
bmg50_new_gun
Research:
470 Rp icon.png
Cost:
530 Sl icon.png
100 Ge icon.png
Mods pilon bomb.png
MBC-25
Research:
470 Rp icon.png
Cost:
530 Sl icon.png
100 Ge icon.png
Mod arrow 1.png
Mods ammo.png
bmg50_turret_belt_pack
Research:
700 Rp icon.png
Cost:
790 Sl icon.png
150 Ge icon.png
Mod arrow 0.png
Mods turret gun.png
bmg50_turret_new_gun
Research:
550 Rp icon.png
Cost:
620 Sl icon.png
120 Ge icon.png
Mods pilon bomb.png
LBC-25
Research:
550 Rp icon.png
Cost:
620 Sl icon.png
120 Ge icon.png

Armaments

Offensive armament

Ammunition2 000 rounds
Fire rate750 shots/min
B-25J-1 unloading on ground targets with its five forward-facing machine guns (not including the single machine gun controlled by the nose gunner/bombardier).
Main article: M2 Browning (12.7 mm)

The B-25J-1 is armed with:

  • 1 x 12.7 mm M2 Browning machine gun, nose-mounted (400 rpg)
  • 4 x 12.7 mm M2 Browning machine guns, cheek-mounted (400 rpg = 1,600 total)

Suspended armament

List of setups (8)
Setup 112 x 100 lb AN-M30A1 bomb
Setup 24 x 250 lb AN-M57 bomb
Setup 38 x 100 lb AN-M30A1 bomb
4 x 250 lb AN-M57 bomb
Setup 48 x 250 lb AN-M57 bomb
Setup 58 x 100 lb AN-M30A1 bomb
2 x 500 lb AN-M64A1 bomb
Setup 64 x 500 lb AN-M64A1 bomb
Setup 79 x 100 lb AN-M30A1 bomb
1 x 1000 lb AN-M65A1 bomb
Setup 83 x 1000 lb AN-M65A1 bomb
B-25J-1 diving on a ground target.

The B-25J-1 can be outfitted with the following ordnance:

  • 12 x 100 lb AN-M30A1 bombs (1,200 lb total)
  • 4 x 250 lb AN-M57 bombs (1,000 lb total)
  • 4 x 250 lb AN-M57 bombs + 8 x 100 lb AN-M30A1 bombs (1,800 lb total)
  • 8 x 250 lb AN-M57 bombs (2,000 lb total)
  • 2 x 500 lb AN-M64A1 bombs + 8 x 100 lb AN-M30A1 bombs (1,800 lb total)
  • 4 x 500 lb AN-M64A1 bombs (2,000 lb total)
  • 1 x 1,000 lb AN-M65A1 bomb + 10 x 100 lb AN-M30A1 bombs (2,000 lb total)
  • 3 x 1,000 lb AN-M65A1 bombs (3,000 lb total)

Defensive armament

Ammunition300 rounds
Fire rate750 shots/min
Ammunition800 rounds
Fire rate750 shots/min
Ammunition250 rounds
Fire rate750 shots/min
Ammunition1200 rounds
Fire rate750 shots/min
Main article: M2 Browning (12.7 mm)

The B-25J-1 is defended by:

  • 1 x 12.7 mm M2 Browning machine gun, nose turret (300 rpg)
  • 2 x 12.7 mm M2 Browning machine guns, dorsal turret (400 rpg = 800 total)
  • 1 x 12.7 mm M2 Browning machine gun, 2 x beam turrets (250 rpg)
  • 2 x 12.7 mm M2 Browning machine guns, tail turret (600 rpg = 1,200 total)

Usage in battles

B-25J-1 tangling with a Japanese fighter over enemy territory.

In Realistic battles (and Arcade to an extent), it is highly recommended against exclusively bombing strategic bases and in general to not bomb from high altitudes. It was rarely used this way in combat, and it makes it very easy for enemy fighters to approach and attack you from your defenceless belly. Also, the bomber's maximum payload of 3 x 1,000 lb of bombs is not enough to destroy an enemy base in Realistic battles, which is useless in regards to decreasing ticket count and, most importantly, does not help your team. Thus, leave base bombing to the British heavy bombers you will likely also encounter on your team, whose payloads vastly outclass yours, and instead - if you wish to help your team as much as possible - use your five nose-mounted Browning machine guns on ground targets. Ground target strafing is not only infinitely more exciting than base bombing, but it can also lower the enemy's ticket count drastically, therefore helping your team win. Fly at low altitudes and attack light pillboxes and soft targets with your guns. If you fail to destroy a target, then pitch up and use your turrets to finish it off. Save the bombs for targets the .50 cal guns cannot destroy, such as heavy tanks and heavy pillboxes; the bombsight is very helpful in doing this (something which the dedicated strafing variants such as the PBJ-1J lack). Make sure to use a fuse timer, 3 seconds should be enough when bombing at treetop level with 1,000 lb bombs.

When strafing, be sure to watch your minimap at all times for any incoming enemies so you can adequately prepare for an attack. When being attacked, try to identify the attacker. If the attacker is of lower rank or a vehicle that don't have a lot of frontal armour, try to perform a head-on attack on them. All of the B-25's frontal .50 cal are in the center so it is very easy to snipe their pilot or blow out their engine with the .50 cal firepower. However if they are a lot stronger than the B-25 (basically any German heavy fighter or very high-ranked aircraft the B-25 can face) or they try to manoeuvre out of the frontal gun fire (don't chase them because the B-25 is not very agile), fly away from the assailant and try to get them on your tail, and manually open fire with the defensive guns while they try to turn to get behind the B-25, making sure to watch your tracers and adjust the direction of fire, so they hit the target. Remember that the turret guns will jam if fired for a long duration, requiring them to be reloaded, which usually takes almost twenty seconds, during which an attacker will most certainly destroy the B-25. If the reticle starts blinking, the guns are very close to jamming, so immediately stop firing and wait for the weapons to cool down. Many experienced players will attempt to utilise the dead zones on your belly and the arcs beyond your twin rudders in their attack. If you find an enemy doing this to you, then switch back to flight view and manoeuvre so that they are in the firing arcs of your guns again and try as much as possible to keep them out of your dead zones and, mostly, make their attack as difficult as possible. The attacker will then either eventually lose patience and try for a head-on, or you will get a successful snipe on their aircraft. It is also very advantageous to use the keyboard controls for pitch, roll, and yaw in the gunner view as it will allow you to make small manoeuvres while still concentrating on defending yourself, letting you, for example, dodge fire or roll/pitch/yaw and shoot someone in your dead zones. Also, use Universal belts for your turrets as they will do the most damage to enemies and cause devastating fires. While doing all these activities, look for the closest ally or friendly ground anti-air gun. Their cover can give the B-25 player an advantage in the fight against the pursuers.

B-25J-1 showing how deadly the tail gunner can be.

If you lose tail control for whatever reason, then immediately turn back to the airfield and use combat flaps to keep your nose up. Make a landing by alternating between takeoff and combat flaps and, if needed, landing flaps. Make sure that your speed does not go too low; if you start nosing down with takeoff flaps then do not use landing flaps (unless in an emergency) as you'll lose speed and potentially crash. Instead, engage WEP and wait for your nose to rise. There is no set method for doing this and it takes lots of practice, but making these daring landings is very rewarding. If you lose an engine, do not engage flaps as you will lose speed, end up in a stall and will die, fly straight and slowly make your way back to base, using WEP if needed. If using manual engine controls, close the radiator of the dead engine, feather it, and open the radiator of the working engine to allow you to use WEP all the way back to the airfield without overheating.

Carrier Landing Technique

Approach at 150 km/h (92 mph/80 kt), flaps set to landing. Keep applying about 60% thrust, or as necessary to maintain 150 km/h. Touchdown at the beginning of the carrier runway, slightly to the left to avoid the island. Apply hard braking, immediately retract flaps, and if necessary fire forward-facing guns to utilize the recoil to stop faster.

Manual Engine Control

MEC elements
Mixer Pitch Radiator Supercharger Turbocharger
Oil Water Type
Controllable Controllable
Not auto controlled
Not controllable
Not auto controlled
Controllable
Auto control available
Separate Controllable
2 gears
Not controllable

Pros and cons

Pros:

  • Very effective front-facing armament of 5 x 12.7 mm machine for aerial attack or ground strafing
  • Durable airframe which can take a beating from weak guns like 20 mm Type 99
  • Heavy defensive armament on two sides, top and especially the tail gunner
  • Can provide initial cover for other bombers until fighters reach their altitude
  • Can be used as a tactical bomber, strategic bomber, attacker or even an interceptor
  • Rather fast dive acceleration

Cons:

  • Manoeuvres stiffly, cannot turnfight
  • Rudder severely locks up over 400 km/h, meaning it cannot adjust its aim in time and need a second pass
  • Difficult to pull out of a dive due to elevator lockup
  • Often the fuel tank in wings will catch fire, leading to the failure of spars
  • No downward-facing defensive armament, vulnerable to attacks from below or Schrage Musik attacks (Do 217 N-2 and Ki-45 tei)
  • If tail control is damaged, return to base and land utilizing flaps and engine throttling
  • Relatively low payload compared to a heavy bomber
  • Forward facing gunner will automatically fire at approx 1,000 m, alerting your target
  • Low energy retention; any attacks that require manoeuvring will cost speed and altitude

History

Early in 1939 as tensions were rising throughout Europe, the Soviet Union and Asia, the United States Army Air Corps (USAAC) issued requirements for a new medium bomber contract. Specifications for the medium bomber included carrying a payload of 2,400 lb (1,100 kg) while flying over 1,200 mi (1,900 km) at a speed of 300 mph (480 km/h). Fortuitously North American Aviation (NAA) already had a previous design for their NA-40B which they had already built as a prototype known as NA-62. After initial service tests, the USAAC placed an order with NAA to produce the NA-62 as the B-25. Alongside the B-25, the USAAC also ordered the Martin B-26 Marauder into production, though it was still only drawings on paper.

NAA had a head start through utilising their existing NA-62 aircraft. Initially, the plane had a constant-dihedral or and upward angle to the main wings. Unfortunately, this configuration caused stability issues which resolved when the wing shape became slightly anhedral just from the engine nacelle to the wingtip. The flattening of the outer wing led the aircraft to have gull shaped wings; however, this eliminated any stability problems previously encountered. Though not as noticeable was the increase in the size of the tail fins and decrease their inward tilt. These factors would also help improved stability and increase the aircraft's responsiveness, especially when carrying heavy loads.

Development continued through 1941 and in 1942 the first B-25A and B-25B models reported for duty with the USAAC. Variants of the B-25 from B through H changed over time, and the military experimented with using the aircraft as a bomber and a strafing aircraft specialising in an anti-shipping role with its skip-bombs, 14-18 forward-facing machine guns or even a 75 mm M4 cannon. The B-25J versions of the plane were essentially the same as a B-25H; however the 75 mm cannon was removed, and the nose of the aircraft was changed out. Now there were two versions of the nose which could be field swapped to change the usage of the aircraft. The B-25J-1 strafer version incorporated a metal nose outfitted with eight 12.7 mm Browning machine guns while the second option utilised a glass nose with a single crew usable 12.7 mm Browning and single 12.7 mm Browning which was fixed and operated by the pilot often in conjunction with four blister mounted 12.7 mm machine guns. This aircraft while developed for mid-level bombing instead excelled as a low altitude strafing bomber, often flying at tree-top levels and at times mast-level with ships. Frequently strafing B-25s lead the charge to eliminate enemy gunners and anti-aircraft instalments while bomber B-25s followed immediately behind to destroy airfields or vessels, often causing havoc at the target site.


Archive of the in-game description

North American B-25J-1 Mitchell twin-engine medium bomber/ground-attack aircraft

The B-25J (NA-108) was the most largely produced Mitchell variant. The first aircraft of this type left the factory floor in December 1943, and the variant drove the B-25C and B-25D completely out of production by March of the next year.

B-25J bombers had two 1,700 hp Wright R-2600-29 fourteen-cylinder, double-row, radial air-cooled engines with Hamilton Standard Hydromatic 23E50 three-bladed automatic metal propellers.

One feature of this variant was that it could be used both as a bomber and as a ground-attack aircraft.

When used as a bomber, the B-25J-1's armament was: one fixed front machine gun (with 400 rounds) and one mobile machine gun (with 300 rounds) mounted on the navigator's cockpit in the forward fuselage; four front machine guns, with 400 rounds each, mounted in pairs on both sides of the lower fuselage section, near the pilot's cockpit; a Bendix A-9 upper turret housing twin machine guns, with 400 rounds each; a twin Bell M-7 rear mount, with 600 rounds each; and two machine guns, with 600 rounds each, in the fuselage blisters on the starboard and port sides. All gun emplacements had 12.7 mm Colt-Browning ANM2.5 machine guns. The total number of machine guns was 12.

Thus, the B-25J was practically as good in its armament as heavy bombers like the B-17 or the B-24, except for coverage from below.

To use the B-25J-1 as a ground-attack aircraft, the nose section with the navigator/bombardier's cockpit could be easily removed and replaced by a solid unglazed nose with a battery of eight 12.7 mm Colt-Browning ANM2.5 machine guns, with 400 rounds each. Thus the number of front machine guns was increased to 12, and the total number of guns to 18.

The B-25J-1's maximum bomb capacity was 4,000 lb (1,815 kg). Starting with the 151st machine, one bomb rack, meant to suspend a 2,000 lb (908 kg) bomb, was removed from production B-25J-1 bombers, since it was almost never used in combat units and did nothing but take up a lot of space in the bomb bay.

The aircraft usually carried three 1,000 lb (454 kg) or two 1,600 lb (726 kg) bombs. Different combinations of bombs of smaller sizes were also used. 10 kg parachute bombs were used, as well. The B-25J could carry a Mk.13 torpedo weighing 907 kg. In addition, removable bomb racks for bombs up to 250 kg could be mounted under the wing panels.

When used as a bomber, the aircraft had a crew of six people: two pilots, a navigator/bombardier/gunner, a turret gunner/engineer, a radio operator/waist gunner, and a tail gunner. When used as a ground-attack aircraft, the crew consisted of five people, excluding the navigator/bombardier.

Both pilot seats were equipped with an armoured backrest. One armour plate was located behind the instrument panel, and the second was under the cockpit windshield. Two armour sheets were fixed outside to the sides. Armour protection was provided for all gunners.


Media

Skins
Videos

See also

Aircraft of comparable role, configuration and era
Other B-25 variants in-game
  • B-25J-20 - Very little difference between the J-1 and J-20, an additional nose-mounted machine gun, slight armour difference.
  • B-25J-30 (Chinese lend-lease) - Virtually same as J-20 variant.
  • B-25J-30 (Soviet lend-lease) - Same as Chinese lend-lease version with the exception it utilises Soviet bombs.
  • PBJ-1H - U.S. Marine variant - 75 mm autocannon and eight nose-mounted machine guns, lower service ceiling, reduced bomb load compared to J-1, J-20 and J-30 variants, increased armour around the cockpit.
  • PBJ-1J - U.S. Marine variant - Identical to PBJ-1H in-flight characteristics and bomb loadout, no 75 mm cannon, a total of 12 nose-mounted machine guns.

External links


North American Aviation
Fighters 
P-51A  P-51
P-51C  P-51C-10
P-51D  P-51D-5 · P-51D-10 · P-51D-20-NA · P-51D-30
P-51H  P-51H-5-NA
Twin-engine fighters  F-82E
Jet fighters  F-86A-5 · F-86F-2 · F-86F-25 · F-86F-35 · F-100D
Strike aircraft  A-36 · PBJ-1H · PBJ-1J
  FJ-4B · FJ-4B VMF-232
Bombers  B-25J-1 · B-25J-20
Export/Licence  ▂B-25J-30 · ␗B-25J-30
  ▄Mustang Mk IA · F-6C-10-NA · ␗P-51D-20 · J26 David · J26 · P-51D-20-NA · ␗P-51K
  F-86F-30 ▅ · ␗F-86F-30 · F-86F-40 ▅ · F-86F-40 JASDF▅ · ␗F-86F-40
  ◄F-86K · ▄F-86K (Italy) · ▄F-86K (France)
  ␗F-100A · ▄F-100D · ␗F-100F
Captured  ▅P-51C-11-NT
  Canadair Limited license-built the F-86 as the CL-13 for use in Canada and export to Europe.
  Fiat license-built the F-86K for the Italian Air Force though another 120 NAA built F-86Ks were also sold to the Italians.
See Also  Mitsubishi Heavy Industries · Canadair Limited · Fiat Aviation

USA bombers
Dive  SB2U-2 · SB2U-3 · SBD-3 · SB2C-1C · SB2C-4
Torpedo  TBD-1 · PBY-5 Catalina · PBY-5A Catalina · TBF-1C · BTD-1
Medium  B-10B · B-18A · B-34 · PV-2D · B-25J-1 · B-25J-20 · A-26C-45 · A-26C-45DT · B-26B
Heavy  B-17E · B-17E/L · B-17G-60-VE · PB4Y-2 · B-24D-25-CO · B-29A-BN
Hydroplanes  OS2U-1 · OS2U-3 · PBM-1 "Mariner" · PBM-3 "Mariner"