|
|
| (40 intermediate revisions by 13 users not shown) |
| Line 1: |
Line 1: |
| − | {{About
| + | {{Specs-Card|code=uk_rooikat_76}} |
| − | | about = British light tank '''{{PAGENAME}}'''
| |
| − | | usage = other versions
| |
| − | | link = Rooikat (Family)
| |
| − | }}
| |
| − | {{Specs-Card | |
| − | |code=uk_rooikat_76 | |
| − | |images={{Specs-Card-Image|GarageImage_{{PAGENAME}}.jpg|ArtImage_{{PAGENAME}}.png}}
| |
| − | }} | |
| | | | |
| | == Description == | | == Description == |
| | <!-- ''In the description, the first part should be about the history of the creation and combat usage of the vehicle, as well as its key features. In the second part, tell the reader about the ground vehicle in the game. Insert a screenshot of the vehicle, so that if the novice player does not remember the vehicle by name, he will immediately understand what kind of vehicle the article is talking about.'' --> | | <!-- ''In the description, the first part should be about the history of the creation and combat usage of the vehicle, as well as its key features. In the second part, tell the reader about the ground vehicle in the game. Insert a screenshot of the vehicle, so that if the novice player does not remember the vehicle by name, he will immediately understand what kind of vehicle the article is talking about.'' --> |
| − | In 1976, the South African Armoured Corps issued a new project for a "New Generation Armoured Car", intended to replace the 4x4 [[Eland 90 Mk.7|Eland 90]] in service as they were struggling to provide adequate support for the heavier [[Ratel (Family)|Ratel]] IFVs in tank warfare. Following the inadequate performance of the [[Concept 3|initial prototype series]], new specifications were issued, and new prototypes were designed by Sandock-Austral with assistance from German firm Thyssen-Henschel, leading to the light Class 1 ("Cheetah Mk1") and medium Class 2 ("Cheetah Mk2") fitted with a modification of the 76 mm OTO Melara naval cannon, as well as the heavy [[Class 3 (P)|Class 3 ("Bismarck")]] fitted with a 105 mm L7. While the Class 2 was originally designed in two variants — the 2A having the engine at the front to allow a rear compartment for carrying infantry, and the 2B with a conventional rear-engined setup — such plans were later scrapped in favour of creating a vehicle more focused on reconnaissance and anti-tank capabilities, retaining the Ratel for the IFV role. The Class 2B prototype was selected for development, and limited production for further testing began in 1987, when it was christened the '''Rooikat'''. Mass-production began in mid 1990.
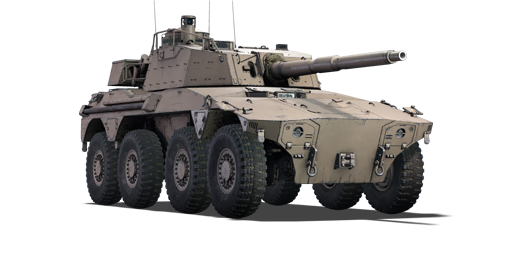
| + | [[File:GarageImage_{{PAGENAME}}.jpg|420px|thumb|left]] |
| − | | + | {{Break}} |
| − | Introduced in [[Update 1.95 "Northern Wind"]], the Rooikat Mk.1D is a powerful and nimble light tank. It has excellent mobility, allowing it to easily set up ambush positions, flank, or reposition after sniping. While the gun somewhat lacks in post-penetration damage, the APFSDS shell's penetration is sufficient for even the heaviest opponents that it may face. Coupled with access to a two-plane stabiliser and laser rangefinder, the Rooikat excels in long range sniping, and can also perform well in closer range engagements, although it risks having to take multiple shots to take out a target.
| + | The '''{{Specs|name}}''' is a rank {{Specs|rank}} British light tank {{Battle-rating}}. It was introduced in [[Update 1.95 "Northern Wind"]]. |
| | | | |
| | == General info == | | == General info == |
| | === Survivability and armour === | | === Survivability and armour === |
| − | {{Specs-Tank-Armour}}
| + | Armor on the Rooikat is, to say the least, nonexistent. You will be safe from rifle caliber MGs from all angles, but 12.7mm and above will be able to penetrate your sides at close ranges. Cannon armed aircraft will also be a significant threat. This vehicle also has hullbreak, so any main gun will probably kill you instantly. Therefore, your key to survival is mobility. |
| − | <!-- ''Describe armour protection. Note the most well protected and key weak areas. Appreciate the layout of modules as well as the number and location of crew members. Is the level of armour protection sufficient, is the placement of modules helpful for survival in combat? If necessary use a visual template to indicate the most secure and weak zones of the armour.'' -->
| |
| − | | |
| − | Armour on the Rooikat chassis is light, but reasonably good. It will be safe from heavy machine guns from almost all the angles. While theoretically the 12.7 mm rounds can penetrate flat sides from up to 500 m and damage them from some angles when closer than 100 m, that almost never happens. 20 mm autocannons and above will be able to penetrate almost anywhere, and so SPAA and cannon-armed aircraft will be a significant threat.
| |
| − | | |
| − | The {{PAGENAME}} has two hull-mounted smoke groups and ESS, making the tank difficult to finish off and allowing it to use smoke offensively whenever it's needed. Unfortunately, the {{PAGENAME}} does not have thermal scope to see through ESS in RB, while many enemies do.
| |
| − | | |
| − | Protection against heavier weapons vary greatly depending on the enemy skill and ammunition type.
| |
| − | | |
| − | Against big kinetic shells: While there are three crew members sitting in a straight line when facing the tank straight, the design of the tank is nonetheless confusing to people which do not bother to learn enemy tanks layouts - the turret and the driver crew are located at different heights, allowing for random misses and there is only one small fuel tank, which is difficult to hit on accident. Furthermore, the ammo racks are small and the last one is located on a side that almost no one ever fires at. By not charging at enemy tanks directly and taking less ammunition, the {{PAGENAME}} can sometimes survive up to 20 kinetic shots from up to 3 tanks at the same time.
| |
| − | | |
| − | Against chemical ammunition: This vehicle is vulnerable to overpressure, and its hull roof can be overpressurized by HEAT or HESH if hit correctly, so anyone actually expecting {{PAGENAME}} can instantly destroy it. Therefore, the {{PAGENAME}}'s key to survival is mobility.
| |
| − | | |
| − | The {{PAGENAME}} also comes stock with a desert yellow camouflage, which can be problematic on certain maps.
| |
| − | | |
| − | '''Armour type:'''
| |
| − | | |
| − | * Rolled homogeneous armour (hull, turret, cupola)
| |
| − | * Wheel (tires, torsion bars)
| |
| − | | |
| − | {| class="wikitable"
| |
| − | |-
| |
| − | ! Armour !! Front (Slope angle) !! Sides !! Rear !! Roof
| |
| − | |-
| |
| − | | Hull || 25 mm (77°) ''Upper glacis - Centre'' <br> 10 mm (75°) ''Upper glacis - Sides'' <br> 30 mm (23°) ''Lower glacis - Centre'' <br> 15 mm (23°) ''Lower glacis - Sides'' || 20 mm (25°) ''Top'' <br> 25 mm (0-9°) ''Bottom'' || 20 mm ''Upper plate'' <br> 20 mm (29°) ''Lower plate'' || 25 mm (13°) ''Front glacis - Centre'' <br> 10 mm (15°) ''Front glacis - Sides'' <br> 20 mm (0-13°) ''Driver compartment'' <br> 10 mm (0-17°) ''Crew compartment'' <br> 5 mm ''Radiator vents''
| |
| − | |-
| |
| − | | Turret || 25 mm (26-28°) ''Turret front'' <br> 25 mm ''Gun mantlet - external'' <br> 30 mm (cylindrical) ''Gun mantlet - internal'' || 25 mm (12-16°) || 15 mm (15°) || 15 mm (10°) ''Front'' <br> 10 mm (0-11°) ''Rear''
| |
| − | |-
| |
| − | | Cupola || colspan="3" style="text-align:center" | 25 mm (cylindrical) ''Base'' <br> 25 mm (spherical) ''Dome'' || 25 mm (spherical) ''Dome''
| |
| − | |-
| |
| − | |}
| |
| − | | |
| − | '''Notes:'''
| |
| − | | |
| − | * Tires and torsion bars are 10 mm thick.
| |
| − | * The storage box behind the turret is 5 mm thick.
| |
| − | * The internal part of the gun mantlet overlaps with parts of the turret front.
| |
| | | | |
| | === Mobility === | | === Mobility === |
| − | {{Specs-Tank-Mobility}}
| |
| | <!-- ''Write about the mobility of the ground vehicle. Estimate the specific power and manoeuvrability, as well as the maximum speed forwards and backwards.'' --> | | <!-- ''Write about the mobility of the ground vehicle. Estimate the specific power and manoeuvrability, as well as the maximum speed forwards and backwards.'' --> |
| | | | |
| − | {{tankMobility|abMinHp=879|rbMinHp=501}} | + | {{tankMobility|abMinHp= 879|rbMinHp= 501}} |
| − | | |
| − | The mobility on the {{PAGENAME}} is best described as good. It's decently fast, both on and off-road, but suffers from a poor turning circle and a somewhat under-powered engine when stock. Users should not be surprised if they have trouble climbing even mild grades from a standstill and it is not uncommon to need to back up and gain some momentum before being able overcome some hills.
| |
| − | | |
| − | In arcade mode, the {{PAGENAME}} is one of the fastest tanks in the game, and it's basically impossible to outrace it if there is an asphalt road nearby, which is expected from a wheeled tank, however it might crash into a wall and flip over if forced to turn while driving at a maximum speed.
| |
| − | | |
| − | Areas with mud (very specific places on maps like the hill entrances on [[White Rock Fortress]] or some river banks) must be avoided, as the {{PAGENAME}} nearly instantly slows down to 8 km/h while moving through it until all of the wheels are freed. Fortunately, mud is very visible and its generally possible to drive around it.
| |
| − | | |
| − | === Modifications and economy ===
| |
| − | {{Specs-Economy}}
| |
| | | | |
| | == Armaments == | | == Armaments == |
| − | {{Specs-Tank-Armaments}}
| |
| | === Main armament === | | === Main armament === |
| − | {{Specs-Tank-Weapon|1}}
| + | ''Give the reader information about the characteristics of the main gun. Assess its effectiveness in a battle based on the reloading speed, ballistics and the power of shells. Do not forget about the flexibility of the fire, that is how quickly the cannon can be aimed at the target, open fire on it and aim at another enemy. Add a link to the main article on the gun: <code><nowiki>{{main|Name of the weapon}}</nowiki></code>. Describe in general terms the ammunition available for the main gun. Give advice on how to use them and how to fill the ammunition storage.'' |
| − | <!-- ''Give the reader information about the characteristics of the main gun. Assess its effectiveness in a battle based on the reloading speed, ballistics and the power of shells. Do not forget about the flexibility of the fire, that is how quickly the cannon can be aimed at the target, open fire on it and aim at another enemy. Add a link to the main article on the gun: <code><nowiki>{{main|Name of the weapon}}</nowiki></code>. Describe in general terms the ammunition available for the main gun. Give advice on how to use them and how to fill the ammunition storage.'' -->
| |
| − | {{main|GT-4 (76 mm)}}
| |
| − | | |
| − | The {{PAGENAME}} is armed with the Denel 76 mm GT-4 cannon. As far as game-play goes, it is essentially a hand-loaded version of the OTO-Melara 76 mm/62 gun found on the OTOMATIC. It fires the same APFSDS and has HE with similar performance to the shell found on the OTOMATIC, albeit not VT-fused and thus far less useful. Its APFSDS has the ability to frontally penetrate any opponent in its battle-rating bracket, although the odd [[Maus]] may be troublesome, particularly if it is angled.
| |
| − | | |
| − | It has a base 8.7 second reload, which can be reduced to 6.7s through a fully trained and aced crew. Unfortunately this reload is exactly as long as the reload on 105mm armed vehicles it may face in its battle-rating bracket such as the Leopard series, OF-40 series, Centauro, and AMX-30 series. It also has the somewhat questionable accuracy of the OTO-Melara 76 mm, so do not be surprised if its shots aren't pinpoint, though this matters more for shooting down the odd helicopter than for tanks. It gets access to a laser rangefinder to make long range shots easier which is useful on large maps like Sinai. It has decent turret traverse and good firing angles, so its quite flexible in terms of positioning.
| |
| − | | |
| − | {| class="wikitable" style="text-align:center" width="100%"
| |
| − | |-
| |
| − | ! colspan="5" | [[GT-4 (76 mm)|76 mm GT-4]] || colspan="5" | Turret rotation speed (°/s) || colspan="4" | Reloading rate (seconds)
| |
| − | |-
| |
| − | ! Mode !! Capacity !! Vertical !! Horizontal !! Stabilizer
| |
| − | ! Stock !! Upgraded !! Full !! Expert !! Aced
| |
| − | ! Stock !! Full !! Expert !! Aced
| |
| − | |-
| |
| − | ! ''Arcade''
| |
| − | | rowspan="2" | 48 || rowspan="2" | -10°/+20° || rowspan="2" | ±180° || rowspan="2" | Two-plane || 38.1 || 52.7 || 64.0 || 70.8 || 75.3 || rowspan="2" | 8.71 || rowspan="2" | 7.70 || rowspan="2" | 7.10 || rowspan="2" | 6.70
| |
| − | |-
| |
| − | ! ''Realistic''
| |
| − | | 23.8 || 28.0 || 34.0 || 37.6 || 40.0
| |
| − | |-
| |
| − | |}
| |
| − | | |
| − | ==== Ammunition ====
| |
| − | {{:GT-4 (76 mm)/Ammunition|76/62 APFSDS, 76/62 HE}}
| |
| − | | |
| − | ==== [[Ammo racks]] ====
| |
| − | [[File:Ammoracks_{{PAGENAME}}.png|right|thumb|x250px|[[Ammo racks]] of the {{PAGENAME}}]]
| |
| − | <!-- '''Last updated: 2.1.0.94''' -->
| |
| − | {| class="wikitable" style="text-align:center"
| |
| − | |-
| |
| − | ! Full<br>ammo
| |
| − | ! 1st<br>rack empty
| |
| − | ! 2nd<br>rack empty
| |
| − | ! 3rd<br>rack empty
| |
| − | ! 4th<br>rack empty
| |
| − | ! 5th<br>rack empty
| |
| − | ! 6th<br>rack empty
| |
| − | ! Visual<br>discrepancy
| |
| − | |-
| |
| − | | '''48''' || 46 ''(+2)'' || 37 ''(+11)'' || 29 ''(+19)'' || 19 ''(+29)'' || 11 ''(+37)'' || 1 ''(+47)'' || Yes
| |
| − | |-
| |
| − | |}
| |
| − | Notes:
| |
| − | | |
| − | * Shells are modeled individually and disappear after having been shot or loaded.
| |
| − | * Rack 6 is a first stage ammo rack. It totals 10 shells and gets filled first when loading up the tank.
| |
| − | ** This rack is also emptied early: the rack depletion order at full capacity is: 6 - 1 - 2 - etc. until 5.
| |
| − | ** Simply not firing when the gun is loaded will move ammo from racks 1-5 into rack 6. Firing will interrupt the restocking of the ready racks.
| |
| − | * The visual discrepancy concerns the total number of shells as well as the number of shells per rack:
| |
| − | ** 49 shells are modeled but you can pack only 48 shells.
| |
| − | ** Rack 1 is modeled as 4 shells but contains only 3 shells.
| |
| | | | |
| | === Machine guns === | | === Machine guns === |
| − | {{Specs-Tank-Weapon|2}}
| + | ''Offensive and anti-aircraft machine guns not only allow you to fight some aircraft but also are effective against lightly armoured vehicles. Evaluate machine guns and give recommendations on its use.'' |
| − | <!-- ''Offensive and anti-aircraft machine guns not only allow you to fight some aircraft but also are effective against lightly armoured vehicles. Evaluate machine guns and give recommendations on its use.'' -->
| |
| − | {{main|Browning MG4 (7.62 mm)}}
| |
| − | | |
| − | {| class="wikitable" style="text-align:center" width="50%"
| |
| − | |-
| |
| − | ! colspan="5" | [[Browning MG4 (7.62 mm)|7.62 mm Browning MG4]]
| |
| − | |-
| |
| − | ! Mount !! Capacity (Belt) !! Fire rate !! Vertical !! Horizontal
| |
| − | |-
| |
| − | | Coaxial || 3,750 (250) || 500 || N/A || N/A
| |
| − | |-
| |
| − | |}
| |
| | | | |
| | == Usage in battles == | | == Usage in battles == |
| − | <!-- ''Describe the tactics of playing in the vehicle, the features of using vehicles in the team and advice on tactics. Refrain from creating a "guide" - do not impose a single point of view but instead give the reader food for thought. Describe the most dangerous enemies and give recommendations on fighting them. If necessary, note the specifics of the game in different modes (AB, RB, SB).'' -->
| + | ''Describe the tactics of playing in the vehicle, the features of using vehicles in the team and advice on tactics. Refrain from creating a "guide" - do not impose a single point of view but instead give the reader food for thought. Describe the most dangerous enemies and give recommendations on fighting them. If necessary, note the specifics of the game in different modes (AB, RB, SB).'' |
| − | | |
| − | The Rooikat Mk.1D should be played either as long range support (with the help of the scouting mechanic) or in quick flanking manoeuvres.
| |
| − | | |
| − | As a wheeled vehicle, the mobility is excellent and allows the Rooikat to get to ambush or sniping spots very quickly before the slower and heavier opponents show up. Although the gun penetrates far above its weight for its calibre, the post-penetration damage leaves something to be desired and can punish careless point-and-click targeting. Drivers of the Rooikat must take this in mind and put extra thought on where on a target they should aim, as its rather long reload does not leave room for error with such limited post-pen damage.
| |
| − | | |
| − | If a player decides to snipe with the Rooikat, they should adopt a "shoot-and-scoot" strategy: shoot an opponent, fall back behind cover and relocate to a new firing spot to avoid retaliation. An opponent returning fire will most likely not have any issues taking you out within 1 or 2 shots.
| |
| − | | |
| − | While it's not very recommended, the {{PAGENAME}} can quickly rush down enemy sniper tanks and attack them at close range. Double smoke screens also help with this, as they can be used to force snipers to abandon their cover. It is possible to attack capture points in the same manner if there are allies to cover the reckless light tank. Smokes might prolong tanks life for up to 2 minutes, sometimes allowing the {{PAGENAME}} to steal a victory.
| |
| − | | |
| − | It is important to not bully ATGM tanks unless the kill is guaranteed, because they will vaporize any light tanks that are a nuisance to them immediately and the small APFSDS of the {{PAGENAME}} can, against all odds, shatter upon hitting some ATGM tanks or disable only one of the crew members, ultimately failing to stop them from retaliating.
| |
| | | | |
| | === Pros and cons === | | === Pros and cons === |
| − | <!-- ''Summarise and briefly evaluate the vehicle in terms of its characteristics and combat effectiveness. Mark its pros and cons in a bulleted list. Try not to use more than 6 points for each of the characteristics. Avoid using categorical definitions such as "bad", "good" and the like - use substitutions with softer forms such as "inadequate" and "effective".'' --> | + | <!--Summarise and briefly evaluate the vehicle in terms of its characteristics and combat effectiveness. Mark its pros and cons in a bulleted list. Try not to use more than 6 points for each of the characteristics. Avoid using categorical definitions such as "bad", "good" and the like - use substitutions with softer forms such as "inadequate" and "effective".--> |
| | | | |
| | '''Pros:''' | | '''Pros:''' |
| | | | |
| − | * Fast ground vehicle (120 km/h in RB), even with stock modules it can often drive off-road as fast as an upgraded [[BMP-2]] | + | * Currently the fastest vehicle in-game (120 km/h in RB), even with stock modules it can often drive off-road as fast as an upgraded [[BMP-2]] |
| | * Access to APFSDS rounds | | * Access to APFSDS rounds |
| | + | * Able to hull-break light tanks with the APFSDS round |
| | + | * One of the only British scout tanks, along with the [[Warrior]] |
| | * Sides and front can stop .50 cals at slight angle or at 100+ metres | | * Sides and front can stop .50 cals at slight angle or at 100+ metres |
| − | * Laser Rangefinder helps with aiming at any range | + | * Cheap to repair, {{sl}} 3,600 stock, {{sl}} 6,161 spaded |
| | + | * Has a laser rangefinder that can measure up to 4,260 m |
| | * Very good reverse speed at -43 km/h | | * Very good reverse speed at -43 km/h |
| − | * Has good zoom variety for a light tank, having X8-12 zoom compared to usual X7-8 of light tanks at the rank | + | * Has good zoom for its optics (8.0x - 12.0x) |
| − | * Incredible stock grind experience thanks to stock APFSDS and good gun handling & excellent speed on the appropriate terrain
| |
| − | * Access to a drone (rank 6)
| |
| | | | |
| | '''Cons:''' | | '''Cons:''' |
| | | | |
| − | * Despite the indicated top speed, the vehicle will rarely get to 100+ km/h and there aren't many maps that allow to use it in a meaningful way either | + | * Despite the indicated top speed, the vehicle will rarely get to 100+ km/h |
| | * Not as good at reversing as other British light tanks or the [[Object 906]] | | * Not as good at reversing as other British light tanks or the [[Object 906]] |
| − | * Weak armour overall, it will succumb to any autocannon fire instantly | + | * Weak armour overall, unlike [[Warrior]] it will succumb to any autocannon fire instantly |
| | * Vehicle will not be able to stabilise the gun at speeds of 75+ km/h (46.6+ mph) | | * Vehicle will not be able to stabilise the gun at speeds of 75+ km/h (46.6+ mph) |
| − | * The 76/62 APFSDS has very punctual post-pen damage. It's not uncommon to take 3+ rounds to finish a target off
| |
| − | * Reload rate is rather average - mediocre when taking into account the lackluster sabot damage
| |
| | * Has a rather large turning circle, so turning around in confined areas may require 3-point turns. | | * Has a rather large turning circle, so turning around in confined areas may require 3-point turns. |
| | | | |
| | == History == | | == History == |
| − | <!-- ''Describe the history of the creation and combat usage of the vehicle in more detail than in the introduction. If the historical reference turns out to be too long, take it to a separate article, taking a link to the article about the vehicle and adding a block "/History" (example: <nowiki>https://wiki.warthunder.com/(Vehicle-name)/History</nowiki>) and add a link to it here using the <code>main</code> template. Be sure to reference text and sources by using <code><nowiki><ref></ref></nowiki></code>, as well as adding them at the end of the article with <code><nowiki><references /></nowiki></code>. This section may also include the vehicle's dev blog entry (if applicable) and the in-game encyclopedia description (under <code><nowiki>=== In-game description ===</nowiki></code>, also if applicable).'' -->
| + | ''Describe the history of the creation and combat usage of the vehicle in more detail than in the introduction. If the historical reference turns out to be too long, take it to a separate article, taking a link to the article about the vehicle and adding a block "/History" (example: <nowiki>https://wiki.warthunder.com/(Vehicle-name)/History</nowiki>) and add a link to it here using the <code>main</code> template. Be sure to reference text and sources by using <code><nowiki><ref></ref></nowiki></code>, as well as adding them at the end of the article with <code><nowiki><references /></nowiki></code>. This section may also include the vehicle's dev blog entry (if applicable) and the in-game encyclopedia description (under <code><nowiki>=== In-game description ===</nowiki></code>, also if applicable).'' |
| − | | |
| − | === [[wt:en/news/6496-development-rooikat-76-mk-1d-desert-cat-en|Devblog]] ===
| |
| − | During the mid 1970s, the South African armed forces issued a specification which kickstarted the development of the "New Generation Armoured Car" project. The aim of the project, as the name suggests, was the development of a new heavy armoured car that would replace dated existing designs in the near future.
| |
| − | | |
| − | First test beds were developed in the late 1970s, intended to primarily trial various designs for mobility. At the same time, South Africa was involved in some local conflicts with the neighbouring state of Angola during the mid '70s - mid '80s, further shaping the development of the ongoing project.
| |
| − | | |
| − | In the early 1980s, having sought knowledge and expertise from German engineers, several prototype designs were built and tested. Among them, the eight-wheeled 'Cheetah Mk.2' armed with a 76 mm gun was selected as the winner and was subsequently procured by the South African army. Small scale production began in the late 1980s, with the Cheetah Mk.2 officially receiving the name 'Rooikat' after entering service. Following initial limited production runs, mass production commenced in mid 1990, which led to a total of over 240 Rooikats being produced.
| |
| − | | |
| − | In the early 2000s, the Rooikat 76 Mk.1D was developed under a modernisation program, becoming the most modern modification of the vehicle. The upgrade introduced several smaller improvements, such as improved commander optics and number of smoke launchers as well as others. Over 170 Rooikat 76 Mk.1Ds serve with the South African army today.
| |
| | | | |
| | == Media == | | == Media == |
| − | <!-- ''Excellent additions to the article would be video guides, screenshots from the game, and photos.'' --> | + | <!--Excellent additions to the article would be video guides, screenshots from the game, and photos.--> |
| | + | {{Youtube-gallery|qoprhFB5S7I|'''The Shooting Range #179''' - ''Metal Beasts'' section at 00:30 discusses the Rooikat Mk.1D.}} |
| | | | |
| − | ;Skins
| + | == See also == |
| | + | ''Links to the articles on the War Thunder Wiki that you think will be useful for the reader, for example:'' |
| | | | |
| − | * [https://live.warthunder.com/feed/camouflages/?vehicle=uk_rooikat_76 Skins and camouflages for the {{PAGENAME}} from live.warthunder.com.]
| |
| − |
| |
| − | ;Images
| |
| − | <gallery mode="packed" heights="150">
| |
| − | File:Rooikat Mk1D WTWallpaper 01.jpg|
| |
| − | File:Rooikat Mk1D WTWallpaper 02.jpg|
| |
| − | File:Rooikat Mk1D WTWallpaper 03.jpg|
| |
| − | File:Rooikat Mk1D WTWallpaper 04.jpg|
| |
| − | File:Rooikat Mk1D WTWallpaper 05.jpg|
| |
| − | File:Rooikat Mk1D WTWallpaper 06.jpg|
| |
| − | </gallery>
| |
| − |
| |
| − | ;Videos
| |
| − | {{Youtube-gallery|rDQ8R95LQJM|'''Should You Buy The Rooikat Mk. 1D''' - ''Sako Sniper''|qoprhFB5S7I|'''The Shooting Range #179''' - ''Metal Beasts'' section at 00:30 discusses the Rooikat Mk.1D.|RJjVRagzYPU|'''Rooikat Mk.1D - Speeding Up British 8.3 Lineup''' - ''Napalmratte''}}
| |
| − |
| |
| − | == See also ==
| |
| − | <!-- ''Links to the articles on the War Thunder Wiki that you think will be useful for the reader, for example:''
| |
| | * ''reference to the series of the vehicles;'' | | * ''reference to the series of the vehicles;'' |
| − | * ''links to approximate analogues of other nations and research trees.'' --> | + | * ''links to approximate analogues of other nations and research trees.'' |
| − | | |
| − | ;Other vehicles of similar configuration and role
| |
| − | | |
| − | * [[AUBL/74 HVG]]
| |
| − | * [[Centauro]]
| |
| − | * [[AMX-10RC]]
| |
| | | | |
| | == External links == | | == External links == |
| − | <!-- ''Paste links to sources and external resources, such as:'' | + | <!--Paste links to sources and external resources, such as: |
| | * ''topic on the official game forum;'' | | * ''topic on the official game forum;'' |
| − | * ''other literature.'' --> | + | * ''encyclopedia page on the tank;'' |
| | + | * ''other literature.''--> |
| | | | |
| | * [[wt:en/news/6496-development-rooikat-76-mk-1d-desert-cat-en|[Devblog] Rooikat 76 Mk.1D: Desert Cat]] | | * [[wt:en/news/6496-development-rooikat-76-mk-1d-desert-cat-en|[Devblog] Rooikat 76 Mk.1D: Desert Cat]] |
| | | | |
| | {{Britain light tanks}} | | {{Britain light tanks}} |
| − | [[Category:Wheeled ground vehicles]]
| |

 3,600 stock,