Difference between revisions of "Zrinyi II"
FLAYINGGHOST (talk | contribs) (→Usage in battles) (Tag: Visual edit) |
Inceptor57 (talk | contribs) (Edits to text. Removed unnecessary emphasis, formatted for cohesion, removed first-hand experience language to be more general) |
||
| Line 11: | Line 11: | ||
== General info == | == General info == | ||
| − | === Survivability and | + | === Survivability and armour === |
{{Specs-Tank-Armour}} | {{Specs-Tank-Armour}} | ||
<!-- ''Describe armour protection. Note the most well protected and key weak areas. Appreciate the layout of modules as well as the number and location of crew members. Is the level of armour protection sufficient, is the placement of modules helpful for survival in combat? If necessary use a visual template to indicate the most secure and weak zones of the armour.'' --> | <!-- ''Describe armour protection. Note the most well protected and key weak areas. Appreciate the layout of modules as well as the number and location of crew members. Is the level of armour protection sufficient, is the placement of modules helpful for survival in combat? If necessary use a visual template to indicate the most secure and weak zones of the armour.'' --> | ||
| − | + | ||
| + | The {{PAGENAME}} has 75 mm of frontal armour, plus the addition 20 mm from tracks that are placed on frontal armour. This means that you can, with ease, frontally face your opponents. Most opponents would not be able to penetrate the front armour with ease, with the exception of well-informed players that know the {{PAGENAME}} weak points as well as tank destroyers. The biggest frontal weak spot is the 50 mm of armour in front of driver. Most of tanks can penetrate this spot, but it won't one-shot the {{PAGENAME}}. Besides the frontal armour, at the sides and at the back there are around 25mm of armour. This is very weak and can allow the {{PAEGNAME}} to be one-shot destroyed, so it is important to face the enemy directly in the front to make the most of the frontal armour. | ||
'''Armour type:''' <!-- The types of armour present on the vehicle and their general locations --> | '''Armour type:''' <!-- The types of armour present on the vehicle and their general locations --> | ||
| Line 89: | Line 90: | ||
== Usage in battles == | == Usage in battles == | ||
| − | <!-- ''Describe the tactics of playing in the vehicle, the features of using vehicles in the team and advice on tactics. Refrain from creating a "guide" - do not impose a single point of view but instead give the reader food for thought. Describe the most dangerous enemies and give recommendations on fighting them. If necessary, note the specifics of the game in different modes (AB, RB, SB).'' --> | + | <!-- ''Describe the tactics of playing in the vehicle, the features of using vehicles in the team and advice on tactics. Refrain from creating a "guide" - do not impose a single point of view but instead give the reader food for thought. Describe the most dangerous enemies and give recommendations on fighting them. If necessary, note the specifics of the game in different modes (AB, RB, SB).'' --> |
| + | |||
| + | The {{PAGENAME}} has very good frontal armour, which can encourage an aggressive play style with this tank with front facing towards the enemy. It can absorb most of shells from the tanks around your BR. Use this to advance aggressively to take points and hold them by facing towards where the enemies are expected to attack from, so long as the side armour is not exposed to any enemy fire. | ||
| + | |||
| + | With the gun, the {{PAGENAME}} should be able to one-shot the majority of the opponents. For tougher enemies, try to aim for the weak points, one particularly good one is the cupola on German tanks. The gun, however, has a slow shell velocity so it could be difficult to attack enemies at ranges, but with some experiences this could be corrected to a sure hit even at far distances, making the {{PAGENAME}} perfect for sniping. | ||
| + | |||
| + | If there is a need to displace or adjust the {{PAGENAME}}'s position, remember that it has the same forward and backward speed around 25-30km/h (in realistic), if you have to retreat just go backwards. In case of a bad situation, using smoke can help obscure parts of the tank, especially when the driver is knocked out for some crucial seconds to replace the crew before escaping. | ||
| + | |||
| + | Some enemies to be especially cautious against are tank destroyers, especially those with large-caliber guns (SU-122, Ho-Ro, etc.). Also don't underestimate light tanks because they can easily flank the {{PAGENAME}} and shoot it from an unsuspecting location. The reload time is not the fastest, but it is recommended to upgrade the crew to ace because you shorten reload time by three whole seconds. | ||
=== Pros and cons === | === Pros and cons === | ||
Revision as of 06:57, 18 December 2023

Contents
Description
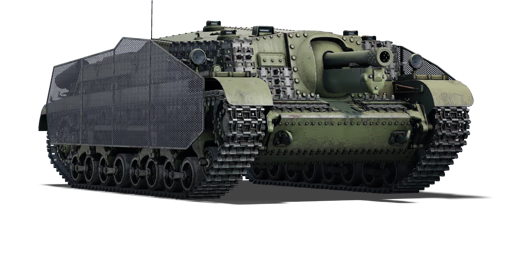
The 43M Zrínyi II was a Hungarian World War II assault gun inspired by the German success with the StuG III. Like the StuG, a versatile self-propelled gun built on the chassis of a medium tank, the Hungarians decided to create their own version using the Hungarian Turán tank's chassis. The project was named Zrínyi, after a famous Hungarian noble family and military leader, Miklós Zrínyi. The plan was to produce two variants of the Zrínyi: one with a 75 mm anti-tank gun (Zrínyi I), and one with a 105 mm howitzer for assault operations (Zrínyi II). Around 72 Zrínyi IIs were built and the vehicle saw combat fighting against the Soviets on the Eastern Front and in the defence of Hungary. The production of Zrínyi IIs was severely slowed due to Hungarian factories being targeted by a serious Allied strategic bombing campaign.
The 40/43.M Zrinyi II was introduced in Update "Sons of Attila" as part of the Hungarian subtree in the Italian tech tree. Armed with a powerful 105 mm howitzer, this low-profile Hungarian tank destroyer with adequate frontal armour is a dangerous opponent for almost any enemy tank it might face, whilst still retaining the decent mobility, excellent reverse speed and smoke grenades of the Turán series.
General info
Survivability and armour
The Zrinyi II has 75 mm of frontal armour, plus the addition 20 mm from tracks that are placed on frontal armour. This means that you can, with ease, frontally face your opponents. Most opponents would not be able to penetrate the front armour with ease, with the exception of well-informed players that know the Zrinyi II weak points as well as tank destroyers. The biggest frontal weak spot is the 50 mm of armour in front of driver. Most of tanks can penetrate this spot, but it won't one-shot the Zrinyi II. Besides the frontal armour, at the sides and at the back there are around 25mm of armour. This is very weak and can allow the Template:PAEGNAME to be one-shot destroyed, so it is important to face the enemy directly in the front to make the most of the frontal armour.
Armour type:
| Armour | Front (Slope angle) | Sides | Rear | Roof |
|---|---|---|---|---|
| Hull | ___ mm | ___ mm Top ___ mm Bottom |
___ mm | ___ - ___ mm |
| Turret | ___ - ___ mm Turret front ___ mm Gun mantlet |
___ - ___ mm | ___ - ___ mm | ___ - ___ mm |
| Cupola | ___ mm | ___ mm | ___ mm | ___ mm |
Notes:
Mobility
| Game Mode | Max Speed (km/h) | Weight (tons) | Engine power (horsepower) | Power-to-weight ratio (hp/ton) | |||
|---|---|---|---|---|---|---|---|
| Forward | Reverse | Stock | Upgraded | Stock | Upgraded | ||
| Arcade | 44 | 44 | 22.6 | 369 | 496 | 16.33 | 21.95 |
| Realistic | 41 | 41 | 230 | 260 | 10.18 | 11.5 | |
Modifications and economy
| Mobility | Protection | Firepower | ||||||||||||||||||||
|---|---|---|---|---|---|---|---|---|---|---|---|---|---|---|---|---|---|---|---|---|---|---|
|
|
|
Armaments
Main armament
| 105 mm Mavag 40/43M | Turret rotation speed (°/s) | Reloading rate (seconds) | |||||||||||
|---|---|---|---|---|---|---|---|---|---|---|---|---|---|
| Mode | Capacity | Vertical | Horizontal | Stabilizer | Stock | Upgraded | Full | Expert | Aced | Stock | Full | Expert | Aced |
| Arcade | 52 | -7°/+16° | ±10° | - | 12.3 | 17.0 | 20.7 | 22.9 | 24.4 | 13.00 | 11.50 | 10.60 | 10.00 |
| Realistic | 8.3 | 9.8 | 11.9 | 13.2 | 14.0 | ||||||||
Ammunition
| Penetration statistics | |||||||
|---|---|---|---|---|---|---|---|
| Ammunition | Type of warhead |
Penetration @ 0° Angle of Attack (mm) | |||||
| 10 m | 100 m | 500 m | 1,000 m | 1,500 m | 2,000 m | ||
| 38/33M | HE | 27 | 27 | 27 | 27 | 27 | 27 |
| 42M | HEAT | 120 | 120 | 120 | 120 | 120 | 120 |
| Shell details | ||||||||||||
|---|---|---|---|---|---|---|---|---|---|---|---|---|
| Ammunition | Type of warhead |
Velocity (m/s) |
Projectile mass (kg) |
Fuse delay (m) |
Fuse sensitivity (mm) |
Explosive mass (TNT equivalent) (kg) |
Ricochet | |||||
| 0% | 50% | 100% | ||||||||||
| 38/33M | HE | 471 | 15.04 | 0.2 | 0.1 | 2.22 | 79° | 80° | 81° | |||
| 42M | HEAT | 444 | 17 | 0.05 | 0.1 | 2.3 | 62° | 69° | 73° | |||
Ammo racks
| Full ammo |
1st rack empty |
2nd rack empty |
3rd rack empty |
4th rack empty |
5th rack empty |
6th rack empty |
Visual discrepancy |
|---|---|---|---|---|---|---|---|
| 52 | __ (+__) | __ (+__) | __ (+__) | __ (+__) | __ (+__) | __ (+__) | __ |
Usage in battles
The Zrinyi II has very good frontal armour, which can encourage an aggressive play style with this tank with front facing towards the enemy. It can absorb most of shells from the tanks around your BR. Use this to advance aggressively to take points and hold them by facing towards where the enemies are expected to attack from, so long as the side armour is not exposed to any enemy fire.
With the gun, the Zrinyi II should be able to one-shot the majority of the opponents. For tougher enemies, try to aim for the weak points, one particularly good one is the cupola on German tanks. The gun, however, has a slow shell velocity so it could be difficult to attack enemies at ranges, but with some experiences this could be corrected to a sure hit even at far distances, making the Zrinyi II perfect for sniping.
If there is a need to displace or adjust the Zrinyi II's position, remember that it has the same forward and backward speed around 25-30km/h (in realistic), if you have to retreat just go backwards. In case of a bad situation, using smoke can help obscure parts of the tank, especially when the driver is knocked out for some crucial seconds to replace the crew before escaping.
Some enemies to be especially cautious against are tank destroyers, especially those with large-caliber guns (SU-122, Ho-Ro, etc.). Also don't underestimate light tanks because they can easily flank the Zrinyi II and shoot it from an unsuspecting location. The reload time is not the fastest, but it is recommended to upgrade the crew to ace because you shorten reload time by three whole seconds.
Pros and cons
Pros:
- Powerful 105 mm howitzer can easily destroy most tanks it will face
- 120 mm of penetration on the HEAT round is enough to deal with almost any opponent you will face
- Good explosive mass for both rounds
- Has relatively strong frontal armour which can absorb a lot of fire
- Has smoke grenades
- Has an excellent reverse speed
- Has mesh side skirt armour which protects against HEAT and HE projectiles
- Has plenty of ammo
Cons:
- No machine guns
- No AP rounds of any kind, if an enemy is behind a fence, your HEAT/HE shells will just destroy the fence instead of the enemy
- Long reload
- Low-velocity rounds
- No turret
- Roof armour is weak and thus vulnerable to strafing from aircraft
History
Describe the history of the creation and combat usage of the vehicle in more detail than in the introduction. If the historical reference turns out to be too long, take it to a separate article, taking a link to the article about the vehicle and adding a block "/History" (example: https://wiki.warthunder.com/(Vehicle-name)/History) and add a link to it here using the main template. Be sure to reference text and sources by using <ref></ref>, as well as adding them at the end of the article with <references />. This section may also include the vehicle's dev blog entry (if applicable) and the in-game encyclopedia description (under === In-game description ===, also if applicable).
Media
Excellent additions to the article would be video guides, screenshots from the game, and photos.
See also
Related development
Other Hungarian vehicles
Similar vehicles
External links
Paste links to sources and external resources, such as:
- topic on the official game forum;
- other literature.
| Italy tank destroyers | |
|---|---|
| Italy | |
| M41 | 75/18 M41 · 75/32 M41 · 90/53 M41M |
| M42 | 75/34 M42 |
| M43 | 105/25 M43 · M43 "G.C.Leoncello" · 75/34 M43 · 75/46 M43 |
| Wheeled | Lancia 3Ro (100/17) · AS 42/47 · Breda 90/53 · Breda 501 |
| Other | L3/33 CC · 47/32 L40 |
| Germany | ▄StuG III G |
| USA | M36B1 · ▄M109G · M113A1 (TOW) |
| Hungary | |
| Zrínyi | Zrinyi I · Zrinyi II |
| USSR | ◔2S1 |
