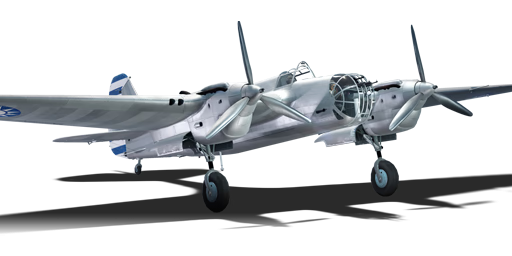
SB 2M-103U (China)
| This page is about the Chinese bomber SB 2M-103U (China). For other variants, see SB (Family). |
.jpg)
Contents
Description
The ␗SB 2M-103U is a rank II Chinese bomber with a battle rating of 2.7 (AB) and 2.3 (RB/SB). It was introduced in Update 1.91 "Night Vision". The Tupolev SB 20-103U is a mid 30's tactical bomber and is used as such in the game to strike bases or ground targets.
General info
Flight performance
| Characteristics | Max Speed (km/h at 4,000 m) |
Max altitude (metres) |
Turn time (seconds) |
Rate of climb (metres/second) |
Take-off run (metres) | |||
|---|---|---|---|---|---|---|---|---|
| AB | RB | AB | RB | AB | RB | |||
| Stock | 403 | 388 | 9560 | 25.0 | 25.7 | 5.8 | 5.8 | 366 |
| Upgraded | 446 | 423 | 24.0 | 24.2 | 13.0 | 8.9 | ||
Details
| Features | ||||
|---|---|---|---|---|
| Combat flaps | Take-off flaps | Landing flaps | Air brakes | Arrestor gear |
| ✓ | ✓ | ✓ | X | X |
| Limits | ||||||
|---|---|---|---|---|---|---|
| Wings (km/h) | Gear (km/h) | Flaps (km/h) | Max Static G | |||
| Combat | Take-off | Landing | + | - | ||
| 580 | 350 | 315 | 309 | 280 | ~4 | ~3 |
| Optimal velocities (km/h) | |||
|---|---|---|---|
| Ailerons | Rudder | Elevators | Radiator |
| < 250 | < 300 | < 185 | > 350 |
Survivability and armour
This aircraft is lightweight compared to its colleagues such as the B-34 or the Maryland. It only has 6 mm steel behind the pilot and a poor defensive armament. But the fact that it is lightweight allows the plane to be more fast and manoeuvrable than a lot of 2.3 medium bombers. To survive, you don't especially need to fly in formation, you'll just have to make a detour to get away from main combat. The fuel tanks are located in the wings. There are 2 in each wing, and are self-sealing.
Modifications and economy
| Flight performance | Survivability | Weaponry | ||||||||||||||||||||
|---|---|---|---|---|---|---|---|---|---|---|---|---|---|---|---|---|---|---|---|---|---|---|
|
|
|
Armaments
Suspended armament
The SB 2M-103U (China) can be outfitted with the following ordnance:
- 6 x 100 kg FAB-100sv bombs (600 kg total)
- 2 x 250 kg FAB-250sv bombs + 6 x 100 kg FAB-100sv bombs (1,100 kg total)
- 2 x 250 kg FAB-250sv bombs (500 kg total)
- 4 x 250 kg FAB-250sv bombs (1,000 kg total)
- 2 x 500 kg FAB-500sv bombs + 2 x 250 kg FAB-250sv bombs (1,500 kg total)
- 1 x 500 kg FAB-500sv bomb (500 kg total)
- 3 x 500 kg FAB-500sv bombs (1,500 kg total)
- 1 x 500 kg FAB-500sv bomb + 2 x 250 kg FAB-250sv bombs (1,000 kg total)
Defensive armament
The SB 2M-103U (China) is defended by:
- 2 x 7.62 mm ShKAS machine gun, nose turret (960 rpg = 1,920 total)
- 1 x 7.62 mm ShKAS machine gun, dorsal turret (1,920 rpg)
- 1 x 7.62 mm ShKAS machine gun, ventral turret (500 rpg)
Usage in battles
Arcade Battles:
This bomber is quite fast for its BR so you should use this as an advantage. For example, you should climb directly at the beginning of the match to 5,000 m and destroy the enemy bases with setup 5 (2 x 250 kg + 2 x 500 kg) which is the heaviest payload you'll have with this plane.
Realistic Battles:
In Realistic battles you should use the same tactics as in Arcade battles. Note that 2 x 500 kg FAB 500 bombs are enough to destroy a base.
Simulator Battles:
In Simulator Mode, the general tactic still remains the same as for other bombers: base bombing and airfield bombing. However, unlike later bombers, the SB 2M is very challenging to control in the pitch axis, much like the equally unstable I-16. If you leave the joystick in its deadzone, the plane tends to automatically enter a climb or dive which, if unnoticed, will very likely lead to a stall or crash. Trimming doesn't seem to solve this issue. As you switch to the gunner sight, although you might have enabled the "autopilot when in gunner view" option, it will not always help since the aircraft will still pitch up and down like a ship on waves. Also, when you are changing to the gunner sight, there is a chance that the plane will randomly roll to one side which will make it enter a spin quickly, and you must level it immediately if this happens. Therefore, this plane can be quite frustrating to fly in Simulator.
When bombing airfields, be sure to fly above 2,000 m so the airfield AAA fire cannot hurt you. This is vital as the SB 2M is large and unprotected, its cooling systems are likely to get damaged leading to the engines overheating slowly. You can memorise the locations of each module in an airfield to maximise your damage. The long, visible airstrip is often the easiest target, however damaging other modules can also be very effective. The plane hangars are probably the second easiest since they are also quite visible: a column of big rectangular buildings. They impact the repair and reload speed of enemy aircraft. Other modules include the living quarter which is a series of small tents, and the fuel module which is a series of barrels with towers around.
Landing in Simulator:
The SB 2M has a pair of giant wings lifting its slim fuselage, providing great lift. Though this is good when flying, it can make landing much trickier for new pilots. The abundance of lift when landing will make the plane bounce off the ground and leap into the air again and again, and the falling process can be dangerous. The key is to slow it down more than any other bomber, as well as setting keybinds for "flaps down" and "flaps up" instead of the default "toggle flaps". This way you can use the desired flap position any time and not be limited to landing flaps only. When approaching the airfield, make sure to descend to around 400 m altitude when you are about 2 km away from the start of the runway. Cut throttle if you feel you are a bit too fast, so that when the airstrip occupies around 1/3 of your windscreen you are flying at about 220 km/h. Now deploy landing gears and combat flaps, and push the nose down to counter the extra lift. When you are even lower to the ground, decelerate further to around 160 km/h, use takeoff flaps and push down the nose more. This speed may appear dangerously close to many plane's stall speed, but the SB 2M can still glide quite well at this speed. At the last second before touchdown, decelerate to ~140 km/h and use landing flaps. If you are a bit slower or faster than expected, adjust throttle and flap position accordingly to control your speed. As such, the bomber will be slow enough to gently land without bouncing into the air, but still fast enough to generate adequate lift to ensure a soft landing. Finally, do not constantly hold the brakes. Tap the brake key, release it at once if the bomber's nose starts to dip down.
Against the SB 2M (applies to all modes):
New fighter and interceptor pilots should be extra careful when dealing with bombers, especially in Simulator since with "full real controls" the plane will manoeuvre much more gently, which makes itself an easy target to lead for the bomber's gunners.
If you are flying an early fighter (e.g. He 51, Ki-10, F2A, etc) with weak armament (2-4 x 7.7 mm MGs or worse) you should use deflection shots. Imagine yourself as an air-to-air missile, fly on a path that will lead you crashing into the bomber, but adjust a little so that you will end up right behind the bomber instead of actually crashing into it (unless you are out of ammo). As the target passes in front of your guns, open fire. Make sure to engage from the SB 2M's underside, sides, or higher front to avoid its turrets. This way you give the SB 2M's gunners very small windows to lead and fire at you. Given your weak guns, target its critical components like the cockpit, gunners and engines. The pilot is ill-protected and may result in a surprising pilot snipe. Bullets to the engine compartment will either damage the engine or the cooling systems, hindering its speed. The gunners are also unprotected meaning they are easy to take out. With the SB 2M's gunner(s) knocked out, you can safely take your time and spray bullets at it until it dies.
If you are flying an interceptor/heavy fighter with great firepower and/or protection (e.g. Do 217, Ki-45, etc), the most straightforward tactic is to just enter a tail chase behind the SB 2M and comfortably fire bursts at it. The SB 2M's 7.62 mm MGs will struggle to critically damage you. As for the safest tactic, it is still and will always be deflection shooting. A quick and well-placed burst will cripple the SB 2M's components easily. However given that most early-war heavy fighters and interceptors have poor flight characteristics (especially climb rate and energy retention) that limit them from doing manoeuvres to set up deflection shots, a tailchase might end up as the better solution most of the times.
Manual Engine Control
| MEC elements | ||||||
|---|---|---|---|---|---|---|
| Mixer | Pitch | Radiator | Supercharger | Turbocharger | ||
| Oil | Water | Type | ||||
| Controllable | Controllable Not auto controlled |
Not controllable Not auto controlled |
Controllable Not auto controlled |
Combined | Not controllable 1 gear |
Not controllable |
Pros and cons
Pros:
- Adequate speed for a bomber, allowing it to get to targets quickly
- Great turn rate allows it to change direction quickly, or to even dodge attacks
- Nice payload allows it to finish off a base in one go, or destroy tanks / pillboxes easily
- Great defensive firepower at the tail (2 x 7.62 mm MGs) with fast rate of fire, good trajectory and plenty of ammo allows it to deal with enemies on its six effectively
Cons:
- Defensive guns don't cover the belly and the sides well, and are quite light against fighters such as Bf 109 E-1 or Ki-61
- Crew and important parts (e.g. fuel tank, engines, coolers) lack protection, increasing the chance of being pilot-sniped or critically damaged
- In Simulator, it is extremely hard to control. No matter how precisely you trim, it will always automatically pitch up and down. Also when switching to gunner view, it will roll, causing a death spin.
History
The SB2M entered service in 1934 and was used as a bomber in multiple conflicts. Although historically Sino-Russian relations (ROC and USSR at the time) were not good, right after the invasion of Japanese, on 21st August 1937, the Sino-Soviet Non-Aggression Pact (中蘇互不侵犯條約) was signed for supplies of weaponry from the Soviet Union; the Tupolev SB bombers were among the equipment received. The first batches of them were received in Lanzhou (蘭州, now the capital of Gansu Province) by the 1st Squadron, National Revolutionary Air Force (later ROCAF); these bombers were used in the first bombing operations against the Japanese in early 1938 along with Soviet Voluntary Air Force on Taipei's Songshan Airfield. There were also later deliveries to the NRAF in 1939 and 1940 which joined some of the major battles against Japanese forces. Spare parts for the SB also became the basis for the "XB-3" (轟研三式轟炸機) domestic design, but structural issues hindered further development.
After the introduction of B-25 to NRAF in 1943, the SB bombers were soon phased.
Media
- Skins
See also
- Aircraft of comparable role, configuration and era
- Martin B-10B
- Martin 139WC
- Fiat BR.20 DR
- Martin 167-A3 Maryland
- Mitsubishi Ki-21-Ia
- Heinkel He 111 H-3
External links
Paste links to sources and external resources, such as:
- topic on the official game forum;
- other literature.
| Tupolev Design Bureau (Ту́полев Опытное конструкторское бюро) | |
|---|---|
| Bombers | TB-3M-17-32 · SB 2M-100 · SB 2M-103 MV-3 · SB 2M-103 · SB 2M-103U · SB 2M-103U MV-3 · SB 2M-105 |
| Tu-2 · Tu-2S · Tu-2S-44 · Tu-2S-59 · Tu-4 | |
| Arkhangelsky Bomber | Ar-2* |
| Strike Aircraft | Tu-1 |
| Jet Bomber | Tu-14T |
| Export | ␗SB 2M-103U · ␗Tu-2S-44 · ␗Tu-4 |
| ◔Tu-2S-59 | |
| * While Andrei Tupolev was imprisoned, Alexander Arkhangelsky, second in command at Tupolev OKB was able to append his name to the final production series of the SB bomber. | |
| China bombers | |
|---|---|
| American | Martin 139WC*(␗B-10B) · ␗A-29 · ␗B-25J-30 · ␗PB4Y-2 |
| German | ␗Hs 123 A-1 |
| Soviet | ␗SB 2M-103U · ␗DB-3A · ␗Tu-2S-44 · ␗Tu-4 |
| Japanese | ␗P1Y1 mod. 11 |
| *Export Name | |
