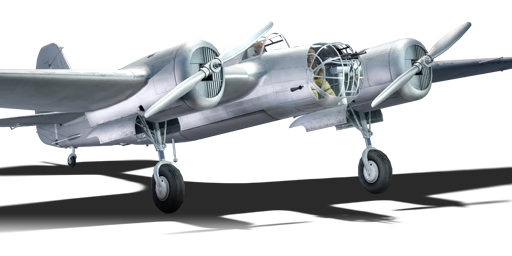
SB 2M-100

From War Thunder Wiki
Jump to: navigation, search
Rank IV USSR | Premium | Golden Eagles
Tu-1 Pack
This page is about the Soviet bomber SB 2M-100. For other versions, see SB (Family).
SB 2M-100
sb_2m_100.png
GarageImage SB 2M-100.jpg
SB 2M-100
AB RB SB
1.3 1.0 1.7
Research:2 900 Specs-Card-Exp.png
Purchase:700 Specs-Card-Lion.png
Show in game

Description

The SB 2M-100 is a rank I Soviet bomber with a battle rating of 1.3 (AB), 1.0 (RB), and 1.7 (SB). It has been in the game since the start of the Open Beta Test prior to Update 1.27.

General info

Flight performance

Max speed
at 4 000 m423 km/h
Turn time24 s
Max altitude9 560 m
Engine2 х Klimov M-100
TypeInline
Cooling systemWater
Take-off weight6 t

The SB 2M-100 is a fast bomber, capable of reaching almost 400 km/h stock. At its low battle rating, it is capable of outrunning some of the fighters it encounters, such as the F3F and I-153 Chaika. With enough energy though, it can outrun early monoplanes such as the Ki-27, the F2A (rare), and even a P-36. The SB 2M-100 is very manoeuvrable, but it can only drop bombs from certain angles.

Characteristics Max Speed
(km/h at 4,000 m)
Max altitude
(metres)
Turn time
(seconds)
Rate of climb
(metres/second)
Take-off run
(metres)
AB RB AB RB AB RB
Stock 408 393 9560 24.9 25.5 6.8 6.8 366
Upgraded 437 423 23.6 24.2 11.2 8.9

Details

Features
Combat flaps Take-off flaps Landing flaps Air brakes Arrestor gear
X X
Limits
Wings (km/h) Gear (km/h) Flaps (km/h) Max Static G
Combat Take-off Landing + -
550 350 315 309 280 ~3 ~2
Optimal velocities (km/h)
Ailerons Rudder Elevators Radiator
< 250 < 300 < 180 > 350

Survivability and armour

Crew4 people
Speed of destruction
Structural0 km/h
Gear350 km/h

The SB 2M does not have any armour except for the pilot's back seat, which features 6 mm of armour plate. The fuel tanks are not protected but they are self-sealing. The gunners are all exposed with the exception of the nose gunner. The dorsal gunner has his torso sticking out of the plane. As a result, if trailed, pull some small evasive manoeuvres making it harder to disable the gunners.

Modifications and economy

Repair costBasic → Reference
AB116 → 152 Sl icon.png
RB151 → 198 Sl icon.png
SB201 → 264 Sl icon.png
Total cost of modifications2 960 Rp icon.png
885 Sl icon.png
Talisman cost190 Ge icon.png
Crew training200 Sl icon.png
Experts1 000 Sl icon.png
Aces20 Ge icon.png
Research Aces96 000 Rp icon.png
Reward for battleAB / RB / SB
20 / 30 / 50 % Sl icon.png
100 / 100 / 100 % Rp icon.png
Modifications
Flight performance Survivability Weaponry
Mods aerodinamic fuse.png
Fuselage repair
Research:
200 Rp icon.png
Cost:
60 Sl icon.png
45 Ge icon.png
Mods radiator.png
Radiator
Research:
200 Rp icon.png
Cost:
60 Sl icon.png
45 Ge icon.png
Mods armor frame.png
Airframe
Research:
220 Rp icon.png
Cost:
65 Sl icon.png
50 Ge icon.png
Mods compressor.png
Compressor
Research:
220 Rp icon.png
Cost:
65 Sl icon.png
50 Ge icon.png
Mods aerodinamic wing.png
Wings repair
Research:
185 Rp icon.png
Cost:
55 Sl icon.png
45 Ge icon.png
Mods new engine.png
Engine
Research:
185 Rp icon.png
Cost:
55 Sl icon.png
45 Ge icon.png
Mods armor cover.png
Cover
Research:
480 Rp icon.png
Cost:
145 Sl icon.png
110 Ge icon.png
Mods engine extinguisher.png
EFS
Research:
480 Rp icon.png
Cost:
145 Sl icon.png
110 Ge icon.png
Mods ammo.png
shkas_turret_belt_pack
Research:
200 Rp icon.png
Cost:
60 Sl icon.png
45 Ge icon.png
Mod arrow 1.png
Mods pilon bomb.png
Der-33
Research:
220 Rp icon.png
Cost:
65 Sl icon.png
50 Ge icon.png
Mod arrow 0.png
Mods turret gun.png
shkas_turret_new_gun
Research:
185 Rp icon.png
Cost:
55 Sl icon.png
45 Ge icon.png
Mods pilon bomb.png
Der-19
Research:
185 Rp icon.png
Cost:
55 Sl icon.png
45 Ge icon.png

Armaments

Suspended armament

List of setups (5)
Setup 16 x 100 kg FAB-100sv bomb
Setup 22 x 250 kg FAB-250sv bomb
Setup 31 x 500 kg FAB-500sv bomb
Setup 42 x 220 kg BRAB-220 (1930) armor-piercing bomb
Setup 51 x 500 kg BRAB-500 (1938) armor-piercing bomb

The SB 2M-100 can be outfitted with the following ordnance:

  • 6 x 100 kg FAB-100sv bombs (600 kg total)
  • 2 x 250 kg FAB-250sv bombs (500 kg total)
  • 1 x 500 kg FAB-500sv bomb (500 kg total)

Defensive armament

Turret2 x 7.62 mm ShKAS machine gun
Ammunition1920 rounds
Fire rate1800 shots/min
Turret7.62 mm ShKAS machine gun
Ammunition500 rounds
Fire rate1800 shots/min
Turret7.62 mm ShKAS machine gun
Ammunition1920 rounds
Fire rate1800 shots/min
Main article: ShKAS (7.62 mm)

The SB 2M-100 is defended by:

  • 2 x 7.62 mm ShKAS machine gun, nose turret (960 rpg = 1,920 total)
  • 1 x 7.62 mm ShKAS machine gun, dorsal turret (1,920 rpg)
  • 1 x 7.62 mm ShKAS machine gun, ventral turret (500 rpg)

Usage in battles

Arcade Battles:

This bomber is quite fast for its BR so you should use this as an advantage. For example, climb directly at the beginning of the match to 5,000 m and destroy the enemy bases with the 500 kg bomb, which is the heaviest payload you'll have with this plane. Note that a good reload speed can make it easier to take out all the bases more quickly. A more aggressive playstyle is available for this plane. You can destroy small yet valuable ground targets with the 6x 100 kg bombs. This is however a much more risky playstyle for the SB 2M.

Realistic Battles:

In realistic battles, you are guaranteed to destroy a base if you stay high. Do not under any circumstance dive bomb bases. Fly level and maintain altitude, and nothing will be able to climb to catch you. However, you can also destroy ground targets while flying at low level. If you need to destroy ground targets, take the 6x 100kg bombs. The defensive armament in this plane is rather decent when the enemy is travelling at low speed. The ShKAS machine guns have a really fast rate of fire and good damage output. Just remember that these guns jam VERY quickly compared to other guns. Be mindful when pressing the trigger.

The SB 2M should be landed with care. Not only does it like to bounce up into the air again, but a very light touch on the brakes is required, because it is very easy to nose over, even at surprisingly low speeds. Flying several practice takeoff and landing cycles in test flight mode is highly recommended.

Simulator Battles:

In Sim, the overall tactic remains the same as other bombers: base/airfield bombing. However, the SB 2M is super hard to control in the pitch. If you leave the stick at the dead zone, the aircraft will automatically climb or dive which will lead to a crash if unnoticed. Trimming doesn't help. For the gunner view, even though you might have the "autopilot when in gunner view" enabled, it won't help either, as it will still continuously pitch up and down like a boat. Also note that when switching to gunner view, it will sometimes uncontrollably roll to one side which will make it enter a spin quickly. Therefore this bomber is extremely frustrating to fly in simulator.

When bombing airfields, make sure to fly above 2,000 m to avoid the anti-aircraft artillery, as this plane is unprotected and its cooling systems will often be damaged, leading to the engines overheating. You should familiarise with each module of the airfield to maximise the damage. The airstrip is the most visible and the easiest one to hit, however, bombing it seems to halve your reward. So it is recommended to bomb everything else: hangar, fuel area, living quarters, etc. The plane hangars are probably easy since they aren't too small.

Given its huge wings compared to the rather skinny fuselage, it can be tricky to land as it will bounce off the ground and leap into the air again and again, no matter how slow it seems to fly. The trick is to slow it down more than any other twin-engine plane, plus set up key binds for "flaps down" and "flaps up" to replace the default "toggle flaps". This way you can use the wanted flap anytime. When approaching the airfield, make sure to descend to around 400 m when you are approximately 2 km away from the start of the runway. This is an appropriate distance to decelerate. As the airstrip occupies 1/3 of your windscreen, reduce speed to approximately 220 km/h, deploy combat flaps and cancel out that extra lift by pitching down. When you are almost touching down, reduce speed to no more than 160 km/h (seems dangerously slow but it can still glide safely), deploy landing gear, take-off flaps and pitch down even more so the SB 2M remains overall parallel to the ground. At the last second before touch down, make sure you are around 130 km/h and deploy landing flaps. This way the bomber can land gently and softly, and will not bounce off. At last, do not constantly hold the brake. Release brake immediately once the nose starts to dip down to avoid propeller strike.

Against the SB 2M (all modes but mostly in sim):

You should be very careful against bombers since with the Sim control (whether it be mouse joystick or a real stick) the plane will manoeuvre much more gently, making yourself a great target for the bomber's gunners. DO NOT follow behind the SB 2M's six unless you are sure that its tail gunners are unconscious. Chasing behind the SB 2M makes yourself pretty much stationary for the tail gunners, and you will be showered with 7.62 mm bullets.

If your plane is an early biplane armed with weak MGs (2-4 x 7.7 mm or below), you should use deflection shots. That is, imagine yourself as an anti-air missile, predict where you two will meet and fly towards that point. This way it gives the gunners little window to open fire at you. When firing, try to aim for the cockpit for a possible pilot-snipe, as the pilot is very unprotected or aim at its engines to damage it or the cooler. Without an engine, the SB 2M won't fly far.

If you are flying an interceptor/heavy fighter that is heavily armed and armoured, you can just sit behind the SB 2M and confidently take out its crew/modules one by one, as its 7.62 mm machine gun has rather weak penetration and damage. This is the most precise way of damaging an aircraft, however, the safest tactic is still, and will always be deflection shooting. One accurate burst will critically damage the weak airframe of the SB 2M, or snap off its wing straight away.

Manual Engine Control

MEC elements
Mixer Pitch Radiator Supercharger Turbocharger
Oil Water Type
Controllable Not controllable
Not auto controlled
Not controllable
Not auto controlled
Controllable
Not auto controlled
Combined Not controllable
1 gear
Not controllable

The manual engine control in this plane is really easy to get used to. The only controls present are Mixture and radiator. Keep the mixture at 60% when flying at higher altitudes, and adjust the mixture to 90% when flying nearer to the ground. The radiator can be kept at 20% normally, even under WEP. If the engine starts to overheat in hotter climates, keep opening the radiator till the temperature returns to normal.

Pros and cons

Pros:

  • Quite fast for a bomber
  • Relatively effective defensive armament if used against biplanes like He 51 or early monoplanes like I-16
  • Fast rate of fire for defensive armament
  • Good aircraft to bring into Realistic tank battles
  • Decent arc of fire from gunners, few blind spots

Cons:

  • Almost no protection in terms of armour
  • Relatively weak airframe
  • Bomb load inadequate against bases - more for vehicles, pillboxes, ships and anti-aircraft positions
  • Exposed gunners mean that they get quickly knocked out
  • Easily catches fire if fuel tanks are hit
  • Almost non-existent stock climb rate
  • In Simulator, it is extremely hard to control. No matter how precisely you trim, it will always automatically pitch up and down. Also when switching to gunner view, it will roll, causing a death spin
  • Dorsal gunner cannot fire directly backwards, leaving it quite vulnerable to attacks from behind

History


Archive of the in-game description

A three-seat, all-metal monoplane with a retractable landing gear system including a tail wheel.

This aircraft was designed in the Department of Aviation, Hydroaviation and Aircraft Prototype Engineering (AGOS) of the Central Aerohydrodynamic Institute (TsAGI) under the direction of A. N. Tupolev and A. A. Arkhangelski. A prototype ANT-40-1 made its first flight on 7 October 1934. Full-scale production of the aircraft under the designation of SB (meaning "High-Speed Bomber") was launched in February 1936.

When creating the new aircraft, the designers paid much attention to the plane's aerodynamic superiority, considering this one of the most important components necessary to obtain high speed. Many structural and technological decisions were made to improve the plane's aerodynamics. It was the first time that an aircraft of this class had smooth metal skin instead of more rigid, corrugated skin; also, new high-strength materials were introduced, flush riveting used, retractable landing gear installed, and crew cockpits enclosed. The SB included the most advanced achievements in the field of aerodynamics, aircraft materials, and technology. As a result, during tests, the ANT-40 prototype nearly matched the maximum speed of the I-16 fighter.

The first production SB planes had 750 hp Klimov M-100 twelve-cylinder, V-type, liquid-cooled engines (a licensed version of the French Hispano-Suiza 12Ybrs engine).

The engines were fitted with cowls featuring a frontal circular radiator which was completely covered by movable shutters which regulated the incoming air flow. The first production SBs were equipped with two-bladed, fixed-pitch metal propellers.

The SB's defensive armament included three gun posts: a starboard post, an upper post, and a hatch post. The starboard mount in the navigator's cockpit consisted of two 7.62 mm ShKAS machine guns with a total magazine capacity of 1,900 rounds. The TUR-9 upper turret was equipped with one ShKAS machine gun whose magazine capacity was 1,000 rounds. The LU hatch mount, with one ShKAS machine gun carrying 500 rounds, was intended for cover the aircraft's lower rear. All of the machine guns were belt-fed, which was also was a revolutionary innovation: the rest of the world mostly continued to use detachable magazines.

The bombing armament of the first-series SBs was housed only inside the bomb bay, on two DER-33 horizontal racks (on which FAB-500 or FAB-250 bombs could be suspended) or four DER-34 vertical racks (for FAB-100 bombs or bomb clusters). The plane's maximum bomb capacity was 600 kg (6 FAB-100 bombs, suspended vertically).


Media

Skins
Videos

See also

Aircraft of comparable role, configuration and era

External links

Paste links to sources and external resources, such as:

  • topic on the official game forum;
  • other literature.


Tupolev Design Bureau (Ту́полев Опытное конструкторское бюро)
Bombers  TB-3M-17-32 · SB 2M-100 · SB 2M-103 MV-3 · SB 2M-103 · SB 2M-103U · SB 2M-103U MV-3 · SB 2M-105
  Tu-2 · Tu-2S · Tu-2S-44 · Tu-2S-59 · Tu-4
Arkhangelsky Bomber  Ar-2*
Strike Aircraft  Tu-1
Jet Bomber  Tu-14T
Export  ␗SB 2M-103U · ␗Tu-2S-44 · ␗Tu-4
  ◔Tu-2S-59
  * While Andrei Tupolev was imprisoned, Alexander Arkhangelsky, second in command at Tupolev OKB was able to append his name to the final production series of the SB bomber.

USSR bombers
SB and Ar  SB 2M-100 · SB 2M-103 · SB 2M-103 MV-3 · SB 2M-103U · SB 2M-103U MV-3 · SB 2M-105 · Ar-2
Yer-2 (petrol)  Yer-2 (M-105) · Yer-2 (M-105) TAT · Yer-2 (M-105R) TAT · Yer-2 (M-105R) LU
Yer-2 (diesel)  Yer-2 (ACh-30B) (e) · Yer-2 (ACh-30B) (l)
Tu  Tu-2 · Tu-2S · Tu-2S-44 · Tu-2S-59 · Tu-4
Pe  Pe-2-1 · Pe-2-31 · Pe-2-83 · Pe-2-110 · Pe-2-205 · Pe-2-359 · Pe-8
IL  DB-3B · IL-4
  Po-2 · Po-2M · MBR-2-M-34 · TB-3M-17-32 · Yak-4 · Be-6
Lend-Lease  ▂PBY-5A Catalina · ▂Hampden TB Mk I · ▂A-20G-30 · ▂B-25J-30