Difference between revisions of "Strv m/39"
(→Description) |
(History to Strv m39) (Tag: Visual edit) |
||
| (18 intermediate revisions by 9 users not shown) | |||
| Line 1: | Line 1: | ||
| − | |||
| − | |||
| − | |||
| − | |||
| − | |||
{{Specs-Card | {{Specs-Card | ||
|code=sw_strv_m39 | |code=sw_strv_m39 | ||
| Line 11: | Line 6: | ||
== Description == | == Description == | ||
<!-- ''In the description, the first part should be about the history of the creation and combat usage of the vehicle, as well as its key features. In the second part, tell the reader about the ground vehicle in the game. Insert a screenshot of the vehicle, so that if the novice player does not remember the vehicle by name, he will immediately understand what kind of vehicle the article is talking about.'' --> | <!-- ''In the description, the first part should be about the history of the creation and combat usage of the vehicle, as well as its key features. In the second part, tell the reader about the ground vehicle in the game. Insert a screenshot of the vehicle, so that if the novice player does not remember the vehicle by name, he will immediately understand what kind of vehicle the article is talking about.'' --> | ||
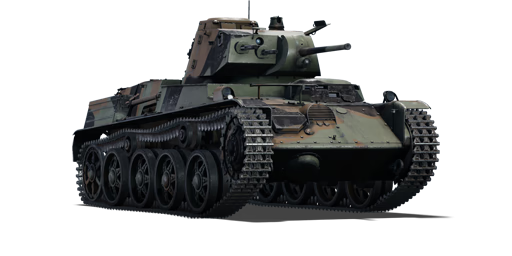
| − | The '''{{Specs|name}}''' | + | The '''{{Specs|name}}''' is a premium rank {{Specs|rank}} Swedish light tank {{Battle-rating}}. It was introduced in [[Update 1.97 "Viking Fury"]]. |
| − | |||
| − | |||
== General info == | == General info == | ||
| Line 20: | Line 13: | ||
<!-- ''Describe armour protection. Note the most well protected and key weak areas. Appreciate the layout of modules as well as the number and location of crew members. Is the level of armour protection sufficient, is the placement of modules helpful for survival in combat? If necessary use a visual template to indicate the most secure and weak zones of the armour.'' --> | <!-- ''Describe armour protection. Note the most well protected and key weak areas. Appreciate the layout of modules as well as the number and location of crew members. Is the level of armour protection sufficient, is the placement of modules helpful for survival in combat? If necessary use a visual template to indicate the most secure and weak zones of the armour.'' --> | ||
| − | ''' | + | {| class="wikitable" |
| + | !Armour | ||
| + | !Front (Slope angle) | ||
| + | !Sides | ||
| + | !Rear | ||
| + | !Roof | ||
| + | |- | ||
| + | |Hull | ||
| + | |13 mm (58°) ''Upper glacis'' | ||
| + | 13 mm (45°) ''Lower glacis'' | ||
| − | + | 13 mm (30°) ''Upper plate'' | |
| − | |||
| − | + | 13 mm + 35 mm ''Driver's cupola'' | |
| + | |13 mm | ||
| + | |13 mm (33°) ''Lower'' | ||
| + | 9 + 15 mm (14°) ''Upper'' | ||
| + | |4-13 mm | ||
|- | |- | ||
| − | + | |Turret | |
| − | | | + | |13 mm + 35 mm (14°) ''Turret front'' |
| − | + | 13 mm + 35 mm (9°-72°) ''Gun mantlet'' | |
| − | + | |13 mm | |
| − | + | |13 mm | |
| − | + | |5- 8 mm | |
| − | |||
| − | |||
|- | |- | ||
| + | |Cupola | ||
| + | |13 mm | ||
| + | |13 mm | ||
| + | |13 mm | ||
| + | |5 mm | ||
|} | |} | ||
| − | |||
| − | |||
| − | |||
=== Mobility === | === Mobility === | ||
| Line 74: | Line 79: | ||
==== Ammunition ==== | ==== Ammunition ==== | ||
| − | {{: | + | {| class="wikitable sortable" style="text-align:center" width="100%" |
| + | ! colspan="8" | Penetration statistics | ||
| + | |- | ||
| + | ! rowspan="2" data-sort-type="text" | Ammunition | ||
| + | ! rowspan="2" | Type of<br>warhead | ||
| + | ! colspan="6" | '''Penetration @ 0° Angle of Attack (mm)''' | ||
| + | |- | ||
| + | ! 10 m !! 100 m !! 500 m !! 1,000 m !! 1,500 m !! 2,000 m | ||
| + | |- | ||
| + | | slpprj m/38 || APBC || 59 || 55 || 41 || 28 || 19 || 13 | ||
| + | |- | ||
| + | | slpgr m/39 || APBC || 55 || 51 || 37 || 26 || 17 || 12 | ||
| + | |- | ||
| + | | 3,7 cm slpprj m/49 || APDS || 105 || 103 || 97 || 89 || 82 || 75 | ||
| + | |- | ||
| + | |} | ||
| + | {| class="wikitable sortable" style="text-align:center" width="100%" | ||
| + | ! colspan="10" | Shell details | ||
| + | |- | ||
| + | ! rowspan="2" data-sort-type="text" | Ammunition | ||
| + | ! rowspan="2" | Type of<br>warhead | ||
| + | ! rowspan="2" | Velocity<br>(m/s) | ||
| + | ! rowspan="2" | Projectile<br>Mass (kg) | ||
| + | ! rowspan="2" | Fuse delay<br>(m) | ||
| + | ! rowspan="2" | Fuse sensitivity<br>(mm) | ||
| + | ! rowspan="2" | Explosive Mass<br>(TNT equivalent) (g) | ||
| + | ! colspan="3" | Ricochet | ||
| + | |- | ||
| + | ! 0% !! 50% !! 100% | ||
| + | |- | ||
| + | | slpprj m/38 || APBC || 785 || 0.74 || N/A || N/A || N/A || 47° || 60° || 65° | ||
| + | |- | ||
| + | | slpgr m/39 || APBC || 800 || 0.74 || 1.2 || 9.0 || 15 || 47° || 60° || 65° | ||
| + | |- | ||
| + | | 3,7 cm slpprj m/49 || APDS || 1,150 || 0.71 || N/A || N/A || N/A || 75° || 78° || 80° | ||
| + | |- | ||
| + | |} | ||
==== [[Ammo racks]] ==== | ==== [[Ammo racks]] ==== | ||
| − | <!-- | + | <!-- [[File:Ammoracks_{{PAGENAME}}.png|right|thumb|x250px|[[Ammo racks]] of the {{PAGENAME}}]] --> |
{| class="wikitable" style="text-align:center" | {| class="wikitable" style="text-align:center" | ||
|- | |- | ||
| Line 87: | Line 128: | ||
! 5th<br>rack empty | ! 5th<br>rack empty | ||
! 6th<br>rack empty | ! 6th<br>rack empty | ||
| − | |||
| − | |||
| − | |||
| − | |||
| − | |||
! Visual<br>discrepancy | ! Visual<br>discrepancy | ||
|- | |- | ||
| − | | '''100''' || | + | | '''100''' || __ ''(+__)'' || __ ''(+__)'' || __ ''(+__)'' || __ ''(+__)'' || __ ''(+__)'' || __ ''(+__)'' || __ |
|- | |- | ||
|} | |} | ||
| − | |||
=== Machine guns === | === Machine guns === | ||
{{Specs-Tank-Weapon|2}} | {{Specs-Tank-Weapon|2}} | ||
<!-- ''Offensive and anti-aircraft machine guns not only allow you to fight some aircraft but also are effective against lightly armoured vehicles. Evaluate machine guns and give recommendations on its use.'' --> | <!-- ''Offensive and anti-aircraft machine guns not only allow you to fight some aircraft but also are effective against lightly armoured vehicles. Evaluate machine guns and give recommendations on its use.'' --> | ||
| − | {{main|ksp m/ | + | {{main|ksp m/36 (8 mm)}} |
{| class="wikitable" style="text-align:center" width="50%" | {| class="wikitable" style="text-align:center" width="50%" | ||
|- | |- | ||
| − | ! colspan="5" | [[ksp m/ | + | ! colspan="5" | [[ksp m/36 (8 mm)|8 mm ksp m/36]] |
|- | |- | ||
! Mount !! Capacity (Belt) !! Fire rate !! Vertical !! Horizontal | ! Mount !! Capacity (Belt) !! Fire rate !! Vertical !! Horizontal | ||
| Line 117: | Line 152: | ||
== Usage in battles == | == Usage in battles == | ||
| − | + | ''Describe the tactics of playing in the vehicle, the features of using vehicles in the team and advice on tactics. Refrain from creating a "guide" - do not impose a single point of view but instead give the reader food for thought. Describe the most dangerous enemies and give recommendations on fighting them. If necessary, note the specifics of the game in different modes (AB, RB, SB).'' | |
| − | |||
| − | |||
| − | |||
| − | |||
| − | |||
=== Pros and cons === | === Pros and cons === | ||
| Line 129: | Line 159: | ||
'''Pros:''' | '''Pros:''' | ||
| − | * | + | * APDS offer up to 100 mm of penetration. |
| − | |||
* Fast reload, up to 3.1 seconds with an ACE crew. | * Fast reload, up to 3.1 seconds with an ACE crew. | ||
| − | * Decent turret | + | * Decent turret armor offers up to 35mm at the front and with sloping for increased protection. |
| − | * | + | * Top speed up to 45 km/h |
| − | |||
| Line 140: | Line 168: | ||
* Only 3 crew members | * Only 3 crew members | ||
| − | |||
* Slow turret traverse speed with 11.2°/s | * Slow turret traverse speed with 11.2°/s | ||
| − | |||
| − | |||
== History == | == History == | ||
| − | + | After the Strv m/38 was put into service, the Swedish wanted a better version. So AB Landsverk designed another tank designated the L60C, with Otto Merker designing a better turret and mantlet to accommodate a bigger gun , the 37mm bofors. 20 were delivered to the Armed forces until the invasion in 1940. During the war it would receive additional add on armor of up to 50mm. | |
| − | |||
| − | |||
| − | |||
| − | |||
| − | |||
| − | |||
== Media == | == Media == | ||
| − | + | ''Excellent additions to the article would be video guides, screenshots from the game, and photos.'' | |
| − | + | == See also == | |
| − | + | ''Links to the articles on the War Thunder Wiki that you think will be useful for the reader, for example:'' | |
| − | |||
| − | |||
| − | |||
| − | |||
| − | |||
| − | |||
* ''reference to the series of the vehicles;'' | * ''reference to the series of the vehicles;'' | ||
| − | * ''links to approximate analogues of other nations and research trees.'' | + | * ''links to approximate analogues of other nations and research trees.'' |
| − | |||
| − | |||
| − | |||
| − | |||
== External links == | == External links == | ||
| Line 177: | Line 186: | ||
* ''topic on the official game forum;'' | * ''topic on the official game forum;'' | ||
| + | * ''encyclopedia page on the tank;'' | ||
* ''other literature.'' | * ''other literature.'' | ||
| − | |||
{{Sweden light tanks}} | {{Sweden light tanks}} | ||
{{Sweden premium ground vehicles}} | {{Sweden premium ground vehicles}} | ||
Revision as of 18:03, 29 December 2020

Contents
Description
The Stridsvagn m/39 is a premium rank I Swedish light tank with a battle rating of 1.0 (AB/RB/SB). It was introduced in Update 1.97 "Viking Fury".
General info
Survivability and armour
| Armour | Front (Slope angle) | Sides | Rear | Roof |
|---|---|---|---|---|
| Hull | 13 mm (58°) Upper glacis
13 mm (45°) Lower glacis 13 mm (30°) Upper plate 13 mm + 35 mm Driver's cupola |
13 mm | 13 mm (33°) Lower
9 + 15 mm (14°) Upper |
4-13 mm |
| Turret | 13 mm + 35 mm (14°) Turret front
13 mm + 35 mm (9°-72°) Gun mantlet |
13 mm | 13 mm | 5- 8 mm |
| Cupola | 13 mm | 13 mm | 13 mm | 5 mm |
Mobility
| Game Mode | Max Speed (km/h) | Weight (tons) | Engine power (horsepower) | Power-to-weight ratio (hp/ton) | |||
|---|---|---|---|---|---|---|---|
| Forward | Reverse | Stock | Upgraded | Stock | Upgraded | ||
| Arcade | 51 | 6 | 8.9 | 220 | 271 | 24.72 | 30.45 |
| Realistic | 46 | 6 | 126 | 142 | 14.16 | 15.96 | |
Modifications and economy
| Mobility | Protection | Firepower | ||||||||||||||||||||||||
|---|---|---|---|---|---|---|---|---|---|---|---|---|---|---|---|---|---|---|---|---|---|---|---|---|---|---|
|
|
|
Armaments
Main armament
| 37 mm kan m/38 | Turret rotation speed (°/s) | Reloading rate (seconds) | |||||||||||
|---|---|---|---|---|---|---|---|---|---|---|---|---|---|
| Mode | Capacity | Vertical | Horizontal | Stabilizer | Stock | Upgraded | Full | Expert | Aced | Stock | Full | Expert | Aced |
| Arcade | 100 | -15°/+25° | ±180° | N/A | 15.23 | 21.08 | 25.60 | 28.31 | 30.12 | 4.03 | 3.57 | 3.29 | 3.10 |
| Realistic | 9.52 | 11.20 | 13.60 | 15.04 | 16.00 | ||||||||
Ammunition
| Penetration statistics | |||||||
|---|---|---|---|---|---|---|---|
| Ammunition | Type of warhead |
Penetration @ 0° Angle of Attack (mm) | |||||
| 10 m | 100 m | 500 m | 1,000 m | 1,500 m | 2,000 m | ||
| slpprj m/38 | APBC | 59 | 55 | 41 | 28 | 19 | 13 |
| slpgr m/39 | APBC | 55 | 51 | 37 | 26 | 17 | 12 |
| 3,7 cm slpprj m/49 | APDS | 105 | 103 | 97 | 89 | 82 | 75 |
| Shell details | |||||||||
|---|---|---|---|---|---|---|---|---|---|
| Ammunition | Type of warhead |
Velocity (m/s) |
Projectile Mass (kg) |
Fuse delay (m) |
Fuse sensitivity (mm) |
Explosive Mass (TNT equivalent) (g) |
Ricochet | ||
| 0% | 50% | 100% | |||||||
| slpprj m/38 | APBC | 785 | 0.74 | N/A | N/A | N/A | 47° | 60° | 65° |
| slpgr m/39 | APBC | 800 | 0.74 | 1.2 | 9.0 | 15 | 47° | 60° | 65° |
| 3,7 cm slpprj m/49 | APDS | 1,150 | 0.71 | N/A | N/A | N/A | 75° | 78° | 80° |
Ammo racks
| Full ammo |
1st rack empty |
2nd rack empty |
3rd rack empty |
4th rack empty |
5th rack empty |
6th rack empty |
Visual discrepancy |
|---|---|---|---|---|---|---|---|
| 100 | __ (+__) | __ (+__) | __ (+__) | __ (+__) | __ (+__) | __ (+__) | __ |
Machine guns
| 8 mm ksp m/36 | ||||
|---|---|---|---|---|
| Mount | Capacity (Belt) | Fire rate | Vertical | Horizontal |
| Coaxial | 1,750 (250) | 649 | -10°/+25° | N/A |
| Coaxial | 1,750 (250) | 649 | -10°/+25° | N/A |
Usage in battles
Describe the tactics of playing in the vehicle, the features of using vehicles in the team and advice on tactics. Refrain from creating a "guide" - do not impose a single point of view but instead give the reader food for thought. Describe the most dangerous enemies and give recommendations on fighting them. If necessary, note the specifics of the game in different modes (AB, RB, SB).
Pros and cons
Pros:
- APDS offer up to 100 mm of penetration.
- Fast reload, up to 3.1 seconds with an ACE crew.
- Decent turret armor offers up to 35mm at the front and with sloping for increased protection.
- Top speed up to 45 km/h
Cons:
- Only 3 crew members
- Slow turret traverse speed with 11.2°/s
History
After the Strv m/38 was put into service, the Swedish wanted a better version. So AB Landsverk designed another tank designated the L60C, with Otto Merker designing a better turret and mantlet to accommodate a bigger gun , the 37mm bofors. 20 were delivered to the Armed forces until the invasion in 1940. During the war it would receive additional add on armor of up to 50mm.
Media
Excellent additions to the article would be video guides, screenshots from the game, and photos.
See also
Links to the articles on the War Thunder Wiki that you think will be useful for the reader, for example:
- reference to the series of the vehicles;
- links to approximate analogues of other nations and research trees.
External links
Paste links to sources and external resources, such as:
- topic on the official game forum;
- encyclopedia page on the tank;
- other literature.
| Sweden light tanks | |
|---|---|
| L-60 | Strv m/38 · Strv m/39 · Strv m/39 TD · Strv m/40L |
| Strv m/41 | Strv m/41 S-I · Strv m/41 S-II |
| Ikv 91 | Ikv 91 · Ikv 91-105 |
| CV 90 | Strf 9040B · Strf 9040C · Strf 9040 BILL |
| CV 90105 · CV 90120 | |
| Wheeled | Pbil m/40 · U-SH 405 |
| Other | Strv m/31 · Strv 74 · Pbv 501 |
| Finland | Vickers Mk.E · ▄T-26E · BT-42 · ▄PT-76 · CV9030FIN · CT-CV 105HP |
| Denmark | CV9035DK |
| Sweden premium ground vehicles | |
|---|---|
| Light tanks | ▄T-26E · Strv m/39 · Pbil m/40 · Strv m/41 S-I · CV9035DK · CV 90105 |
| Medium tanks | Sherman III/IV · Strv 81 (RB 52) · Strv 103-0 · Leopard 1A5NO2 · Christian II |
| Heavy tanks | Kungstiger |
| Tank destroyers | Ikv 73 · SAV 20.12.48 · VIDAR |
