IS-2 (1944) (China)
| This page is about the Chinese heavy tank IS-2 (1944) (China). For other versions, see IS-2 (Family). |
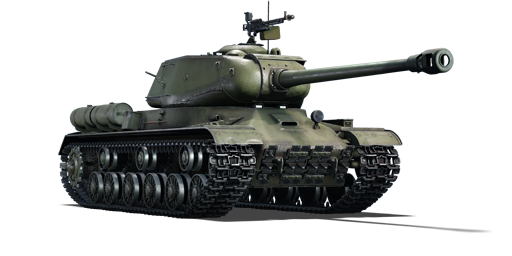
_(China).jpg)
Contents
Description
The ␗IS-2 (1944) is a rank IV Chinese heavy tank with a battle rating of 6.7 (AB/RB/SB). It was introduced in Update 1.91 "Night Vision".
It is almost identical to the Soviet IS-2 (1944) except for the lack of spaced armour on the turret.
General info
Survivability and armour
The armour of the IS-2 (1944) (China) is fitting for a heavy tank, with enough thickness to ward off most incoming shots. However, there are lots of weak points present that enemy guns can readily penetrate, namely the lower glacis and the turret front, the latter which presents only 100 mm of armour if the incoming shell hits at a 0 degree impact angle. The side armour is thick enough to utilize side-scraping techniques with the IS-2 (1944) (China), but don't expect much if the enemy is able to attack at a small impact angle.
The vehicle overall however is well protected against aircraft armaments strafing the IS-2 (1944) (China), but keep an eye out for large-calibre aircraft cannons as well as the usual aircraft ordnance such as bombs and rockets.
Armour type:
- Cast homogeneous armour
- Rolled homogeneous armour (Hull sides and roof, Turret roof)
| Armour | Front | Sides | Rear | Roof |
|---|---|---|---|---|
| Hull | 100 mm (25-61°) Front glacis* 100 mm (29°) Lower glacis |
90 - 130 mm (9-25°) Top 90 mm Bottom |
60 mm (48-50°) Top 60 mm (38°) Bottom |
30 mm |
| Turret | 100 mm (7-72°) Turret front 100 mm (5-60°) Gun mantlet* |
100 mm (12-22°) | 100 mm (5-35°) | 30 mm |
| Cupola | 90 mm (15-60°) | 90 mm (15-60°) | 90 mm (15-60°) | 30 mm |
Notes:
- * - Indicates armour section is modeled as volumetric armour, plate thickness estimated from 0° impact angle.
- Suspension wheels are 20 mm thick while tracks are 30 mm thick.
- The side hull is stronger towards the front of the tank, with armour ranging 115 mm to 130 mm, while towards the rear is only 90 mm thick.
- A 200 mm thick ring surrounds round the cannon barrel on the gun mantlet.
Mobility
| Game Mode | Max Speed (km/h) | Weight (tons) | Engine power (horsepower) | Power-to-weight ratio (hp/ton) | |||
|---|---|---|---|---|---|---|---|
| Forward | Reverse | Stock | Upgraded | Stock | Upgraded | ||
| Arcade | 40 | 16 | 46.2 | 671 | 992 | 14.52 | 21.47 |
| Realistic | 38 | 15 | 460 | 520 | 9.96 | 11.26 | |
The IS-2 (1944) (China)'s mobility is quite subpar due to the heavy weight. The vehicle's handling is rather sluggish, with acceleration and braking being rather slow so it will be hard to get moving quickly once the IS-2 (1944) (China) comes to a complete stop.
The slow mobility and handling does translate to a less rocky ride, and so the gun does not move too harshly when aiming down the sights while moving, even when coming to a stop. While this gun handling is not sufficient enough to fire while moving, it does allow a player to keep the enemy in sight to easily lay the gun onto once the IS-2 (1944) (China) stops for a stable shot.
Modifications and economy
| Mobility | Protection | Firepower | ||||||||||||||||||||
|---|---|---|---|---|---|---|---|---|---|---|---|---|---|---|---|---|---|---|---|---|---|---|
|
|
|
Armaments
Main armament
| 122 mm D-25T | Turret rotation speed (°/s) | Reloading rate (seconds) | |||||||||||
|---|---|---|---|---|---|---|---|---|---|---|---|---|---|
| Mode | Capacity | Vertical | Horizontal | Stabilizer | Stock | Upgraded | Full | Expert | Aced | Stock | Full | Expert | Aced |
| Arcade | 28 | -3°/+20° | ±180° | N/A | 11.33 | 15.68 | 19.04 | 21.06 | 22.4 | 27.1 | 23.92 | 22.05 | 20.8 |
| Realistic | 8.33 | 9.8 | 11.9 | 13.16 | 14.0 | ||||||||
Ammunition
| Penetration statistics | |||||||
|---|---|---|---|---|---|---|---|
| Ammunition | Type of warhead |
Penetration @ 0° Angle of Attack (mm) | |||||
| 10 m | 100 m | 500 m | 1,000 m | 1,500 m | 2,000 m | ||
| BR-471 | APHE | 205 | 201 | 182 | 161 | 143 | 127 |
| OF-471 | HE | 37 | 37 | 37 | 37 | 37 | 37 |
| BR-471B | APHEBC | 205 | 203 | 192 | 178 | 166 | 155 |
| BR-471D | APCBC | 230 | 227 | 215 | 200 | 186 | 173 |
| Shell details | ||||||||||||
|---|---|---|---|---|---|---|---|---|---|---|---|---|
| Ammunition | Type of warhead |
Velocity (m/s) |
Projectile mass (kg) |
Fuse delay (m) |
Fuse sensitivity (mm) |
Explosive mass (TNT equivalent) (g) |
Ricochet | |||||
| 0% | 50% | 100% | ||||||||||
| BR-471 | APHE | 795 | 25 | 1.2 | 19 | 246.4 | 47° | 60° | 65° | |||
| OF-471 | HE | 795 | 25 | 0 | 0.1 | 3,600 | 79° | 80° | 81° | |||
| BR-471B | APHEBC | 795 | 25 | 1.2 | 19 | 246.4 | 48° | 63° | 71° | |||
| BR-471D | APCBC | 800 | 25 | 1.2 | 19 | 192.5 | 48° | 63° | 71° | |||
Ammo racks

| Full ammo |
Ammo part |
1st rack empty |
2nd rack empty |
3rd rack empty |
4th rack empty |
5th rack empty |
6th rack empty |
Visual discrepancy |
|---|---|---|---|---|---|---|---|---|
| 28 | Projectiles Propellants |
13 (+15) 27 (+1) |
1 (+27) 24 (+4) |
N/A 21 (+7) |
N/A 11 (+17) |
N/A 6 (+22) |
N/A 1 (+27) |
No |
Notes:
- The IS-2 (1944) (China) uses two-piece ammunition, composed of projectiles (yellow) and propellant bags (orange). Both have separate racks.
- Shells are modeled individually and disappear after having been shot or loaded.
- Centre floor rack emptied: 11 (+17) shells.
Machine guns
The machine gun armament of the IS-2 (1944) (China) is vastly improved from the previous iteration due to the presence of a 12.7 mm DShK machine gun on a pintle-mount. This allows not only a better ability to defend against aircraft, but as an alternative offensive capability to the slow-firing 122 mm gun. Penetrating more than 20 mm of armour from at maximum 500 m, the DShK is great to attack lightly armoured vehicles. The coaxial gun in this case has little use aside from an harassing tool against an armoured enemy or foliage clearing device against fences that may be in the way. Still, these two machine guns should not be neglected from the arsenal of the IS-2 (1944) (China).
| 12.7 mm DShK | ||||
|---|---|---|---|---|
| Mount | Capacity (Belt) | Fire rate | Vertical | Horizontal |
| Pintle | 250 (50) | 600 | -10°/+60° | ±180° |
| 7.62 mm DT | ||||
|---|---|---|---|---|
| Mount | Capacity (Belt) | Fire rate | Vertical | Horizontal |
| Coaxial | 1,890 (63) | 600 | - | - |
Usage in battles
The IS-2 '44 is a definite improvement on its predecessor, the IS-2. Most notably the frontal armour now features a slope, which can bounce or outright block some rounds. This iteration of the IS-2 also features a roof-mounted machine gun that can be used to attack aircraft without moving your turret (by using weapon selection keys set in the controls). Otherwise, the IS-2 '44 is identical to the IS-2.
If you are to apply bushes onto the IS-2 1944, consider putting most of them on the curved sides next to the upper glacis. You can even leave the upper glacis exposed, as it is very tough. This is because that quite some opponents will automatically target the curved armour, knowing that area is a common weak spot when the IS is angling. By covering up these curves, it will cause some confusion and delay the enemy's reaction & aiming time, as they now cannot directly see where your curved armour is, gifting you a few precious seconds before they open fire. For any leftover bushes, the turret front and the lower front plate are also good spots to put them on.
General Gameplay
You will see Tiger II (H) and Panther II a lot, as well as much more heavily armoured vehicles such as the Jagdtiger, the Ferdinand, the T32 and the T95 (in an up-tier). These tanks are near-impossible to penetrate frontally, so you will have to try to flank them. Otherwise, the gameplay remains the same as with the previous IS-2.
Overall, you shouldn't over-extend into enemy territory because your reload is still slow; you should play off your teammates and use your great reverse speed to get out of line of sight as soon as you have shot, or have been shot; you should have fun with the 122 mm gun that blows roofs off most enemies you penetrate. Flanking is best done in Arcade, while in Realistic you're better of setting up ambushes at a medium distance away from main pathways.
Arcade Battles
In Arcade, the IS-2 proves to be quite mobile when fully upgraded. This can be used effectively to get into superior positions to engage enemies early in the match when they haven't yet set-up camp in well-covered positions and/or presented their strongest armour. Thus, it's easy to gain a kill at the start of the match, if you are comfortable with the 122 mm gun.
Close quarters combat proves even more deadly in Arcade Battles because all opposing vehicles will be able to easily overrun a single IS-2, especially after it has shot and is now waiting through it long reloads (> 20s). Hence why it's advised to use your improved reverse speed to quickly disengage after shooting and retreating towards your teammates, who will likely be able to return fire. If the map forces you to fight in close quarters, attempt to get into a position where your teammates can cover your sides, while you can face forwards and clear the road. If the map allows, you can try taking 5 rounds of ammunition and camp at a capture point (usually one that's given to your team) to snipe all enemies that enter your line of sight while reducing your chances of blowing up at the first incoming shot.
In rare cases, it's possible to rush with the IS-2 and surprise lighter vehicles at a contested capture point in the early stages of a game. This strategy relies on the capture point being unpopular and being lucky to face only one enemy vehicle at a time. Some light tanks are unable to penetrate the IS-2 frontally, especially if they are from a much lower rank (e.g. BT-7, the Puma or the R3), so that's an added benefit of being a decently mobile heavy tank. If successful, the IS-2 can then flank to other objectives or advance to the enemy spawn to destroy another enemy or two. You shouldn't expect a lot of easy targets with this strategy, because it exposes your tank to potentially a lot of enemy fire.
Realistic Battles
In Realistic, the IS-2 begins to feel like a heavy tank. Its mobility is heavily reduced and its speed is outmatched by practically everything, mostly due to poor acceleration off-roads. However, this should be used as an advantage to gauge where the enemies are set-up, by looking where your teammates are killed from. You can then decide to return fire, although sometimes opponents don't show themselves until later in the match, in which case you should stay passive and try to remain behind your team's front lines.
Due to generally increased map size in Realistic, you will have to get comfortable with the bullet drop. Now, the IS-2 performs decently well at longer ranges, but it will cost you a lot if you miss or don't penetrate, because the reload is so long. Often, you will need to rely on the rangefinder, the teammates or map knowledge to gauge how high you need to shoot, so it might be a great idea to take out another vehicle first (such as the T-34-85 Gai or Type 63-I) remember the distance and then take the IS-2 out. However, on larger maps, it is generally a better idea to take out other vehicles.
A more reliable strategy for the IS-2 is to camp nearby an objective and pick off any enemies who pose a threat. Just make sure to find a flat spot with cover, because your poor gun depression and long reload will be your death in hilly or open areas. It's also a good idea to target heavy enemies, because they are easier to hit, and also will likely pose a larger threat to your general team (e.g. the Ferdinand, the Ho-Ri or the Tiger II (H) ).
General Tactics
Although classified as a heavy tank, the IS-2's armour will no longer hold up to its more common and heavier opponents of its battle rating. Compared with other vehicles such as the new German Tiger II, American heavy T-series tanks; most of which can easily deflect even the most powerful shots of the IS-2 unless targeted specifically and known weak-spots. Because of this, it is recommended to always travel and fight in groups of two or more vehicles. The slow and difficult in the manoeuvring of the vehicle (especially in confined spaces) will more than once place the IS-2 in significant danger. It is recommended to field the IS-2 into a fire-support role, peeking over the shoulder of friendly, more heavier vehicles and firing a shot against the opposition in tandem.
Another significant note of this vehicle is the IS-2's considerably fast reverse rate, the highest of its rank and battle rating for the nation's faction inherited from its IS-1 predecessor, topping at 17 km/h. During situations where engagement is expected, an unorthodox strategy can be utilized where the operator of the IS-2 tank re-positions the vehicle 90 degrees and drives in reverse with the rear facing towards the enemy. By driving in reverse this way, the engine blocks make a crude yet somewhat effective shield to protect the more delicate crew members. As the fuel tanks are mostly stored at the front on the left and right side of the driver's station, the risk of fire and fuel-tank explosion is reduced significantly (but not completely eliminated) and thus, the tank is able to resist even the most powerful of shots. Be aware that more experienced players may attempt to instead fire at the more exposed turret of the IS tank and instantly knocking out the crew with a common APHE penetrating shell in this way.
In regards to shells, the D-25T cannon is also equipped with powerful High-explosive (HE) shells which should not go ignored. Firing a HE shell with precise aim directly underneath the chassis of enemy vehicles were the armour, like on the top of the vehicle if thinnest, can cripple or instantly destroy said enemy vehicles. In rare instances, the HE shell of the D-25T is so powerful to the point two or more medium or heavy tanks close to each other can be destroyed with a single exploding HE Shell. Alternatively, the powerful armour-piercing capability of the D-25T cannon's APHE rounds has also been documented to pierce two or three light-armoured targets without exploding.

An important note when engaging tanks, especially Tiger Is, is that, with the implementation of volumetric shells, you can no longer expect your shells to pierce through small openings or right past an obstacle. The large 122 mm calibre of your shells will result in it catching on an armour plate's edge very often, losing all of its penetration. For example, a Tiger I has some edges that can absorb your shell unexpectedly, despite having flat armour. Thus you must always make sure that where you are aiming at is absolutely free of obstruction, or it may result in a non-penetration or a ricochet. This can be seen in the diagram to the right.
Specific Enemies Worth Noting
These are common vehicles you will see in this tank.
- ☠ T32 - You have to go for the MG port in the lower left of the UFP, otherwise you can only penetrate the side armour or the rear.
- ☠ T28 - You can only penetrate the cupolas on top of the tank. If they're hidden or you are unsure about the shot, you can try hitting the cannon barrel and running away.
- ☠ Ferdinand - Go for the angled armour at the sides of the lower front plate (below the casemate, but above the lowest plates), this will disable Ferdinand's engine and/or driver, so you can flank and finish it off.
- ☠ Jagdtiger - You cannot reliably penetrate or damage this tank frontally. You can try disabling the cannon barrel, and then flanking is your best option (or running away).
- ☠ Conqueror - Shoot the hull, don't shoot the turret.
- ☠ Ho-Ri Production - You cannot reliably penetrate or damage this tank frontally. You can try disabling the cannon barrel and then flanking is your best option (or running).
- ☠ AMX-50 Foch - You cannot reliably penetrate or damage this tank frontally. You can try disabling the cannon barrel and then flanking is your best option (or running).
- T34 / T29 - Turret cheeks can work, although it's best to go for the LFP because the ammo storage is very low in the tank. If you don't see the LFP, try going just below the turret ring, where the driver sits.
- Tiger II (H) / Panther II - You can easily penetrate the turret cheeks with BR-471B.
- Panther D, A, F, G - You can penetrate the UFP.
- Tortoise - Shoot to the right of the gun of the Tortoise. When you see it head-on, shoot on the left plate there is a chance to knock it out with a single shot.
- AMX-50 Surbaissé - Go for the LFP.
The Stock Grind
When grinding the first modifications, Arcade Battles might be more fun, because of faster-paced gameplay and the ability to see all threats. Now, it's a priority to research Parts and FPE (you may want to activate 3-5 universal vehicle back-ups to be able to respawn twice in one match if you really wish to upgrade this vehicle quickly).
General stock grind advice:
- Don't show your rear to any enemies, because a single fire will be your death.
- Your gun is still very effective, so don't be afraid to attack enemies frontally, just make sure to aim for weak-spots if possible.
- Shooting at planes in Arcade with your machine gun (or main gun) and scoring some hits can often award you a kill if the plane crashes, which grants points.
- Play as a support tank - push with your team and let them take fire, then poke out and take your shots, then retreat back into cover.
- Try to push into objectives with your team to gain those points as well.
Pros and cons
Pros:
- Extremely powerful 122 mm gun. Can easily knock out any tank with a single shot
- The top 122 mm APHE shell has good overmatching mechanics, can go through the upper plate of the Panther past 500 m fairly easily
- Upper plate is basically impenetrable, as tough as the Tiger II's upper plate
- Has good mobility and a high top speed for a heavy
- Has a roof mounted 12.7 mm machine gun, so dealing with lightly armoured vehicles/ defending its self from planes is possible
- Is a good flanker and ambushing tank thanks to its good top speed, armour, and massive gun
Cons:
- Terrible reload speed. Getting into brawls with contemporary heavies like the Tiger II is ill advised
- Despite the good overall armour, has some serious weak spots on the turret
- Horrible gun depression - hill fighting is nearly impossible without exposing the entire tank
- Has a massive and unsloped lower front plate - virtually all tanks at its BR can cut right through it and knock out the IS-2 with a single shot through the LFP
- Very small crew compartment, any APHE shell that pens it will likely kill everyone in the tank
- Worse optics than its predecessor
- Not as good at side scraping as the Tiger IIs due to its hull cheeks
- Ammo capacity for the MG on top is low, only 250 rounds
History
People's Liberation Army (PLA)
The People's Republic of China (PRC) received a total of 60 IS-2 heavy tanks from the Soviet Union in 1950 and another 22 in 1954, for a total of 82. The Chinese IS-2 heavy tanks saw service in the Korean War from 1950 to 1951, equipping four or more tank companies with 5 IS-2s each according to American intelligence. The IS-2 was removed from active service with the PLA by the end of the 1950s.
Media
- Skins
See also
Links to the articles on the War Thunder Wiki that you think will be useful for the reader, for example:
- reference to the series of the vehicles;
- links to approximate analogues of other nations and research trees.
External links
Paste links to sources and external resources, such as:
- topic on the official game forum;
- other literature.
| Chelyabinsk Tractor Plant (Челябинский тракторный завод) | |
|---|---|
| IFVs | |
| BMP-1 | BMP-1 |
| Heavy Tanks | |
| KV | KV-85 · KV-122 |
| IS-1/2 | IS-1 · IS-2 · IS-2 (1944) · IS-2 "Revenge" · IS-2 No.321 |
| T-10 | T-10A · T-10M |
| Other IS Tanks | IS-3 · IS-4M |
| Tank Destroyers | |
| KV Derivatives | SU-152 |
| IS Derivatives | ISU-152 · ISU-122 · ISU-122S · Object 268 |
| Export | |
| IS-2 | ␗IS-2 · IS-2 No.402 · ␗IS-2 (1944) |
| ISU | ␗ISU-152 · ␗ISU-122 |
| IFVs | SPz BMP-1 |
| See Also | Leningrad Kirov Plant |
| China heavy tanks | |
|---|---|
| USSR | ␗IS-2 · IS-2 No.402 · ␗IS-2 (1944) |
