Difference between revisions of "Strv 103A"
Matsuri4life (talk | contribs) (→Main armament: Autoloader) (Tag: Visual edit) |
m (gun is no longer to hard aim, look: https://warthunder.com/en/news/7241-it-s-fixed-13-en) (Tag: Visual edit) |
||
| (14 intermediate revisions by 7 users not shown) | |||
| Line 1: | Line 1: | ||
| − | |||
{{Specs-Card | {{Specs-Card | ||
|code=sw_strv_103a | |code=sw_strv_103a | ||
| Line 7: | Line 6: | ||
== Description == | == Description == | ||
<!-- ''In the description, the first part should be about the history of the creation and combat usage of the vehicle, as well as its key features. In the second part, tell the reader about the ground vehicle in the game. Insert a screenshot of the vehicle, so that if the novice player does not remember the vehicle by name, he will immediately understand what kind of vehicle the article is talking about.'' --> | <!-- ''In the description, the first part should be about the history of the creation and combat usage of the vehicle, as well as its key features. In the second part, tell the reader about the ground vehicle in the game. Insert a screenshot of the vehicle, so that if the novice player does not remember the vehicle by name, he will immediately understand what kind of vehicle the article is talking about.'' --> | ||
| − | The ''' | + | The '''{{Specs|name}}''' is a rank {{Specs|rank}} Swedish medium tank {{Battle-rating}}. It was introduced in [[Update 1.97 "Viking Fury"]]. It is a first unique tank in the Swedish tree which is a MBT, although by its appearance it would seem to instead be a tank destroyer. It is also known as ''S-Tank'' or ''Door Stop''. |
| − | |||
| − | |||
== General info == | == General info == | ||
| Line 15: | Line 12: | ||
{{Specs-Tank-Armour}} | {{Specs-Tank-Armour}} | ||
<!-- ''Describe armour protection. Note the most well protected and key weak areas. Appreciate the layout of modules as well as the number and location of crew members. Is the level of armour protection sufficient, is the placement of modules helpful for survival in combat? If necessary use a visual template to indicate the most secure and weak zones of the armour.'' --> | <!-- ''Describe armour protection. Note the most well protected and key weak areas. Appreciate the layout of modules as well as the number and location of crew members. Is the level of armour protection sufficient, is the placement of modules helpful for survival in combat? If necessary use a visual template to indicate the most secure and weak zones of the armour.'' --> | ||
| − | + | With a superbly sloped front hull armour, incoming kinetic rounds are prone to harmlessly bounce off, though chemical rounds will typically do some damage. Side, rear and top armour of the vehicle are weak, most aircraft can penetrate the roof, especially if they have 20 mm rounds or larger. With a total of three crew members, survivability after taking hits tend to be slim. However, the Strv 103 series are the only tanks that can operate with only one crew member! A major drawback is without transmission/engine you can no longer manoeuvre the hull to aim left or right. | |
| − | With a superbly sloped | ||
| − | |||
| − | |||
| − | |||
| − | |||
| − | |||
| − | Side, rear and top armour of the vehicle are | ||
| − | |||
| − | |||
| − | |||
| − | With a total of three crew members, survivability after taking hits tend to be slim. However, the Strv 103 series are the only tanks that can operate with only one crew member | ||
'''Armour type:''' | '''Armour type:''' | ||
* Rolled homogeneous armour | * Rolled homogeneous armour | ||
| + | * Structural steel - Storage boxes | ||
| + | * Gun steel - Main gun, machine guns | ||
| + | * Tracks | ||
| + | * Structural steel of chassis - Suspension | ||
{| class="wikitable" | {| class="wikitable" | ||
| + | !Armour | ||
| + | !Front (Slope angle) | ||
| + | !Sides | ||
| + | !Rear | ||
| + | !Roof | ||
|- | |- | ||
| − | + | |Hull | |
| − | | | + | |40 mm (77°) ''Upper Glacis'' |
| − | + | 40 mm (74°) ''Lower Glacis'' | |
| − | + | |30 mm +10 mm ''Upper'' | |
| − | + | 30 mm ''Lower'' | |
| + | |30 mm | ||
| + | |20 mm | ||
|- | |- | ||
| + | |Cupola | ||
| + | |35 mm | ||
| + | |35 mm | ||
| + | |35 mm | ||
| + | |20 mm | ||
|} | |} | ||
'''Notes:''' | '''Notes:''' | ||
| − | * Tracks | + | * Main gun - 25 mm |
| − | * The crew compartment is lined with 10 mm RHA | + | * Machine guns - 5 mm |
| − | * Storage boxes | + | * Tracks - 20 mm |
| + | * Suspension - 15 mm | ||
| + | * The crew compartment is lined with 10 mm RHA | ||
| + | * Storage boxes - 4 mm | ||
=== Mobility === | === Mobility === | ||
{{Specs-Tank-Mobility}} | {{Specs-Tank-Mobility}} | ||
<!-- ''Write about the mobility of the ground vehicle. Estimate the specific power and manoeuvrability, as well as the maximum speed forwards and backwards.'' --> | <!-- ''Write about the mobility of the ground vehicle. Estimate the specific power and manoeuvrability, as well as the maximum speed forwards and backwards.'' --> | ||
| − | |||
| − | |||
| − | |||
| − | |||
| − | |||
| − | |||
| − | |||
| − | |||
| − | |||
| − | |||
{{tankMobility|abMinHp=732|rbMinHp=478}} | {{tankMobility|abMinHp=732|rbMinHp=478}} | ||
| Line 72: | Line 67: | ||
<!-- ''Give the reader information about the characteristics of the main gun. Assess its effectiveness in a battle based on the reloading speed, ballistics and the power of shells. Do not forget about the flexibility of the fire, that is how quickly the cannon can be aimed at the target, open fire on it and aim at another enemy. Add a link to the main article on the gun: <code><nowiki>{{main|Name of the weapon}}</nowiki></code>. Describe in general terms the ammunition available for the main gun. Give advice on how to use them and how to fill the ammunition storage.'' --> | <!-- ''Give the reader information about the characteristics of the main gun. Assess its effectiveness in a battle based on the reloading speed, ballistics and the power of shells. Do not forget about the flexibility of the fire, that is how quickly the cannon can be aimed at the target, open fire on it and aim at another enemy. Add a link to the main article on the gun: <code><nowiki>{{main|Name of the weapon}}</nowiki></code>. Describe in general terms the ammunition available for the main gun. Give advice on how to use them and how to fill the ammunition storage.'' --> | ||
{{main|L74 (105 mm)}} | {{main|L74 (105 mm)}} | ||
| − | |||
| − | |||
| − | |||
| − | |||
| − | |||
| − | |||
{| class="wikitable" style="text-align:center" width="100%" | {| class="wikitable" style="text-align:center" width="100%" | ||
|- | |- | ||
| − | ! colspan="5" | [[L74 (105 mm)|105 mm L74]] || colspan="5" | Turret rotation speed (°/s) || Reloading rate (seconds) | + | ! colspan="5" | [[L74 (105 mm)|105 mm L74]] || colspan="5" | Turret rotation speed (°/s) || colspan="4" | Reloading rate (seconds) |
|- | |- | ||
! Mode !! Capacity !! Vertical !! Horizontal !! Stabilizer | ! Mode !! Capacity !! Vertical !! Horizontal !! Stabilizer | ||
! Stock !! Upgraded !! Full !! Expert !! Aced | ! Stock !! Upgraded !! Full !! Expert !! Aced | ||
| − | ! | + | ! Stock !! Full !! Expert !! Aced |
|- | |- | ||
! ''Arcade'' | ! ''Arcade'' | ||
| − | | rowspan="2" | 50 || rowspan="2" | -10°/+12° || rowspan="2" | N/A || rowspan="2" | N/A || | + | | rowspan="2" | 50 || rowspan="2" | -10°/+12° || rowspan="2" | N/A || rowspan="2" | N/A || 67.2 || 67.2 || 81.6 || 90.2 || 96.0 || rowspan="2" | 4.0 || rowspan="2" | 4.0 || rowspan="2" | 4.0 || rowspan="2" | 4.0 |
|- | |- | ||
! ''Realistic'' | ! ''Realistic'' | ||
| − | | | + | | 42.0 || 42.0 || 51.0 || 56.4 || 60.0 |
|- | |- | ||
|} | |} | ||
==== Ammunition ==== | ==== Ammunition ==== | ||
| − | + | {| class="wikitable sortable" style="text-align:center" width="100%" | |
| − | + | ! colspan="8" | Penetration statistics | |
| − | + | |- | |
| − | + | ! rowspan="2" data-sort-type="text" | Ammunition | |
| − | + | ! rowspan="2" | Type of<br>warhead | |
| − | + | ! colspan="6" | '''Penetration @ 0° Angle of Attack (mm)''' | |
| − | + | |- | |
| − | { | + | ! 10 m !! 100 m !! 500 m !! 1,000 m !! 1,500 m !! 2,000 m |
| + | |- | ||
| + | | slpprj m/61 || APDS || 303 || 302 || 296 || 277 || 257 || 252 | ||
| + | |- | ||
| + | | slpprj m/62 || APDS || 260 || 258 || 250 || 240 || 231 || 222 | ||
| + | |- | ||
| + | | slsgr m/61A || HE || 23 || 23 || 23 || 23 || 23 || 23 | ||
| + | |- | ||
| + | | slspgr m/61 || HESH || 127 || 127 || 127 || 127 || 127 || 127 | ||
| + | |- | ||
| + | |} | ||
| + | {| class="wikitable sortable" style="text-align:center" width="100%" | ||
| + | ! colspan="10" | Shell details | ||
| + | |- | ||
| + | ! rowspan="2" data-sort-type="text" | Ammunition | ||
| + | ! rowspan="2" | Type of<br>warhead | ||
| + | ! rowspan="2" | Velocity<br>(m/s) | ||
| + | ! rowspan="2" | Projectile<br>Mass (kg) | ||
| + | ! rowspan="2" | Fuse delay<br>(m) | ||
| + | ! rowspan="2" | Fuse sensitivity<br>(mm) | ||
| + | ! rowspan="2" | Explosive Mass<br>(TNT equivalent) (g) | ||
| + | ! colspan="3" | Ricochet | ||
| + | |- | ||
| + | ! 0% !! 50% !! 100% | ||
| + | |- | ||
| + | | slpprj m/61 || APDS || 1,500 || 4 || N/A || N/A || N/A || 75° || 78° || 80° | ||
| + | |- | ||
| + | | slpprj m/62 || APDS || 1,450 || 4.5 || N/A || N/A || N/A || 75° || 78° || 80° | ||
| + | |- | ||
| + | | slsgr m/61A || HE || 680 || 14.4 || 0 || 0.1 || 1,830 || 79° || 80° || 81° | ||
| + | |- | ||
| + | | slspgr m/61 || HESH || 760 || 14.85 || 0.05 || 0.1 || 4,780 || 73° || 77° || 80° | ||
| + | |- | ||
| + | |} | ||
| + | {| class="wikitable" style="text-align:center" | ||
| + | ! colspan="7" | Smoke shell characteristics | ||
| + | |- | ||
| + | ! Ammunition | ||
| + | ! Velocity<br>(m/s) | ||
| + | ! Projectile<br>Mass (kg) | ||
| + | ! Screen radius<br>(m) | ||
| + | ! Screen deploy time<br>(s) | ||
| + | ! Screen hold time<br>(s) | ||
| + | ! Explosive Mass<br>(TNT equivalent) (g) | ||
| + | |- | ||
| + | | rökgr m/61 || 330 || 18.7 || 20 || 5 || 25 || 50 | ||
| + | |- | ||
| + | |} | ||
==== [[Ammo racks]] ==== | ==== [[Ammo racks]] ==== | ||
| − | |||
| − | |||
{| class="wikitable" style="text-align:center" | {| class="wikitable" style="text-align:center" | ||
|- | |- | ||
| Line 116: | Line 150: | ||
! 4th<br>rack empty | ! 4th<br>rack empty | ||
! 5th<br>rack empty | ! 5th<br>rack empty | ||
| − | |||
| − | |||
| − | |||
! 6th<br>rack empty | ! 6th<br>rack empty | ||
! 7th<br>rack empty | ! 7th<br>rack empty | ||
| Line 126: | Line 157: | ||
! Visual<br>discrepancy | ! Visual<br>discrepancy | ||
|- | |- | ||
| − | | 21 ''(+29)'' || 16 ''(+34)'' || 11 ''(+39)'' || 6 ''(+44)'' || 1 ''(+49)'' || No | + | | '''50''' || 46 ''(+4)'' || 41 ''(+9)'' || 36 ''(+14)'' || 31 ''(+19)'' || 26 ''(+24)'' || 21 ''(+29)'' || 16 ''(+34)'' || 11 ''(+39)'' || 6 ''(+44)'' || 1 ''(+49)'' || No |
|- | |- | ||
|} | |} | ||
| − | + | [[File:Ammoracks_{{PAGENAME}}.png|right|thumb|x250px|[[Ammo racks]] of the {{PAGENAME}}]] | |
| − | |||
| − | |||
=== Machine guns === | === Machine guns === | ||
| Line 139: | Line 168: | ||
{{main|ksp 58 (7.62 mm)}} | {{main|ksp 58 (7.62 mm)}} | ||
| − | The {{PAGENAME}} has 3 x 7.62 mm ksp 58 machine guns, 2 on the left side in their own mount and one on top of the commander's cupola. | + | The {{PAGENAME}} has 3 x 7.62 mm ksp 58 machine guns, 2 on the left side in their own mount and one on top of the commander's cupola. All 3 machine guns are fixed to the hull with no traverse. |
{| class="wikitable" style="text-align:center" width="50%" | {| class="wikitable" style="text-align:center" width="50%" | ||
| Line 147: | Line 176: | ||
! Mount !! Capacity (Belt) !! Fire rate !! Vertical !! Horizontal | ! Mount !! Capacity (Belt) !! Fire rate !! Vertical !! Horizontal | ||
|- | |- | ||
| − | | Hull || | + | | Hull || 1,375 (250) || 600 || N/A || N/A |
|- | |- | ||
| − | | Hull || | + | | Hull || 1,375 (250) || 600 || N/A || N/A |
|- | |- | ||
| − | | Pintle || 1, | + | | Pintle || 1,375 (250) || 600 || N/A || N/A |
|- | |- | ||
|} | |} | ||
| Line 159: | Line 188: | ||
The Strv 103A is an amazing tank to take in defensive positions and snipe with. Although it's mainly used for the sniping role, it can also do close quarters combat quite well if one needs to push out to a capture point. Due to the armour design of the Strv 103, surviving conventional shells that can be found on the early Cold War-era Soviet tanks is easy. The only challenges with the tank is to learn key positions to lock down with the rapid firing 105 mm [[L74 (105 mm)|L7-derived cannon]] and learning the shooting mechanics of hull-aim. It is important to stay on flat ground when playing this tank, as slopes can cause issues with the hull-aim. | The Strv 103A is an amazing tank to take in defensive positions and snipe with. Although it's mainly used for the sniping role, it can also do close quarters combat quite well if one needs to push out to a capture point. Due to the armour design of the Strv 103, surviving conventional shells that can be found on the early Cold War-era Soviet tanks is easy. The only challenges with the tank is to learn key positions to lock down with the rapid firing 105 mm [[L74 (105 mm)|L7-derived cannon]] and learning the shooting mechanics of hull-aim. It is important to stay on flat ground when playing this tank, as slopes can cause issues with the hull-aim. | ||
| − | While the Strv 103 can easily hold its own against conventional shells, against chemical and more modern kinetic rounds it starts to lose its points. | + | While the Strv 103 can easily hold its own against conventional shells, against chemical and more modern kinetic rounds it starts to lose its points. HEAT-FS shells can easily penetrate the frontal armour, going through both the armour and engine, knocking out the crew behind it (this gets remedied with the later [[Strv 103C|103C]], which has slat armour at the front to prematurely detonate the shell). In full uptiers, it's also highly likely to get shot at by APFSDS shells, which ignore the armour completely. That's why when facing these vehicles, one should take full utility of the smoke launchers and smoke rounds to create a quick escape out and avoid getting shot at. |
| − | If the tank does get shot at, the survivability is quite high due to the crew all being located behind the transmission and the engine. And since the tank can be operated by only one crew member, the tank is mostly only destroyed by being set afire by the fuel tank and engine in the front of the tank | + | If the tank does get shot at, the survivability is quite high due to the crew all being located behind the transmission and the engine. And since the tank can be operated by only one crew member, the tank is mostly only destroyed by being set afire by the fuel tank and engine in the front of the tank. |
=== Pros and cons === | === Pros and cons === | ||
| Line 169: | Line 198: | ||
* Low profile | * Low profile | ||
| − | * | + | * Fast reload |
| + | * Effectively sloped front armour | ||
| + | * Can be controlled by one crew member | ||
* Extremely survivable | * Extremely survivable | ||
| − | |||
| − | |||
* Gunner and Commander perform the same roles, so there is no crew switch if either is knocked out | * Gunner and Commander perform the same roles, so there is no crew switch if either is knocked out | ||
'''Cons:''' | '''Cons:''' | ||
| − | * Slow aiming | + | * Slow aiming |
* Vulnerable to flanking | * Vulnerable to flanking | ||
* Only three crew members | * Only three crew members | ||
* Gun is prone to damage | * Gun is prone to damage | ||
| − | * Catches fire often when shot from the side and sometimes from the front | + | * Catches fire often when shot from the side and sometimes from the front |
| − | |||
== History == | == History == | ||
| Line 199: | Line 227: | ||
== Media == | == Media == | ||
| − | + | ''Excellent additions to the article would be video guides, screenshots from the game, and photos.'' | |
| − | |||
| − | |||
| − | |||
| − | |||
| − | |||
| − | |||
| − | |||
== See also == | == See also == | ||
| Line 218: | Line 239: | ||
* ''topic on the official game forum;'' | * ''topic on the official game forum;'' | ||
| + | * ''encyclopedia page on the tank;'' | ||
* ''other literature.'' | * ''other literature.'' | ||
| − | |||
{{Sweden medium tanks}} | {{Sweden medium tanks}} | ||
Revision as of 13:54, 14 July 2021

Contents
Description
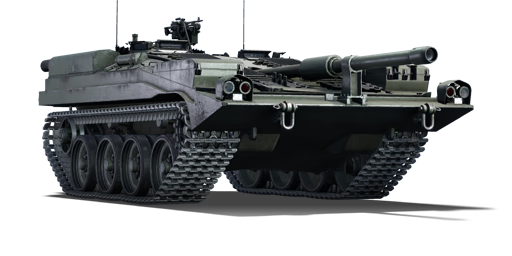
The Stridsvagn 103A is a rank V Swedish medium tank with a battle rating of 8.0 (AB/RB/SB). It was introduced in Update 1.97 "Viking Fury". It is a first unique tank in the Swedish tree which is a MBT, although by its appearance it would seem to instead be a tank destroyer. It is also known as S-Tank or Door Stop.
General info
Survivability and armour
With a superbly sloped front hull armour, incoming kinetic rounds are prone to harmlessly bounce off, though chemical rounds will typically do some damage. Side, rear and top armour of the vehicle are weak, most aircraft can penetrate the roof, especially if they have 20 mm rounds or larger. With a total of three crew members, survivability after taking hits tend to be slim. However, the Strv 103 series are the only tanks that can operate with only one crew member! A major drawback is without transmission/engine you can no longer manoeuvre the hull to aim left or right.
Armour type:
- Rolled homogeneous armour
- Structural steel - Storage boxes
- Gun steel - Main gun, machine guns
- Tracks
- Structural steel of chassis - Suspension
| Armour | Front (Slope angle) | Sides | Rear | Roof |
|---|---|---|---|---|
| Hull | 40 mm (77°) Upper Glacis
40 mm (74°) Lower Glacis |
30 mm +10 mm Upper
30 mm Lower |
30 mm | 20 mm |
| Cupola | 35 mm | 35 mm | 35 mm | 20 mm |
Notes:
- Main gun - 25 mm
- Machine guns - 5 mm
- Tracks - 20 mm
- Suspension - 15 mm
- The crew compartment is lined with 10 mm RHA
- Storage boxes - 4 mm
Mobility
| Game Mode | Max Speed (km/h) | Weight (tons) | Engine power (horsepower) | Power-to-weight ratio (hp/ton) | |||
|---|---|---|---|---|---|---|---|
| Forward | Reverse | Stock | Upgraded | Stock | Upgraded | ||
| Arcade | 56 | 49 | 36.9 | 732 | 1,030 | 19.84 | 27.91 |
| Realistic | 50 | 44 | 478 | 540 | 12.95 | 14.63 | |
Modifications and economy
| Mobility | Protection | Firepower | ||||||||||||||||||||||||
|---|---|---|---|---|---|---|---|---|---|---|---|---|---|---|---|---|---|---|---|---|---|---|---|---|---|---|
|
|
|
Armaments
Main armament
| 105 mm L74 | Turret rotation speed (°/s) | Reloading rate (seconds) | |||||||||||
|---|---|---|---|---|---|---|---|---|---|---|---|---|---|
| Mode | Capacity | Vertical | Horizontal | Stabilizer | Stock | Upgraded | Full | Expert | Aced | Stock | Full | Expert | Aced |
| Arcade | 50 | -10°/+12° | N/A | N/A | 67.2 | 67.2 | 81.6 | 90.2 | 96.0 | 4.0 | 4.0 | 4.0 | 4.0 |
| Realistic | 42.0 | 42.0 | 51.0 | 56.4 | 60.0 | ||||||||
Ammunition
| Penetration statistics | |||||||
|---|---|---|---|---|---|---|---|
| Ammunition | Type of warhead |
Penetration @ 0° Angle of Attack (mm) | |||||
| 10 m | 100 m | 500 m | 1,000 m | 1,500 m | 2,000 m | ||
| slpprj m/61 | APDS | 303 | 302 | 296 | 277 | 257 | 252 |
| slpprj m/62 | APDS | 260 | 258 | 250 | 240 | 231 | 222 |
| slsgr m/61A | HE | 23 | 23 | 23 | 23 | 23 | 23 |
| slspgr m/61 | HESH | 127 | 127 | 127 | 127 | 127 | 127 |
| Shell details | |||||||||
|---|---|---|---|---|---|---|---|---|---|
| Ammunition | Type of warhead |
Velocity (m/s) |
Projectile Mass (kg) |
Fuse delay (m) |
Fuse sensitivity (mm) |
Explosive Mass (TNT equivalent) (g) |
Ricochet | ||
| 0% | 50% | 100% | |||||||
| slpprj m/61 | APDS | 1,500 | 4 | N/A | N/A | N/A | 75° | 78° | 80° |
| slpprj m/62 | APDS | 1,450 | 4.5 | N/A | N/A | N/A | 75° | 78° | 80° |
| slsgr m/61A | HE | 680 | 14.4 | 0 | 0.1 | 1,830 | 79° | 80° | 81° |
| slspgr m/61 | HESH | 760 | 14.85 | 0.05 | 0.1 | 4,780 | 73° | 77° | 80° |
| Smoke shell characteristics | ||||||
|---|---|---|---|---|---|---|
| Ammunition | Velocity (m/s) |
Projectile Mass (kg) |
Screen radius (m) |
Screen deploy time (s) |
Screen hold time (s) |
Explosive Mass (TNT equivalent) (g) |
| rökgr m/61 | 330 | 18.7 | 20 | 5 | 25 | 50 |
Ammo racks
| Full ammo |
1st rack empty |
2nd rack empty |
3rd rack empty |
4th rack empty |
5th rack empty |
6th rack empty |
7th rack empty |
8th rack empty |
9th rack empty |
10th rack empty |
Visual discrepancy |
|---|---|---|---|---|---|---|---|---|---|---|---|
| 50 | 46 (+4) | 41 (+9) | 36 (+14) | 31 (+19) | 26 (+24) | 21 (+29) | 16 (+34) | 11 (+39) | 6 (+44) | 1 (+49) | No |

Machine guns
The Strv 103A has 3 x 7.62 mm ksp 58 machine guns, 2 on the left side in their own mount and one on top of the commander's cupola. All 3 machine guns are fixed to the hull with no traverse.
| 7.62 mm ksp 58 | ||||
|---|---|---|---|---|
| Mount | Capacity (Belt) | Fire rate | Vertical | Horizontal |
| Hull | 1,375 (250) | 600 | N/A | N/A |
| Hull | 1,375 (250) | 600 | N/A | N/A |
| Pintle | 1,375 (250) | 600 | N/A | N/A |
Usage in battles
The Strv 103A is an amazing tank to take in defensive positions and snipe with. Although it's mainly used for the sniping role, it can also do close quarters combat quite well if one needs to push out to a capture point. Due to the armour design of the Strv 103, surviving conventional shells that can be found on the early Cold War-era Soviet tanks is easy. The only challenges with the tank is to learn key positions to lock down with the rapid firing 105 mm L7-derived cannon and learning the shooting mechanics of hull-aim. It is important to stay on flat ground when playing this tank, as slopes can cause issues with the hull-aim.
While the Strv 103 can easily hold its own against conventional shells, against chemical and more modern kinetic rounds it starts to lose its points. HEAT-FS shells can easily penetrate the frontal armour, going through both the armour and engine, knocking out the crew behind it (this gets remedied with the later 103C, which has slat armour at the front to prematurely detonate the shell). In full uptiers, it's also highly likely to get shot at by APFSDS shells, which ignore the armour completely. That's why when facing these vehicles, one should take full utility of the smoke launchers and smoke rounds to create a quick escape out and avoid getting shot at.
If the tank does get shot at, the survivability is quite high due to the crew all being located behind the transmission and the engine. And since the tank can be operated by only one crew member, the tank is mostly only destroyed by being set afire by the fuel tank and engine in the front of the tank.
Pros and cons
Pros:
- Low profile
- Fast reload
- Effectively sloped front armour
- Can be controlled by one crew member
- Extremely survivable
- Gunner and Commander perform the same roles, so there is no crew switch if either is knocked out
Cons:
- Slow aiming
- Vulnerable to flanking
- Only three crew members
- Gun is prone to damage
- Catches fire often when shot from the side and sometimes from the front
History
After 6 months of trial with the Strv 103-0 and the goal settings for requirements that the tank needed to pass were done in 1963 it was not till Autumn 1964 that the first order for the Strv 103 came in to AB Bofors. 1967 the Strv 103A started to deliver to the army, a total of 70 Strv 103As were ordered to the army as the first series production. Strv 103A had a 300hk powered gasturbine that during delivery proved to be not quite effective and would be required a change in the upcoming version of the Strv 103. Directly when the S tank got delivered instructor courses began and it was not till 1968 that the first conscripts go the education on the Strv 103 "S" systems.
Devblog
In the immediate postwar years, Sweden began looking for a replacement to the Centurion tanks, then in service with its army. The most straightforward solution was to once again look into the export market for potential candidates, although engineers were already working on a domestic design - the Kranvagn. While this process was ongoing, an engineer by the name of Sven Berge came up with a radical new tank design in 1956.
This new vehicle featured a turretless design with a cannon fixed to the hull, which would be trained onto its targets with the precise use of an adjustable suspension system. The design was based on results from a study on tank crew casualties during WWII and the Korean War, which showed a correlation between tank height and hit probability. As such, the 'S-Tank' was kept very small in dimensions and low in profile, while also utilizing some innovative new engineering solutions, such as a mixed power plant consisting of a diesel engine and a gas turbine.
In 1959, the Swedish government approved the construction and testing of two prototypes. In 1960, a pre-production batch of 10 vehicles of the '0-serie' was ordered for field trials, which went on into the mid '60s. Generating more than favorable test results, the vehicle was formally ordered into production and procured as the 'Stridsvagn 103'.
Despite its original purpose being to replace the Centurion tanks in the Swedish Army, the Strv 103 ended up serving alongside it for a number of decades, until it was ultimately decommissioned in the late 1990s. By that time, 290 Strv 103s were built, spanning over five variants.
Media
Excellent additions to the article would be video guides, screenshots from the game, and photos.
See also
Links to the articles on the War Thunder Wiki that you think will be useful for the reader, for example:
- reference to the series of the vehicles;
- links to approximate analogues of other nations and research trees.
External links
Paste links to sources and external resources, such as:
- topic on the official game forum;
- encyclopedia page on the tank;
- other literature.
| Sweden medium tanks | |
|---|---|
| Strv m/42 | Lago I · Strv m/42 EH · Ikv 73 · Strv m/42 DT · Pvkv IV |
| Centurion derivatives | Strv 81 · Strv 81 (RB 52) · Strv 101 · Strv 104 · Strv 105 |
| Strv 103 | Strv 103-0 · Strv 103A · Strv 103С |
| Strv 121/122 | Strv 121 · Christian II · Strv 122A · Strv 122B PLSS · Strv 122B+ |
| Other | Sherman III/IV · T 80 U |
| Finland | |
| WWII | ▄T-28 · ▄T-34 · ▄Pz.IV · ▄T-34-85 |
| Post War | ▄Comet I · ▄Charioteer Mk VII · ▄T-54 · ▄T-55M · ▄T-72M1 · ▄Leopard 2A4 · ▄Leopard 2A6 |
| Norway | Leopard 1A5NO2 |
