Khrizantema-S

Contents
Description
A few years after the fall of the USSR, efforts were restarted to develop an anti-tank guided missile with dual-control modes. The program was officially restarted and spearheaded in 1996 by the Konstruktorskoye Byuro Mashynostroyenia Engineering Design Bureau, or KBM for short. The project resulted in the 9M123 Khrizantema missile, which was available in both laser-beam riding and radar-beam riding variants. The design philosophy behind this was for new attack helicopters being designed during the '90s, such as the Ka-52 and the Mi-28N, to be able to launch two separate 9M123 missiles at two separate targets in different locations; one guided by radar while the other is guided with conventional laser optics. However, due to multiple reasons, chiefly delays and budget cuts during development of the Ka-52 and Mi-28N respectively, a new cheaper platform was devised for the 9M123 missile. This cheap platform was envisioned through a heavily modified version of the existing BMP-3 chassis, named the 9P157-2 Khrizantema-S. The Khrizantema-S launcher vehicle was hastily designed with simplicity but effectiveness in mind, touted by the manufacturer with the promise that "Only three defending [Khrizantema-S] tank destroyers are able to engage 14 attacking tanks and destroy at least sixty percent of the attacking force". The 9P157-2 Khrizantema-S had a few developmental delays and teething issues during testing, which were not ironed out for a few years, allowing it to finally enter service in 2005. Trials for an upgraded "Khrizantema-SM" version with better radar, electronics, and upgraded variants of the Khrizantema missile were officially completed in 2016, although it is not known if a full production order was issued for the upgraded model.
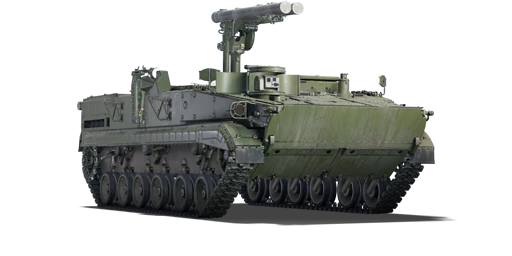
Introduced in Update "Starfighters", the 9P157-2 Khrizantema-S is essentially an amphibious ATGM carrier based on the chassis of the familiar BMP-3. It is the spiritual successor to the previous Shturm-S, which was also an amphibious ATGM carrier based on the chassis of the MT-LB that requires good positioning behind lines to perform well. However, unlike the Shturm, the Khrizantema-S is equipped with a ground-based radar system for its 9M123 "Khrizantema" (Chrysanthemum) missiles, which can be guided by both radar and laser beams. Despite its delicate name, the 9M123 is the most powerful Russian ATGM in War Thunder with a tandem warhead penetrating 1,200 mm of RHA and a fast flight speed of 550 m/s. However the platform also has many drawbacks: the armour protection is very poor and it has no gun armament whatsoever, making it a specialist vehicle that requires caution and relies on teammate support. The Khrizantema-S is best played as a back-line sniper with its incredible optics and radar to pick off targets with its fast and punchy missiles. Effectiveness of this vehicle will rely on player's knowledge of the terrain along with anticipation of "choke points" and hot-spots on certain maps.
General info
Survivability and armour
The Khrizantema-S is very lightly armoured and only has 2 crew members, so it will barely survive any attack stronger than 7.62 mm MG to the hull. It, however, has some RHA plates on front, which are also angled closer towards 80°, making it capable of deflecting heavy machine gun fire and, at times, 20 mm autocannon fire. They will not protect from APDS or APFSDS belts of light tanks.
Unlike the Shturm-S, which has a virtual plate of 5 mm RHA covering the launcher hole at all the times, the Khrizantema-S has a huge gaping hole in the middle of the roof with no protection at all, which makes the tank count as open-topped. Due to this and overall bad armour thickness, any HE shell will knock out the vehicle even with an indirect hit. This means that AP-I or even HE-I anti-air belts on planes, light tanks and SPAA are not a joke, but a legitimate lethal threat. Hellfire missiles or rocket salvos will also disintegrate the carrier.
Due to this, the Khrizantema-S requires hulldown positions or flat hills just to be able to fight, and should avoid direct fights and artillery fire at all costs. It is optimal to have 3 firing positions which are at least 60 m apart to rotate through if the Khrizantema-S is within artillery request range, allowing it to dodge artillery fire for as long as possible, but survival is not guaranteed regardless, as sometimes the initial correction shots are lucky enough to land straight on the roof and destroy the carrier.
To retreat from battle or to exploit its weapon system offensively, the Khrizantema-S can also use ESS together with thermal scope, creating a smoke wall behind and around itself. Unfortunately, it will not protect from tanks which also have thermal scope unlocked, which are the majority at the BR.
The weakness of armour is exacerbated by the fact that, even in hulldown, its launcher and radar are still widely exposed and can be hit with HE, HESH, or HEAT projectiles. This means that HE shells can be landed on top of it in such a way that it will destroy the Khrizantema-S via overpressure, allowing any tank and even SAM to defeat it, if their reaction time and aim are better.
There is no way to force the carrier to put the launcher down and close the hatch, so the tank is virtually exposed at all the times unlike with the Shturm-S. This is very unfortunate, as the hull is actually very short and could be hidden in the same manner as the predecessor otherwise.
The "Dozer Blade" upgrade allows the Khrizantema-S to create firing positions for itself anywhere, or to make attacking into its cover incredibly annoying and difficult, but its general weaknesses will remain the same.
Armour type:
- Alloy ABT-102 (hull)
- High hardness rolled armour (appliqué armour)
| Armour | Front (Slope angle) | Sides | Rear | Roof |
|---|---|---|---|---|
| Hull | 18 + 10 (81°) Upper glacis 10 + 12 mm Upper plate 60 + 10 mm (53°) Lower glacis |
60 Top front 43 mm Top rear 45 mm Bottom 13 mm Engine vent |
43 mm Upper plate 43 mm (22°) Lower glacis 13 mm (22°) Exhaust |
18 + 10 (9°) Front glacis 15 mm Fighting compartment 18 mm Launcher hatch |
Notes:
- Suspension wheels and torsion bars are 15 mm thick while tracks are 20 mm thick.
- Mudguards are 4 mm thick.
- There are additional but sporadic 10 mm thick appliqué armour plates on the sides of the hull.
- Belly armour is 10 mm thick.
Mobility
| Game Mode | Max Speed (km/h) | Weight (tons) | Engine power (horsepower) | Power-to-weight ratio (hp/ton) | |||
|---|---|---|---|---|---|---|---|
| Forward | Reverse | Stock | Upgraded | Stock | Upgraded | ||
| Arcade | 77 | 23 | 18 | 710 | 954 | 39.44 | 53 |
| Realistic | 71 | 21 | 442 | 500 | 24.56 | 27.78 | |
The Khrizantema-S's acceleration and mobility is somewhat closer to tracked light tanks due to its low weight, but it has rather limited maximum speed, when compared to top rank VI or VII vehicles.
In RB, its offroad forward speed is generally around 45 km/h. Its reverse speed is also limited, but will allow it to back out of a fight with about 15 km/h on demand. In AB, the acceleration is higher, so it is not impossible to reach 70 km/h with upgrades, but it will not outpace most medium tanks of the other nations at the rank.
The Khrizantema-S's climbing ability is mediocre, but it should be able to climb any hills when spaded. Overall, it's similar to the Shturm-S in that regard. The Khrizantema-S can swim with greatly reduced movement speed.
Modifications and economy
| Mobility | Protection | Firepower | ||||||||||||||||||||
|---|---|---|---|---|---|---|---|---|---|---|---|---|---|---|---|---|---|---|---|---|---|---|
|
|
|
Armaments
Main armament
The Khrizantema-S has an ATGM handle similarly to the Shturm-S. It reloads two of the missile launchers at once, and only reloads them after both were used. Since it's completely automated, it will always take 15 seconds to reload.
Sniper optics and laser pointer are located on the very front-right of the hull, separately from the launchers. The optics must be able to point towards the target for semi-automatic (mouse) aim to work.
Since the launcher is very fragile, it is important to avoid being hit until "Parts" are researched, as if the handle or the launcher are critically hit, the field repair will fail to completely fix them and the Khrizantema-S will become useless until it finds a light tank, squadmate, or friendly capture point. This can be debilitating to a point it's easier to just bail out of the carrier rather than to try to repair.
The handle can aim in about a 160 degree sector in front of the tank, but has problems with pointing down and too far up, which makes sniper aim more useful in open, flat terrain, where the tank can fire at targets directly. If it must be used in cluttered streets, it's best to approach targets carefully while being mindful of the fact that the launcher is located behind the sniper scope and not just above it, to avoid misfiring and hitting the tank's own cover.
Similar issues follow radar aim as well, due to radar's limited vertical traverse, but it can guide missiles at angles far beyond capability of the laser designator and can easily guide shots behind a hill if the lock was somehow obtained.
Both missiles can be controlled at the same time, either both by laser, or the first by radar and then the second by laser.
| Missiles can be slaved to radar, therefore the first missile launched while radar is locked on will fly straight for it and ignore user's input. It will do so even if the Khrizantema-S's hull is furiously shaking while swimming and manual shot seems impossible to make. If you let the first missile reach its target before firing again, the next missile will also be guided by a radar. |
Missiles themselves have high levels of horizontal mobility, but significantly lower vertical mobility - they can take sharp turns to the sides, but they will refuse to drop down at the last moment, so it is better to keep them level with the intended target, unless they are guided by radar, in which case you have no control over them and they generally go for the turret neck or the centre of the target. Radar has far better control over how missiles move, but it is still ill-advised to launch them at too high an angle, as they will just slam into the ground. They, however, will likely catch any slow flying helicopter, that does not immediately perform a drop straight down to the ground (which is very bad for RB helicopters and may result in unintended crash by itself).
Since the missiles are too bad at vertical manoeuvres, it's near impossible to use them for trick shots and for the same pseudo-hulldown tactics generally employed by the Shturm-S. There is no difference between AB and RB for this tank, so only radar shots can reliably land when launched beyond cover.
Missiles can fly up to 6 km before running out of fuel. It makes them useful against both ground and air, but it may fail to reach overly cautious rank VII helicopters, due to them being able to fire from 8 km away. They are not very good at catching planes which are evading direct shots, especially when guided by the radar, as it often leads them in a less than optimal way.
9M123 is an extremely powerful tandem missile, which can potentially penetrate any NERA currently in the game on direct hit and will definitely penetrate any ERA due to its power alone and tandem technology used to specifically breach ERA. Unlike the missiles of the Shturm-S, it is extremely unlikely that the target will survive, unless it was a glancing hit.
9M123F is the same carrier missile, but it is loaded with HE instead. In terms of penetration, they are equal to the strongest HE shells in the game. These are generally used to harass other light vehicles, which sometimes cannot be simply destroyed with HEAT payload, but, due to their high raw power, they sometimes can be launched at a main battle tank to destroy them if their turret is too thick even for the incredibly powerful default missile or their commanders are being way too paranoid to hit directly with HEAT. Due to the extreme explosive mass, these missiles can actually cause dents in the ground which are not only visible by the eye, but slowly wear down enemy cover over time (though it will still take a very long time to do and is not very viable outside of AB).
| 9M123 missile | Turret rotation speed (°/s) | Reloading rate (seconds) | ||||||||
|---|---|---|---|---|---|---|---|---|---|---|
| Mode | Capacity (Belt) | Vertical | Horizontal | Stabilizer | Stock | Upgraded | Full | Expert | Aced | Autoloader |
| Arcade | 16 (2) | -5°/+15° | ±85° | N/A | 35.2 | 48.8 | 59.2 | 65.5 | 69.7 | 15.00 |
| Realistic | 23.8 | 28.0 | 34.0 | 37.6 | 40.0 | |||||
Ammunition
| Penetration statistics | |||||||
|---|---|---|---|---|---|---|---|
| Ammunition | Type of warhead |
Penetration @ 0° Angle of Attack (mm) | |||||
| 10 m | 100 m | 500 m | 1,000 m | 1,500 m | 2,000 m | ||
| 9M123 | ATGM (tandem) | 1,200 | 1,200 | 1,200 | 1,200 | 1,200 | 1,200 |
| 9M123F | ATGM-HE | 61 | 61 | 61 | 61 | 61 | 61 |
| Missile details | ||||||||||||
|---|---|---|---|---|---|---|---|---|---|---|---|---|
| Ammunition | Type of warhead |
Velocity (m/s) |
Range (m) |
Projectile mass (kg) |
Fuse delay (m) |
Fuse sensitivity (mm) |
Explosive mass (TNT equivalent) (kg) |
Ricochet | ||||
| 0% | 50% | 100% | ||||||||||
| 9M123 | ATGM (tandem) | 550 | 6,000 | 46 | 0.4 | 0.01 | 6.16 | 80° | 82° | 90° | ||
| 9M123F | ATGM-HE | 550 | 6,000 | 46 | 0.2 | 0.01 | 9.24 | 79° | 80° | 81° | ||
Ammo racks

| Full ammo |
1st rack empty |
Visual discrepancy |
|---|---|---|
| 8 | 1 (+7) | No |
Radars
| The Khrizantema-S's radar can not only lock onto aerial targets but also search for and lock onto ground targets, and it can also lock onto targets behind smoke and trees, and in the dark, even if the user cannot see them. Keep both of these facts in mind when using it. |
The Khrizantema-S is equipped with a single search and tracking radar, mounted to the left of missile launchers. The radar dish follows the targeting device and only scans in chosen direction. The radar system is incapable of scanning while tracking, and can only lock on targets within a 20° arc in direction the aiming device is pointed at. This limitation persists after locking on - if the user turns the sight too far away from the target, the lock will automatically break.
It is much easier to lock onto tanks by using binoculars and occasionally pressing "fire", as the tank will temporarily "aim" straight at the tanks through cover, ignoring targeting device limitations (as it can't really guide missiles with laser there and will derail the radar as well), ensuring that the radar tries to scan in that exact direction. When "lock on" is pressed, the radar will attempt to lock onto targets straight in the middle of binocular or sniper view, regardless of their vertical position.
Vertically, the radar also has rather limited angles at which it can lock and track, being very similar to limitations of the launcher itself. It also seems to rely more on hull position rather than aiming device when aiming at the sky. For that reason, it is better not to rely on search mode whatsoever and try to lock onto targets manually (by pressing the lock-on button in binocular mode while aiming at the target) to see if the tank needs to be moved, or it's just the radar being picky and the carrier needs to be moved.
The radar will generally refuse to lock if the target is behind a tree or something solid, which means you will not waste a shot by just relying on it. However, it will often fail to lock on to a turret of a tank (which could be hit resulting in target destruction), so radar suggestions are not absolute and manual aim is not to be discarded.
Sometimes, the radar can lock on and track hostile tanks at very long ranges, while aiming at them almost through the ground, allowing missiles to be launched over hills with minimal tank exposure and giving the Khrizantema-S an unexpected advantage, particularly noticeable at longer ranges of over 1.8 km.
Radar is hidden within vehicle whenever it is powered down or seriously damaged. Since radar is a valid target for explosives, sometimes it is worth turning it off on purpose in RB. Sometimes, it is possible to damage the radar even if it's hidden for some reason.
It is definitely necessary to turn it off sometimes in AB, as it is easy to lock onto "selected" tank from sniper scope within radar scan radius even if it's offline, and the radar will only pop out for a fraction of a second if the lock was unsuccessful, instead of being a liability when under heavy fire. The good time to have it always on is when there are non-ESS smoke screens popped all around, so it is necessary to continuously scan the smoke in order to stay safe and fight.
| 1L32-1 - Target Detection Radar | ||||
|---|---|---|---|---|
| Maximum Detection Range |
Minimum Detection Range |
Max Azimuth Scan Angle |
Max Elevation Scan Angle |
Minimum relative speed |
| 8,000 m | N/A | ±7° | ±4.5° | N/A |
| 1L32-1 - Target Tracking Radar | ||||
| Maximum Tracking Range |
Minimum Tracking Range |
Azimuth Tracking Angle |
Elevation Tracking Angle |
Minimum target speed |
| 8,000 m | N/A | ±15° | -10°/+20° | N/A |
Usage in battles
- Arcade mode
Like the Shturm-S, the Khrizantema-S is an extremely flawed tank and is already outclassed by almost everything at its own BR, most noticeably when fighting proximity missile carriers. It also lost its anti-air ability, relying on the sheer speed of the missiles and, sometimes, its radar to hit aircraft. The radar is also quite a liability in AB due to it being a target for explosives in a mode where all cannon-mounted tanks have aim prediction and assistance, and, unlike with the Shturm-S, this carrier will explode if hit by a chemical shell anywhere.
However, the Khrizantema-S still has ATGMs with the highest raw damage in the game, which means that almost any tank hit directly will vaporize immediately. Unfortunately, the missiles also have poor vertical manoeuvrability, so it's impossible to imitate vertical ATGM and use hills like with the Shturm-S and a different strategy is required.
To decide whether to spawn this ATGM carrier or not, a few questions should be answered first:
- Does the enemy team have an excessive amount of Dardo or M3A3 Bradley?
- Are there good horizontal hulldown spots on this map that you can use?
- Can you be easily hit to the hull in that hulldown spot (whether by ATGM or aim assisted HE/HESH/HEAT)?
- Can you make it to the hulldown spot before you get sniped?
- Is your team being steamrolled so hard that an enemy team can afford an endless air support?
- Is it necessary to rush something down to win, at least right now? If so, is enemy position vulnerable to the attacks of Khrizantema-S and are you comfortable enough with the weapon controls to do it?
- Are there close air support planes in this round? If so, are you good with hitting them without any help?

If any of these questions are a concern to you, it is probably better to spawn a different tank. Against proximity missiles, some medium tanks with ERA on the turret might be better. In some general combat situations, even the Shturm-S might be better due to its anti-air capability and lesser vulnerability to HEAT, but it has to use HE to fight NERA tanks and has to reload more often.
It is possible, that the second question puzzled you, as there are almost no sniping spots in this game, which could be normally used by the Khrizantema-S in AB without an immediate threat of being hit by a HEAT projectile (leading to an instant explosion due to a hole in the roof). This is very true due to launcher being exposed all the time, even before it can fire on targets. To avoid being instantly destroyed, it is necessary to use radar lock as much as possible.
At the very start of the match, turn your radar off and drive straight towards some flat spot that can cover carrier's hull completely. You want to hold the line until the very last missile with minimal movement. The line might be the front, which you can observe from behind an unusually big rock or a short flat hill, it could be a plateau, as it might allow you to use the radar to fire down. In general, you want to have as little vegetation in your way as possible. If using a hill, avoid taking positions too close to the enemy tanks, as close range combat is complicated, especially against ERA tanks.
If you have the Dozer Blade modification, you can try to reinforce a firing position in some unusual spot. But, whatever you choose, the launcher must be able to aim straight at the enemy tank (even if you fire from behind cover, the radar cannot lock beyond launcher aiming angles), so you are limited to only flat ground. Ideally, you want to be standing right next to your cover, as otherwise enemy might accidentally hit the hull by flinging shells, ATGM or even SAM over terrain (although radar or launcher hit would be equally fatal, it is slightly more difficult to pull off).
After taking the position and cleaning it up for missile launching, wait for the enemies to appear. It won't take long, since many players around rank VII have fast tanks. After seeing one, enter binoculars mode, press fire button to turn turret towards enemy, adjust aim, then try to lock onto enemy tank. Entering binocular scope is necessary to ensure that the radar is actually aimed at your target and not somewhere else.
Upon locking onto tank, enter sniper scope, aim above your cover and fire. If the tank in question is some sort of ATGM light tank or SPAA, you can immediately double tap them, even if you are generally sure of your aim, as to avoid being shot back into the launcher (which can be fatal if they use default belts or ATGM). Both missiles can be guided at the same time, so the second shot is not entirely wasted and can be redirected into the next tank.

If possible, plan a retreat route for yourself, as it is often impossible to stop rank VII tankers from advancing. Many of them either have enough speed and game knowledge to understand that they have to annihilate you and will go full throttle towards you while you reload, or will go full throttle towards you simply because they can. However, if you have a plan B and can retreat behind the next cover, you can avoid being destroyed during the reload and deny enemy access to the area for far longer.
If you won a battle for the capture point of your choice and nobody seems to be interested in attacking it anymore for more than two minutes, you can transition towards different sniping spot to try and blindside enemies somewhere else. It is, however, very likely that there still is at least one more enemy hiding somewhere nearby, so only move out when there are friendly aircraft in the air, to ensure that at least your immediate surroundings are safe, or that you at least know where the enemy tanks are (via radio communication skill). If you'll meet enemy tanks while out of cover and won't manage to fire before they react, you are going to be destroyed instantly.
Unlike with the Shturm-S, there are no anti-air missile on the Khrizantema, and it is even more vulnerable to air raids, so fighting back will be difficult.
If there are helicopters: Use a hill, which allows the radar to lock on to one of them regardless of height, then launch first missile via radar, while you guide the second missile into another one. Remember, radar lock will break if you turn the guiding device too far away from the first target, so if they spawned in a very spread-out formation you can just fire both missiles and guide them yourself immediately. If you see any helicopter ATGMs, use ESS and continue guiding the missiles via thermal scope towards the ATGM helicopter.
If there are planes: Forget about the radar and fire immediately. If you see a bomber spawning, immediately attack it, as they fly slower than the missiles and can't turn too much, so they are a relatively easy target. If you were able to shoot it down before they reached 1.8 km distance towards you, you are probably safe, but you can additionally move to a different cover if you saw any bombs flying off them. If there is a strike aircraft coming, you are pretty much dead, as they can easily dodge missiles and can keep throwing the plane up and down while firing off rockets, which the 9M123 will not be able to keep up with no matter what. Enemy fighters almost always come down to fire at the Khrizantema-S after fighting each other, but they are often spooked when you launch an ATGM straight at them, so when they reach 1 km distance or start directly diving onto you, fire an ATGM back at them and hope it hits or scares them away. Do not just forget about them after they passed you, as they definitely will circle around and try to hit you again.
If the enemy is using smoke grenades, pull the radar out and scan the screen, then lock onto them and fire one missile at the locked target. Scanning and locking on can also be done manually from the sniper seat without activating the radar, but you will have to be more precise about it, and you cant let yourself to be distracted by anything else. Remember that you still can use thermal scope to see through your own ESS if the radar was destroyed.
Pros and cons
Pros:
- Destructive ATGM with an astounding 1,200 mm penetration, can penetrate most NERA screens and will obliterate most tanks on direct hit
- Radar can also lock onto tanks, through smokes, bushes, etc.
- Can fire and guide both missiles at once. It's also possible to attack two different targets at once, one via radar, one via laser
- Can swim and accurately snipe in water, rare for amphibious tanks
- Radar guided missiles can shut down any slow helicopter on their own if operator can keep the lock
- Has thermal optics for gunner
- Great mobility and acceleration
- Heavily sloped frontal armour with additional plating can sustain machine guns or bad 20 mm ammunition
Cons:
- Armour is easily penetrated by any big gun and frontal penetration is almost always fatal due to fuel explosion
- Launcher and radar are easy to hit when hull down, allowing hostile tanks to explode the hull anyway, as it counts as open-topped
- Very vulnerable to assaults by strike aircraft and have no efficient way of fighting them
- 9M123 ATGMs have inferior speed when compared to surface-to-air missiles, making them inferior in missile duels
- Launcher can be hard to aim manually
- Missiles have poor vertical manoeuvrability
- Has to follow a specific set of rules to be useful in AB, extremely niche due to its limitations and versatility of opponent ATGM
History
Devblog
In the eighties, the KB Mashinostroyeniya in Kolomna began work on an all-weather anti-tank missile system capable of efficiently detecting and destroying ground armoured vehicles, helicopters and other units at any time of day and any visibility level.
The system was chosen to be mounted on the BMP-3 chassis – a highly mobile, all-terrain platform that could even navigate water. That is how the 9P157-2 Khrizantema came to be – it became a unique unit capable of simultaneously following targets on two separate channels – on its radar system and through visual contact.
Moreover, the abovementioned radar can detect and take aim at targets at any time of day and visibility level (be it night, smoke or sandstorm).
The system's missiles are capable of penetrating tank ERA along with over another 1,000 mm of armour beneath it. The Khrizantema was put into service by the Russian army in 2004 and has since undergone modernisation several times. The missile system has also been exported abroad and deployed by other countries.
Media
- Skins
- Images


See also
Links to the articles on the War Thunder Wiki that you think will be useful for the reader, for example:
- reference to the series of the vehicles;
- links to approximate analogues of other nations and research trees.
External links
| USSR tank destroyers | |
|---|---|
| SU-76M | SU-76M · SU-76M (5th Gv.Kav.Corps) · SU-85A |
| SU-57B | SU-57B · SU-76D |
| T-34 Derivatives | SU-122 · SU-85 · SU-85M · SU-100 · SU-122P |
| Heavy Tank Derivatives | SU-100Y · ISU-122 · ISU-122S · SU-152 · ISU-152 · Object 268 |
| SU-100P and Derivatives | SU-100P · Object 120 |
| Wheeled | YaG-10 (29-K) |
| Airborne | ASU-57 · ASU-85 |
| Rocket | BM-8-24 · BM-13N · BM-31-12 |
| ATGM | IT-1 · Shturm-S · Object 775 · Khrizantema-S |
| Artillery | 2S1 · 2S3M |
| Other | SU-5-1 · ZiS-30 · SU-122-54 |
| USA | SU-57 |
- Ground vehicles
- USSR ground vehicles
- Seventh rank ground vehicles
- Tank destroyers
- ATGM vehicles
- Ground vehicles with engine smoke generating system
- Ground vehicles with dozer blade
- Amphibious ground vehicles
- Ground vehicles with night vision device
- Ground vehicles with thermal sight
- Ground vehicles with autoloader
