Difference between revisions of "Type 60 ATM"
bangerland (talk | contribs) (Tried to explain how it works and separate ab/rb work, due to it's specifics. Will fabricate screenshots later.) |
bangerland (talk | contribs) m |
||
| Line 117: | Line 117: | ||
To attack enemy on move you have to use aim assist, as sniper scope is locked to launcher's firing arc and vehicle lacks stabilizer, so your missile may go anywhere it wants to otherwise. Due to missile overall low speed (currently the lowest one in the game) and "aim assist" option (right mouse button) as long as enemy is in tank's sights, one can treat the missile as a sort of dumb third-generation missile. The point is, it is so slow, that it is almost unable to hit the ground or a wall on accident, which means that you can even launch it forward and follow it, and if anyone dares to drive in the open near to you, you can just hold right mouse button to make missile destroy them on it's own. It's still best to not drive around recklessly and rely on missile that much, as it still '''very''' slow and it still requires you to see enemy tank (which means, they also can see you) and it will not avoid any obstacles on a way, so you still have to correct it sometimes. | To attack enemy on move you have to use aim assist, as sniper scope is locked to launcher's firing arc and vehicle lacks stabilizer, so your missile may go anywhere it wants to otherwise. Due to missile overall low speed (currently the lowest one in the game) and "aim assist" option (right mouse button) as long as enemy is in tank's sights, one can treat the missile as a sort of dumb third-generation missile. The point is, it is so slow, that it is almost unable to hit the ground or a wall on accident, which means that you can even launch it forward and follow it, and if anyone dares to drive in the open near to you, you can just hold right mouse button to make missile destroy them on it's own. It's still best to not drive around recklessly and rely on missile that much, as it still '''very''' slow and it still requires you to see enemy tank (which means, they also can see you) and it will not avoid any obstacles on a way, so you still have to correct it sometimes. | ||
| − | Overall, if one uses aim assist, you should keep in mind how it works - it always aims for center of the tank, and it lags behind the moving vehicle. To avoid hitting fuel tanks or missing moving tank, you can adjust it without breaking the tracking. After holding down the aim assist button, move your mouse a bit up, to let missile hit enemy just below the gun barrel, but high enough to not hit their tracks, and, if target moves to the left or right, move mouse to the left or right to make missile track them properly. After that, wait for about 10 to 13 seconds for it to hit enemy, unless they realize what's coming for them and sidestep the missile, or to hit hit random tree on a way towards them. | + | Overall, if one uses aim assist, you should keep in mind how it works - it always aims for center of the tank, and it lags behind the moving vehicle. To avoid hitting fuel tanks or missing moving tank, you can adjust it without breaking the tracking. After holding down the aim assist button, move your mouse a bit up, to let missile hit enemy just below the gun barrel, but high enough to not hit their tracks, and, if target moves to the left or right, move mouse to the left or right to make missile track them properly. After that, wait for about 10 to 13 seconds for it to hit enemy, unless they realize what's coming for them and sidestep the missile, or to hit hit random tree on a way towards them. Having maxed out "keen vision" and "improved optics" allows you to do this at any range indefinitely, as it's impossible to avoid being detected by you at missile's effective range. |
{| class="wikitable" style="text-align:center" | {| class="wikitable" style="text-align:center" | ||
Revision as of 09:20, 23 May 2019
Contents
Description

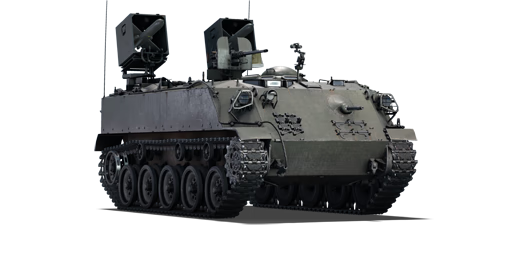
The Type 60 ATM is a Rank IV Japanese tank destroyers
with a battle rating of 6.7 (AB/RB/SB). It was introduced in Update 1.67 "Assault".
This is the lowest BR non-premium vehicle to have ATGM in the game, closest second being BMP-1, though Japanese have to grind through entire rank 4 on 6.3-7.0 BR to get access to it first.
General info
Survivability and armour
While armour of Type 60 hull can handle some direct MG fire, and maybe even unfocused 12.7 mm, it's roof armour is nonexistent. Every fighter in the game will try and succeed to strafe Type 60 ATM, and there is no saving from them.
Hull is just exactly low enough to use every other hulldown position, that any normal tank would fail to use. As example, one can use solid concrete roadblocks, building leftovers, solid construction details, random medium sized rocks, destroyed gas cisterns, destroyed tank hulls and so on as cover. The only thing exposed will be the launchers.
Launchers themselves seem to be irrelevant to the tank, and though they can be "broken" they seem to be able to fire even when they are completely destroyed. Loaded ATGM also seem to be resistant to attempts of setting them off (As tested in AB). It is worth noting that Soviets can still load HE shells and just explode entire tank by hitting the launcher, but not every one of them even carries these shells.
Being hit to the hull is strictly forbidden, as compartment is not made with damage control in mind. In AB it can sustain a hit to the upper part of the hull, but once type 60 is pinned, it goes down very easily, especially if fighter is going kamikaze on it.
Armour type:
- Rolled homogeneous armour
- Cast homogeneous armour (Machine gun port, Cupola)
| Armour | Front (Slope angle) | Sides | Rear | Roof |
|---|---|---|---|---|
| Hull | 20 mm (35-43°) Front glacis 20 mm (30°) Lower glacis 20 mm (7-65°) Machine gun port |
12.7 mm | 20 mm (1°) | 10 mm 20 mm Driver's hatches |
| Missile platform | N/A | 10 mm | N/A | 10 mm |
| Armour | Sides | Roof | ||
| Cupola | 20 mm | 10 mm |
Notes:
- Suspension wheels and tracks are both 15 mm thick, while torsion bar chassis is 12 mm thick.
- Belly armour is 10 mm thick.
Mobility
| Mobility characteristic | ||
|---|---|---|
| Weight (tons) | Add-on Armour weight (tons) |
Max speed (km/h) |
| 12.0 | N/A | 42 (AB) |
| 38 (RB/SB) | ||
| Engine power (horsepower) | ||
| Mode | Stock | Upgraded |
| Arcade | 312 | ___ |
| Realistic/Simulator | 195 | ___ |
| Power-to-weight ratio (hp/ton) | ||
| Mode | Stock | Upgraded |
| Arcade | 26.00 | __.__ |
| Realistic/Simulator | 16.25 | __.__ |
Armaments
Main armament
Vehicle uses 2 type 64 ATGMs at once, with 4 reserve being stored in the hull. They can be launched in about 30 degree arc in front of the hull.
You have the main camera leading indicator, which directs initial launch and guides missiles in AB, and you have 2 separate targeting indicators for each launcher, which show the reload times and try to show how far missiles will fly initially in CQC, though they're extremely inaccurate and should only be used for range estimation and to see if missile can be launched at all.
Sniper optics are only directed forward, so if you want to look at something far away while you guide missile, you have to first turn your entire hull towards them.
Type 64 missiles are on the same trigger, vehicle always fires the right missile first if it can. The only way to fire left missile first is in CQC, by turning your main aiming reticle to the left just enough for right launcher reticle to go offline, but not in the dead zone of left launcher yet. The left-to-right shot, however convenient, is impossible to make if right launcher is loaded. This makes CQC firing training extremely complex and unforgiving.
Missiles have about 500 mm of penetration at flat angle, which is enough to penetrate anything at BR of 6 to 8. While it's penetration is nothing to be amazed of, it has 4.5 kilograms of explosive mass, which compensates for it's low "health" and allows it to do fatal damage even with 30 mm left. It's technically possible to even destroy T-64B with a good hit. Like with any HEAT based projectile, fuel tanks can stop it, if they are huge enough.
The missiles act very differently in either game mode, and so vehicle cannot be treated same in AB as in RB, which further increases training difficulty.
Due to extremely limited firing arc, if one wants to forcefully launch missile behind enemy cover it is recommended to stand with hull towards the enemy behind cover and use left launcher to fire right (L-R) or right launcher to fire left (R-L), but since L-R shot is by default overridden by R-R shot, it is also recommended to practice it a lot, or to not attack enemy from the left, if possible. As for vertical attacks, it depends on game mode a lot.
It is also rather easy to just sidestep the missile, which most of BR ~8.0 light tanks will do, unless they do not notice ATGM somehow, or are too busy fighting something else.
In RB, Missile has about 40km/h initial speed and missile wont respond to your commands until it flies at least 50-80 meters, and should be treated as a rocket until that point. Even past this point, missile is rather slow on taking commands with about of 0.8 sec delay and prefers to keep it's initial vertical course, so it's better to launch it properly to begin with. Ironically, lower speed allows it to be launched onto tanks which are almost ramming Type 60, with dead zone being just 6 meters, if operator aims at the ground below the vehicle. Basically, this means it can oneshot T64 or tanks with even lower profile, like IT-1, while being at a gunpoint. On flat ground, to hit targets at ~50 meters one should aim about 1/3 the range between tanks. To hit targets at ~80 meters one should aim 1/2 the range between tanks, as ATGM accelerates by that point.
To hit targets in cover far away, operator must be very good at judging distances, because input lag and missile attitude with it sometimes returning to initial course makes dropping missiles hard down rather challenging. As for tanks which stand in open or with minimal cover, this brings no problems, as over distance you have plenty of time to correct course.
In AB, Missile has full 89 km/h initial speed (also max speed) and responds to SACLOS manual input (mouse movements, not the targeting reticle itself) almost immediately (with real dead zone being unclear), so it can be somewhat curved around even during launch sequence, which allows operator to push it even further behind houses. But due to it's speed the launch dead zone is extended to 11 m, so one cannot let enemy too close to themselves. Past initial launch dead zone, operator should always aim about 1\2 toward enemy tank.
Long range sniping isn't much different from RB, you just have to aim at enemy with your mouse instead of manually curving missile. It is still hard to do on a move, so you might want to rely on other ways of aiming.
To attack enemy on move you have to use aim assist, as sniper scope is locked to launcher's firing arc and vehicle lacks stabilizer, so your missile may go anywhere it wants to otherwise. Due to missile overall low speed (currently the lowest one in the game) and "aim assist" option (right mouse button) as long as enemy is in tank's sights, one can treat the missile as a sort of dumb third-generation missile. The point is, it is so slow, that it is almost unable to hit the ground or a wall on accident, which means that you can even launch it forward and follow it, and if anyone dares to drive in the open near to you, you can just hold right mouse button to make missile destroy them on it's own. It's still best to not drive around recklessly and rely on missile that much, as it still very slow and it still requires you to see enemy tank (which means, they also can see you) and it will not avoid any obstacles on a way, so you still have to correct it sometimes.
Overall, if one uses aim assist, you should keep in mind how it works - it always aims for center of the tank, and it lags behind the moving vehicle. To avoid hitting fuel tanks or missing moving tank, you can adjust it without breaking the tracking. After holding down the aim assist button, move your mouse a bit up, to let missile hit enemy just below the gun barrel, but high enough to not hit their tracks, and, if target moves to the left or right, move mouse to the left or right to make missile track them properly. After that, wait for about 10 to 13 seconds for it to hit enemy, unless they realize what's coming for them and sidestep the missile, or to hit hit random tree on a way towards them. Having maxed out "keen vision" and "improved optics" allows you to do this at any range indefinitely, as it's impossible to avoid being detected by you at missile's effective range.
| 120 mm Type 64 MAT ATGM | |||||
|---|---|---|---|---|---|
| Capacity | Fire rate (shots/minute) |
Vertical guidance |
Horizontal guidance |
Stabilizer | |
| 6 | 3 | N/A | N/A | N/A | |
| Turret rotation speed (°/s) | |||||
| Mode | Stock | Upgraded | Prior + Full crew | Prior + Expert qualif. | Prior + Ace qualif. |
| Arcade | 25.9 | N/A | __.__ | __.__ | __.__ |
| Realistic | 17.5 | N/A | __.__ | __.__ | __.__ |
| Reloading rate (seconds) | |||||
| Stock | Prior + Full crew | Prior + Expert qualif. | Prior + Ace qualif. | ||
| 13.0 | __.__ | __.__ | __.__ | ||
Ammunition
| Penetration statistics | |||||||
|---|---|---|---|---|---|---|---|
| Ammunition | Type of warhead |
Penetration in mm @ 0° Angle of Attack | |||||
| 10 m | 100 m | 500 m | 1,000 m | 1,500 m | 2,000 m | ||
| Type 64 | ATGM | 500 | 500 | 500 | 500 | 500 | 500 |
| Shell details | |||||||||||
|---|---|---|---|---|---|---|---|---|---|---|---|
| Ammunition | Type of warhead |
Maximum Velocity in m/s |
Projectile Mass in kg |
Range (m) | Fuse delay
in m: |
Fuse sensitivity
in mm: |
Explosive Mass in g (TNT equivalent): |
Normalization At 30° from horizontal: |
Ricochet: | ||
| 0% | 50% | 100% | |||||||||
| Type 64 | ATGM | 85 | 16 | 1,800 | 0.0 | 0.1 | 4,550 | +0° | 80° | 82° | 90° |
Notes:
- Flight characteristics heavily depend on the mode you play in.
- While stat card states the max range is 1,800 m, in reality, it is less due to the missile losing fuel making course corrections. The resulting effective range is closer to 1,600 m.
- In AB, rearm takes about 40 seconds once launcher is empty and no partial rearm can be done on capture point. Rearm only happens for one launcher at once, which means full rearm will take you 80 seconds. Launcher still reloads during rearm, so you can fire away immediately, after it's done.
Ammo racks
| Full ammo |
1st rack empty |
2nd rack empty |
3rd rack empty |
4th rack empty |
5th rack empty |
6th rack empty |
Visual discrepancy |
|---|---|---|---|---|---|---|---|
| 6 | XX (X+) | (+) | (+) | (+) | (+) | (+) | no |
Machine guns
The Type 60 ATM comes equipped with a coaxial 12.7mm M2HB Browning machine gun and a smaller 7.62mm Browning machine gun.
The 7.62mm, while useless against conventional tanks, can sometimes come in handy for clearing some debris and can convince some BR 6.7 open top HEAT SPG to leave you alone. The 12.7mm machine gun serves similar purpouse, but it also can destroy some light tanks, though something like AMX-13 will resist it's fire from the front.
Both of MGs are only able to fire at planes that try to strafe your vehicle directly, which is not very likely, so in case if attacker is present on the field, vehicle should just run behind some hills and hope the pilot isn't after it.
| 12.7 mm M2HB | ||||||
|---|---|---|---|---|---|---|
| Pintle mount | ||||||
| Capacity (Belt capacity) | Fire rate (shots/minute) |
Vertical guidance |
Horizontal guidance | |||
| 2,500 (200) | 577 | -5°/+25° | ±45° | |||
| 7.62 mm M1919A4 | ||||||
|---|---|---|---|---|---|---|
| Coaxial mount | ||||||
| Capacity (Belt capacity) | Fire rate (shots/minute) |
Vertical guidance |
Horizontal guidance | |||
| 3,000 (250) | 500 | ±22° | ±22° | |||
Usage in the battles
The Type 60 ATM struggles in close quarters and is unsuited for direct urban combat. When playing the Type 60 ATGM consider all your flanking routes and hulldown positions as your high damage potential can be most effectively harnessed in these environments. Avoid all major sight-lines, and pick your targets carefully. The cover is your best friend, finding positions, where you can scout enemy vehicles for your team, can often be more beneficial than attempting to destroy enemy tanks yourself.
To get most out of the tank, one should find hulldown position with a sight onto capture point, to scout everyone, who is open for allied snipers, and then pick off pinned down opponents, forcing them to choose between being destroyed by ATGM or your allies.
As one example, on Alaska map Type 60 ATM can use concrete blocks and rubbish to the east of B point to become resistant to enemy fire, while being able to fire clean shots at both A and B points with little fear of being directly attacked back.
The Type 60 ATM often plays out as a support vehicle instead of a tank destroyer, though in AB it can also do some moral damage, as it's presence alone forces enemy to change plans, as soon as they realize it can destroy them without even showing up on a field or doing elaborate artillery tricks, unlike Type 60 SPRG (C). You shouldn't let this to get to your head, though, as you are most likely unable to stop massive coordinated push.
As example, experienced type 60 ATM user can entrench itself on river of Berlin map, making people who see ATGM for the first time to lose any will to attack B point at all, and seriously stalling the rest, although this requires meticulous training in CQC launch techniques, as combat range there can quickly reach 20 meters, and ground isn't exactly even, often resulting in misses. Still, in AB the fear alone may stall enemy long enough for vehicle to rearm, and damage done to launcher is completely irrelevant in that mode.
The Type 60 ATM's biggest threats in battle are many. Avoid directly fighting all vehicles at all costs to prevent dying - almost every shell at your BR will destroy Type 60 with ease. The vehicle will often face enemy frontally when you fire missiles, and that's where the 3 of your crew are crammed together, 2 of which are the gunner and driver.
As soon as enemy tries to drop artillery on you, it's best to leave the position, as tank might explode in one hit. As such, always keep plan B in your head.
Try to use scouting to know the very moment your opponent drives out to attack your tank and try to blast them away with ATGM. If direct confrontation with light tank is inevitable - fire 12.7 MG at it's sides as well and hope it penetrates them.
Pros and cons
Pros:
- Good missile maneuverability
- Type 64 ATGM's provide exceptional firepower
- Upwards facing launchers can allow vehicle to fire behind cover, although a setup is often required
- Has scouting
Cons:
- Very limited main ammunition (even more so than SPRG version)
- Slow missile speed, to a point it can be sidestepped by many tanks
- Need a visual target for accurate hit, otherwise it heavily relies on operator skill to hit anything at all
- Cannot be partially rearmed on capture point in AB, forcing it to completely empty the ammunition
- Can't move while the missile flies to the target in RB
- Missiles have input lag in RB, which makes them unreliable at times
- Need a certain range for effective hit (maximum 1600 m for long range, at least 10 m at close range, at least 100 m for guidance system to start in RB)
- Very long reload after each missile is fired
- Highly visible, very distinct profile, with the sore Japanese green camouflage and obvious launchers
- Little to no armour, most shells immediately destroy this vehicle
- Limited maximum speed to 38 kph along with mediocre mobility
History
Describe the history of the creation and combat usage of the ground vehicle in more detail than in the introduction. If the historical reference turns out to be too big, take it to a separate article, taking a link to an article about the vehicle and adding a block "/historical reference" (example: https://wiki.warthunder.com/Name-vehicles/historical reference) and add a link to it here using the main template. Be sure to include links to sources at the end of the article.
Media
An excellent addition to the article will be video guides, as well as screenshots from the game and photos.
Read also
Sources
Paste links to sources and external resources, such as:
- topic on the official game forum;
- other literature.
| Japan tank destroyers | |
|---|---|
| Ro-Go Derivatives | Ro-Go Exp. |
| Chi-Ha Derivatives | Ho-Ni I · Ho-Ni III · Ho-Ro · Chi-Ha LG |
| Ho-Ri | Ho-Ri Prototype · Ho-Ri Production |
| Other | Na-To |
| JGSDF | |
| SPRG | Type 60 (C) |
| SPH | Type 75 · Type 99 |
| ATGM | Type 60 ATM |
| Rocket | Type 75 MLRS |
| USA | ▅M36 |
