Difference between revisions of "Magach 3 (ERA)"
Colok76286 (talk | contribs) (Edits) |
ww2FREAK58 (talk | contribs) (I have filled out the page. This was a blank and brand new page and I put in all the information.) (Tag: Visual edit) |
||
| Line 13: | Line 13: | ||
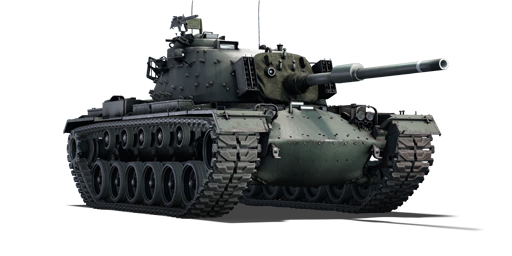
The '''{{Specs|name}}''' is a premium rank {{Specs|rank}} Israeli medium tank {{Battle-rating}}. It was introduced in [[Update "Danger Zone"]]. | The '''{{Specs|name}}''' is a premium rank {{Specs|rank}} Israeli medium tank {{Battle-rating}}. It was introduced in [[Update "Danger Zone"]]. | ||
| + | In a sense, the Magach 3 is a combination of features between the [[Magach 1]] and Magach 2 along with the [[Magach 6]]. Sharing the rounded cast hull shape of the Magach 1 and 2 hull chassis and a rounded turret housing the 105 mm M68 gun. However, unlike the usual Magach 6, the Magach 3 has the M60 engine installed and its engine grilles and exhausts on the rear are similar to that of the Magach 6. | ||
| + | |||
| + | Features exclusive to the Magach 3 are plentiful however. From the front, smoke grenade launchers can be seen on the gun mantlet sides, with a total of 20 smoke grenades that could be launched. On the turret roof, the prominent commander's cupola infamous on the M48, M60, and some other Magach designs has been replaced with the Urdan design, which has a drastically smaller profile at the expense of the commander's 12.7 mm machine gun. In its place, a 7.62 mm Browning on a pintle-mount is available on the roof. | ||
| + | |||
| + | More prominently throughout the Magach 3 are mountings for the Blazer ERA on the hull front, turret front, and turret sides. More than likely however, these mountings on the battlefield would be covered by the Blazer ERA which would fill up the Magach 3 profile with large blocks running vertically throughout the design. | ||
== General info == | == General info == | ||
=== Survivability and armour === | === Survivability and armour === | ||
{{Specs-Tank-Armour}} | {{Specs-Tank-Armour}} | ||
<!-- ''Describe armour protection. Note the most well protected and key weak areas. Appreciate the layout of modules as well as the number and location of crew members. Is the level of armour protection sufficient, is the placement of modules helpful for survival in combat? If necessary use a visual template to indicate the most secure and weak zones of the armour.'' --> | <!-- ''Describe armour protection. Note the most well protected and key weak areas. Appreciate the layout of modules as well as the number and location of crew members. Is the level of armour protection sufficient, is the placement of modules helpful for survival in combat? If necessary use a visual template to indicate the most secure and weak zones of the armour.'' --> | ||
| − | + | The Magach 3 has good frontal armour, but it cannot be relied on all of the time. Make sure to not expose the rear or sides of the tank and turret. These are weakest parts and if hit is likely to end the tank. Most of the crew is in the turret and a shot there will almost always be deadly. | |
| + | |||
| + | '''Armour type:''' | ||
| − | + | *Cast homogeneous armour (Front hull, Turret) | |
| − | + | *Rolled homogeneous armour (Side, Rear, Roof) | |
| − | * | ||
{| class="wikitable" | {| class="wikitable" | ||
| Line 27: | Line 33: | ||
! Armour !! Front (Slope angle) !! Sides !! Rear !! Roof | ! Armour !! Front (Slope angle) !! Sides !! Rear !! Roof | ||
|- | |- | ||
| − | | Hull || | + | | Hull ||85-200 mm (59-74°) ''Front glacis'' |
| + | 63-200 mm (13-60°) ''Lower glacis'' | ||
| + | |76 mm (0-44°) ''Front'' | ||
| + | 51 mm (0-44°) ''Rear'' | ||
| + | |30 mm (0-3°) ''Top'' | ||
| + | 25 mm (26-59°) ''Bottom'' | ||
| + | |57 mm ''Front'' | ||
| + | 20 mm ''Rear'' | ||
|- | |- | ||
| − | | Turret || | + | | Turret ||105-128 mm (6-71°) ''Turret front'' |
| + | 152 mm (3-28°) ''Gun mantlet'' | ||
| + | |66-97 mm (2-46°)||45-50 mm (4-55°) | ||
| + | 25.4 mm (70-71°) ''Turret underside'' | ||
| + | |24-65 mm | ||
|- | |- | ||
| − | | Cupola || | + | | Cupola ||70 mm||70 mm||70 mm||30 mm |
| + | |- | ||
| + | |} | ||
| + | |||
| + | {| class="wikitable" | ||
| + | !Special armour* | ||
| + | !Kinetic | ||
| + | !Chemical | ||
|- | |- | ||
| + | |ERA | ||
| + | |5 mm | ||
| + | |260 mm | ||
|} | |} | ||
| + | '''Notes:''' | ||
| − | + | *Suspension wheels and tracks are 20 mm thick. | |
| − | + | *Belly armour is 38 mm in the front and 25 mm in the rear. | |
| + | *Rangefinder device on the turret sides count as 127 mm cast armour. | ||
| + | *ERA can be attached on turret and front hull via modification. | ||
=== Mobility === | === Mobility === | ||
{{Specs-Tank-Mobility}} | {{Specs-Tank-Mobility}} | ||
| − | <!-- ''Write about the mobility of the ground vehicle. Estimate the specific power and manoeuvrability, as well as the maximum speed forwards and backwards.'' --> | + | <!-- ''Write about the mobility of the ground vehicle. Estimate the specific power and manoeuvrability, as well as the maximum speed forwards and backwards.'' -->''.'' |
| − | '' | ||
{{tankMobility}} | {{tankMobility}} | ||
| Line 54: | Line 83: | ||
<!-- ''Give the reader information about the characteristics of the main gun. Assess its effectiveness in a battle based on the reloading speed, ballistics and the power of shells. Do not forget about the flexibility of the fire, that is how quickly the cannon can be aimed at the target, open fire on it and aim at another enemy. Add a link to the main article on the gun: <code><nowiki>{{main|Name of the weapon}}</nowiki></code>. Describe in general terms the ammunition available for the main gun. Give advice on how to use them and how to fill the ammunition storage.'' --> | <!-- ''Give the reader information about the characteristics of the main gun. Assess its effectiveness in a battle based on the reloading speed, ballistics and the power of shells. Do not forget about the flexibility of the fire, that is how quickly the cannon can be aimed at the target, open fire on it and aim at another enemy. Add a link to the main article on the gun: <code><nowiki>{{main|Name of the weapon}}</nowiki></code>. Describe in general terms the ammunition available for the main gun. Give advice on how to use them and how to fill the ammunition storage.'' --> | ||
{{main|M68 (105 mm)}} | {{main|M68 (105 mm)}} | ||
| − | |||
| − | |||
{| class="wikitable" style="text-align:center" width="100%" | {| class="wikitable" style="text-align:center" width="100%" | ||
| Line 66: | Line 93: | ||
|- | |- | ||
! ''Arcade'' | ! ''Arcade'' | ||
| − | | rowspan="2" | 57 || rowspan="2" | -9°/+19° || rowspan="2" | ±180° || rowspan="2" | N/A || | + | | rowspan="2" | 57 || rowspan="2" | -9°/+19° || rowspan="2" | ±180° || rowspan="2" | N/A ||22.85||31.62||38.40||42.47||45.18|| rowspan="2" |8.71|| rowspan="2" |7.70|| rowspan="2" |7.10|| rowspan="2" |6.70 |
|- | |- | ||
! ''Realistic'' | ! ''Realistic'' | ||
| − | | | + | |14.28||16.80||20.40||22.56||24.00 |
|- | |- | ||
|} | |} | ||
==== Ammunition ==== | ==== Ammunition ==== | ||
| + | |||
| + | *'''M392A2 APDS''' (Armour-Piercing Discarding Sabot) is capable of easily penetrating the majority of the foes it meets, but these rounds do require finesse as to their placing. Because the shell lacks an explosive filler, the best bet is to try and either knock out the majority of the enemy tank's crew, or to destroy the enemy by ammo or fuel detonation through hitting their respective storage capacities. This, of course, requires knowledge about the vehicles the Magach may face - so be sure to use the game's X-Ray view in the hangar and analyse the potential foes for their weak spots! Also keep in mind that with increased armour thickness the amount of shrapnels shrinks. | ||
| + | |||
| + | *'''M156 HESH''' (High-Explosive Squash-Head) works very differently than other shell-types. It ignores any angle, except for ricochet and deals damage by metal-flakes which are blown off inside the armour by the exterior explosion. Basically the fighting compartment is showered in metal rain. Currently only true armour thickness (opposed to line of sight thickness) will provide sufficient means of protection, benefitting the USSR turret designs and in general German tanks. Like all high-explosive shells the fuse is very sensitive and can be set-off by most objects e.g. fences, trees, pillars. | ||
| + | |||
| + | *'''M152 HEATFS''' (High-Explosive Anti Tank Fin Stabilised): The knowledge of enemy vehicle layouts gained from the stock shell (M392A2), will be handy to use for the Magach's fullest potential - as the M152 is a round that can penetrate most vehicle's armour frontally. Like the APDS shot, increased armour thickness results in reduced amount of shrapnels after penetration. Unlike APDS it has one downside: Given that it is a chemical energy round, its fuse is highly sensitive in regards to its practical application in battle. As a result, virtually anything, such as trees or even a fence, will set it off prematurely, so the HEATFS round cannot fire through obstructions with this kind. | ||
| + | |||
{| class="wikitable sortable" style="text-align:center" width="100%" | {| class="wikitable sortable" style="text-align:center" width="100%" | ||
! colspan="8" | Penetration statistics | ! colspan="8" | Penetration statistics | ||
| Line 83: | Line 117: | ||
! 10 m !! 100 m !! 500 m !! 1,000 m !! 1,500 m !! 2,000 m | ! 10 m !! 100 m !! 500 m !! 1,000 m !! 1,500 m !! 2,000 m | ||
|- | |- | ||
| − | | M392A2 || APDS || | + | | M392A2 || APDS ||303||302||296||277||257||252 |
|- | |- | ||
| − | | M156 || HESH || | + | | M156 || HESH ||127||127||127||127||127||127 |
|- | |- | ||
| − | | M152 || HEATFS || | + | | M152 || HEATFS ||400||400||400||400||400||400 |
|- | |- | ||
|} | |} | ||
| Line 104: | Line 138: | ||
! 0% !! 50% !! 100% | ! 0% !! 50% !! 100% | ||
|- | |- | ||
| − | | M392A2 || APDS || | + | | M392A2 || APDS ||1,478||4||N/A||N/A||N/A||75°||78°||80° |
|- | |- | ||
| − | | M156 || HESH || | + | | M156 || HESH ||732||14.85||0.1||4||4,310||73°||77°||80° |
|- | |- | ||
| − | | M152 || HEATFS || | + | | M152 || HEATFS ||1,173||10.5||0.05||0.1||1,270||65°||72°||77° |
|- | |- | ||
|} | |} | ||
| Line 122: | Line 156: | ||
! Explosive Mass<br>(TNT equivalent) (g) | ! Explosive Mass<br>(TNT equivalent) (g) | ||
|- | |- | ||
| − | | M416 || | + | | M416 ||730||11.4||20||5||25||50 |
|- | |- | ||
|} | |} | ||
| Line 128: | Line 162: | ||
==== [[Ammo racks]] ==== | ==== [[Ammo racks]] ==== | ||
<!-- [[File:Ammoracks_{{PAGENAME}}.png|right|thumb|x250px|[[Ammo racks]] of the {{PAGENAME}}]] --> | <!-- [[File:Ammoracks_{{PAGENAME}}.png|right|thumb|x250px|[[Ammo racks]] of the {{PAGENAME}}]] --> | ||
| − | <!-- '''Last updated:''' --> | + | <!-- '''Last updated:''' -->{| class="wikitable" style="text-align:center" |
| − | {| class="wikitable" style="text-align:center" | ||
| − | |||
| − | |||
| − | |||
| − | |||
| − | |||
| − | |||
| − | |||
| − | |||
| − | |||
|- | |- | ||
| − | + | !Full | |
| + | ammo | ||
| + | !1st | ||
| + | rack empty | ||
| + | !2nd | ||
| + | rack empty | ||
| + | !3rd | ||
| + | rack empty | ||
| + | !4th | ||
| + | rack empty | ||
| + | !5th | ||
| + | rack empty | ||
| + | !Visual | ||
| + | discrepancy | ||
|- | |- | ||
| + | |'''57'''||47 ''(+10)''||32 ''(+25)''||23 ''(+34)''||7 ''(+50)''||1 ''(+56)''||No | ||
|} | |} | ||
| − | |||
=== Machine guns === | === Machine guns === | ||
{{Specs-Tank-Weapon|2}} | {{Specs-Tank-Weapon|2}} | ||
| Line 150: | Line 187: | ||
{{main|M73 (7.62 mm)|M1919A4 (7.62 mm)}} | {{main|M73 (7.62 mm)|M1919A4 (7.62 mm)}} | ||
| − | + | Both machine guns are rifle caliber and are not much help against ground targets, even light ones. They are however somewhat useful in the role of lightly damaging enemy helicopters and aircraft. | |
{| class="wikitable" style="text-align:center" width="50%" | {| class="wikitable" style="text-align:center" width="50%" | ||
| Line 158: | Line 195: | ||
! Mount !! Capacity (Belt) !! Fire rate !! Vertical !! Horizontal | ! Mount !! Capacity (Belt) !! Fire rate !! Vertical !! Horizontal | ||
|- | |- | ||
| − | | || | + | |Pintle||1,200 (250)||500||-15°/+60°||±180° |
|- | |- | ||
|} | |} | ||
| Line 167: | Line 204: | ||
! Mount !! Capacity (Belt) !! Fire rate !! Vertical !! Horizontal | ! Mount !! Capacity (Belt) !! Fire rate !! Vertical !! Horizontal | ||
|- | |- | ||
| − | | || | + | |Coaxial||5,950 (250)||500||N/A||N/A |
|- | |- | ||
|} | |} | ||
| Line 173: | Line 210: | ||
== Usage in battles == | == Usage in battles == | ||
<!-- ''Describe the tactics of playing in the vehicle, the features of using vehicles in the team and advice on tactics. Refrain from creating a "guide" - do not impose a single point of view but instead give the reader food for thought. Describe the most dangerous enemies and give recommendations on fighting them. If necessary, note the specifics of the game in different modes (AB, RB, SB).'' --> | <!-- ''Describe the tactics of playing in the vehicle, the features of using vehicles in the team and advice on tactics. Refrain from creating a "guide" - do not impose a single point of view but instead give the reader food for thought. Describe the most dangerous enemies and give recommendations on fighting them. If necessary, note the specifics of the game in different modes (AB, RB, SB).'' --> | ||
| − | + | To use this tank effectively do not charge straight into battle, instead, go around. Use the terrain, make it harder to be identifiable by selecting the appropriate camouflage and navigate using the map. To flank, the opponents from the sides or the rear, use a flanking tactic to surprise the enemy tankers and destroy them. However, do not let the Magach 3 be seen and the longer it can stay hidden, the higher the chances of finding more tanks off guard and surviving the match. Try to attack from long distances: The Magach 3 has a very powerful and accurate cannon. This can be equipped with some of the most lethal ammunition in the game. It will turn the biggest and most powerful tanks into blazing wrecks. | |
| + | |||
| + | The Magach 3 looks similar to the T-54 series of tanks an unskilled T-54 player will pause for a short amount of time to identify the tank. This will give the tank extra time to angle the tank and to calculate a perfect shot and destroy vital parts of the enemy tank. Do not expose/show the rear of the tank as this will give away the Magach 3 immediately since the rear does not resemble a T-54 and is one of the weakest places on this tank. | ||
| + | |||
| + | Playing on maps which have villages, towns, and city centres modelled, such as Poland, Advance to the Rhine, Normandy etc. These require a more specific tactic to survive in these locations as being flanked and not knowing about it until it's too late is very common. A good way of preventing this while using a Magach tank is to not enter the urban environment. In these environments, the Magach 3 will be normally too close for the armour to work as effectively. However, if going around the sides of the town and move in and out of streets, this will prevent the enemy team to predict where the Magach will go. The Magach, once upgraded, offers some of the best handling in the game, use that as an advantage in narrow and congested streets. | ||
| + | When engaging with other medium tanks, the Magach 3 offers an excellent gun which can dominate any other medium tank. If the HEATFS is unlocked, the Magach will be able to terminate any tank with one hit most of the time. The closer to the enemy tank, the higher the odds of ending it with an instant termination. When using HESH rounds, do not hit the sides of the enemy tank, it won't really do much damage. However, when the enemy has exposed the front, especially the Upper Glacis of the tank, using the HESH rounds will cause a lot of damage to the Crew and could also end that tank in one shot. Examples are the [[T-54 (1949)|T-54's]], [[IS-3]] and [[IS-4M|IS-4Ms]]. Against [[T-10M]]s, its not that reliable because of spaced armour. | ||
| + | |||
| + | Make sure to not expose the rear or sides of the tank and turret. These are weakest parts and if hit is likely to end the tank. | ||
=== Pros and cons === | === Pros and cons === | ||
| − | <!-- ''Summarise and briefly evaluate the vehicle in terms of its characteristics and combat effectiveness. Mark its pros and cons in a bulleted list. Try not to use more than 6 points for each of the characteristics. Avoid using categorical definitions such as "bad", "good" and the like - use substitutions with softer forms such as "inadequate" and "effective".'' --> | + | <!-- ''Summarise and briefly evaluate the vehicle in terms of its characteristics and combat effectiveness. Mark its pros and cons in a bulleted list. Try not to use more than 6 points for each of the characteristics. Avoid using categorical definitions such as "bad", "good" and the like - use substitutions with softer forms such as "inadequate" and "effective".'' -->'''Pros:''' |
| − | '' | + | |
| + | *E.R.A. provides some extra protection from Sabot and HEAT rounds | ||
| + | *Removal of the tall commander's cupola on the M48A1 Patton = slightly lower silhouette | ||
| + | *Hard-hitting and accurate 105 mm L7 gun | ||
| + | *Very accurate gun at long ranges when upgraded | ||
| + | *Good stock shell (APDS) | ||
| + | *HEATFS and HESH shells available | ||
| + | *Decent turning capability | ||
| + | *Very good stock turret transverse speed | ||
| + | *Great off-road speed (but not as great compared to [[Leopard (Family)|Leopards]] and [[T-10M]]s) | ||
| + | *Front hull reliable against most Rank IV & a few Rank V tanks | ||
| − | |||
* | * | ||
'''Cons:''' | '''Cons:''' | ||
| + | |||
| + | *Sides are only 41 mm thick, they can be penetrated easily | ||
| + | *Gun mantlet is 152 mm thick with little sloping, can easily be penetrated even by lower-tier tanks | ||
| + | *Turret ring can be penetrated by enemy rounds | ||
| + | *Front is vulnerable to HEAT and the most powerful APHE ([[T-10M]], [[Maus]]) at close range | ||
| + | *No shells with HE core | ||
| + | *Gun can't depress over the engine bay; makes it difficult to combat flankers. | ||
| + | *E.R.A. doesn't help against regular AP rounds | ||
| + | |||
* | * | ||
== History == | == History == | ||
<!-- ''Describe the history of the creation and combat usage of the vehicle in more detail than in the introduction. If the historical reference turns out to be too long, take it to a separate article, taking a link to the article about the vehicle and adding a block "/History" (example: <nowiki>https://wiki.warthunder.com/(Vehicle-name)/History</nowiki>) and add a link to it here using the <code>main</code> template. Be sure to reference text and sources by using <code><nowiki><ref></ref></nowiki></code>, as well as adding them at the end of the article with <code><nowiki><references /></nowiki></code>. This section may also include the vehicle's dev blog entry (if applicable) and the in-game encyclopedia description (under <code><nowiki>=== In-game description ===</nowiki></code>, also if applicable).'' --> | <!-- ''Describe the history of the creation and combat usage of the vehicle in more detail than in the introduction. If the historical reference turns out to be too long, take it to a separate article, taking a link to the article about the vehicle and adding a block "/History" (example: <nowiki>https://wiki.warthunder.com/(Vehicle-name)/History</nowiki>) and add a link to it here using the <code>main</code> template. Be sure to reference text and sources by using <code><nowiki><ref></ref></nowiki></code>, as well as adding them at the end of the article with <code><nowiki><references /></nowiki></code>. This section may also include the vehicle's dev blog entry (if applicable) and the in-game encyclopedia description (under <code><nowiki>=== In-game description ===</nowiki></code>, also if applicable).'' --> | ||
| − | ' | + | During the 1960s and '70s, Israel purchased a number of M48 and M60 tanks from West Germany and later the USA. These tanks and their subsequent upgraded versions were named Magach. The first two Magach tanks were for the most part "stock" versions Israel initially received, without any significant retrofits. However, the first wave of major upgrades became visible with the Magach 3. This version intended to upgrade the Israeli M48s to the A4 standard, following the Six-Day-War of 1967. The Magach 3 introduced several major improvements over the previous versions, including the replacement of the 90 mm with the L7 105 mm cannon, an improved diesel engine and transmission as well as a low-profile commanders cupola, just to name a few. |
| + | |||
| + | During the Yom Kippur War of 1973, Israel suffered heavy tank losses at the hands of entrenched Egyptian infantry on the Sinai peninsula. After the war, the Israeli tank force was more than halved. Once a critical vulnerability was discovered with the location of the highly flammable hydraulic fluid of the Magach tanks, the decision was made to replace the losses sustained in the previous war with newer Magach 5 and 6 tanks during the 1970s. The newer Magach tanks would introduce more improvements over time that further tailored their performance to the IDF's needs, but that's a story for another day. The Magachs remained the frontline MBT of the IDF until the '80s and '90s until they were gradually being replaced by Israel's new domestically designed Merkava tank. By 2006, all Megachs were decommissioned from active service. | ||
| + | ''- From [[wt:en/news/5329-development-magach-3-chariot-of-war-en|Devblog]]'' | ||
== Media == | == Media == | ||
<!-- ''Excellent additions to the article would be video guides, screenshots from the game, and photos.'' --> | <!-- ''Excellent additions to the article would be video guides, screenshots from the game, and photos.'' --> | ||
| − | '' | + | ;Skins |
| + | |||
| + | *[https://live.warthunder.com/feed/camouflages/?q=%23magach3 Skins and camouflages for the {{PAGENAME}} from live.warthunder.com.] | ||
| + | |||
| + | ;Videos | ||
| + | |||
| + | {{Youtube-gallery|91duRbIoCPM|'''The Shooting Range #91''' - ''Metal Beasts'' section at 00:23 discusses the Magach 3.|a8_8L-F44ts|'''Premium Vehicles: Magach 3''' - ''War Thunder Wiki''|Xwid3UCLr5U|'''The Patton Family''' discusses the {{PAGENAME}} at 7:33 - ''War Thunder Official Channel''}} | ||
== See also == | == See also == | ||
| Line 197: | Line 268: | ||
* ''reference to the series of the vehicles;'' | * ''reference to the series of the vehicles;'' | ||
* ''links to approximate analogues of other nations and research trees.'' --> | * ''links to approximate analogues of other nations and research trees.'' --> | ||
| − | + | ||
| − | * | + | * [[Gal Batash]] - Most modern and upgraded Magach |
| − | * | + | * [[Magach (Family)]] |
== External links == | == External links == | ||
| Line 206: | Line 277: | ||
* ''other literature.'' --> | * ''other literature.'' --> | ||
''Paste links to sources and external resources, such as:'' | ''Paste links to sources and external resources, such as:'' | ||
| + | |||
* ''topic on the official game forum;'' | * ''topic on the official game forum;'' | ||
* ''other literature.'' | * ''other literature.'' | ||
Revision as of 02:37, 18 June 2022
| This page is about the premium Israeli medium tank Magach 3 (ERA). For other versions, see Magach (Family). |
.jpg)
Contents
Description
The Magach 3 (ERA) is a premium rank V Israeli medium tank with a battle rating of 8.0 (AB/RB/SB). It was introduced in Update "Danger Zone".
In a sense, the Magach 3 is a combination of features between the Magach 1 and Magach 2 along with the Magach 6. Sharing the rounded cast hull shape of the Magach 1 and 2 hull chassis and a rounded turret housing the 105 mm M68 gun. However, unlike the usual Magach 6, the Magach 3 has the M60 engine installed and its engine grilles and exhausts on the rear are similar to that of the Magach 6.
Features exclusive to the Magach 3 are plentiful however. From the front, smoke grenade launchers can be seen on the gun mantlet sides, with a total of 20 smoke grenades that could be launched. On the turret roof, the prominent commander's cupola infamous on the M48, M60, and some other Magach designs has been replaced with the Urdan design, which has a drastically smaller profile at the expense of the commander's 12.7 mm machine gun. In its place, a 7.62 mm Browning on a pintle-mount is available on the roof.
More prominently throughout the Magach 3 are mountings for the Blazer ERA on the hull front, turret front, and turret sides. More than likely however, these mountings on the battlefield would be covered by the Blazer ERA which would fill up the Magach 3 profile with large blocks running vertically throughout the design.
General info
Survivability and armour
The Magach 3 has good frontal armour, but it cannot be relied on all of the time. Make sure to not expose the rear or sides of the tank and turret. These are weakest parts and if hit is likely to end the tank. Most of the crew is in the turret and a shot there will almost always be deadly.
Armour type:
- Cast homogeneous armour (Front hull, Turret)
- Rolled homogeneous armour (Side, Rear, Roof)
| Armour | Front (Slope angle) | Sides | Rear | Roof |
|---|---|---|---|---|
| Hull | 85-200 mm (59-74°) Front glacis
63-200 mm (13-60°) Lower glacis |
76 mm (0-44°) Front
51 mm (0-44°) Rear |
30 mm (0-3°) Top
25 mm (26-59°) Bottom |
57 mm Front
20 mm Rear |
| Turret | 105-128 mm (6-71°) Turret front
152 mm (3-28°) Gun mantlet |
66-97 mm (2-46°) | 45-50 mm (4-55°)
25.4 mm (70-71°) Turret underside |
24-65 mm |
| Cupola | 70 mm | 70 mm | 70 mm | 30 mm |
| Special armour* | Kinetic | Chemical |
|---|---|---|
| ERA | 5 mm | 260 mm |
Notes:
- Suspension wheels and tracks are 20 mm thick.
- Belly armour is 38 mm in the front and 25 mm in the rear.
- Rangefinder device on the turret sides count as 127 mm cast armour.
- ERA can be attached on turret and front hull via modification.
Mobility
.
| Game Mode | Max Speed (km/h) | Weight (tons) | Engine power (horsepower) | Power-to-weight ratio (hp/ton) | |||
|---|---|---|---|---|---|---|---|
| Forward | Reverse | Stock | Upgraded | Stock | Upgraded | ||
| Arcade | 54 | 9 | 49.9 | _,___ | 1,431 | __.__ | 28.68 |
| Realistic | 49 | 8 | _,___ | 750 | __.__ | 15.03 | |
Modifications and economy
| Mobility | Protection | Firepower | ||||||||||||||||||||||||
|---|---|---|---|---|---|---|---|---|---|---|---|---|---|---|---|---|---|---|---|---|---|---|---|---|---|---|
|
|
|
Armaments
Main armament
| 105 mm M68 | Turret rotation speed (°/s) | Reloading rate (seconds) | |||||||||||
|---|---|---|---|---|---|---|---|---|---|---|---|---|---|
| Mode | Capacity | Vertical | Horizontal | Stabilizer | Stock | Upgraded | Full | Expert | Aced | Stock | Full | Expert | Aced |
| Arcade | 57 | -9°/+19° | ±180° | N/A | 22.85 | 31.62 | 38.40 | 42.47 | 45.18 | 8.71 | 7.70 | 7.10 | 6.70 |
| Realistic | 14.28 | 16.80 | 20.40 | 22.56 | 24.00 | ||||||||
Ammunition
- M392A2 APDS (Armour-Piercing Discarding Sabot) is capable of easily penetrating the majority of the foes it meets, but these rounds do require finesse as to their placing. Because the shell lacks an explosive filler, the best bet is to try and either knock out the majority of the enemy tank's crew, or to destroy the enemy by ammo or fuel detonation through hitting their respective storage capacities. This, of course, requires knowledge about the vehicles the Magach may face - so be sure to use the game's X-Ray view in the hangar and analyse the potential foes for their weak spots! Also keep in mind that with increased armour thickness the amount of shrapnels shrinks.
- M156 HESH (High-Explosive Squash-Head) works very differently than other shell-types. It ignores any angle, except for ricochet and deals damage by metal-flakes which are blown off inside the armour by the exterior explosion. Basically the fighting compartment is showered in metal rain. Currently only true armour thickness (opposed to line of sight thickness) will provide sufficient means of protection, benefitting the USSR turret designs and in general German tanks. Like all high-explosive shells the fuse is very sensitive and can be set-off by most objects e.g. fences, trees, pillars.
- M152 HEATFS (High-Explosive Anti Tank Fin Stabilised): The knowledge of enemy vehicle layouts gained from the stock shell (M392A2), will be handy to use for the Magach's fullest potential - as the M152 is a round that can penetrate most vehicle's armour frontally. Like the APDS shot, increased armour thickness results in reduced amount of shrapnels after penetration. Unlike APDS it has one downside: Given that it is a chemical energy round, its fuse is highly sensitive in regards to its practical application in battle. As a result, virtually anything, such as trees or even a fence, will set it off prematurely, so the HEATFS round cannot fire through obstructions with this kind.
| Penetration statistics | |||||||
|---|---|---|---|---|---|---|---|
| Ammunition | Type of warhead |
Penetration @ 0° Angle of Attack (mm) | |||||
| 10 m | 100 m | 500 m | 1,000 m | 1,500 m | 2,000 m | ||
| M392A2 | APDS | 303 | 302 | 296 | 277 | 257 | 252 |
| M156 | HESH | 127 | 127 | 127 | 127 | 127 | 127 |
| M152 | HEATFS | 400 | 400 | 400 | 400 | 400 | 400 |
| Shell details | |||||||||
|---|---|---|---|---|---|---|---|---|---|
| Ammunition | Type of warhead |
Velocity (m/s) |
Projectile Mass (kg) |
Fuse delay (m) |
Fuse sensitivity (mm) |
Explosive Mass (TNT equivalent) (g) |
Ricochet | ||
| 0% | 50% | 100% | |||||||
| M392A2 | APDS | 1,478 | 4 | N/A | N/A | N/A | 75° | 78° | 80° |
| M156 | HESH | 732 | 14.85 | 0.1 | 4 | 4,310 | 73° | 77° | 80° |
| M152 | HEATFS | 1,173 | 10.5 | 0.05 | 0.1 | 1,270 | 65° | 72° | 77° |
| Smoke shell characteristics | ||||||
|---|---|---|---|---|---|---|
| Ammunition | Velocity (m/s) |
Projectile Mass (kg) |
Screen radius (m) |
Screen deploy time (s) |
Screen hold time (s) |
Explosive Mass (TNT equivalent) (g) |
| M416 | 730 | 11.4 | 20 | 5 | 25 | 50 |
Ammo racks
| Full
ammo |
1st
rack empty |
2nd
rack empty |
3rd
rack empty |
4th
rack empty |
5th
rack empty |
Visual
discrepancy |
|---|---|---|---|---|---|---|
| 57 | 47 (+10) | 32 (+25) | 23 (+34) | 7 (+50) | 1 (+56) | No |
Machine guns
Both machine guns are rifle caliber and are not much help against ground targets, even light ones. They are however somewhat useful in the role of lightly damaging enemy helicopters and aircraft.
| 7.62 mm M73 | ||||
|---|---|---|---|---|
| Mount | Capacity (Belt) | Fire rate | Vertical | Horizontal |
| Pintle | 1,200 (250) | 500 | -15°/+60° | ±180° |
| 7.62 mm M1919A4 | ||||
|---|---|---|---|---|
| Mount | Capacity (Belt) | Fire rate | Vertical | Horizontal |
| Coaxial | 5,950 (250) | 500 | N/A | N/A |
Usage in battles
To use this tank effectively do not charge straight into battle, instead, go around. Use the terrain, make it harder to be identifiable by selecting the appropriate camouflage and navigate using the map. To flank, the opponents from the sides or the rear, use a flanking tactic to surprise the enemy tankers and destroy them. However, do not let the Magach 3 be seen and the longer it can stay hidden, the higher the chances of finding more tanks off guard and surviving the match. Try to attack from long distances: The Magach 3 has a very powerful and accurate cannon. This can be equipped with some of the most lethal ammunition in the game. It will turn the biggest and most powerful tanks into blazing wrecks.
The Magach 3 looks similar to the T-54 series of tanks an unskilled T-54 player will pause for a short amount of time to identify the tank. This will give the tank extra time to angle the tank and to calculate a perfect shot and destroy vital parts of the enemy tank. Do not expose/show the rear of the tank as this will give away the Magach 3 immediately since the rear does not resemble a T-54 and is one of the weakest places on this tank.
Playing on maps which have villages, towns, and city centres modelled, such as Poland, Advance to the Rhine, Normandy etc. These require a more specific tactic to survive in these locations as being flanked and not knowing about it until it's too late is very common. A good way of preventing this while using a Magach tank is to not enter the urban environment. In these environments, the Magach 3 will be normally too close for the armour to work as effectively. However, if going around the sides of the town and move in and out of streets, this will prevent the enemy team to predict where the Magach will go. The Magach, once upgraded, offers some of the best handling in the game, use that as an advantage in narrow and congested streets.
When engaging with other medium tanks, the Magach 3 offers an excellent gun which can dominate any other medium tank. If the HEATFS is unlocked, the Magach will be able to terminate any tank with one hit most of the time. The closer to the enemy tank, the higher the odds of ending it with an instant termination. When using HESH rounds, do not hit the sides of the enemy tank, it won't really do much damage. However, when the enemy has exposed the front, especially the Upper Glacis of the tank, using the HESH rounds will cause a lot of damage to the Crew and could also end that tank in one shot. Examples are the T-54's, IS-3 and IS-4Ms. Against T-10Ms, its not that reliable because of spaced armour.
Make sure to not expose the rear or sides of the tank and turret. These are weakest parts and if hit is likely to end the tank.
Pros and cons
Pros:
- E.R.A. provides some extra protection from Sabot and HEAT rounds
- Removal of the tall commander's cupola on the M48A1 Patton = slightly lower silhouette
- Hard-hitting and accurate 105 mm L7 gun
- Very accurate gun at long ranges when upgraded
- Good stock shell (APDS)
- HEATFS and HESH shells available
- Decent turning capability
- Very good stock turret transverse speed
- Great off-road speed (but not as great compared to Leopards and T-10Ms)
- Front hull reliable against most Rank IV & a few Rank V tanks
Cons:
- Sides are only 41 mm thick, they can be penetrated easily
- Gun mantlet is 152 mm thick with little sloping, can easily be penetrated even by lower-tier tanks
- Turret ring can be penetrated by enemy rounds
- Front is vulnerable to HEAT and the most powerful APHE (T-10M, Maus) at close range
- No shells with HE core
- Gun can't depress over the engine bay; makes it difficult to combat flankers.
- E.R.A. doesn't help against regular AP rounds
History
During the 1960s and '70s, Israel purchased a number of M48 and M60 tanks from West Germany and later the USA. These tanks and their subsequent upgraded versions were named Magach. The first two Magach tanks were for the most part "stock" versions Israel initially received, without any significant retrofits. However, the first wave of major upgrades became visible with the Magach 3. This version intended to upgrade the Israeli M48s to the A4 standard, following the Six-Day-War of 1967. The Magach 3 introduced several major improvements over the previous versions, including the replacement of the 90 mm with the L7 105 mm cannon, an improved diesel engine and transmission as well as a low-profile commanders cupola, just to name a few.
During the Yom Kippur War of 1973, Israel suffered heavy tank losses at the hands of entrenched Egyptian infantry on the Sinai peninsula. After the war, the Israeli tank force was more than halved. Once a critical vulnerability was discovered with the location of the highly flammable hydraulic fluid of the Magach tanks, the decision was made to replace the losses sustained in the previous war with newer Magach 5 and 6 tanks during the 1970s. The newer Magach tanks would introduce more improvements over time that further tailored their performance to the IDF's needs, but that's a story for another day. The Magachs remained the frontline MBT of the IDF until the '80s and '90s until they were gradually being replaced by Israel's new domestically designed Merkava tank. By 2006, all Megachs were decommissioned from active service.
- From Devblog
Media
- Skins
- Videos
See also
- Gal Batash - Most modern and upgraded Magach
- Magach (Family)
External links
Paste links to sources and external resources, such as:
- topic on the official game forum;
- other literature.
| Israeli Ordnance Corps (חיל החימוש) | |
|---|---|
| Medium Tanks | M-51 · M-51 (W) |
| MBTs | |
| Magach | Magach 1 · Magach 2 · Magach 3 · Magach 3 (ERA) · ▃Magach 3 (ERA) · Magach 5 |
| Magach 6 · Magach 6A · Magach 6B · Magach 6C · Magach 6R · Magach 6M · Gal Batash | |
| Sho't | Sho't · Sho't Kal Alef · Sho't Kal Gimel · Sho't Kal Dalet · ▄Sho't Kal Dalet |
| Tiran | Tiran 4 · Tiran 4S |
| Merkava | ▃Merkava Mk.1 · Merkava Mk.1B · Merkava Mk.2B · ▃Merkava Mk.2B · Merkava Mk.2D |
| Merkava Mk.3B · Merkava Mk.3C · ▃Merkava Mk.3D · Merkava Mk.4B · Merkava Mk.4M | |
| Tank destroyers | Zachlam Tager |
| See Also | Chrysler Defense · Department of Tank Design · Morozov Design Bureau |
| Israel medium tanks | |
|---|---|
| M-51 | M-51 · M-51 (W) |
| Magach | Magach 1 · Magach 2 · Magach 3 · Magach 3 (ERA) · Magach 5 · Magach 6 |
| Magach 6A · Magach 6B · Magach 6B Gal · Gal Batash · Magach 6C · Magach 6M · Magach 6R · Magach Hydra · Magach 7C | |
| Tiran | Tiran 4 · Tiran 4S |
| Sho't | Sho't · Sho't Kal Alef · Sho't Kal Gimel · Sho't Kal Dalet |
| Merkava | Merkava Mk.1B · Merkava Mk.2B · Merkava Mk.2D · Merkava Mk.3B · Merkava Mk.3C · Raam Segol |
| Merkava Mk.4B · Merkava Mk.4M · Merkava Mk.4 LIC | |
| Israel premium ground vehicles | |
|---|---|
