Difference between revisions of "M4A3E2"
(→Description: Cleaned up article, added portions to "Usage in Battles" section and Summary.) (Tag: Visual edit) |
(→Description: Rewrote most of the article up to "Usage in Battles." I will finish later.) (Tag: Visual edit) |
||
| Line 15: | Line 15: | ||
<!-- ''In the description, the first part should be about the history of the creation and combat usage of the vehicle, as well as its key features. In the second part, tell the reader about the ground vehicle in the game. Insert a screenshot of the vehicle, so that if the novice player does not remember the vehicle by name, he will immediately understand what kind of vehicle the article is talking about.'' --> | <!-- ''In the description, the first part should be about the history of the creation and combat usage of the vehicle, as well as its key features. In the second part, tell the reader about the ground vehicle in the game. Insert a screenshot of the vehicle, so that if the novice player does not remember the vehicle by name, he will immediately understand what kind of vehicle the article is talking about.'' --> | ||
| − | The '''{{Specs|name}}''' is a rank {{Specs|rank}} American heavy tank {{Battle-rating}}. It was one of the first American tanks to be released with the American ground tree in [[Update 1.45 "Steel Generals"]]. | + | The '''{{Specs|name}}''' is a rank {{Specs|rank}} American heavy tank {{Battle-rating}}. It was one of the first American tanks to be released with the American ground tree in [[Update 1.45 "Steel Generals"]]. A variant of the M4A3 Sherman, the M4A3E2 has a new T23 style turret and extra armor clapped on nearly every surface. This additional armor gives the M4A3E2 nearly 10 centimeters of protection sloped at 47 degrees, which is a massive upgrade over the previous M4 Shermans. As a side note, the nickname "Jumbo" was likely never used during WWII, as there is no record of it. However, its use both on the Wiki and in-game is still prevalent. |
| − | + | Though the M4A3E2 looks like a regular Sherman, it is able to soak up a lot more damage than your average M4 and is able to assault positions effectively. A majority of common guns around the Jumbo's BR really struggle to frontally penetrate this beast. Using the M4A3E2 to lead an aggressive push can often force your enemies to direct their fire on you, allowing your stronger-gunned allies to take out tougher targets. | |
| − | + | Despite broadly resembling an [[M4A2]], this tank is a much tougher target. The 38.1 mm of armor added to the frontal glacis and upper side of the Jumbo offer significant protection against most guns at this BR, especially when angled at about 30 degrees. The T23-esque turret is another departure from the standard Sherman formula, as it offers an astounding 152mm of protection at all angles and has a large, blocky gun mantlet that surrounds the rather underwhelming 75mm gun. To help with mobility, the M4A3E2's tracks have been widened with duckbill connectors to spread the greater weight of the tank along a larger area and a beefier engine was installed. | |
| − | |||
| − | |||
| − | |||
| − | |||
== General info == | == General info == | ||
| − | === Survivability and | + | === Survivability and Armor === |
{{Specs-Tank-Armour}} | {{Specs-Tank-Armour}} | ||
<!-- ''Describe armour protection. Note the most well protected and key weak areas. Appreciate the layout of modules as well as the number and location of crew members. Is the level of armour protection sufficient, is the placement of modules helpful for survival in combat? If necessary use a visual template to indicate the most secure and weak zones of the armour.'' --> | <!-- ''Describe armour protection. Note the most well protected and key weak areas. Appreciate the layout of modules as well as the number and location of crew members. Is the level of armour protection sufficient, is the placement of modules helpful for survival in combat? If necessary use a visual template to indicate the most secure and weak zones of the armour.'' --> | ||
| − | ''' | + | '''Armor type:''' |
| − | * Rolled homogeneous | + | * Rolled homogeneous armor (hull, turret roof, cupola roof) |
| − | * Cast homogeneous | + | * Cast homogeneous armor (turret, cupola, gun mantlet, transmission housing, MG port) |
{| class="wikitable" | {| class="wikitable" | ||
| Line 48: | Line 44: | ||
'''Notes:''' | '''Notes:''' | ||
| − | * Suspension wheels are 15 mm thick, while bogies are 10 mm thick and tracks are 20 mm thick | + | * Suspension wheels are 15 mm thick, while bogies are 10 mm thick and tracks are 20 mm thick |
| − | * Belly | + | * Belly armor is 25.4 mm thick |
| − | * Hull underside right above the tracks | + | * Hull underside right above the tracks is 9.5 mm thick |
| + | |||
| + | While >160mm of line-of-sight thickness is nothing to sneeze at, there are still a few guns around the M4A3E2's BR that can cleave through it with little effort. Give the German Long 88, Soviet 122mm, and 152mm guns the respect they deserve; they can easily knock the Jumbo out in one shot regardless of angle. | ||
| + | |||
| + | However, if you can't penetrate the M4A3E2's glacis, there are still points that were not (or could not be) unarmored; namely, the machine gun port, cupola, and lower side. | ||
| + | |||
| + | The M4A3E2 presents very little frontal weak spots in an engagement. If possible, it is best to try and force the Jumbo to try and angle his vehicle. An angle of more than 30 degrees can expose the much weaker 38mm thick lower side armor. With a powerful enough gun, a round can penetrate this area and damage the crew, immobilize the tank, or detonate the ammo. | ||
| − | + | If the M4A3E2 decides not to angle significantly enough to expose its weak lower side, there are a few other areas to try and penetrate. The semispherical machine gun port is only about 60mm thick, so nearly any gun around this BR can attempt to penetrate it. However, it is an extremely hard target to hit, especially when the Jumbo angles and moves back and forth. Make sure to aim for the gun port proper, as a shell that clips the horseshoe shaped bit of armor around it will generally fail to penetrate. | |
| − | + | The cupola of the M4A3E2 is another small weak point. Tanks like the Tiger 1 that lack the penetration to cut through the glacis can float a shell through the Jumbo's low cupola. An APHE shell that manages to detonate will generally kill the entire turret crew, crippling the tank. | |
=== Mobility === | === Mobility === | ||
| Line 65: | Line 67: | ||
{{Specs-Economy}} | {{Specs-Economy}} | ||
| − | In Tier I, ''Parts'' should, of course, be the prioritized module for field repairs. This will unlock Tier II modifications and grant access to the vital ''FPE'' and ''M61 shot'', the former for preservation against fires and the latter to improve | + | In Tier I, ''Parts'' should, of course, be the prioritized module for field repairs. This will unlock Tier II modifications and grant access to the very vital ''FPE'' and ''M61 shot'', the former for preservation against fires and the latter to improve combat effectiveness. |
| − | + | In Tier III, ''Crew Replenishment'' should be obtained for crew survival improvement and the APCR ''T45 shot'' for improved armor-piercing power. After that, everything else could be done at one's own priorities, but ''Engine'' should be invested for better automotive performances and ''M89'' for the smoke capabilities. Fully upgraded, the Jumbo can glide around very fast for a heavy, so mobility upgrades are recommended. | |
== Armaments == | == Armaments == | ||
| Line 94: | Line 96: | ||
==== Ammunition ==== | ==== Ammunition ==== | ||
| − | * M72 shot - {{Annotation|AP|Armour-Piercing}} - Solid shot, stock shell. An | + | * M72 shot - {{Annotation|AP|Armour-Piercing}} - Solid shot, stock shell. An armor-piercing shell with acceptable penetration but poor post-penetration damage. |
| − | * M48 shell - {{Annotation|HE|High-Explosive fragmentation shell}} - A low-velocity shell useful against soft targets, in particular when hitting an open-topped vehicle. Harmless against any enclosed vehicle with more than 10 mm of | + | * M48 shell - {{Annotation|HE|High-Explosive fragmentation shell}} - A low-velocity shell useful against soft targets, in particular when hitting an open-topped vehicle. Harmless against any enclosed vehicle with more than 10 mm of armor. |
| − | * M61 shot - {{Annotation|APCBC|Armour-Piercing Capped Ballistic Capped}} - A capped | + | * M61 shot - {{Annotation|APCBC|Armour-Piercing Capped Ballistic Capped}} - A capped armor-piercing shell with a better penetration than the M72 thanks to its ballistic cap and a good post-penetration damage thanks to its explosive filler. |
| − | * T45 shot - {{Annotation|APCR|Armour-Piercing Composite Round}} - | + | * T45 shot - {{Annotation|APCR|Armour-Piercing Composite Round}} - Subcaliber round with high penetration but only on flat surfaces, with a high muzzle velocity but a poor post-penetration damage potential. |
* M89 - Smoke shell - A very low-velocity shell deploying a smoke screen on impact, useful to blind enemy vehicles that are too remote for you to disable so that you can progress towards objectives. | * M89 - Smoke shell - A very low-velocity shell deploying a smoke screen on impact, useful to blind enemy vehicles that are too remote for you to disable so that you can progress towards objectives. | ||
| Line 172: | Line 174: | ||
Notes: | Notes: | ||
| − | * As they are modeled | + | * As they are modeled by sets of 2, shells disappear from the rack only after you fire both shells in the set. |
* Turret empty: 100 ''(+4)'' shells. | * Turret empty: 100 ''(+4)'' shells. | ||
| Line 190: | Line 192: | ||
|- | |- | ||
|} | |} | ||
| − | The roof-mounted M2HB .50 cal heavy machine gun is very good at knocking out tracks, punching through lightly armoured vehicles | + | The roof-mounted M2HB .50 cal heavy machine gun is very good at knocking out tracks, punching through lightly armoured vehicles and shooting down low-flying aircraft. Use it sparsely because of its low ammo count. |
{| class="wikitable" style="text-align:center" width="50%" | {| class="wikitable" style="text-align:center" width="50%" | ||
| Line 206: | Line 208: | ||
<!-- ''Describe the tactics of playing in the vehicle, the features of using vehicles in the team and advice on tactics. Refrain from creating a "guide" - do not impose a single point of view but instead give the reader food for thought. Describe the most dangerous enemies and give recommendations on fighting them. If necessary, note the specifics of the game in different modes (AB, RB, SB).'' --> | <!-- ''Describe the tactics of playing in the vehicle, the features of using vehicles in the team and advice on tactics. Refrain from creating a "guide" - do not impose a single point of view but instead give the reader food for thought. Describe the most dangerous enemies and give recommendations on fighting them. If necessary, note the specifics of the game in different modes (AB, RB, SB).'' --> | ||
| − | The M4A3E2 is best in assaulting enemy positions with allies. Its great mobility for a heavy tank | + | The M4A3E2 is best in assaulting enemy positions with allies. Its great mobility for a heavy tank, especially with its armour, makes it a vehicle able to charge into battle and take anything head-on with confidence. It can act as a bullet magnet against enemy tanks more worried about the M4A3E2, diverting fire that would've gone to more vulnerable teammates. Though the 75mm gun's AP performance is not suited to the type of enemies expected at the BR, it can still harass enemies and the gun is lethal enough that enemies will be forced to show their front armour towards the Jumbo else a 75 mm penetrates their side armour. Their focus on the Jumbo can allow allies to move around and eliminate them. During all this, take care not to over-angle and show the lower side armour too much as this will allow vehicles to penetrate through down there and damage modules, even the ammunition storage if they are lucky. |
Another role the M4A3E2 is good it is as a flanker. Due to its great mobility as a heavy tank, the M4A3E2 Jumbo can manoeuvre like a medium tank around the battlefield. This is also beneficial to the 75 mm gun as it would permit the M4A3E2 a chance to attack the weaker side armours of enemy vehicles. Once flanking around and finding a prime position in a firing angle right into an enemy chokepoint, minimize exposure to anything but the front armour and the M4A3E2 can remain a formidable obstacle to all opponents. Take care not to be outflanked by enemy players aware of the M4A3E2 position. | Another role the M4A3E2 is good it is as a flanker. Due to its great mobility as a heavy tank, the M4A3E2 Jumbo can manoeuvre like a medium tank around the battlefield. This is also beneficial to the 75 mm gun as it would permit the M4A3E2 a chance to attack the weaker side armours of enemy vehicles. Once flanking around and finding a prime position in a firing angle right into an enemy chokepoint, minimize exposure to anything but the front armour and the M4A3E2 can remain a formidable obstacle to all opponents. Take care not to be outflanked by enemy players aware of the M4A3E2 position. | ||
| − | + | Due to the M4A3E2 Jumbo having a slightly higher battle-rating than the other M4 Shermans, it can face tanks such as the [[Panther D]] and [[Tiger_H1|Tiger H1]], meaning its 75 mm cannon starts becoming less effective. For this reason, it is advisable to take the T45 APCR ammo into battle once unlocked, at least enough to take on the armoured targets the Jumbo will face. | |
| − | + | The Soviet 85 mm can be a threat, so caution is advised when going up against tanks armed with the 85 mm, such as the [[T-34-85]], [[SU-85]], and [[IS-1]]. The [[Jagdpanzer 38(t)]] and [[Jagdpanzer IV]] can be tricky when facing off against them. Their frontal armour is too thick and sloped for the 75 mm M3 gun to have any effect on it. For these two targets, it is advised to target their tracks and transmission and then flank for a side shot, where the armour is much weaker. Also, the [[Dicker Max]] wields a 105 mm that can penetrate the front plate of the M4A3E2 Jumbo, so caution is advised against those as well. The 2 last common threats from the German tree are the [[Panzer IV/70(A)]] and [[Panzer IV/70(V)]]. The same advice can be taken from the Jagdpanzer 38(t) and Jagdpanzer IV but also considering that these tank destroyers can penetrate your frontal hull and turret under 500m. The [[SU-152]] and [[ISU-152]] with the stock APHE round can sometimes penetrate your frontal plate, however, special caution should be paid to the ISU-152. From the front, the 75mm gun will struggle to penetrate the armour of the ISU-152 but an ISU-152 using the HEAT shell can easily penetrate anywhere in the front hull and turret. The best tactic to countering the ISU-152 is to attempt to flank it as the side armour is only 75 mm thick. If flanking it is not possible, aim for the barrel, as it will reduce the accuracy of the ISU-152's main gun, and many ISU-152 players will not shoot the main gun if the barrel is damaged. Remember to wait for the ISU-152 to shoot before engaging it, as the reload time of the ISU-152 is very long. Finally, there is one more common opponent from the Soviet/Chinese tree: [[IS-2 (Family)|IS-2]]. Its 122 mm gun can easily penetrate the Jumbo, regardless of angle and distance. To destroy it, shoot at it when it's reloading or is unaware of your presence. For the 1943 model, aim at the cupola or the curved part of its hull armour that blends into the side. It has only 4 crew so killing all the turret crew (3, which is easy) will destroy it. For the [[IS-2 (1944)|1944 model]], only aim at the turret or the cupola as its hull is very strong. | |
=== Pros and cons === | === Pros and cons === | ||
| Line 219: | Line 221: | ||
'''Pros:''' | '''Pros:''' | ||
| + | * Decent 75 mm gun with APCR rounds | ||
* High rate of fire for the main gun | * High rate of fire for the main gun | ||
* Excellent gun depression | * Excellent gun depression | ||
* Very strong turret armour from all sides, very good at hull down position | * Very strong turret armour from all sides, very good at hull down position | ||
* Very good at leading a spearhead towards a capture point where it can provide cover to weaker allied tanks with more powerful guns | * Very good at leading a spearhead towards a capture point where it can provide cover to weaker allied tanks with more powerful guns | ||
| − | * Excellent | + | * Excellent frontal armour, about 101 mm thick |
| − | * | + | * Excellent all around turret armour, average 152 mm thick |
* Can absorb a lot of damage | * Can absorb a lot of damage | ||
* Better mobility than the Soviet KV-1 and the British Churchill | * Better mobility than the Soviet KV-1 and the British Churchill | ||
| − | * Equipped with gun stabilizer working up to 24km/h | + | * Equipped with gun stabilizer working up to 24km/h, making it more to shoot while moving. |
* Good acceleration | * Good acceleration | ||
* Incredibly tough when angled | * Incredibly tough when angled | ||
* Wide tracks enable it to have decent off-road mobility, unlike other previous Sherman models | * Wide tracks enable it to have decent off-road mobility, unlike other previous Sherman models | ||
| − | * | + | * Learning curve from previous Sherman variant will help a lot at mastering this tank |
'''Cons:''' | '''Cons:''' | ||
| Line 239: | Line 242: | ||
* Armour weak spot above the gun-mantlet (63.5 mm @ 60°) | * Armour weak spot above the gun-mantlet (63.5 mm @ 60°) | ||
* Small bottom corners on M4A3E2 gun mantlet can serve as shot traps | * Small bottom corners on M4A3E2 gun mantlet can serve as shot traps | ||
| − | * | + | * Side armour better than normal, but still weak (76.2 mm), but the lower side hull armour is even worse (38.1 mm) |
* Very thin rear armour | * Very thin rear armour | ||
| − | * | + | * Inability to compound angle greatly due to very weak lower side hull armour that would be penetrated |
| − | * Tall profile makes it a | + | * Tall profile makes it a bigger target |
| − | * | + | * Bad off-road manoeuvrability |
| + | * Low top speed of 35 km/h | ||
* Reverse speed is bad | * Reverse speed is bad | ||
* Hull MG is a weak spot | * Hull MG is a weak spot | ||
Revision as of 02:52, 2 November 2021
| This page is about the American heavy tank M4A3E2. For other M4 Shermans, see M4 Sherman (Family). For other uses, see M4 (Disambiguation). |

Contents
Description
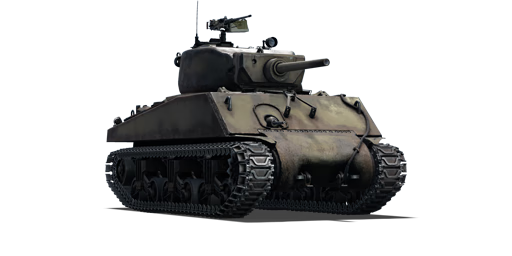
The Assault Tank M4A3E2 Jumbo is a rank III American heavy tank with a battle rating of 5.3 (AB) and 5.7 (RB/SB). It was one of the first American tanks to be released with the American ground tree in Update 1.45 "Steel Generals". A variant of the M4A3 Sherman, the M4A3E2 has a new T23 style turret and extra armor clapped on nearly every surface. This additional armor gives the M4A3E2 nearly 10 centimeters of protection sloped at 47 degrees, which is a massive upgrade over the previous M4 Shermans. As a side note, the nickname "Jumbo" was likely never used during WWII, as there is no record of it. However, its use both on the Wiki and in-game is still prevalent.
Though the M4A3E2 looks like a regular Sherman, it is able to soak up a lot more damage than your average M4 and is able to assault positions effectively. A majority of common guns around the Jumbo's BR really struggle to frontally penetrate this beast. Using the M4A3E2 to lead an aggressive push can often force your enemies to direct their fire on you, allowing your stronger-gunned allies to take out tougher targets.
Despite broadly resembling an M4A2, this tank is a much tougher target. The 38.1 mm of armor added to the frontal glacis and upper side of the Jumbo offer significant protection against most guns at this BR, especially when angled at about 30 degrees. The T23-esque turret is another departure from the standard Sherman formula, as it offers an astounding 152mm of protection at all angles and has a large, blocky gun mantlet that surrounds the rather underwhelming 75mm gun. To help with mobility, the M4A3E2's tracks have been widened with duckbill connectors to spread the greater weight of the tank along a larger area and a beefier engine was installed.
General info
Survivability and Armor
Armor type:
- Rolled homogeneous armor (hull, turret roof, cupola roof)
- Cast homogeneous armor (turret, cupola, gun mantlet, transmission housing, MG port)
| Armour | Front (Slope angle) | Sides | Rear | Roof |
|---|---|---|---|---|
| Hull | 63.5 + 38.1 mm (47°) Front glacis 25.4 + 34 mm MG port 114.3-139.7 mm (cylindrical) Transmission housing |
76.2 mm Top 38.1 mm Bottom |
38.1 mm (10°) Upper plate 38.1 mm (7°) Lower plate 38.1 mm (24°) Lower glacis |
63.5 + 38.1 mm (42°) Front glacis 19.5 mm Centre 19.5 mm (8°) Rear - Centre 19.5 mm (24°) Rear - Sides |
| Turret | 152.4 mm (0-52°) Turret front 177.8 mm (4-60°) Gun mantlet |
152.4 mm (4-42°) | 152.4 mm (0-79°) | 63.5 mm (28°) Front 25.4 mm Centre |
| Cupola | 51 mm (conical) | 51 mm Outer ring 25.4 mm Centre | ||
Notes:
- Suspension wheels are 15 mm thick, while bogies are 10 mm thick and tracks are 20 mm thick
- Belly armor is 25.4 mm thick
- Hull underside right above the tracks is 9.5 mm thick
While >160mm of line-of-sight thickness is nothing to sneeze at, there are still a few guns around the M4A3E2's BR that can cleave through it with little effort. Give the German Long 88, Soviet 122mm, and 152mm guns the respect they deserve; they can easily knock the Jumbo out in one shot regardless of angle.
However, if you can't penetrate the M4A3E2's glacis, there are still points that were not (or could not be) unarmored; namely, the machine gun port, cupola, and lower side.
The M4A3E2 presents very little frontal weak spots in an engagement. If possible, it is best to try and force the Jumbo to try and angle his vehicle. An angle of more than 30 degrees can expose the much weaker 38mm thick lower side armor. With a powerful enough gun, a round can penetrate this area and damage the crew, immobilize the tank, or detonate the ammo.
If the M4A3E2 decides not to angle significantly enough to expose its weak lower side, there are a few other areas to try and penetrate. The semispherical machine gun port is only about 60mm thick, so nearly any gun around this BR can attempt to penetrate it. However, it is an extremely hard target to hit, especially when the Jumbo angles and moves back and forth. Make sure to aim for the gun port proper, as a shell that clips the horseshoe shaped bit of armor around it will generally fail to penetrate.
The cupola of the M4A3E2 is another small weak point. Tanks like the Tiger 1 that lack the penetration to cut through the glacis can float a shell through the Jumbo's low cupola. An APHE shell that manages to detonate will generally kill the entire turret crew, crippling the tank.
Mobility
| Game Mode | Max Speed (km/h) | Weight (tons) | Engine power (horsepower) | Power-to-weight ratio (hp/ton) | |||
|---|---|---|---|---|---|---|---|
| Forward | Reverse | Stock | Upgraded | Stock | Upgraded | ||
| Arcade | 38 | 5 | 37.8 | 646 | 795 | 17.09 | 21.03 |
| Realistic | 36 | 5 | 442 | 500 | 11.69 | 13.23 | |
Modifications and economy
| Mobility | Protection | Firepower | ||||||||||||||||||||
|---|---|---|---|---|---|---|---|---|---|---|---|---|---|---|---|---|---|---|---|---|---|---|
|
|
|
In Tier I, Parts should, of course, be the prioritized module for field repairs. This will unlock Tier II modifications and grant access to the very vital FPE and M61 shot, the former for preservation against fires and the latter to improve combat effectiveness.
In Tier III, Crew Replenishment should be obtained for crew survival improvement and the APCR T45 shot for improved armor-piercing power. After that, everything else could be done at one's own priorities, but Engine should be invested for better automotive performances and M89 for the smoke capabilities. Fully upgraded, the Jumbo can glide around very fast for a heavy, so mobility upgrades are recommended.
Armaments
Main armament
| 75 mm M3 | Turret rotation speed (°/s) | Reloading rate (seconds) | |||||||||||
|---|---|---|---|---|---|---|---|---|---|---|---|---|---|
| Mode | Capacity | Vertical | Horizontal | Stabilizer | Stock | Upgraded | Full | Expert | Aced | Stock | Full | Expert | Aced |
| Arcade | 104 | -10°/+25° | ±180° | Vertical | 19.4 | 26.9 | 32.6 | 36.1 | 38.4 | 6.50 | 5.75 | 5.30 | 5.00 |
| Realistic | 14.3 | 16.8 | 20.4 | 22.6 | 24.0 | ||||||||
Ammunition
- M72 shot - AP - Solid shot, stock shell. An armor-piercing shell with acceptable penetration but poor post-penetration damage.
- M48 shell - HE - A low-velocity shell useful against soft targets, in particular when hitting an open-topped vehicle. Harmless against any enclosed vehicle with more than 10 mm of armor.
- M61 shot - APCBC - A capped armor-piercing shell with a better penetration than the M72 thanks to its ballistic cap and a good post-penetration damage thanks to its explosive filler.
- T45 shot - APCR - Subcaliber round with high penetration but only on flat surfaces, with a high muzzle velocity but a poor post-penetration damage potential.
- M89 - Smoke shell - A very low-velocity shell deploying a smoke screen on impact, useful to blind enemy vehicles that are too remote for you to disable so that you can progress towards objectives.
| Penetration statistics | |||||||
|---|---|---|---|---|---|---|---|
| Ammunition | Type of warhead |
Penetration @ 0° Angle of Attack (mm) | |||||
| 10 m | 100 m | 500 m | 1,000 m | 1,500 m | 2,000 m | ||
| M72 shot | AP | 91 | 88 | 78 | 67 | 57 | 49 |
| M48 shell | HE | 10 | 10 | 10 | 10 | 10 | 10 |
| M61 shot | APCBC | 104 | 101 | 90 | 78 | 68 | 59 |
| T45 shot | APCR | 139 | 135 | 121 | 105 | 91 | 79 |
| Shell details | |||||||||
|---|---|---|---|---|---|---|---|---|---|
| Ammunition | Type of warhead |
Velocity (m/s) |
Projectile Mass (kg) |
Fuse delay (m) |
Fuse sensitivity (mm) |
Explosive Mass (TNT equivalent) (g) |
Ricochet | ||
| 0% | 50% | 100% | |||||||
| M72 shot | AP | 619 | 6.3 | N/A | N/A | N/A | 47° | 60° | 65° |
| M48 shell | HE | 463 | 6.3 | 0 | 0.1 | 666 | 79° | 80° | 81° |
| M61 shot | APCBC | 618 | 6.79 | 1.2 | 14 | 63.7 | 48° | 63° | 71° |
| T45 shot | APCR | 868 | 3.81 | N/A | N/A | N/A | 66° | 70° | 72° |
| Smoke shell characteristics | ||||||
|---|---|---|---|---|---|---|
| Ammunition | Velocity (m/s) |
Projectile Mass (kg) |
Screen radius (m) |
Screen deploy time (s) |
Screen hold time (s) |
Explosive Mass (TNT equivalent) (g) |
| M89 | 259 | 3 | 13 | 5 | 20 | 50 |
Ammo racks

| Full ammo |
1st rack empty |
2nd rack empty |
3rd rack empty |
Visual discrepancy |
|---|---|---|---|---|
| 104 | 100 (+4) | 50 (+54) | 0 (+104) | No |
Notes:
- As they are modeled by sets of 2, shells disappear from the rack only after you fire both shells in the set.
- Turret empty: 100 (+4) shells.
Machine guns
| 12.7 mm M2HB | ||||
|---|---|---|---|---|
| Mount | Capacity (Belt) | Fire rate | Vertical | Horizontal |
| Pintle | 600 (200) | 577 | -10°/+30° | ±60° |
The roof-mounted M2HB .50 cal heavy machine gun is very good at knocking out tracks, punching through lightly armoured vehicles and shooting down low-flying aircraft. Use it sparsely because of its low ammo count.
| 7.62 mm M1919A4 | ||||
|---|---|---|---|---|
| Mount | Capacity (Belt) | Fire rate | Vertical | Horizontal |
| Coaxial | 3,000 (250) | 500 | N/A | N/A |
The small calibre of the M1919A4 machine gun makes it largely ineffective against all armoured vehicles but the ones with an open compartment. It still can be used to ping targets as a rangefinding help or to mow down minor obstacles blocking your line of sight.
Usage in battles
The M4A3E2 is best in assaulting enemy positions with allies. Its great mobility for a heavy tank, especially with its armour, makes it a vehicle able to charge into battle and take anything head-on with confidence. It can act as a bullet magnet against enemy tanks more worried about the M4A3E2, diverting fire that would've gone to more vulnerable teammates. Though the 75mm gun's AP performance is not suited to the type of enemies expected at the BR, it can still harass enemies and the gun is lethal enough that enemies will be forced to show their front armour towards the Jumbo else a 75 mm penetrates their side armour. Their focus on the Jumbo can allow allies to move around and eliminate them. During all this, take care not to over-angle and show the lower side armour too much as this will allow vehicles to penetrate through down there and damage modules, even the ammunition storage if they are lucky.
Another role the M4A3E2 is good it is as a flanker. Due to its great mobility as a heavy tank, the M4A3E2 Jumbo can manoeuvre like a medium tank around the battlefield. This is also beneficial to the 75 mm gun as it would permit the M4A3E2 a chance to attack the weaker side armours of enemy vehicles. Once flanking around and finding a prime position in a firing angle right into an enemy chokepoint, minimize exposure to anything but the front armour and the M4A3E2 can remain a formidable obstacle to all opponents. Take care not to be outflanked by enemy players aware of the M4A3E2 position.
Due to the M4A3E2 Jumbo having a slightly higher battle-rating than the other M4 Shermans, it can face tanks such as the Panther D and Tiger H1, meaning its 75 mm cannon starts becoming less effective. For this reason, it is advisable to take the T45 APCR ammo into battle once unlocked, at least enough to take on the armoured targets the Jumbo will face.
The Soviet 85 mm can be a threat, so caution is advised when going up against tanks armed with the 85 mm, such as the T-34-85, SU-85, and IS-1. The Jagdpanzer 38(t) and Jagdpanzer IV can be tricky when facing off against them. Their frontal armour is too thick and sloped for the 75 mm M3 gun to have any effect on it. For these two targets, it is advised to target their tracks and transmission and then flank for a side shot, where the armour is much weaker. Also, the Dicker Max wields a 105 mm that can penetrate the front plate of the M4A3E2 Jumbo, so caution is advised against those as well. The 2 last common threats from the German tree are the Panzer IV/70(A) and Panzer IV/70(V). The same advice can be taken from the Jagdpanzer 38(t) and Jagdpanzer IV but also considering that these tank destroyers can penetrate your frontal hull and turret under 500m. The SU-152 and ISU-152 with the stock APHE round can sometimes penetrate your frontal plate, however, special caution should be paid to the ISU-152. From the front, the 75mm gun will struggle to penetrate the armour of the ISU-152 but an ISU-152 using the HEAT shell can easily penetrate anywhere in the front hull and turret. The best tactic to countering the ISU-152 is to attempt to flank it as the side armour is only 75 mm thick. If flanking it is not possible, aim for the barrel, as it will reduce the accuracy of the ISU-152's main gun, and many ISU-152 players will not shoot the main gun if the barrel is damaged. Remember to wait for the ISU-152 to shoot before engaging it, as the reload time of the ISU-152 is very long. Finally, there is one more common opponent from the Soviet/Chinese tree: IS-2. Its 122 mm gun can easily penetrate the Jumbo, regardless of angle and distance. To destroy it, shoot at it when it's reloading or is unaware of your presence. For the 1943 model, aim at the cupola or the curved part of its hull armour that blends into the side. It has only 4 crew so killing all the turret crew (3, which is easy) will destroy it. For the 1944 model, only aim at the turret or the cupola as its hull is very strong.
Pros and cons
Pros:
- Decent 75 mm gun with APCR rounds
- High rate of fire for the main gun
- Excellent gun depression
- Very strong turret armour from all sides, very good at hull down position
- Very good at leading a spearhead towards a capture point where it can provide cover to weaker allied tanks with more powerful guns
- Excellent frontal armour, about 101 mm thick
- Excellent all around turret armour, average 152 mm thick
- Can absorb a lot of damage
- Better mobility than the Soviet KV-1 and the British Churchill
- Equipped with gun stabilizer working up to 24km/h, making it more to shoot while moving.
- Good acceleration
- Incredibly tough when angled
- Wide tracks enable it to have decent off-road mobility, unlike other previous Sherman models
- Learning curve from previous Sherman variant will help a lot at mastering this tank
Cons:
- 75 mm gun lacks penetration against heavy tanks
- It needs allies support to be effective in battle as it cannot deal serious damage on its own
- Armour weak spot above the gun-mantlet (63.5 mm @ 60°)
- Small bottom corners on M4A3E2 gun mantlet can serve as shot traps
- Side armour better than normal, but still weak (76.2 mm), but the lower side hull armour is even worse (38.1 mm)
- Very thin rear armour
- Inability to compound angle greatly due to very weak lower side hull armour that would be penetrated
- Tall profile makes it a bigger target
- Bad off-road manoeuvrability
- Low top speed of 35 km/h
- Reverse speed is bad
- Hull MG is a weak spot
- Due to the layered armour at the front and the armour over-matching mechanic, the upper glacis armour can be dubious in that it does not reliably ricochet shells, particularly those from large calibre guns like the T-34-85
- Stock round struggles a noticeable amount at this BR, struggling to pen common enemies such as a T-34-85
History
Development
Even before the invasion of Normandy, the Allied commanders had to figure out a method in order to breach heavily-defended fortification lines such as the Siegfried Line blocking the path from France to Germany. One of the solutions was for the implementation of "assault tanks" to enter enemy territory and root out the enemy fortifications. The initial plan was for the production of the M26 Pershing tanks to fulfil this role, but setbacks in its development caused the M26 deployment to be delayed until 1945. A quick solution must be made to fill this "assault tank" role for the invasion of Europe in 1944.
US Ordnance then took their abundant M4 Shermans in stock and fixed them up for the new role they've been assigned in. Although keeping the same engine, the armour was upped from around 76.2 mm initial thickness to 102 mm and angled at 47 degrees from vertical. This angle would influence later Sherman design such as the M4A3 by changing the original 56 degrees angled glacis with protruding crew hatches to 47 degrees angled glacis without any protrusion from the crew hatches. This modified M4 Sherman's armour when angled would then be 150 mm line-of-sight (LOS) thick and 180 mm effective. The side armour is also increased to 76.2 mm thick and the turret is redesigned to provide more protection. These modified Shermans were designated the M4A3E2 by the Ordnance Department, whereas the nickname "Jumbo" was likely a post-war invention. At the end of the modifications, the Sherman "Jumbo" now weighed about 42 tons and moves a lower speed of 22 miles per hour. A drawback to the increased weight of the Sherman is that the Vertical Volute Suspension System (VVSS) from the Sherman was unable to take the weight easily, so extra care was taken by the crew members to not break the suspension.
In March of 1944, the US Army ordered for 254 of these vehicles to be delivered for use for European Operations. Intended for the assault on the Normandy Beachhead, it was deployed in Normandy after D-Day to assist the infantry push through German defences. The M4A3E2 originally came with the 75 mm guns to support infantry with its better HE shells compared to the planned 76 mm instalment, but the 76 mm was installed later in the campaign and called the M4A3E2 (76) W Jumbo.
Combat usage
The M4A3E2 was well-liked by the crew and commanders due to its protection value. Despite the weight difference and strain on the suspension, it performed reliably and could absorb damage that would otherwise destroy regular Shermans. Later in the war, when the quantity of the M4 Sherman "Jumbos" were unable to meet the demand, George S. Patton ordered for existing M4 Shermans to weld on armour plates scavenged from knocked out tanks to makeshift "on-the-field" Jumbos. This caused the newer Shermans such as the M4A3 (76) W HVSS could have the same protection by welding metal onto the hull. One of the Jumbo's notable participation in the war was in Patton's Third Army where it spearheaded the assault to Bastogne to relieve the pinned down 101st Paratroopers (though they deny needing a "rescue").
When the war in the European Theater ended, the M4A3E2s were then placed stateside for the preparation for the invasion of the Japanese Home Islands. However, this was never to be fulfilled as Japan then surrendered to the United States in September 1945. The M4A3E2 Shermans proved to be a very effective stop-gap solution until heavier armoured tanks such as the Pershing could come into play. In 1948, about 96 Sherman Jumbos still remained in US inventory.
In-game description
The M4 Sherman went through its most interesting modification at the end of 1943, when American builders presented a compromise design. It was a direct infantry support tank to be used at the beginning of 1944 during infantry landings in Northern Europe. The solution, which was quite simple, came about after it became clear that the T26E1 heavy assault tank would be ready for full-scale production no earlier than January 1945: boost the tank's armour to 10 cm. At the same time a heavier turret was designed with 10.5 cm armour, the changes together resulting in a tank that weighed in at 38 tons. Experience on the front showed that modernized tracks with fixed grousers were the best option, and they ended up giving the new tank a significant speed boost. It was able to traverse rough terrain at a top speed of 22 mph.
The Fisher Tank Arsenal launched production of the M4A3E2 in May 1944 and finished in June of the same year. The tanks, which were bequeathed the nickname "Jumbo", were delivered to Europe that fall and served successfully through the end of the war.
Media
- Skins
- Videos
See also
- Other M4A3E2 vehicles in the game
External links
- [Devblog] Steel Generals: M4A3E2
- [Wikipedia] M4 Sherman - M4A3E2
- [Tanks Encyclopedia] Assault Tank M4A3E2 Jumbo
| USA heavy tanks | |
|---|---|
| M4 Jumbo | M4A3E2 · Cobra King · M4A3E2 (76) W |
| M6 | T1E1 · M6A1 · M6A2E1 |
| T26 | T26E1-1 · T26E5 |
| T29/30/34 | T29 · T30 · T34 |
| T32 | T32 · T32E1 |
| M103 | M103 |
| Others | T14 |
