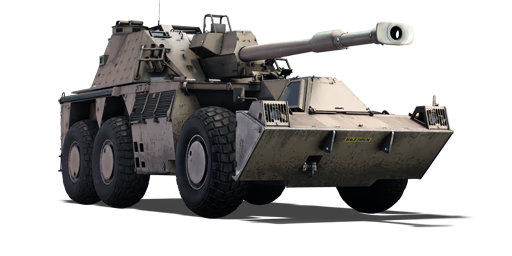
G6


Contents
Description
Often referred to as the "G6 Rhino" or simply the "Rhino", the G6 entered service and serial production with the South African Army in 1988. It was a self-propelled version of the G5 Howitzer series. It has been operated not only by the South African Army, but also Oman and the United Arab Emirates, a combined total of just over 100 exports. It has seen combat in the South African Border War as well as the ongoing Yemeni Civil War.
Introduced in Update "Danger Zone", the G6 has situational utility as a support vehicle, specialising in long-range support by exploiting positional advantages earlier than other vehicles. The firepower of the G6 is exceptional, with one of the most potent high explosive rounds in the game, capable of taking out almost any target in just a single hit. Despite having a high top speed, it performs quite poorly in the mobility department. It has low off-road speeds, extremely poor acceleration, and - like all wheeled vehicles - has a large turning circle which is further exacerbated by the extreme size of the vehicle. This size makes it vulnerable to spotting and identification, so stealth is generally hard to pull off in this SPG. Compounding this issue, it has poor armour, just barely protecting it against high calibre machine guns at 200 m range. Autocannons, and artillery are consequentially extremely dangerous for this vehicle.
General info
Survivability and armour
The armour of the G6 is negligible. It is no thicker than 20 mm, with the overwhelming majority of the vehicle being protected by 15 mm of angled rolled homogeneous armour (RHA). This only completely protects against rifle calibre machineguns. High calibre machineguns will tear the G6 apart from about 200 m away. Because of this, APHE rounds fired by most Soviet tanks may pass through doing minimal damage, due to a higher fuse threshold than that of the armour (19 mm vs 15 mm). The crew of 6 also means that it is difficult to whittle down the number of crew members, granting extra survivability.
There are screens between driver, engine and the turret crew. They are able to stop APHE and HEAT from going any further upon hull penetration, and will slow down the fires, but will never stop APDS or pure AP. It is worth noting, that armour around engine is only 8 mm thick, so if enemy fires APHE at the engine from the side, nothing drastic will happen either. This increases G6 survivability against ignorant enemies which do not immediately fire at the turret.
The charges (ammo racks) are protected by additional screens which prevents them from being detonated by HMG or random shrapnel (although, if shrapnel managed to reach them, the tank crew is probably already done for)
8 x 155 mm smoke grenade launchers provide adequate cover in emergencies.
Armour type:
- Rolled homogeneous armour (Hull, Turret)
| Armour | Front (Slope angle) | Sides | Rear | Roof |
|---|---|---|---|---|
| Hull | 10 mm (42-44°/69°)Upper Front Plate 20 mm (50°) Lower Front Plate |
15 mm (0-21°) 8 mm (7-13°) Engine Cover |
10 mm 15 mm Ammunition stowage |
15 mm (87-90°) |
| Turret | 15 mm (31-46°) Turret face 10 mm (0-28°) Gun mantlet |
15 mm (21°) 10 mm (13-19°) Storage |
15 mm (12°) 10 mm (13-19°) Storage |
15 mm |
| Cupolas | 15 mm (cylindrical) | |||
Notes:
- Wheels are 10 mm thick
- Gun steel is 40 mm thick
- Bulletproof glass is 50 mm thick
- Floor armour is 15 mm thick RHA
Mobility
On paper, it would seem that the G6 would have excellent mobility, with a top speed exceeding 55 mph (90 km/h).
However, this is somewhat deceiving as in reality it's the same chassis as Ratel 90, now carrying even heavier load. the mobility of the G6 is very limited. The top offroad speed is 46 km/h, sometimes reaching 52 km/h. Not only it has very poor acceleration, but as a wheeled vehicle it severely lags behind with regards to off-road performance and turn rate. Adding to this, its immense size and length means that it has an even larger turning radius, with no neutral steering or ability to turn on the spot. It also lacks adequate breaking speed, taking a long period to come to a stop, and longer still to stabilise the primary armament.
In summary, the vehicle is fast on roads, however it lacks in off-road capability, acceleration, deceleration, responsiveness to input, and turning area.
| Game Mode | Max Speed (km/h) | Weight (tons) | Engine power (horsepower) | Power-to-weight ratio (hp/ton) | |||
|---|---|---|---|---|---|---|---|
| Forward | Reverse | Stock | Upgraded | Stock | Upgraded | ||
| Arcade | 93 | 9 | 46 | 736 | 988 | 16 | 21.48 |
| Realistic | 86 | 8 | 458 | 518 | 9.96 | 11.26 | |
Modifications and economy
| Mobility | Protection | Firepower | ||||||||||||||||||||||||
|---|---|---|---|---|---|---|---|---|---|---|---|---|---|---|---|---|---|---|---|---|---|---|---|---|---|---|
|
|
|
Armaments
Main armament
The primary - and only - armament of the G6 is the 155 mm G6 L/45 cannon. It has exceptional explosive filler in both its M1 HE and M1 PF HE shells. Shells have the highest HE muzzle velocity of 897 m/s and penetration at "only" 63 mm, which they make up for with overpressure damage, allowing G6 to punch well above its weight. This allows it to obliterate practically any target in one hit, even the M48A1 which can shrug off the 61 mm penetration HE shells may collapse when hit by M1. Very few exceptions like the T32E1 can sustain hull roof shots.
The primary armament is also able to fire smoke shells which can conceal it or allies for a prolonged period of time, potentially forever, if necessary (30 seconds duration versus 20 seconds reload).
On the other hand, the reloading rate is abysmal, clocking in at a little under 20 seconds and being the slowest among the artillery tanks. It is reloading much faster than the FV4005, so it is by no means helpless, but if a shot misses or fails to destroy the enemy, it will most likely be the death of the G6.
At only 5°, the depression angle of the primary armament is sorely lacking, especially if using in a hull-down position. Additionally, the G6 turret can only traverse ±40°, meaning it has a rather narrow cone of fire to the front of the vehicle, giving it a reduced effectiveness when attacked from the side or rear. Horizontal and vertical traverse speed is adequate, though nothing extraordinary. The heavy barrel of the cannon relative to the rest of the SPG lends it poor weapon handling characteristics, taking a very long time for the weapon to stabilise. The only time the gun is almost completely stable, is when the tank is reversing. All in all, the tank cannot be used in direct assault and ambush or sniping are more in line with this weapon.
The G6 also has a large first-stage ammunition stowage at 16 pieces, which is more than enough for this vehicle. It is therefore ill-advised to take more than 17 rounds into battle (one is pre-loaded into the gun), since a large quantity of shells poses a risk to ammunition detonation, and 17 is more than enough given the low survivability of the vehicle, and low reload rate & high lethality of the weapon.
Sniper optics are reasonable for the shell velocity being X12 max. Commander optics of X10 magnification are also present, allowing commander to use the gun and can be an effective emergency alternative to the primary weapon optics.
One of the supplementary roles for G6 is anti-air. Due to it's ability to aim as high as 75 degrees, high muzzle velocity and the powerful proximity fuse shells, it can terminate bombers or attackers flying around it. However, it is still very easy to miss and the shell will react to rockets, so direct exchange will not always end in G6 favor.
| 155 mm G6 L/45 | Turret rotation speed (°/s) | Reloading rate (seconds) | |||||||||||
|---|---|---|---|---|---|---|---|---|---|---|---|---|---|
| Mode | Capacity | Vertical | Horizontal | Stabilizer | Stock | Upgraded | Full | Expert | Aced | Stock | Full | Expert | Aced |
| Arcade | 41 | -5°/+75° | ±40° | N/A | 25.2 | 34.8 | 42.4 | 46.9 | 49.9 | 19.37 | 17.14 | 15.79 | 14.90 |
| Realistic | 17.0 | 20.1 | 24.4 | 26.9 | 28.6 | ||||||||
Ammunition
| Penetration statistics | |||||||
|---|---|---|---|---|---|---|---|
| Ammunition | Type of warhead |
Penetration @ 0° Angle of Attack (mm) | |||||
| 10 m | 100 m | 500 m | 1,000 m | 1,500 m | 2,000 m | ||
| M1 | HE | 63 | 63 | 63 | 63 | 63 | 63 |
| M1 (PF) | HE-VT | 63 | 63 | 63 | 63 | 63 | 63 |
| Proximity-fused shell details | ||||||||||||
|---|---|---|---|---|---|---|---|---|---|---|---|---|
| Ammunition | Type of warhead |
Velocity (m/s) |
Projectile mass (kg) |
Fuse delay (m) |
Fuse sensitivity (mm) |
Arming distance (m) |
Trigger radius (m) |
Explosive mass (TNT equivalent) (kg) |
Ricochet | |||
| 0% | 50% | 100% | ||||||||||
| M1 | HE | 897 | 45.5 | 0 | 0.1 | - | - | 11.14 | 79° | 80° | 81° | |
| M1 (PF) | HE-VT | 897 | 45.5 | 0 | 0 | 300 | 3 | 11.14 | 79° | 80° | 81° | |
| Smoke shell characteristics | ||||||
|---|---|---|---|---|---|---|
| Ammunition | Velocity (m/s) |
Projectile mass (kg) |
Screen radius (m) |
Screen deploy time (s) |
Screen hold time (s) |
Explosive mass (TNT equivalent) (g) |
| G6 Smoke | 897 | 45.7 | 25 | 5 | 30 | 50 |
Ammo racks

| Full ammo |
Ammo part |
1st rack empty |
2nd rack empty |
3rd rack empty |
4th rack empty |
5th rack empty |
6th rack empty |
Visual discrepancy |
|---|---|---|---|---|---|---|---|---|
| 41 | Projectiles Propellants |
39 (+2) 17 (+24) |
36 (+5) 9 (+32) |
33 (+8) 1 (+40) |
25 (+16) N/A |
17 (+24) N/A |
1 (+40) N/A |
No |
Note:
- Front racks empty: 17 (+24) shells
Usage in battles
It is very difficult to use the G6 in Arcade battles, although not as difficult as the FV4005. At 136% visibility, it is extremely vulnerable to being spotted by random scouts, and is an easy target for aircraft. While AB mitigates many of the aforementioned issues with weapon handling and mobility, the playstyle of quick and aggressive combat does not suit the G6, so you will be stuck sniping, preferably on bigger maps with ranges over 800 m.
To avoid being destroyed immediately, either adjust the scope zero to the enemy positions and fire from safe positions or use commander scope instead of gunner sight to peek over cover. The commander scope, unlike binoculars, allows to use aim assist while visually tracking targets at the same ranges as the sniper scope, but it is placed on the commander cupola, and not above the tank, which may still allow some people to hit you back. However, a hit to the top of the commander cupola will sometimes fail to detonate APHE and you might be able to just laugh it off and leave before more people started firing at you.
In Realistic battles, it can perform better. It is best suited to being a long-range support vehicle, using mobility to reach far areas before enemy forces. It is then best to stay in position and hold common flank routes. Playing in a squad is advised as the long reload rate means that players will often rush immediately after you fire, so it's best to have allies to back you up in an emergency. In predominantly rural maps, it is best to stay at long range, and out of sight. In urban environments, staying with the bulk of your team is the best way to maximise survivability.
In Simulator battles, it is much the same as in Realistic. However, this time due to the more tactical and slow-paced nature of SB, you can take your time and plan out strategies to maximise effectiveness. Holding choke points and flank routes should be a priority, and staying at a range of at least 1 km is best for ensuring long-term survival.
Enemies worth noting:
Soviet APHE tanks: their HE can always obliterate G6, but it is very unlikely that they will specifically carry HE shells just to swat annoying light tanks and the majority of them just use high-normalization APHE. The Soviets, at least in AB, are also unlikely to start shooting G6 with HMG because they don't treat it like a light tank. The Soviet angle-negating APHE denies itself, as it only has 19 mm fuse and only reliably detonates upon hitting the top of the G6 roof (the very angled part or cupolas) or the gun itself, because it simply overrides the angled armour of G6. As such, it is possible to bait the Soviets or even try to brawl at close range, unlike with the German or US tanks. The hull also can completely block APHE, unlike with the AP of the French or APDS, so if you only took 17 shells, it's possible to provoke IS-6 and win the duel by simply outlasting the opponent. Obviously, the more skilled the opponent is, the more likely it is that they actually carry HE, or will aim for the ammo rack next, or try to use HMG (12.7 will penetrate at melee range), so don't push your luck if it's not necessary.
Some Soviet APHE tanks should be avoided because they have 14 mm fuse or for a variety of other reasons:
- The T-44 - This particular popular tank, but not its other modifications, has shells with 14 mm fuse sensitivity. Since the G6 turret is overall 15 mm thick, the T-44 can easily destroy G6 in one hit.
- ASU-85 - It can snipe with APHE despite being awkward to use, so it is extra bad news at long range. Direct fight is also pretty much unwinnable if you miss, as if it gets too close, it can just shoot G6 until it burns.
- Object 906 - Nearly unwinnable matchup. It is also likely to spot you first from across the map. Even if it misses or hits the hull, it can try again 5 times before you get to reload. Destroy it with HE-VT if you get a chance.
- SU-122-54, Object 268 - Even if you somehow survived the first shot (they often fight using chemical shells which can overpressure G6), they will not hesitate to use their 14 mm MG to finish the job.
Pros and cons
Pros:
- High top speed on a road
- Extremely powerful main armament
- Several crew lends additional survivability against pure AP or low sensitivity APHE
- Commander can control the weapon when necessary
- Driver, Engine with fuel tanks and turret crew are well separated, easily protecting main crew compartment from explosive shells upon hull penetration and severely slowing down fire damage
- Ammo and charges are separated, charges are shielded by additional RHA screens, reduced likelihood of ammunition detonation
- Long-range optics (up to 12x zoom)
- Effective night vision devices (NVD)
Cons:
- Next-to-no armour - although it can sustain HMG at over 250 m, it can't sustain autocannons. It is also not thin enough to avoid detonation of 14 mm fuse APHE which is abundant at the SPG natural BR
- A single high sensitivity APHE or medium HE hit to the turret will destroy this SPG
- Poor off-road handling characteristics, encumbered handling of both weapon and vehicle
- Inadequate acceleration even on road
- Limited horizontal guidance at 40° to either side
- Extreme size
History
Background
The G6 Rhino is a Self-Propelled Howitzer, designed and developed by the Lyttelton Engineering Works (now Denel Land Systems, a division of Denel) throughout the late 1970s and 1980s. An indigenous design of South Africa, it was intended to replace the WWII-era Sexton of Canadian origin. The development of an indigenous design as opposed to the purchase of foreign arms is often attributed to the arms embargo (UNSC Resolution 418) on South Africa, passed unanimously by all major world powers - a response to the ongoing apartheid system of racial segregation, as well as escalation of the South African Border War with nearby countries.
Development
Development commenced in the late 1970s, and the first prototype was completed in 1981, with four additional field-test models being used by the mid-1980s. The G5 howitzer was chosen due to its preestablished presence within the South African armed forces. This meant that backwards compatibility allowed for the interchangeable use of spare parts and ammunition, as well as no radical changes to already existing manufacturing plants. The turret, as well as the G5 howitzer were manufactured by Denel Land Systems, and OMC manufactured the chassis. OMC - Olifant Manufacturing Co, was also responsible for the design, development and manufacturing of the Olifant (represented in War Thunder as the Mk.1A & Mk.2) MBT, which was a modified British Centurion tank.
The choice of a wheeled vehicle was intended to increase mine-survivability, reduce fuel consumption, allow for faster deployment times, and reduced wear-and-tear on the roads.
Two countries license-built their own versions of the G6. Chile briefly built it under the designation "CC-SP-45", though the Chilean Army promptly ceased development due to a shift in Augusto Pinochet's foreign policy. Iraq procured the rights to license build the G6 under the name "Al-Manjoon" with the assistance of Canadian artillery engineer Gerald Bull. Bull later went on to design the Al-Fao which is currently regarded as one of the most powerful artillery pieces, and is assumed to be a development of the G6 - be it directly or indirectly.
Combat History
To test its effectiveness in combat, a trial by fire was conducted in 1987, when all four field-test models were deployed in the South African Border War. One vehicle broke down en-route, the other three saw action in Operation Hooper as part of an independent battery. It was critical in the South African success at the Battle of Cuito Cuanvale, where it bombarded an Angolan airfield, and four Angolan MiG-21s were destroyed on take-off. It was clearly demonstrated in this conflict that the G6 was a more than capable medium range SPH system, with future trials showing that it was an extremely accurate piece of artillery.
In 2015, a battery of G6 M1A3s under UAE operation was deployed in the Yemeni Civil War, and were used against militant Houthi positions.
Devblog
Throughout the 1960s and going into the 1970s, the SADF largely still relied on dated artillery systems from the WWII-era such as the British QF 25-pounder cannon and Sexton SPGs. Recognizing this issue, the military began formulating modernization plans in 1968 which were subsequently formalized in 1973. Shortly afterwards, the SADF procured more modern artillery units such as the American M1 and a version of the Canadian GC-45 155 mm howitzer, designated G5 under SADF service.
However, the SADF also wanted to procure a self-propelled version of the G5 howitzer. To this extent, a project was launched in the late 1970s to fit the G5 cannon into an enclosed turret and mount it onto a highly mobile wheeled chassis. Work on the project commenced in 1979 at the ARMSCOR company, eventually resulting in the G6 Rhino. The first prototype of the vehicle was completed in October 1981 with a total of four being manufactured by 1987.
Immediately after rolling off the factory floor, this initial batch of G6s were pressed into service during the South African Border War. During this period, the G6 underwent its baptism by fire and proved its capabilities during combat operations against Angolan forces, being particularly noted for its excellent mobility and ability to quickly shift positions between fire missions. After the initial deployment, full scale production of the G6 commenced in 1988 and lasted until 1994.
By the end of the production run, a total of 154 G6s were manufactured of which 78 were exported to the UAE and another 24 to Oman. Since the late 1980s, the G6 didn't see any further combat action with South African forces, but it did take part in operations with the UAE armed forces in Yemen since 2015.
Media
- Images
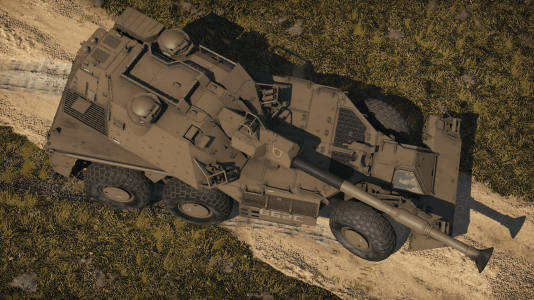
G6 Rhino from above

- Skins
- Videos
See also
External links
| Britain tank destroyers | |
|---|---|
| Infantry tank derivatives | Archer · Gun Carrier (3-in) |
| Light tank derivatives | Alecto I |
| M10 Achilles | Achilles · Achilles (65 Rg.) |
| Centurion derivatives | FV4005 · Conway |
| ATGM | Swingfire · Striker |
| Other | Tortoise · ▄M109A1 |
| Canada | QF 3.7 Ram · ADATS (M113) |
| South Africa | G6 · ZT3A2 |
