Difference between revisions of "Begleitpanzer 57"
(→Pros and cons) (Tag: Visual edit) |
m (Tag: Visual edit) |
||
| (53 intermediate revisions by 21 users not shown) | |||
| Line 1: | Line 1: | ||
| − | {{Specs-Card | + | {{Specs-Card|code=germ_begleitpanzer_57}} |
| − | |code=germ_begleitpanzer_57 | ||
| − | |||
| − | }} | ||
== Description == | == Description == | ||
| − | <!-- ''In the description, the first part | + | <!--''In the description, the first part needs to be about the history of the creation and combat usage of the vehicle, as well as its key features. In the second part, tell the reader about the ground vehicle in the game. Insert the screenshot of the vehicle. If the novice player does not remember the vehicle by name, they will immediately understand what kind of vehicle it is talking about.''--> |
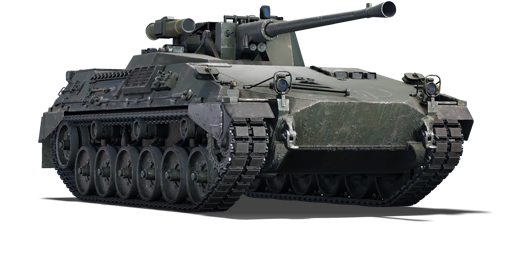
| − | The '''{{Specs|name}}''' is a | + | [[File:GarageImage_{{PAGENAME}}.jpg|420px|thumb|left]] |
| + | {{break}} | ||
| + | The '''{{Specs|name}}''' is a Rank {{Specs|rank}} German light tank {{Battle-rating|1}}. It was introduced in [[Update 1.73 "Vive la France"]]. | ||
| − | At first glance, the Begleitpanzer 57 may be confused for a SPAA due to the light armoured chassis and | + | At first glance, the Begleitpanzer 57 may be confused for a SPAA due to the light armoured chassis and a rapid-fire 57 mm auto cannon. On the turret's is also a TOW launcher that can be fired in a SACLOS manner, meaning it will automatically align itself with the cross hair in flight. |
| − | + | The Begleitpanzer 57 overall construction is similar to that of the [[T114|T114]] with light armour all around that even heavy machine gun ammunition can penetrate through the sides. The turret's nature with its exterior gun mount also has its similarities. | |
| − | As a light tank, the Begleitpanzer 57 carries great firepower | + | As a light tank, the Begleitpanzer 57 carries a great firepower punch for its mobility despite its lack of armour. A rapid firing 57 mm cannon carries enough penetration rivaling that of the [[ZSU-57-2]], but the addition of a TOW launcher system makes this vehicle a dangerous opponent by being able to engage a variety of target at its leisure. |
| + | |||
| + | While the cannon shares the caliber with the Russian 57 mm gun, it is quite different in performance. The Russian SPAA has a slightly better combined fire rate and significantly more accuracy at range. You also start to lose the penetration advantage at 1 km compared to the APHE belt of the ZSU-57-2. All of this combined makes you very reliant on your ATGM, of which you only have 6. Upgrading to the better ATGM is highly encouraged, the APHE belt can be completely ignored as it can not reliably perforate Russian side armor. | ||
== General info == | == General info == | ||
=== Survivability and armour === | === Survivability and armour === | ||
| − | + | <!--''Describe armour protection. Note the most well protected and key weak areas. Appreciate the layout of modules as well as the number and location of crew members. Is the level of armour protection sufficient, is the placement of modules helpfull for survival in combat?'' | |
| − | <!-- ''Describe armour protection. Note the most well protected and key weak areas. Appreciate the layout of modules as well as the number and location of crew members. Is the level of armour protection sufficient, is the placement of modules | + | |
| + | ''If necessary use a visual template to indicate the most secure and weak zones of the armour.''--> | ||
'''Armour type:''' | '''Armour type:''' | ||
| Line 37: | Line 39: | ||
=== Mobility === | === Mobility === | ||
| − | + | <!--''Write about the mobility of the ground vehicle. Estimate the specific power and maneuverability as well as the maximum speed forward and backward.''--> | |
| − | <!-- ''Write about the mobility of the ground vehicle. Estimate the specific power and | + | {| class="wikitable" style="text-align:center" |
| − | + | |- | |
| − | + | ! colspan="3" | Mobility characteristic | |
| − | + | |- | |
| − | === | + | ! Weight (tons) |
| − | + | ! colspan="1" | Add-on Armour<br>weight (tons) | |
| + | ! colspan="1" | Max speed (km/h) | ||
| + | |- | ||
| + | | rowspan="2" | 28.5 || colspan="1" rowspan="2" | N/A || colspan="1" | 78 (AB) | ||
| + | |- | ||
| + | |70 (RB/SB) | ||
| + | |- | ||
| + | ! colspan="3" | Engine power (horsepower) | ||
| + | |- | ||
| + | ! colspan="1" | Mode | ||
| + | !Stock | ||
| + | !Upgraded | ||
| + | |- | ||
| + | |''Arcade'' | ||
| + | |930 | ||
| + | |1,145 | ||
| + | |- | ||
| + | |''Realistic/Simulator'' | ||
| + | |531 | ||
| + | |600 | ||
| + | |- | ||
| + | ! colspan="3" | Power-to-weight ratio (hp/ton) | ||
| + | |- | ||
| + | ! colspan="1" | Mode | ||
| + | !Stock | ||
| + | !Upgraded | ||
| + | |- | ||
| + | |''Arcade'' | ||
| + | |32.63 | ||
| + | |40.18 | ||
| + | |- | ||
| + | |''Realistic/Simulator'' | ||
| + | |18.63 | ||
| + | |21.05 | ||
| + | |- | ||
| + | |} | ||
== Armaments == | == Armaments == | ||
| − | |||
=== Main armament === | === Main armament === | ||
| − | + | <!--''Give the reader information about the characteristics of the main gun. Assess its effectiveness in a battle based on the reloading speed, ballistics and the power of shells. Do not forget about the flexibilty of the fire, that is how quickly the cannon can be aimed at the target, open fire on it and aim at another enemy. Add a link to the main article on the gun: <code><nowiki>{{main|Name of the weapon}}</nowiki></code>. Describe in general terms the ammunition available for the main gun. Give advice on how to use them and how to fill the ammunition storage.''--> | |
| − | <!-- ''Give the reader information about the characteristics of the main gun. Assess its effectiveness in a battle based on the reloading speed, ballistics and the power of shells. Do not forget about the | + | {{main|Bofors L/70 Mk.I (57 mm)}} |
| − | {{main|Bofors L/70 Mk. | ||
| − | {| class="wikitable" style="text-align:center | + | {| class="wikitable" style="text-align:center" |
|- | |- | ||
| − | ! colspan="6" | [[Bofors L/70 Mk. | + | ! colspan="6" | [[Bofors L/70 Mk.I (57 mm)|57 mm Bofors L/70 Mk.I]] |
|- | |- | ||
| − | ! | + | ! colspan="2" rowspan="1" style="width:5em" |Capacity (Belt capacity) |
| − | + | ! rowspan="1" | Fire rate <br> (shots/minute) | |
| − | + | ! rowspan="1" | Vertical <br> guidance | |
| + | ! rowspan="1" | Horizontal <br> guidance | ||
| + | ! rowspan="1" | Stabilizer | ||
|- | |- | ||
| − | + | | colspan="2" | 96 (48) || 200 || -8°/+45° || ±180° || N/A | |
| − | | | ||
|- | |- | ||
| − | ! ''Realistic'' | + | ! colspan="6" | Turret rotation speed (°/s) |
| − | | | + | |- |
| + | ! style="width:4em" |Mode | ||
| + | ! style="width:4em" |Stock | ||
| + | ! style="width:4em" |Upgraded | ||
| + | ! style="width:4em" |Prior + Expert qualif. | ||
| + | ! style="width:4em" |Prior + Ace qualif. | ||
| + | ! style="width:4em" | | ||
| + | |- | ||
| + | | ''Arcade'' || 20.0 || 27.67 || 33.6 || 39.53|| | ||
| + | |- | ||
| + | | ''Realistic'' || 12.5 ||14.7|| 17.22 || 20.87|| | ||
| + | |- | ||
| + | ! colspan="4" | Reloading rate (seconds) | ||
| + | |- | ||
| + | ! colspan="1" style="width:4em" |Stock | ||
| + | ! colspan="1" style="width:4em" |Prior + Full crew | ||
| + | ! colspan="1" style="width:4em" |Prior + Expert qualif. | ||
| + | ! colspan="1" style="width:4em" |Prior + Ace qualif. | ||
| + | |- | ||
| + | | 15.00 || 15.00 || 15.00 || 15.00 | ||
|- | |- | ||
|} | |} | ||
| − | ==== Ammunition ==== | + | ===== Ammunition ===== |
| − | { | + | {| class="wikitable sortable" style="text-align:center" width="100%" |
| + | ! colspan="8" | Penetration statistics 1.85 early | ||
| + | |- | ||
| + | ! rowspan="2" data-sort-type="text" | Ammunition | ||
| + | ! rowspan="2" class="unsortable" | Type of <br /> warhead | ||
| + | ! colspan="6" | '''Penetration''' '''''in mm''''' '''@ 90°''' | ||
| + | |- | ||
| + | ! 10m | ||
| + | ! 100m | ||
| + | ! 500m | ||
| + | ! 1000m | ||
| + | ! 1500m | ||
| + | ! 2000m | ||
| + | |- | ||
| + | | 57x438 AP-T || APCBC || 142 || 140 || 116 || 91 || 72 || 56 | ||
| + | |- | ||
| + | | 57x438 SAP-T || APHEBC || 70 || 68 || 55 || 43 || 29 || 20 | ||
| + | |- | ||
| + | | 57x438 HE-T || HE || 11 || 11 || 11 || 11 || 11 || 11 | ||
| + | |- | ||
| + | |} | ||
| + | {| class="wikitable sortable" style="text-align:center" width="100%" | ||
| + | ! colspan="8" | Penetration statistics 1.85 | ||
| + | |- | ||
| + | ! rowspan="2" data-sort-type="text" | Ammunition | ||
| + | ! rowspan="2" class="unsortable" | Type of <br /> warhead | ||
| + | ! colspan="6" | '''Penetration''' '''''in mm''''' '''@ 90°''' | ||
| + | |- | ||
| + | ! 10m | ||
| + | ! 100m | ||
| + | ! 500m | ||
| + | ! 1000m | ||
| + | ! 1500m | ||
| + | ! 2000m | ||
| + | |- | ||
| + | | 57x438 AP-T || APCBC ||124||122||107||90||77||65 | ||
| + | |- | ||
| + | | 57x438 SAP-T || APHEBC ||94|| 83 || 80 ||68||58||49 | ||
| + | |- | ||
| + | | 57x438 HE-T || HE || 11 || 11 || 11 || 11 || 11 || 11 | ||
| + | |} | ||
| + | {| class="wikitable sortable" style="text-align:center" width="100%" | ||
| + | ! colspan="11" | Shell details | ||
| + | |- | ||
| + | ! rowspan="2" data-sort-type="text" | Ammunition | ||
| + | ! rowspan="2" class="unsortable" | Type of <br /> warhead | ||
| + | ! rowspan="2" |Velocity <br /> in m/s | ||
| + | ! rowspan="2" |Projectile<br />Mass in kg | ||
| + | ! rowspan="2" | ''Fuse delay'' | ||
| + | ''in m:'' | ||
| + | ! rowspan="2" | ''Fuse sensitivity'' | ||
| + | ''in mm:'' | ||
| + | ! rowspan="2" | ''Explosive Mass in g<br /> (TNT equivalent):'' | ||
| + | ! rowspan="2" | ''Normalization At 30° <br> from horizontal:'' | ||
| + | ! colspan="3" | ''Ricochet:'' | ||
| + | |- | ||
| + | ! 0% | ||
| + | ! 50% | ||
| + | ! 100% | ||
| + | |- | ||
| + | | 57x438 AP-T || APCBC || 950 || 2.4 || N/A || N/A || N/A || +4° || 48° || 63° || 71° | ||
| + | |- | ||
| + | | 57x438 SAP-T || APHEBC || 950 || 2.4 || 1.3 || 15 || 127.5 || +4° || 48° || 63° || 71° | ||
| + | |- | ||
| + | | 57x438 HE-T || HE || 1020 || 2.4 || 0.4 || 0.1 || 765 || +0° || 79° || 80° || 81° | ||
| + | |- | ||
| + | |} | ||
| − | ==== [[Ammo racks]] ==== | + | ===== [[Ammo racks|Ammo racks]] ===== |
| − | + | {| class="wikitable sortable" style="text-align:center" | |
| − | |||
| − | {| class="wikitable" style="text-align:center" | ||
|- | |- | ||
| − | ! Full<br>ammo | + | ! class="wikitable unsortable" |Full<br /> ammo |
| − | ! 1st<br>rack empty | + | ! class="wikitable unsortable" |1st<br /> rack empty |
| − | ! 2nd<br>rack empty | + | ! class="wikitable unsortable" |2nd<br /> rack empty |
| − | ! 3rd<br>rack empty | + | ! class="wikitable unsortable" |3rd<br /> rack empty |
| − | ! Visual<br>discrepancy | + | ! class="wikitable unsortable" |4th<br /> rack empty |
| + | ! class="wikitable unsortable" |5th<br /> rack empty | ||
| + | ! class="wikitable unsortable" |6th<br /> rack empty | ||
| + | ! class="wikitable unsortable" |Visual<br /> discrepancy | ||
|- | |- | ||
| − | | ''' | + | || '''96''' ||48||48|| ''(+)'' || ''(+)'' || ''(+)'' || ''(+)'' || style="text-align:left" | no |
|- | |- | ||
|} | |} | ||
| − | |||
| − | |||
| − | |||
| − | |||
| − | |||
| − | |||
| − | |||
| − | |||
=== Additional armament === | === Additional armament === | ||
| − | + | <!--''Some tanks are armed with several guns in one or more turrets. Evaluate the additional weaponry and give advice on its use. Describe the ammunition available for additional weaponry. Give advice on how to use them and how to fill the ammunition storage. If there is no additional weaponry remove this subsection.''--> | |
| − | <!-- ''Some tanks are armed with several guns in one or more turrets. Evaluate the additional weaponry and give advice on its use. Describe the ammunition available for additional weaponry. Give advice on | + | {| class="wikitable" style="text-align:center" |
| − | { | + | |- |
| + | ! colspan="6" | BGM-71B TOW ATGM | ||
| + | |- | ||
| + | ! colspan="3" rowspan="1" style="width:5em" |Capacity | ||
| + | ! rowspan="1" | Vertical <br> guidance | ||
| + | ! rowspan="1" | Flight <br> speed (m/s) | ||
| + | ! rowspan="1" | Range (m) | ||
| + | |- | ||
| + | | colspan="3" | 6 || -6°/+20° || 299 ||3,000 | ||
| + | |- | ||
| + | |} | ||
| − | {| class="wikitable" style="text-align:center | + | OR |
| + | {| class="wikitable" style="text-align:center" | ||
|- | |- | ||
| − | ! colspan=" | + | ! colspan="6" | BGM-71C TOW ATGM |
|- | |- | ||
| − | ! Capacity ! | + | ! colspan="3" rowspan="1" style="width:5em" |Capacity |
| − | ! | + | ! rowspan="1" | Vertical <br> guidance |
| + | ! rowspan="1" | Flight <br> speed (m/s) | ||
| + | ! rowspan="1" | Range (m) | ||
|- | |- | ||
| − | | 6 || -6°/+20° || - || - || | + | | colspan="3" | 6 || -6°/+20° ||296||3,750 |
| + | |} | ||
| + | ===== Ammunition ===== | ||
| + | {| class="wikitable sortable" style="text-align:center" width="100%" | ||
| + | ! colspan="8" | Penetration statistics | ||
| + | |- | ||
| + | ! rowspan="2" data-sort-type="text" | Ammunition | ||
| + | ! rowspan="2" class="unsortable" | Type of <br /> warhead | ||
| + | ! colspan="6" | '''Penetration''' '''''in mm''''' '''@ 90°''' | ||
| + | |- | ||
| + | ! 10m | ||
| + | ! 100m | ||
| + | ! 500m | ||
| + | ! 1000m | ||
| + | ! 1500m | ||
| + | ! 2000m | ||
| + | |- | ||
| + | | TOW || ATGM || 430 || 430 || 430 || 430 || 430 || 430 | ||
| + | |- | ||
| + | | I-TOW || ATGM || 630 || 630 || 630 || 630 || 630 || 630 | ||
| + | |- | ||
| + | |} | ||
| + | {| class="wikitable sortable" style="text-align:center" width="100%" | ||
| + | ! colspan="11" | Shell details | ||
| + | |- | ||
| + | ! rowspan="2" data-sort-type="text" | Ammunition | ||
| + | ! rowspan="2" class="unsortable" | Type of <br /> warhead | ||
| + | ! rowspan="2" |Velocity <br /> in m/s | ||
| + | ! rowspan="2" |Projectile<br />Mass in kg | ||
| + | ! rowspan="2" | ''Fuse delay'' | ||
| + | ''in m:'' | ||
| + | ! rowspan="2" | ''Fuse sensitivity'' | ||
| + | ''in mm:'' | ||
| + | ! rowspan="2" | ''Explosive Mass in g<br /> (TNT equivalent):'' | ||
| + | ! rowspan="2" | ''Normalization At 30° <br> from horizontal:'' | ||
| + | ! colspan="3" | ''Ricochet:'' | ||
| + | |- | ||
| + | ! 0% | ||
| + | ! 50% | ||
| + | ! 100% | ||
| + | |- | ||
| + | | TOW || ATGM || 299 || 19 || 0.0 || 0.1 || 2,450 || ° || 80° || 82° || 90° | ||
| + | |- | ||
| + | | I-TOW || ATGM || 296 || 19 || 0.0 || 0.1 || 2,080 || ° || 80° || 82° || 90° | ||
|- | |- | ||
|} | |} | ||
| − | = | + | ===== [[Ammo racks|Ammo racks]] ===== |
| − | + | {| class="wikitable sortable" style="text-align:center" | |
| − | |||
| − | ==== [[Ammo racks]] ==== | ||
| − | |||
| − | |||
| − | {| class="wikitable" style="text-align:center" | ||
|- | |- | ||
| − | ! Full<br>ammo | + | ! class="wikitable unsortable" |Full<br /> ammo |
| − | ! Visual<br>discrepancy | + | ! class="wikitable unsortable" |1st<br /> rack empty |
| + | ! class="wikitable unsortable" |2nd<br /> rack empty | ||
| + | ! class="wikitable unsortable" |3rd<br /> rack empty | ||
| + | ! class="wikitable unsortable" |4th<br /> rack empty | ||
| + | ! class="wikitable unsortable" |5th<br /> rack empty | ||
| + | ! class="wikitable unsortable" |6th<br /> rack empty | ||
| + | ! class="wikitable unsortable" |Visual<br /> discrepancy | ||
|- | |- | ||
| − | | ''' | + | || ''6''' || XX ''(X+)'' || ''(+)'' || ''(+)'' || ''(+)'' || ''(+)'' || ''(+)'' || style="text-align:left" | no |
|- | |- | ||
|} | |} | ||
=== Machine guns === | === Machine guns === | ||
| − | + | <!--''Offensive and anti-aircraft machine guns not only allow you to fight some aircraft, but also are effective against lightly armoured vehicles. Evaluate machine guns and give recommendations on its use.''--> | |
| − | <!-- ''Offensive and anti-aircraft machine guns not only allow you to fight some aircraft but also are effective against lightly armoured vehicles. Evaluate machine guns and give recommendations on its use.'' --> | + | {{main|MG 3A1 (7.62 mm)}} |
| − | {{main| | ||
| − | {| class="wikitable" style="text-align:center" | + | {| class="wikitable" style="text-align:center" |
| + | |- | ||
| + | ! colspan="7" | [[MG 3A1 (7.62 mm)|7.62 mm MG 3A1]] | ||
|- | |- | ||
| − | ! colspan=" | + | ! colspan="7" | ''Coaxial mount'' |
|- | |- | ||
| − | ! | + | ! colspan="4" rowspan="1" style="width:5em" |Capacity (Belt capacity) |
| + | ! rowspan="1" | Fire rate <br> (shots/minute) | ||
| + | ! rowspan="1" | Vertical <br> guidance | ||
| + | ! rowspan="1" | Horizontal <br> guidance | ||
|- | |- | ||
| − | | | + | | colspan="4" | 5,000 (1,000) || 1,200 || N/A || N/A |
|- | |- | ||
|} | |} | ||
| − | == Usage in battles == | + | == Usage in the battles == |
| − | |||
| − | |||
| − | |||
| − | |||
| − | |||
| − | |||
| − | |||
| − | |||
| − | |||
| − | |||
=== Pros and cons === | === Pros and cons === | ||
| − | <!-- '' | + | <!--''Summarize and briefly evaluate the vehicle in terms of its characteristics and combat effectiveness. Mark its pros and cons in a bulleted list. Do not use more than 6 points for each of the characteristics. Avoid using categorical definitions such as "bad", "good" and the like - they have a substitution in the form of softer "inadequate", "effective".''--> |
| − | |||
'''Pros:''' | '''Pros:''' | ||
| − | * | + | * 57 mm useful against light armoured vehicles like light tanks and Leopards. |
| − | * | + | * Great for spotting / disabling tracks and cannon parts. |
| − | * | + | * Can take out aircraft from a 45 degree angle or lower. |
| − | * | + | * When flanking, can easily destroy tanks from the side. |
| − | + | * Armour can withstand 7.62mm (.30) bullets from the front, but higher caliber AP will penetrate. | |
| − | |||
'''Cons:''' | '''Cons:''' | ||
| − | * | + | * Most high-caliber machine guns (higher than .50 cals) will go through any of its armor. |
| − | * Cannot | + | * Its 45 degree gun elevation makes it vulnerable to high angle attacks. |
| − | * Fairly low ammunition count | + | * Easy be hull broken. |
| − | * Gun breech | + | * Cannot take on most tanks from the front. |
| − | * Must stop to | + | * Fairly low ammunition count. |
| − | + | * Lack of a stabilizer | |
| − | + | * Gun breech can be damaged from 7mm machine guns | |
| + | * Must stop to use AGTMs | ||
== History == | == History == | ||
| − | + | The Begleitpanzer (Escort Tank 57) AIFSV (Armored Infantry Fire Support Vehicle) was a project of the companies Thyssen-Henschel and Bofors. Only a single prototype was built. In the mid-1970s, the two then-existing companies Thyssen-Henschel and Bofors began without government a mandate with the development of an infantry escort tank, as they believed to have discovered a gap in a light fire support platform. The vehicle was first introduced in November 1977. However, due to lack of interest from potential buyers, the project was not pursued. | |
| − | + | ''The modified hull of the armored personnel carrier Marder was used as chassis. Here all the components of the infantry fight, such as bullet covers, rear MG, tailgate and hatchways of the crew compartment had been removed to accommodate the much larger turret and associated equipment. The asymmetrically shaped turret had a recess in the middle in the longitudinal direction, in which the external, crest-fixed pipe cradle was mounted. In the direction of travel left was on the turret ceiling, the hatch of the commander with angle mirrors and stabilized round periscope. On the right side of the turret, which resembled the Marder Turret, was a launching device for TOW antitank missiles, including the gunner's hatch. This operated with a telescope with night vision thermal imaging system, a laser rangefinder and tracked control system for the missiles. For the commander, there was a monitor with parallel information. The cannon moved in the elevation range from -8 ° to + 45 ° The vehicle led an ammunition supply of 48 cartridges 57 mm ammunition and six anti-tank guided missiles with it. The cannon was a Bofors 57 mm / L70 Mk.1 ship gun with automatic loading.[https://en.wikipedia.org/wiki/Begleitpanzer_57_AIFSV]'' | |
| − | The | ||
| − | |||
| − | |||
== Media == | == Media == | ||
| − | + | ''An excellent addition to the article will be video guides, as well as screenshots from the game and photos.'' | |
| − | + | == Read also == | |
| − | + | <!--''Links to the articles on the War Thunder Wiki that you think will be useful for the reader, for example,'' | |
| − | |||
| − | |||
| − | |||
| − | |||
| − | |||
| − | == | ||
| − | <!-- ''Links to the articles on the War Thunder Wiki that you think will be useful for the reader, for example | ||
* ''reference to the series of the vehicles;'' | * ''reference to the series of the vehicles;'' | ||
| − | * ''links to approximate analogues of other nations and research trees.'' --> | + | * ''links to approximate analogues of other nations and research trees.'' |
| + | ''ETC.''--> | ||
| − | + | * [https://warthunder.com/en/news/5069-development-begleitpanzer-57-bofors-marder-united-at-last-en [Devblog<nowiki>]</nowiki> Begleitpanzer 57: Bofors/Marder united at last!] | |
| − | + | == Sources == | |
| − | + | ''Paste links to sources and external resources, such as:'' | |
| − | |||
| − | |||
* ''topic on the official game forum;'' | * ''topic on the official game forum;'' | ||
| − | * ''other literature.'' | + | * ''other literature.'' |
| − | |||
| − | |||
{{Germany light tanks}} | {{Germany light tanks}} | ||
[[Category:ATGM vehicles]] | [[Category:ATGM vehicles]] | ||
Revision as of 08:59, 5 March 2019
Contents
Description

The Begleitpanzer 57 is a Rank VI German light tank
with a battle rating of 9.7 (AB) and 9.3 (RB/SB). It was introduced in Update 1.73 "Vive la France".
At first glance, the Begleitpanzer 57 may be confused for a SPAA due to the light armoured chassis and a rapid-fire 57 mm auto cannon. On the turret's is also a TOW launcher that can be fired in a SACLOS manner, meaning it will automatically align itself with the cross hair in flight.
The Begleitpanzer 57 overall construction is similar to that of the T114 with light armour all around that even heavy machine gun ammunition can penetrate through the sides. The turret's nature with its exterior gun mount also has its similarities.
As a light tank, the Begleitpanzer 57 carries a great firepower punch for its mobility despite its lack of armour. A rapid firing 57 mm cannon carries enough penetration rivaling that of the ZSU-57-2, but the addition of a TOW launcher system makes this vehicle a dangerous opponent by being able to engage a variety of target at its leisure.
While the cannon shares the caliber with the Russian 57 mm gun, it is quite different in performance. The Russian SPAA has a slightly better combined fire rate and significantly more accuracy at range. You also start to lose the penetration advantage at 1 km compared to the APHE belt of the ZSU-57-2. All of this combined makes you very reliant on your ATGM, of which you only have 6. Upgrading to the better ATGM is highly encouraged, the APHE belt can be completely ignored as it can not reliably perforate Russian side armor.
General info
Survivability and armour
Armour type:
- Rolled homogeneous armour
| Armour | Front (Slope angle) | Sides | Rear | Roof |
|---|---|---|---|---|
| Hull | 11 mm (76°), 32 mm (32°) Front glacis 32 mm (31-61°) Lower glacis |
15 mm (30°) Top 15 mm |
11 mm (24°) Top 11 mm (26°) |
11 mm |
| Turret | 25 mm (39°) Turret front 25 mm (0-9°) Gun mantlet |
15 mm (12-16°) Left side 15 mm Right side |
15 mm (39°) | 11 mm |
Notes:
- Suspension wheels and tracks are 20 mm thick.
- Belly armour is 11 mm thick.
Mobility
| Mobility characteristic | ||
|---|---|---|
| Weight (tons) | Add-on Armour weight (tons) |
Max speed (km/h) |
| 28.5 | N/A | 78 (AB) |
| 70 (RB/SB) | ||
| Engine power (horsepower) | ||
| Mode | Stock | Upgraded |
| Arcade | 930 | 1,145 |
| Realistic/Simulator | 531 | 600 |
| Power-to-weight ratio (hp/ton) | ||
| Mode | Stock | Upgraded |
| Arcade | 32.63 | 40.18 |
| Realistic/Simulator | 18.63 | 21.05 |
Armaments
Main armament
| 57 mm Bofors L/70 Mk.I | |||||
|---|---|---|---|---|---|
| Capacity (Belt capacity) | Fire rate (shots/minute) |
Vertical guidance |
Horizontal guidance |
Stabilizer | |
| 96 (48) | 200 | -8°/+45° | ±180° | N/A | |
| Turret rotation speed (°/s) | |||||
| Mode | Stock | Upgraded | Prior + Expert qualif. | Prior + Ace qualif. | |
| Arcade | 20.0 | 27.67 | 33.6 | 39.53 | |
| Realistic | 12.5 | 14.7 | 17.22 | 20.87 | |
| Reloading rate (seconds) | |||||
| Stock | Prior + Full crew | Prior + Expert qualif. | Prior + Ace qualif. | ||
| 15.00 | 15.00 | 15.00 | 15.00 | ||
Ammunition
| Penetration statistics 1.85 early | |||||||
|---|---|---|---|---|---|---|---|
| Ammunition | Type of warhead |
Penetration in mm @ 90° | |||||
| 10m | 100m | 500m | 1000m | 1500m | 2000m | ||
| 57x438 AP-T | APCBC | 142 | 140 | 116 | 91 | 72 | 56 |
| 57x438 SAP-T | APHEBC | 70 | 68 | 55 | 43 | 29 | 20 |
| 57x438 HE-T | HE | 11 | 11 | 11 | 11 | 11 | 11 |
| Penetration statistics 1.85 | |||||||
|---|---|---|---|---|---|---|---|
| Ammunition | Type of warhead |
Penetration in mm @ 90° | |||||
| 10m | 100m | 500m | 1000m | 1500m | 2000m | ||
| 57x438 AP-T | APCBC | 124 | 122 | 107 | 90 | 77 | 65 |
| 57x438 SAP-T | APHEBC | 94 | 83 | 80 | 68 | 58 | 49 |
| 57x438 HE-T | HE | 11 | 11 | 11 | 11 | 11 | 11 |
| Shell details | ||||||||||
|---|---|---|---|---|---|---|---|---|---|---|
| Ammunition | Type of warhead |
Velocity in m/s |
Projectile Mass in kg |
Fuse delay
in m: |
Fuse sensitivity
in mm: |
Explosive Mass in g (TNT equivalent): |
Normalization At 30° from horizontal: |
Ricochet: | ||
| 0% | 50% | 100% | ||||||||
| 57x438 AP-T | APCBC | 950 | 2.4 | N/A | N/A | N/A | +4° | 48° | 63° | 71° |
| 57x438 SAP-T | APHEBC | 950 | 2.4 | 1.3 | 15 | 127.5 | +4° | 48° | 63° | 71° |
| 57x438 HE-T | HE | 1020 | 2.4 | 0.4 | 0.1 | 765 | +0° | 79° | 80° | 81° |
Ammo racks
| Full ammo |
1st rack empty |
2nd rack empty |
3rd rack empty |
4th rack empty |
5th rack empty |
6th rack empty |
Visual discrepancy |
|---|---|---|---|---|---|---|---|
| 96 | 48 | 48 | (+) | (+) | (+) | (+) | no |
Additional armament
| BGM-71B TOW ATGM | |||||
|---|---|---|---|---|---|
| Capacity | Vertical guidance |
Flight speed (m/s) |
Range (m) | ||
| 6 | -6°/+20° | 299 | 3,000 | ||
OR
| BGM-71C TOW ATGM | |||||
|---|---|---|---|---|---|
| Capacity | Vertical guidance |
Flight speed (m/s) |
Range (m) | ||
| 6 | -6°/+20° | 296 | 3,750 | ||
Ammunition
| Penetration statistics | |||||||
|---|---|---|---|---|---|---|---|
| Ammunition | Type of warhead |
Penetration in mm @ 90° | |||||
| 10m | 100m | 500m | 1000m | 1500m | 2000m | ||
| TOW | ATGM | 430 | 430 | 430 | 430 | 430 | 430 |
| I-TOW | ATGM | 630 | 630 | 630 | 630 | 630 | 630 |
| Shell details | ||||||||||
|---|---|---|---|---|---|---|---|---|---|---|
| Ammunition | Type of warhead |
Velocity in m/s |
Projectile Mass in kg |
Fuse delay
in m: |
Fuse sensitivity
in mm: |
Explosive Mass in g (TNT equivalent): |
Normalization At 30° from horizontal: |
Ricochet: | ||
| 0% | 50% | 100% | ||||||||
| TOW | ATGM | 299 | 19 | 0.0 | 0.1 | 2,450 | ° | 80° | 82° | 90° |
| I-TOW | ATGM | 296 | 19 | 0.0 | 0.1 | 2,080 | ° | 80° | 82° | 90° |
Ammo racks
| Full ammo |
1st rack empty |
2nd rack empty |
3rd rack empty |
4th rack empty |
5th rack empty |
6th rack empty |
Visual discrepancy |
|---|---|---|---|---|---|---|---|
| 6' | XX (X+) | (+) | (+) | (+) | (+) | (+) | no |
Machine guns
| 7.62 mm MG 3A1 | ||||||
|---|---|---|---|---|---|---|
| Coaxial mount | ||||||
| Capacity (Belt capacity) | Fire rate (shots/minute) |
Vertical guidance |
Horizontal guidance | |||
| 5,000 (1,000) | 1,200 | N/A | N/A | |||
Usage in the battles
Pros and cons
Pros:
- 57 mm useful against light armoured vehicles like light tanks and Leopards.
- Great for spotting / disabling tracks and cannon parts.
- Can take out aircraft from a 45 degree angle or lower.
- When flanking, can easily destroy tanks from the side.
- Armour can withstand 7.62mm (.30) bullets from the front, but higher caliber AP will penetrate.
Cons:
- Most high-caliber machine guns (higher than .50 cals) will go through any of its armor.
- Its 45 degree gun elevation makes it vulnerable to high angle attacks.
- Easy be hull broken.
- Cannot take on most tanks from the front.
- Fairly low ammunition count.
- Lack of a stabilizer
- Gun breech can be damaged from 7mm machine guns
- Must stop to use AGTMs
History
The Begleitpanzer (Escort Tank 57) AIFSV (Armored Infantry Fire Support Vehicle) was a project of the companies Thyssen-Henschel and Bofors. Only a single prototype was built. In the mid-1970s, the two then-existing companies Thyssen-Henschel and Bofors began without government a mandate with the development of an infantry escort tank, as they believed to have discovered a gap in a light fire support platform. The vehicle was first introduced in November 1977. However, due to lack of interest from potential buyers, the project was not pursued.
The modified hull of the armored personnel carrier Marder was used as chassis. Here all the components of the infantry fight, such as bullet covers, rear MG, tailgate and hatchways of the crew compartment had been removed to accommodate the much larger turret and associated equipment. The asymmetrically shaped turret had a recess in the middle in the longitudinal direction, in which the external, crest-fixed pipe cradle was mounted. In the direction of travel left was on the turret ceiling, the hatch of the commander with angle mirrors and stabilized round periscope. On the right side of the turret, which resembled the Marder Turret, was a launching device for TOW antitank missiles, including the gunner's hatch. This operated with a telescope with night vision thermal imaging system, a laser rangefinder and tracked control system for the missiles. For the commander, there was a monitor with parallel information. The cannon moved in the elevation range from -8 ° to + 45 ° The vehicle led an ammunition supply of 48 cartridges 57 mm ammunition and six anti-tank guided missiles with it. The cannon was a Bofors 57 mm / L70 Mk.1 ship gun with automatic loading.[1]
Media
An excellent addition to the article will be video guides, as well as screenshots from the game and photos.
Read also
Sources
Paste links to sources and external resources, such as:
- topic on the official game forum;
- other literature.
| Germany light tanks | |
|---|---|
| Pz.II | Pz.II C · Pz.II C (DAK) · Pz.II C TD · Pz.II F · Pz.Sfl.Ic |
| Sd.Kfz.234 | Sd.Kfz.234/1 · Sd.Kfz.234/2 · Sd.Kfz.234/2 TD |
| Marder | Marder A1- · Marder 1A3 · Begleitpanzer 57 · DF105 |
| PUMA | |
| Wheeled | Sd.Kfz.221 (s.Pz.B.41) · Class 3 (P) · Radkampfwagen 90 |
| Other | Ru 251 · SPz 12-3 LGS |
| Argentina | TAM · TAM 2C · TAM 2IP · JaPz.K A2 |
| Czechoslovakia | Pz.35(t) · Pz.38(t) A · Pz.38(t) F · Pz.38(t) n.A. · Sd.Kfz. 140/1 |
| France | Pz.Sp.Wg.P204(f) KwK |
| Lithuania | Vilkas |
| USA | leKPz M41 |
| USSR | SPz BMP-1 |
