Difference between revisions of "Ho-Ri Prototype"
(→Description) |
bigredsnake (talk | contribs) (→Pros and cons) (Tag: Visual edit) |
||
| (17 intermediate revisions by 6 users not shown) | |||
| Line 11: | Line 11: | ||
== Description == | == Description == | ||
<!-- ''In the description, the first part should be about the history of the creation and combat usage of the vehicle, as well as its key features. In the second part, tell the reader about the ground vehicle in the game. Insert a screenshot of the vehicle, so that if the novice player does not remember the vehicle by name, he will immediately understand what kind of vehicle the article is talking about.'' --> | <!-- ''In the description, the first part should be about the history of the creation and combat usage of the vehicle, as well as its key features. In the second part, tell the reader about the ground vehicle in the game. Insert a screenshot of the vehicle, so that if the novice player does not remember the vehicle by name, he will immediately understand what kind of vehicle the article is talking about.'' --> | ||
| − | The ''' | + | The '''{{Specs|name}}''' is a premium rank {{Specs|rank}} Japanese tank destroyer {{Battle-rating}}. It was introduced in [[Update 1.71 "New E.R.A."]]. |
| − | |||
| − | |||
== General info == | == General info == | ||
| Line 74: | Line 72: | ||
==== Ammunition ==== | ==== Ammunition ==== | ||
| − | {{: | + | {| class="wikitable sortable" style="text-align:center" width="100%" |
| + | ! colspan="8" | Penetration statistics | ||
| + | |- | ||
| + | ! rowspan="2" data-sort-type="text" | Ammunition | ||
| + | ! rowspan="2" | Type of<br>warhead | ||
| + | ! colspan="6" | '''Penetration @ 0° Angle of Attack (mm)''' | ||
| + | |- | ||
| + | ! 10 m !! 100 m !! 500 m !! 1,000 m !! 1,500 m !! 2,000 m | ||
| + | |- | ||
| + | | Type 2 APHE || APHE || 205 || 201 || 181 || 159 || 140 || 123 | ||
| + | |- | ||
| + | | Experimental HE || HE || 30 || 30 || 30 || 30 || 30 || 30 | ||
| + | |- | ||
| + | |} | ||
| + | {| class="wikitable sortable" style="text-align:center" width="100%" | ||
| + | ! colspan="10" | Shell details | ||
| + | |- | ||
| + | ! rowspan="2" data-sort-type="text" | Ammunition | ||
| + | ! rowspan="2" | Type of<br>warhead | ||
| + | ! rowspan="2" | Velocity<br>(m/s) | ||
| + | ! rowspan="2" | Projectile<br>Mass (kg) | ||
| + | ! rowspan="2" | Fuse delay<br>(m) | ||
| + | ! rowspan="2" | Fuse sensitivity<br>(mm) | ||
| + | ! rowspan="2" | Explosive Mass<br>(TNT equivalent) (g) | ||
| + | ! colspan="3" | Ricochet | ||
| + | |- | ||
| + | ! 0% !! 50% !! 100% | ||
| + | |- | ||
| + | | Type 2 APHE || APHE || 916 || 16 || 1.2 || 19 || 200 || 47° || 60° || 65° | ||
| + | |- | ||
| + | | Experimental HE || HE || 920 || 16 || 0 || 0.1 || 2,520 || 79° || 80° || 81° | ||
| + | |- | ||
| + | |} | ||
==== [[Ammo racks]] ==== | ==== [[Ammo racks]] ==== | ||
[[File:Ammoracks_{{PAGENAME}}.png|right|thumb|x250px|[[Ammo racks]] of the {{PAGENAME}}]] | [[File:Ammoracks_{{PAGENAME}}.png|right|thumb|x250px|[[Ammo racks]] of the {{PAGENAME}}]] | ||
| − | <!-- '''Last updated: | + | <!-- '''Last updated: 1.101.0.53''' --> |
{| class="wikitable" style="text-align:center" | {| class="wikitable" style="text-align:center" | ||
|- | |- | ||
| Line 89: | Line 119: | ||
! Visual<br>discrepancy | ! Visual<br>discrepancy | ||
|- | |- | ||
| − | | '''51''' || 46 ''(+ | + | | '''51''' || 46 ''(+4)'' || 40 ''(+11)'' || 30 ''(+21)'' || 12 ''(+39)'' || 1 ''(+50)'' || No |
|- | |- | ||
|} | |} | ||
| Line 99: | Line 129: | ||
== Usage in battles == | == Usage in battles == | ||
<!-- ''Describe the tactics of playing in the vehicle, the features of using vehicles in the team and advice on tactics. Refrain from creating a "guide" - do not impose a single point of view but instead give the reader food for thought. Describe the most dangerous enemies and give recommendations on fighting them. If necessary, note the specifics of the game in different modes (AB, RB, SB).'' --> | <!-- ''Describe the tactics of playing in the vehicle, the features of using vehicles in the team and advice on tactics. Refrain from creating a "guide" - do not impose a single point of view but instead give the reader food for thought. Describe the most dangerous enemies and give recommendations on fighting them. If necessary, note the specifics of the game in different modes (AB, RB, SB).'' --> | ||
| − | The Ho-Ri can be used in multiple roles. Its most effective at medium range, where it's harder for the enemy to aim for the lower plate and shells have a harder time penetrating the mantlet, making it easy for you to destroy them. Another option, although risky is to sit on a road that players like to go down and use your armour to bounce and take shot and return fire on enemy tanks. | + | The Ho-Ri can be used in multiple roles. Its most effective at medium range, where it's harder for the enemy to aim for the lower plate and shells have a harder time penetrating the mantlet, making it easy for you to destroy them. Another option, although risky is to sit on a road that players like to go down and use your armour to bounce and take shot and return fire on enemy tanks. Honestly this is one of the BEST premiums in the game. It makes good SL, RP, and can go head long into battle and kill almost any tank at it's BR with one shot to the front without much aiming. Most premiums are falsely accused of being OP however this SPG easily fits the bill. |
'''Enemies worth noting''': | '''Enemies worth noting''': | ||
| Line 111: | Line 141: | ||
* Good sloping armour on the front | * Good sloping armour on the front | ||
| + | * By far one of the best premiums in the game, it can deflect most frontal attacks and can easily penetrate most enemies from the front and kill them in one shot | ||
* High velocity high penetrating gun with APHE filler | * High velocity high penetrating gun with APHE filler | ||
* Rather good gun depression | * Rather good gun depression | ||
| Line 127: | Line 158: | ||
<!-- ''Describe the history of the creation and combat usage of the vehicle in more detail than in the introduction. If the historical reference turns out to be too long, take it to a separate article, taking a link to the article about the vehicle and adding a block "/History" (example: <nowiki>https://wiki.warthunder.com/(Vehicle-name)/History</nowiki>) and add a link to it here using the <code>main</code> template. Be sure to reference text and sources by using <code><nowiki><ref></ref></nowiki></code>, as well as adding them at the end of the article with <code><nowiki><references /></nowiki></code>. This section may also include the vehicle's dev blog entry (if applicable) and the in-game encyclopedia description (under <code><nowiki>=== In-game description ===</nowiki></code>, also if applicable).'' --> | <!-- ''Describe the history of the creation and combat usage of the vehicle in more detail than in the introduction. If the historical reference turns out to be too long, take it to a separate article, taking a link to the article about the vehicle and adding a block "/History" (example: <nowiki>https://wiki.warthunder.com/(Vehicle-name)/History</nowiki>) and add a link to it here using the <code>main</code> template. Be sure to reference text and sources by using <code><nowiki><ref></ref></nowiki></code>, as well as adding them at the end of the article with <code><nowiki><references /></nowiki></code>. This section may also include the vehicle's dev blog entry (if applicable) and the in-game encyclopedia description (under <code><nowiki>=== In-game description ===</nowiki></code>, also if applicable).'' --> | ||
| − | + | After the IJA compared Russian and German tanks during 1943 and the shock of encountering the US [[M4]] Sherman, they decided to design tanks with more powerful guns to destroy tanks rather than to support infantry. Like other Japanese self-propelled guns, the Ho-Ri was not equipped any weapon to combat infantry. The design of the Ho-Ri was based on the hull of the Chi-Ri, and with a powerful 105 mm gun mounted in the casemate. | |
| − | |||
| − | |||
| − | |||
| − | |||
| − | |||
| − | The | ||
| − | + | The IJA planned to produce 5 prototypes. However, they made only one 1/5 sized mock-up model | |
| − | + | A prototype was completed by August 1944 and five more models were to be completed in 1945, but production was halted due to the industrial damages and resource shortage from the war effort.<ref name="Sun Ho-Ri">Sun, Eun Ae. ''The Ho-Ri Tank Destroyer'' SENSHA. Blogger.com, 03 Sep. 2017. Web. 28 Aug. 2020. [https://web.archive.org/web/20180208195232/http://sensha-manual.blogspot.com/2017/09/the-ho-ri-tank-destroyer.html Website (Archived)]</ref> | |
| − | |||
| − | |||
| − | |||
| − | |||
| − | |||
| − | |||
== Media == | == Media == | ||
| Line 149: | Line 168: | ||
;Skins | ;Skins | ||
| − | * [https://live.warthunder.com/feed/camouflages/?vehicle=jp_type_5_ho_ri_prototype Skins and | + | |
| + | * [https://live.warthunder.com/feed/camouflages/?vehicle=jp_type_5_ho_ri_prototype Skins and Camouflages for the Ho-Ri Prototype in live.warthunder.com] | ||
;Videos | ;Videos | ||
| Line 172: | Line 192: | ||
<references /> | <references /> | ||
| − | |||
{{Japan tank destroyers}} | {{Japan tank destroyers}} | ||
{{Japan premium ground vehicles}} | {{Japan premium ground vehicles}} | ||
Revision as of 14:21, 27 August 2021
| This page is about the premium Japanese tank destroyer Ho-Ri Prototype. For the regular version, see Ho-Ri Production. |


Contents
Description
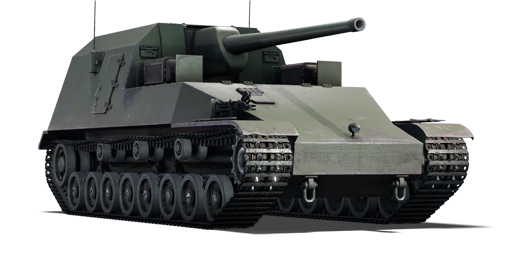
The Type 5 Ho-Ri Prototype is a premium rank IV Japanese tank destroyer with a battle rating of 6.7 (AB/RB/SB). It was introduced in Update 1.71 "New E.R.A.".
General info
Survivability and armour
Armour type:
- Rolled homogeneous armour
- Cast homogeneous armour
| Armour | Front (Slope angle) | Sides | Rear | Roof |
|---|---|---|---|---|
| Hull | 75 mm (70°) Front glacis 75 mm (8°), 50 mm (67°) Lower glacis |
55-65 mm (16-17°) Top 55 mm Bottom |
35 mm (5°) Top 35 mm (10-40°) Bottom |
20 mm |
| Casemate | 120-150 mm (5-20°) Turret front 250 mm Gun mantlet 50-200 mm (2-65°) Barrel shroud |
55-65 mm (17°) | 35 mm (5°) | 20-50 mm |
Notes:
- Suspension wheels and bogies are 15 mm thick while the tracks are 20 mm thick.
- Belly armour is 20 mm thick.
- Two 5 mm structural steel plates separate the engine compartment from the crew compartments.
- Small parts of the suspension on the hull sides give 10 mm thick protection at their area.
Mobility
| Game Mode | Max Speed (km/h) | Weight (tons) | Engine power (horsepower) | Power-to-weight ratio (hp/ton) | |||
|---|---|---|---|---|---|---|---|
| Forward | Reverse | Stock | Upgraded | Stock | Upgraded | ||
| Arcade | 44 | 9 | 51 | 781 | 1,049 | 15.31 | 20.57 |
| Realistic | 41 | 8 | 486 | 550 | 9.53 | 10.78 | |
Modifications and economy
| Mobility | Protection | Firepower | ||||||||||||||||
|---|---|---|---|---|---|---|---|---|---|---|---|---|---|---|---|---|---|---|
|
|
|
Armaments
Main armament
| 105 mm Experimental High Velocity | Turret rotation speed (°/s) | Reloading rate (seconds) | |||||||||||
|---|---|---|---|---|---|---|---|---|---|---|---|---|---|
| Mode | Capacity | Vertical | Horizontal | Stabilizer | Stock | Upgraded | Full | Expert | Aced | Stock | Full | Expert | Aced |
| Arcade | 51 | -10°/+20° | ±10° | N/A | 5.3 | 7.3 | 8.9 | 9.8 | 10.5 | 11.18 | 9.89 | 9.12 | 8.60 |
| Realistic | 3.6 | 4.2 | 5.1 | 5.6 | 6.0 | ||||||||
Ammunition
| Penetration statistics | |||||||
|---|---|---|---|---|---|---|---|
| Ammunition | Type of warhead |
Penetration @ 0° Angle of Attack (mm) | |||||
| 10 m | 100 m | 500 m | 1,000 m | 1,500 m | 2,000 m | ||
| Type 2 APHE | APHE | 205 | 201 | 181 | 159 | 140 | 123 |
| Experimental HE | HE | 30 | 30 | 30 | 30 | 30 | 30 |
| Shell details | |||||||||
|---|---|---|---|---|---|---|---|---|---|
| Ammunition | Type of warhead |
Velocity (m/s) |
Projectile Mass (kg) |
Fuse delay (m) |
Fuse sensitivity (mm) |
Explosive Mass (TNT equivalent) (g) |
Ricochet | ||
| 0% | 50% | 100% | |||||||
| Type 2 APHE | APHE | 916 | 16 | 1.2 | 19 | 200 | 47° | 60° | 65° |
| Experimental HE | HE | 920 | 16 | 0 | 0.1 | 2,520 | 79° | 80° | 81° |
Ammo racks

| Full ammo |
1st rack empty |
2nd rack empty |
3rd rack empty |
4th rack empty |
5th rack empty |
Visual discrepancy |
|---|---|---|---|---|---|---|
| 51 | 46 (+4) | 40 (+11) | 30 (+21) | 12 (+39) | 1 (+50) | No |
Notes:
- Shells are modeled individually and disappear from the rack after having been shot or loaded.
- To go into battle with the flanks empty of ammo, pack 40 (+11) shells or fewer.
Usage in battles
The Ho-Ri can be used in multiple roles. Its most effective at medium range, where it's harder for the enemy to aim for the lower plate and shells have a harder time penetrating the mantlet, making it easy for you to destroy them. Another option, although risky is to sit on a road that players like to go down and use your armour to bounce and take shot and return fire on enemy tanks. Honestly this is one of the BEST premiums in the game. It makes good SL, RP, and can go head long into battle and kill almost any tank at it's BR with one shot to the front without much aiming. Most premiums are falsely accused of being OP however this SPG easily fits the bill.
Enemies worth noting:
- IS-2 / IS-2 (1944) / ISU-122: These machines carry a huge 122 mm cannon that penetrates literally anything they see, including the Ho-Ri. Their shells will go through Ho-Ri's vertical armour of the fighting compartment pretty easily, killing the crew inside or detonating the ammo. To deal with the IS-2, try get a shot at them before the notice you / when they are reloading. These tanks tend to get one-shot due to their lack of crew or the cramped interior. For IS-2 mod.1943, aim for the hull armour that curves and blends into the side, or aim at the turret cheeks. For mod.1944, only go for the turret as the hull is very thick and well sloped. For the ISU-122, aim at anywhere but the gun mantlet, as it often absorb shells or cause ricochet.
Pros and cons
Pros:
- Good sloping armour on the front
- By far one of the best premiums in the game, it can deflect most frontal attacks and can easily penetrate most enemies from the front and kill them in one shot
- High velocity high penetrating gun with APHE filler
- Rather good gun depression
- Not slow considering its armour and weight
- Spaced out crew
- Central engine could absorb penetrating front shots
Cons:
- Armour is not 100% reliable. Fighting compartment can get penetrated by the IS-2 easily
- It is barely ever going to reach its top speed (40 km/h or 25 mph)
- Side armour is quite bad
- Depressing the gun all the way will open roof for the breech, possibly exposing crew to strafing fire.
History
After the IJA compared Russian and German tanks during 1943 and the shock of encountering the US M4 Sherman, they decided to design tanks with more powerful guns to destroy tanks rather than to support infantry. Like other Japanese self-propelled guns, the Ho-Ri was not equipped any weapon to combat infantry. The design of the Ho-Ri was based on the hull of the Chi-Ri, and with a powerful 105 mm gun mounted in the casemate.
The IJA planned to produce 5 prototypes. However, they made only one 1/5 sized mock-up model
A prototype was completed by August 1944 and five more models were to be completed in 1945, but production was halted due to the industrial damages and resource shortage from the war effort.[1]
Media
- Skins
- Videos
See also
External links
References
- ↑ Sun, Eun Ae. The Ho-Ri Tank Destroyer SENSHA. Blogger.com, 03 Sep. 2017. Web. 28 Aug. 2020. Website (Archived)
| Japan tank destroyers | |
|---|---|
| Ro-Go Derivatives | Ro-Go Exp. |
| Chi-Ha Derivatives | Ho-Ni I · Ho-Ni III · Ho-Ro · Chi-Ha LG |
| Ho-Ri | Ho-Ri Prototype · Ho-Ri Production |
| Other | Na-To |
| JGSDF | |
| SPRG | Type 60 (C) |
| SPH | Type 75 · Type 99 |
| ATGM | Type 60 ATM |
| Rocket | Type 75 MLRS |
| USA | ▅M36 |
| Japan premium ground vehicles | |
|---|---|
| Light tanks | Ha-Go Commander · Type 16 (FPS) |
| Medium tanks | Chi-Ha Short Gun · Chi-He (5th Regiment) · Ka-Chi · Chi-Nu II · Type 74 (G) · Type 90 (B) "Fuji" |
| Heavy tanks | Ro-Go · ▅Heavy Tank No.6 |
| Tank destroyers | Ho-Ri Prototype · Type 75 MLRS |
