Difference between revisions of "Staghound AA"
m (→Description: Added some things) (Tag: Visual edit) |
(→Description) |
||
| (36 intermediate revisions by 13 users not shown) | |||
| Line 1: | Line 1: | ||
| − | {{Specs-Card|code=uk_t17e2}} | + | {{Specs-Card |
| + | |code=uk_t17e2 | ||
| + | |images={{Specs-Card-Image|GarageImage_{{PAGENAME}}.jpg|ArtImage_{{PAGENAME}}.png}} | ||
| + | }} | ||
== Description == | == Description == | ||
| − | <!--''In the description, the first part | + | <!-- ''In the description, the first part should be about the history of the creation and combat usage of the vehicle, as well as its key features. In the second part, tell the reader about the ground vehicle in the game. Insert a screenshot of the vehicle, so that if the novice player does not remember the vehicle by name, he will immediately understand what kind of vehicle the article is talking about.'' --> |
| − | + | The '''T17E2''' started as an armoured car requested by US Army Ordnance in July 1941. The request asked for a medium armoured car for combat services. Two companies, Ford Motor Company and Chevrolet, submitted designs to this request. During the T17's development, the British Purchasing Commission was also looking for a medium armoured car that could be used in the current campaign in North Africa. British requirements were a bit different than the American's and asked for the turret of the car to house at least two people and with a radio in the turret rather than in the hull. Some T17E1s were modified with a new turret developed by Frazer-Nash that equipped two .50 cal M2 Browning machine guns, this modified vehicle was given the name '''T17E2'''. About 789 Staghounds were converted into the T17E2, also named the ''"Staghound AA"'', in the period of October 1943 and April 1944. | |
| − | |||
| − | The ''' | ||
| − | The T17E2 has two obvious characteristics. It has wheels, giving it excellent speed and mobility, especially on hard surfaces like rock or roads. The wheels also mean that it struggles in mud, sand or snow. Then, there are the guns, the T17E2 is armed with a seemingly light armament of two 12.7 mm (.50 cal) machine guns. Compared to other SPAA of the rank, the armament are light. German and Japanese SPAA are armed with highly potent | + | It was introduced in [[Update 1.55 "Royal Armour"]] along with the initial British ground tree. The '''{{Specs|name}}''' is a very mobile SPAA with dual-mounted .50 cal machine guns, it also has armour rivalling some other Rank I vehicles and can thus withstand a majority of the smaller shells. The T17E2 has two obvious characteristics. It has wheels, giving it excellent speed and mobility, especially on hard surfaces like rock or roads. The wheels also mean that it struggles in mud, sand or snow. Then, there are the guns, the T17E2 is armed with a seemingly light armament of two 12.7 mm (.50 cal) machine guns. Compared to other SPAA of the rank, the armament are light. German and Japanese SPAA are armed with highly potent 20 mm auto cannons, which inflict far more damage to aircraft and vehicles alike. Instead, the T17E2 relies on its longevity and high rate of fire. |
== General info == | == General info == | ||
=== Survivability and armour === | === Survivability and armour === | ||
| − | <!--''Describe armour protection. Note the most well protected and key weak areas. Appreciate the layout of modules as well as the number and location of crew members. Is the level of armour protection sufficient, is the placement of modules helpful for survival in combat?'' | + | {{Specs-Tank-Armour}} |
| + | <!-- ''Describe armour protection. Note the most well protected and key weak areas. Appreciate the layout of modules as well as the number and location of crew members. Is the level of armour protection sufficient, is the placement of modules helpful for survival in combat? If necessary use a visual template to indicate the most secure and weak zones of the armour.'' --> | ||
| + | The Staghound AA's armour protection is moderate for an SPAA. The frontal hull glacis is a sloped 22 mm plate which, when angling, can deflect quite some shells. Most reserve tanks' 37 mm guns will not be able to penetrate this, which makes the Staghound seem greatly protected considering that it is only a wheeled SPAA. However the driver's port will not be able to resist most shots as it is only 15 mm, and poorly angled. The turret is made of 31 mm plates all-round, which makes it immune to vehicles with weak penetration when they are shooting from far away, for example the [[H.35]]. This thickness is also enough to stop most aircraft weapons, such as the commonly used 7.92 mm MG17 and the 12.7 mm M2HB. | ||
| + | |||
| + | However, when facing vehicles at a higher BR with more powerful guns (e.g. [[Chi-Ha Kai]], [[M3A1 Stuart|M3A1]], [[Pz.IV C]], etc) this armour will not hold up any more, so it is better to stay in cover if tanks are around. The crew count is low, at only 3 men. Luckily there is a gap between the driving compartment and the fighting compartment. The post-penetration survivability depends on the shell: if it is an early tank's low-calibre shell or a solid AP round, then a penetration might take out only one or no crew member at all. If it is explosive, then you will not be so lucky. Quite some times the shell enters the hull at an angle, perfectly lining up the driver/machine gunner with the turret gunner, taking out those 2 crew members and destroying the Staghound. The turret is also prone to penetrations and strafing runs as it is open topped. The gun shield has a crack that lets the gunner aim but unfortunately exposes him to enemy fire at the same time. Overall the Staghound AA has quite some thick armour for a low tier wheeled SPAA, but should still be played carefully. | ||
| − | |||
'''Armour type:''' | '''Armour type:''' | ||
| Line 32: | Line 36: | ||
=== Mobility === | === Mobility === | ||
| + | {{Specs-Tank-Mobility}} | ||
<!-- ''Write about the mobility of the ground vehicle. Estimate the specific power and manoeuvrability, as well as the maximum speed forwards and backwards.'' --> | <!-- ''Write about the mobility of the ground vehicle. Estimate the specific power and manoeuvrability, as well as the maximum speed forwards and backwards.'' --> | ||
| + | The mobility of the Staghound AA is quite decent for a SPAA vehicle. Its weight is quite high for a wheeled vehicle. With a lower-than-average power-to-weight ratio, it will suffer from extremely low acceleration and lacklustre top speed in bad terrain like mud, snow and sand. But on hard surfaces it can often reach around ~50 km/h. The Staghound benefits greatly from developed roads, so pick the routes with the best terrain like concrete roads or hard grass plain to maximise your speed. Remember though that stock Staghounds will need quite some time to pick up speed. Its reverse speed of -15 km/h is also adequately fast to back you up from a dangerous corner, which can save your life. However it is still not fast enough comparing to vehicles with reverse gearbox, like the [[Sd.Kfz.234 (Family)|Sd.Kfz.234]] series, so do not count too much on your -15 km/h and don't overextend beyond cover when the situation ahead is unknown. | ||
| − | {{tankMobility|abMinHp= 276|rbMinHp= 172}} | + | {{tankMobility|abMinHp=276|rbMinHp=172}} |
| + | |||
| + | === Modifications and economy === | ||
| + | {{Specs-Economy}} | ||
== Armaments == | == Armaments == | ||
| + | {{Specs-Tank-Armaments}} | ||
=== Main armament === | === Main armament === | ||
| − | <!--''Give the reader information about the characteristics of the main gun. Assess its effectiveness in a battle based on the reloading speed, ballistics and the power of shells. Do not forget about the flexibility of the fire, that is how quickly the cannon can be aimed at the target, open fire on it and aim at another enemy. Add a link to the main article on the gun: <code><nowiki>{{main|Name of the weapon}}</nowiki></code>. Describe in general terms the ammunition available for the main gun. Give advice on how to use them and how to fill the ammunition storage.''--> | + | {{Specs-Tank-Weapon|1}} |
| − | {{main| | + | <!-- ''Give the reader information about the characteristics of the main gun. Assess its effectiveness in a battle based on the reloading speed, ballistics and the power of shells. Do not forget about the flexibility of the fire, that is how quickly the cannon can be aimed at the target, open fire on it and aim at another enemy. Add a link to the main article on the gun: <code><nowiki>{{main|Name of the weapon}}</nowiki></code>. Describe in general terms the ammunition available for the main gun. Give advice on how to use them and how to fill the ammunition storage.'' --> |
| + | {{main|M2HB (12.7 mm)}} | ||
| + | |||
| + | The Staghound AA is armed with a twin 12.7 mm M2 heavy MG at the gunner's sides. The M2 Browning MG is well known for its great penetration and damage as a machine gun, and it is evident on the Staghound: it can frontally penetrate almost all light tanks (e.g. [[BT-7 (Family)|BT-7]], [[M22]], [[Sd.Kfz.234 (Family)|Sd.Kfz.234]]), and the sides of some medium tanks (e.g. [[T-28 (Family)|T-28]], [[Chi-Ha Kai]], [[Pz.IV C]], etc) at close range, while dealing great damage to the crew. Usually 1 or 2 bullets are enough to knock out one crew member. The rate of fire of almost 600 rounds/min ensures that it can spray bullets around the target and quickly knock out remaining crews. This weapon system is also great at destroying modules such as MG, optics, tracks and gun barrels, though these small targets mean that you have to tilt the reticle to the side due to your far-apart gun placement. | ||
| − | With two 12.7 mm machine guns, the T17E2 shares the same anti-aircraft armament as the early USA's SPAAs (M13 MGMC and M16 MGMC). | + | With two 12.7 mm machine guns, the T17E2 shares the same anti-aircraft armament as the early USA's SPAAs ([[M13 MGMC]] and [[M16 MGMC]]). Against planes the dual M2 generally will not score critical hits instantly like other SPAAs with autocannons. These machine guns require you to accurately track the plane and land as much hits as possible to deal significant damage. With tracers, one can use the turret's fast traverse rate to "trace" the rounds towards the target and stay on them to cause enough damage to destroy planes. Low-tier biplane fighters like the [[He 51 (Family)|He 51]] will usually be destroyed with approximately 10 to 20 rounds, while more robust attackers and bombers can require way more. It is not too hard though, since each gun is fed with a 200-round ammo box, allowing the Staghound AA to spray and pray to some extent. With good trigger control, 200 rounds will be enough to get some planes down them before reloading. The M20 API-T is great at setting engines and fuel tanks on fire. |
{| class="wikitable" style="text-align:center" width="100%" | {| class="wikitable" style="text-align:center" width="100%" | ||
|- | |- | ||
| − | ! colspan="6" | [[ | + | ! colspan="6" | [[M2HB (12.7 mm)|12.7 mm M2HB]] (x2) || colspan="5" | Turret rotation speed (°/s) || colspan="4" | Reloading rate (seconds) |
|- | |- | ||
| − | ! Mode | + | ! Mode !! Capacity (Belt) !! Fire rate !! Vertical !! Horizontal !! Stabilizer |
| − | ! Capacity | + | ! Stock !! Upgraded !! Full !! Expert !! Aced |
| − | ! Fire rate | + | ! Stock !! Full !! Expert !! Aced |
| − | ! Vertical | ||
| − | ! Horizontal | ||
| − | ! Stabilizer | ||
| − | ! Stock | ||
| − | ! Upgraded | ||
| − | ! Full | ||
| − | ! Expert | ||
| − | ! Aced | ||
| − | ! Stock | ||
| − | ! Full | ||
| − | ! Expert | ||
| − | ! Aced | ||
|- | |- | ||
! ''Arcade'' | ! ''Arcade'' | ||
| − | | rowspan="2" | 2, | + | | rowspan="2" | 2,800 (200) || rowspan="2" | 577 || rowspan="2" | -10°/+75° || rowspan="2" | ±180° || rowspan="2" | N/A || 37.87 || 52.41 || 63.64 || 70.38 || 74.87 || rowspan="2" | 10.40 || rowspan="2" | 9.20 || rowspan="2" | 8.48 || rowspan="2" | 8.00 |
|- | |- | ||
| − | ! ''Realistic'' | + | ! ''Realistic'' |
| − | | 25.59 || 30.10 || | + | | 25.59 || 30.10 || 36.55 || 40.42 || 43.00 |
|- | |- | ||
|} | |} | ||
| − | + | ==== Ammunition ==== | |
| − | + | ||
| − | + | * '''Common:''' {{Annotation|API-T|M20 armour-piercing incendiary tracer}}{{-}}{{Annotation|I|M1 incendiary}}{{-}}{{Annotation|AP|M2 armour-piercing}}{{-}}{{Annotation|API-T|M20 armour-piercing incendiary tracer}} - These rounds work well until the others are researched. | |
| − | + | * '''API:''' {{Annotation|API-T|M20 armour-piercing incendiary tracer}}{{-}}{{Annotation|AP-I|M8 armour-piercing incendiary}}{{-}}{{Annotation|API-T|M20 armour-piercing incendiary tracer}} - These are absolutely devastating in the AA role with slightly less performance against enemy tanks than AP. | |
| − | + | * '''AP:''' {{Annotation|AP|M2 armour-piercing}}{{-}}{{Annotation|AP|M2 armour-piercing}}{{-}}{{Annotation|API-T|M20 armour-piercing incendiary tracer}} - These are best against enemy tanks at close range and do good damage to planes. | |
| − | + | * '''APIT:''' {{Annotation|API-T|M20 armour-piercing incendiary tracer}} - Better than API in all regards but not as good against tanks as AP, this is the belt of choice in almost all situations. Since every bullet is a tracer, it makes destroying aircraft much easier and detectability is not greatly increased over AP-I, however is increased a bit over AP. | |
| − | |- | ||
| − | |||
| − | |||
| − | |||
| − | |||
| − | |||
| − | |||
| − | |- | ||
| − | | | ||
| − | |- | ||
| − | |||
| − | |- | ||
| − | | AP-I | | ||
| − | |||
| − | |||
| − | |||
| − | |||
| − | {| | ||
| − | |||
| − | |- | ||
| − | |||
| − | |||
| − | |||
| − | |||
| − | |||
| − | |||
| − | |||
| − | |||
| − | |||
| − | |- | ||
| − | |||
| − | |||
| − | |||
| − | |||
| − | | AP || | ||
| − | |- | ||
| − | | | ||
| − | |||
| − | |||
| − | |||
| − | |||
| − | |||
| − | |||
| − | + | {{:M2HB (12.7 mm)/Ammunition|AP, I, API-T, AP-I}} | |
| − | { | ||
| − | |||
| − | |||
| − | |||
| − | |||
| − | |||
| − | |||
| − | |||
| − | |||
| − | |||
| − | |||
| − | + | ==== [[Ammo racks]] ==== | |
| − | [[File: | + | [[File:Ammoracks_{{PAGENAME}}.png|right|thumb|x250px|[[Ammo racks]] of the {{PAGENAME}}]] |
| − | {| class="wikitable | + | <!-- '''Last updated:''' --> |
| + | {| class="wikitable" style="text-align:center" | ||
|- | |- | ||
| − | ! | + | ! Full<br>ammo |
| − | ! | + | ! 1st<br>rack empty |
| − | ! | + | ! Visual<br>discrepancy |
|- | |- | ||
| − | + | | '''14''' || 2 ''(+10)'' || No | |
|- | |- | ||
|} | |} | ||
| − | + | ==== Optics ==== | |
| − | |||
| − | |||
| − | |||
| − | |||
{| class="wikitable" style="text-align:center" width="50%" | {| class="wikitable" style="text-align:center" width="50%" | ||
| − | ! colspan="3" | {{PAGENAME}} [[Optics]] | + | ! colspan="3" | {{PAGENAME}} [[Optics]] |
|- | |- | ||
! Which ones | ! Which ones | ||
| Line 159: | Line 103: | ||
|- | |- | ||
! Main Gun optics | ! Main Gun optics | ||
| − | | x2.1 || x3.7 | + | | x2.1 || x3.7 |
|- | |- | ||
! Comparable optics | ! Comparable optics | ||
| − | | colspan="2 | + | | colspan="2" | [[M13 MGMC]] |
|- | |- | ||
|} | |} | ||
== Usage in battles == | == Usage in battles == | ||
| − | ''Describe the tactics of playing in the vehicle, the features of using vehicles in the team and advice on tactics. Refrain from creating a "guide" - do not impose a single point of view but give the reader food for thought. Describe the most dangerous enemies and give recommendations on fighting them. If necessary, note the specifics of the game in different modes (AB, RB, SB).'' | + | <!-- ''Describe the tactics of playing in the vehicle, the features of using vehicles in the team and advice on tactics. Refrain from creating a "guide" - do not impose a single point of view but instead give the reader food for thought. Describe the most dangerous enemies and give recommendations on fighting them. If necessary, note the specifics of the game in different modes (AB, RB, SB).'' --> |
| + | The T17E2 main role is anti-aircraft. It is recommended to use tracer belts in order to be accurate yet deadly when engaging an enemy plane. It should be noted the T17E2 lacks capabilities to destroy enemy armour as most of tanks will be able to withstand your 12.7 mm machine guns. Do not engage with enemy armour unless they are lightly armoured (with armour less than 20 mm of thickness) or open vehicles (other anti-aircraft vehicles, Soviet SPGs, etc). Due to being a wheeled vehicle, the T17E2 has enough speed to capture enemy points and retreat. Use this tactic when there are no air engagements, go capture enemy points and avoid enemy contact unless you are in immediate danger or see an open vehicle, use your speed and low profile to your advantage. Bushes (both map props and tank decorators) are your friends in combat as they will camouflage you and reduce your tank silhouette. Be aware of your turret as, since it is open top, enemy planes will be able to kill your gunner in a strafe. Be aware that enemy tanks machine guns will be able to fire between the turret shield and kill your gunner (where the optics are at). | ||
| − | === | + | === Anti-air duty: === |
| − | + | Since the Staghound AA has plenty of ammo, the player will be able to "spray and pray", shooting prolonged bursts at an aircraft and hoping for some hits. This is only safe when the Staghound is in or near friendly territory, since long bursts of MG fire will usually draw enemy tanks' attention if you are near enemy territory. Or, the player can choose to be more accurate and shoot less. First find a hard cover taller than you and stay next to it. This way the target plane will not likely to hit you. When you see an enemy plane, fire off some short bursts (lasting ~1 second) towards it to draw its attention (tracer rounds work the best here). Quite a percentage of pilots in Ground RB tend to go for SPAA kills, so there is a chance that the plane will actually go after you. If it does, keep firing short bursts to "guide" it to you. Once its wingspan occupies around 1/5 of your reticle, start shooting long bursts or keep firing until it dies. Aim slightly above the plane's rudder tip to compensate for the bullet drop, as well as slightly drawing circles when you fire to increase the bullet spread so they are more likely to hit. In a head on like this, most planes will not survive undamaged. If they are not dead, you can still pour bullets at it as it zooms away. However if it lands hits around or on you, it might be a good idea to move into cover and wait for another chance to attack, since you don't have a lot of crew to spare. Other than head-ons, the Staghound AA is also good at killing nearby planes, as the large ammo box allows for long bursts to get the correct lead and deal some damage. | |
| − | + | ||
| − | + | === Anti-tank duty: === | |
| − | + | The twin M2 Browning MG on the Staghound is only capable of gunning down lightly-armoured vehicles, which are quite likely to appear on low BR battlefields. Targets like those (e.g. other SPAAs, tank destroyers, light tanks, or even some medium tanks) are your primary prey. Against SPAAs, tank destroyers, and most light tanks, you should have no problem destroying them, just fire at them before they spot you or shoot at you. Against better armoured tanks like [[T-28E]], your MG become less useful due to their limited penetration of only 31 mm. If the enemy tank does not notice you or is reloading or disarmed, you can break their tracks and/or gun barrels for your teammates to finish them, so you can get assists. You can also try targeting their turret ring, side, copula, or rear armour if possible. | |
| − | + | ||
| − | + | === Enemies worth noting: === | |
| − | + | ||
| − | + | * [[Ju 87 (Family)|Ju 87]]: the Ju 87 Stuka is commonly seen in ground battles. It has great bombload for an attacker/dive bomber, being able to carry huge bombs of up to 1,000 kg. If a Ju 87 is spotted carrying bombs, it is not recommended to draw its attention and go for a head-on, since whether you kill it or not it will still be able to drop its bombs around you, and a single 500 kg or 1,000 kg bomb landing anywhere near you will be more than enough to destroy you with the blast and shrapnel. Therefore, it is better to stay concealed, wait until they dropped all of their bombs on some unlucky teammate, then start firing. The Stuka is rather clumsy and cannot regain much altitude after a dive, so it tends to stay low and strafe around. This is your time: fire off some shots, and once you start getting "Hit"s, lengthen the burst for greater damage. | |
| − | + | * [[AS 42]], [[Flakpanzer 38]]: other SPAAs can be just as dangerous as tanks because their autocannons are great at tearing through light armour like that of a Staghound AA. If these SPAAs do not have the HVAP belt, then the armour of the Staghound can resist the shots, but it is better to assume that they do have HVAP. Their 64 mm penetration allows them to easily penetrate the Staghound AA's frontal armour, and the fast rate of fire will quickly finish off all 3 of your crew members. Thus stay in cover and do not go out if they know your presence. Peek out when they are distracted, their light armour cannot withstand your 12.7 mm bullets at all. | |
| − | |||
| − | |||
| − | |||
| − | |||
| − | |||
| − | |||
| − | |||
| − | |||
| − | |||
| − | |||
| − | |||
| − | |||
| − | |||
| − | |||
| − | |||
| − | |||
| − | |||
| − | |||
| − | |||
| − | |||
| − | |||
| − | |||
| − | |||
| − | |- | ||
| − | |||
=== Pros and cons === | === Pros and cons === | ||
| − | <!--'' | + | <!-- ''Summarise and briefly evaluate the vehicle in terms of its characteristics and combat effectiveness. Mark its pros and cons in a bulleted list. Try not to use more than 6 points for each of the characteristics. Avoid using categorical definitions such as "bad", "good" and the like - use substitutions with softer forms such as "inadequate" and "effective".'' --> |
| + | |||
'''Pros:''' | '''Pros:''' | ||
| − | * | + | * The twin .50 cal MG is potent against both aircraft and lightly-armoured ground targets |
| − | *High rate of fire | + | * High rate of fire sends more bullets towards target, dealing greater damage |
| − | *Good mobility | + | * Good mobility on road |
| − | *Fast turret rotation | + | * Fast turret rotation, good for aiming at fast moving targets |
| − | + | * More efficient than tracked vehicles when turning, due to it having all-wheel drive | |
| − | + | * Frontal hull and all-round turret armour is thick against some cannons (e.g. [[H.35]], [[I-Go Ko]]) | |
| − | *More efficient than tracked vehicles when turning, due to it having all wheel drive | ||
| − | * | ||
'''Cons:''' | '''Cons:''' | ||
| − | * | + | * Extremely slow and sluggish on bad road conditions like water, sand, snow, etc. |
| − | + | * Cannot pivot turn like a tank, difficult to navigate in confined spaces | |
| − | *Cannot pivot turn like a tank, | + | * Low penetration makes heavily-armoured tanks impossible to destroy |
| − | * | + | * Armour is still weak against proper tanks like [[Pz.III M]], [[Crusader II]] |
| − | * | + | * Turret is open-topped, allowing aircraft to knock out the turret crew |
== History == | == History == | ||
| − | <!--''Describe the history of the creation and combat usage of the | + | <!-- ''Describe the history of the creation and combat usage of the vehicle in more detail than in the introduction. If the historical reference turns out to be too long, take it to a separate article, taking a link to the article about the vehicle and adding a block "/History" (example: <nowiki>https://wiki.warthunder.com/(Vehicle-name)/History</nowiki>) and add a link to it here using the <code>main</code> template. Be sure to reference text and sources by using <code><nowiki><ref></ref></nowiki></code>, as well as adding them at the end of the article with <code><nowiki><references /></nowiki></code>. This section may also include the vehicle's dev blog entry (if applicable) and the in-game encyclopedia description (under <code><nowiki>=== In-game description ===</nowiki></code>, also if applicable).'' --> |
===Development=== | ===Development=== | ||
The '''T17E2''' started as an armoured car requested by US Army Ordnance in July 1941. The request asked for a medium armoured car for combat services. Two companies, Ford Motor Company and Chevrolet, submitted designs to this request, Ford's was an all driven 6x6 wheeled vehicle and Chevrolet's was an all driven 4x4 wheeled vehicle. These two were called ''T17'' and ''T17E1'' respectively, both were powered by two Hercules JXD engines in order to standardize on parts. These two vehicles were to use a turret developed by Rock Island Arsenal with a 37 mm cannon and machine guns, this would house a crew of five. Despite their development, the United States interest on the design waned and were never adopted fully by their armed forces, instead taking in the lighter M8 Greyhound car and using the T17 until the M8 production could be started. Had it been adopted, it would've been designated the ''M6''. | The '''T17E2''' started as an armoured car requested by US Army Ordnance in July 1941. The request asked for a medium armoured car for combat services. Two companies, Ford Motor Company and Chevrolet, submitted designs to this request, Ford's was an all driven 6x6 wheeled vehicle and Chevrolet's was an all driven 4x4 wheeled vehicle. These two were called ''T17'' and ''T17E1'' respectively, both were powered by two Hercules JXD engines in order to standardize on parts. These two vehicles were to use a turret developed by Rock Island Arsenal with a 37 mm cannon and machine guns, this would house a crew of five. Despite their development, the United States interest on the design waned and were never adopted fully by their armed forces, instead taking in the lighter M8 Greyhound car and using the T17 until the M8 production could be started. Had it been adopted, it would've been designated the ''M6''. | ||
| Line 235: | Line 154: | ||
===T17E2=== | ===T17E2=== | ||
| − | While the armoured car variants of the T17 served as a light reconnaissance force and armoured car regiments, some were converted into self-propelled anti-aircraft guns. The T17E1 was modified with a new turret developed by Frazer-Nash that equipped two .50 | + | While the armoured car variants of the T17 served as a light reconnaissance force and armoured car regiments, some were converted into self-propelled anti-aircraft guns. The T17E1 was modified with a new turret developed by Frazer-Nash that equipped two .50 cal M2 Browning machine guns, this modified vehicle was given the name '''T17E2'''. The turret was open-topped, had an electric-hydraulic traverse system, and reduced the number of crew on the T17E2 to three: the commander, gunner, and driver. About 789 Staghounds were converted into the T17E2, also named the ''"Staghound AA"'', in the period of October 1943 and April 1944. |
== Media == | == Media == | ||
| − | <!-- | + | <!-- ''Excellent additions to the article would be video guides, screenshots from the game, and photos.'' --> |
| − | + | ||
| − | + | ;Skins | |
| − | = | + | * [https://live.warthunder.com/feed/camouflages/?vehicle=uk_t17e2 Skins and camouflages for the {{PAGENAME}} from live.warthunder.com.] |
| − | <gallery mode="packed-hover"> | + | |
| − | Image:T17E2_WT_poster1.jpg|<small> | + | ;Images |
| − | Image:T17E2_WT_poster2.jpg|<small> | + | <gallery mode="packed-hover" heights="150"> |
| − | Image:T17E2_WT_poster3.jpg|<small> | + | Image:T17E2_WT_poster1.jpg|<small>Front view</small> |
| − | Image:T17E2_WT_poster4.jpg|<small> | + | Image:T17E2_WT_poster2.jpg|<small>Right view</small> |
| + | Image:T17E2_WT_poster3.jpg|<small>Left view</small> | ||
| + | Image:T17E2_WT_poster4.jpg|<small>Rear view</small> | ||
</gallery> | </gallery> | ||
| − | + | ||
| − | {{Youtube-gallery| | + | ;Videos |
| + | {{Youtube-gallery|lSQOT2AmsZc|'''The T17E2, British Tier-1, SPAA''' - ''Angry Nerd Gaming''|0ZhWzyhvFGg|'''Absolute massacre - T17E2 armoured car''' - ''PhlyDaily''}} | ||
== See also == | == See also == | ||
| − | <!--Links to the articles on the War Thunder Wiki that you think will be useful for the reader, for example: | + | <!-- ''Links to the articles on the War Thunder Wiki that you think will be useful for the reader, for example:'' |
* ''reference to the series of the vehicles;'' | * ''reference to the series of the vehicles;'' | ||
| − | * ''links to approximate analogues of other nations and research trees.''--> | + | * ''links to approximate analogues of other nations and research trees.'' --> |
| + | * [[BTR-152A]]: A Soviet SPAA which also features dual-mounted machine guns atop an armoured car. | ||
* [[AC Mk II AA]]: The succeeding vehicle in the British SPAA branch, featuring 20 mm autocannons. | * [[AC Mk II AA]]: The succeeding vehicle in the British SPAA branch, featuring 20 mm autocannons. | ||
| − | |||
== External links == | == External links == | ||
| − | <!--''Paste links to sources and external resources, such as:'' | + | <!-- ''Paste links to sources and external resources, such as:'' |
* ''topic on the official game forum;'' | * ''topic on the official game forum;'' | ||
| − | + | * ''other literature.'' --> | |
| − | * ''other literature.''--> | ||
| − | * [ | + | * [[wt:en/devblog/current/854/|[Devblog] T17E2 and Armoured Car Mk II SPAA]] |
| + | {{TankManufacturer Chevrolet}} | ||
{{Britain anti-aircraft vehicles}} | {{Britain anti-aircraft vehicles}} | ||
| + | [[Category:Wheeled ground vehicles]] | ||
Latest revision as of 15:14, 29 November 2023


Contents
Description
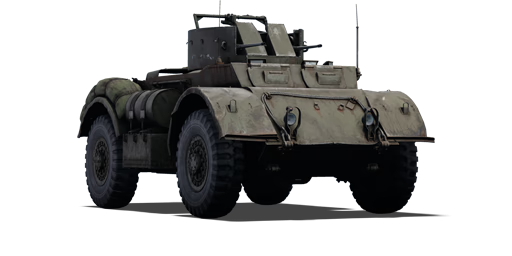
The T17E2 started as an armoured car requested by US Army Ordnance in July 1941. The request asked for a medium armoured car for combat services. Two companies, Ford Motor Company and Chevrolet, submitted designs to this request. During the T17's development, the British Purchasing Commission was also looking for a medium armoured car that could be used in the current campaign in North Africa. British requirements were a bit different than the American's and asked for the turret of the car to house at least two people and with a radio in the turret rather than in the hull. Some T17E1s were modified with a new turret developed by Frazer-Nash that equipped two .50 cal M2 Browning machine guns, this modified vehicle was given the name T17E2. About 789 Staghounds were converted into the T17E2, also named the "Staghound AA", in the period of October 1943 and April 1944.
It was introduced in Update 1.55 "Royal Armour" along with the initial British ground tree. The Armoured Car, Staghound AA (T17E2) is a very mobile SPAA with dual-mounted .50 cal machine guns, it also has armour rivalling some other Rank I vehicles and can thus withstand a majority of the smaller shells. The T17E2 has two obvious characteristics. It has wheels, giving it excellent speed and mobility, especially on hard surfaces like rock or roads. The wheels also mean that it struggles in mud, sand or snow. Then, there are the guns, the T17E2 is armed with a seemingly light armament of two 12.7 mm (.50 cal) machine guns. Compared to other SPAA of the rank, the armament are light. German and Japanese SPAA are armed with highly potent 20 mm auto cannons, which inflict far more damage to aircraft and vehicles alike. Instead, the T17E2 relies on its longevity and high rate of fire.
General info
Survivability and armour
The Staghound AA's armour protection is moderate for an SPAA. The frontal hull glacis is a sloped 22 mm plate which, when angling, can deflect quite some shells. Most reserve tanks' 37 mm guns will not be able to penetrate this, which makes the Staghound seem greatly protected considering that it is only a wheeled SPAA. However the driver's port will not be able to resist most shots as it is only 15 mm, and poorly angled. The turret is made of 31 mm plates all-round, which makes it immune to vehicles with weak penetration when they are shooting from far away, for example the H.35. This thickness is also enough to stop most aircraft weapons, such as the commonly used 7.92 mm MG17 and the 12.7 mm M2HB.
However, when facing vehicles at a higher BR with more powerful guns (e.g. Chi-Ha Kai, M3A1, Pz.IV C, etc) this armour will not hold up any more, so it is better to stay in cover if tanks are around. The crew count is low, at only 3 men. Luckily there is a gap between the driving compartment and the fighting compartment. The post-penetration survivability depends on the shell: if it is an early tank's low-calibre shell or a solid AP round, then a penetration might take out only one or no crew member at all. If it is explosive, then you will not be so lucky. Quite some times the shell enters the hull at an angle, perfectly lining up the driver/machine gunner with the turret gunner, taking out those 2 crew members and destroying the Staghound. The turret is also prone to penetrations and strafing runs as it is open topped. The gun shield has a crack that lets the gunner aim but unfortunately exposes him to enemy fire at the same time. Overall the Staghound AA has quite some thick armour for a low tier wheeled SPAA, but should still be played carefully.
Armour type:
- Rolled homogeneous armour
| Armour | Front | Sides | Rear | Roof |
|---|---|---|---|---|
| Hull | 22 mm (47°) Front glacis 22 mm (43°) Lower glacis 15 mm (32°) Driver's port |
19 mm (8-12°) | 9 mm (2-53°) | 12.7 mm |
| Turret | 31.7 mm (2-42°) | 31.7 mm (0-1°) | 31.7 mm (2°) | N/A |
- Wheels are 10 mm thick.
- Belly armour is 12.7 mm thick.
Mobility
The mobility of the Staghound AA is quite decent for a SPAA vehicle. Its weight is quite high for a wheeled vehicle. With a lower-than-average power-to-weight ratio, it will suffer from extremely low acceleration and lacklustre top speed in bad terrain like mud, snow and sand. But on hard surfaces it can often reach around ~50 km/h. The Staghound benefits greatly from developed roads, so pick the routes with the best terrain like concrete roads or hard grass plain to maximise your speed. Remember though that stock Staghounds will need quite some time to pick up speed. Its reverse speed of -15 km/h is also adequately fast to back you up from a dangerous corner, which can save your life. However it is still not fast enough comparing to vehicles with reverse gearbox, like the Sd.Kfz.234 series, so do not count too much on your -15 km/h and don't overextend beyond cover when the situation ahead is unknown.
| Game Mode | Max Speed (km/h) | Weight (tons) | Engine power (horsepower) | Power-to-weight ratio (hp/ton) | |||
|---|---|---|---|---|---|---|---|
| Forward | Reverse | Stock | Upgraded | Stock | Upgraded | ||
| Arcade | 96 | 16 | 12 | 276 | 370 | 23 | 30.83 |
| Realistic | 88 | 15 | 172 | 194 | 14.33 | 16.17 | |
Modifications and economy
| Mobility | Protection | Firepower | ||||||||||||||||||||
|---|---|---|---|---|---|---|---|---|---|---|---|---|---|---|---|---|---|---|---|---|---|---|
|
|
|
Armaments
Main armament
The Staghound AA is armed with a twin 12.7 mm M2 heavy MG at the gunner's sides. The M2 Browning MG is well known for its great penetration and damage as a machine gun, and it is evident on the Staghound: it can frontally penetrate almost all light tanks (e.g. BT-7, M22, Sd.Kfz.234), and the sides of some medium tanks (e.g. T-28, Chi-Ha Kai, Pz.IV C, etc) at close range, while dealing great damage to the crew. Usually 1 or 2 bullets are enough to knock out one crew member. The rate of fire of almost 600 rounds/min ensures that it can spray bullets around the target and quickly knock out remaining crews. This weapon system is also great at destroying modules such as MG, optics, tracks and gun barrels, though these small targets mean that you have to tilt the reticle to the side due to your far-apart gun placement.
With two 12.7 mm machine guns, the T17E2 shares the same anti-aircraft armament as the early USA's SPAAs (M13 MGMC and M16 MGMC). Against planes the dual M2 generally will not score critical hits instantly like other SPAAs with autocannons. These machine guns require you to accurately track the plane and land as much hits as possible to deal significant damage. With tracers, one can use the turret's fast traverse rate to "trace" the rounds towards the target and stay on them to cause enough damage to destroy planes. Low-tier biplane fighters like the He 51 will usually be destroyed with approximately 10 to 20 rounds, while more robust attackers and bombers can require way more. It is not too hard though, since each gun is fed with a 200-round ammo box, allowing the Staghound AA to spray and pray to some extent. With good trigger control, 200 rounds will be enough to get some planes down them before reloading. The M20 API-T is great at setting engines and fuel tanks on fire.
| 12.7 mm M2HB (x2) | Turret rotation speed (°/s) | Reloading rate (seconds) | ||||||||||||
|---|---|---|---|---|---|---|---|---|---|---|---|---|---|---|
| Mode | Capacity (Belt) | Fire rate | Vertical | Horizontal | Stabilizer | Stock | Upgraded | Full | Expert | Aced | Stock | Full | Expert | Aced |
| Arcade | 2,800 (200) | 577 | -10°/+75° | ±180° | N/A | 37.87 | 52.41 | 63.64 | 70.38 | 74.87 | 10.40 | 9.20 | 8.48 | 8.00 |
| Realistic | 25.59 | 30.10 | 36.55 | 40.42 | 43.00 | |||||||||
Ammunition
- Common: API-T · I · AP · API-T - These rounds work well until the others are researched.
- API: API-T · AP-I · API-T - These are absolutely devastating in the AA role with slightly less performance against enemy tanks than AP.
- AP: AP · AP · API-T - These are best against enemy tanks at close range and do good damage to planes.
- APIT: API-T - Better than API in all regards but not as good against tanks as AP, this is the belt of choice in almost all situations. Since every bullet is a tracer, it makes destroying aircraft much easier and detectability is not greatly increased over AP-I, however is increased a bit over AP.
| Penetration statistics | |||||||
|---|---|---|---|---|---|---|---|
| Ammunition | Penetration @ 0° Angle of Attack (mm) | ||||||
| 10 m | 100 m | 500 m | 1,000 m | 1,500 m | 2,000 m | ||
| AP | 31 | 29 | 21 | 14 | 9 | 6 | |
| I | 7 | 7 | 6 | 5 | 3 | 3 | |
| API-T | 29 | 27 | 19 | 12 | 7 | 5 | |
| AP-I | 30 | 27 | 19 | 12 | 8 | 5 | |
| Shell details | ||||||||||||
|---|---|---|---|---|---|---|---|---|---|---|---|---|
| Ammunition | Velocity (m/s) |
Projectile mass (kg) |
Fuse delay | Fuse sensitivity (mm) |
Explosive mass (TNT equivalent) (g) |
Ricochet | ||||||
| 0% | 50% | 100% | ||||||||||
| AP | 894 | 0.05 | - | - | - | 47° | 56° | 65° | ||||
| I | 944 | 0.04 | 0 | 3 | 0 | 47° | 56° | 65° | ||||
| API-T | 929 | 0.04 | - | - | - | 47° | 56° | 65° | ||||
| AP-I | 929 | 0.04 | - | - | - | 47° | 56° | 65° | ||||
Ammo racks

| Full ammo |
1st rack empty |
Visual discrepancy |
|---|---|---|
| 14 | 2 (+10) | No |
Optics
| Staghound AA Optics | ||
|---|---|---|
| Which ones | Default magnification | Maximum magnification |
| Main Gun optics | x2.1 | x3.7 |
| Comparable optics | M13 MGMC | |
Usage in battles
The T17E2 main role is anti-aircraft. It is recommended to use tracer belts in order to be accurate yet deadly when engaging an enemy plane. It should be noted the T17E2 lacks capabilities to destroy enemy armour as most of tanks will be able to withstand your 12.7 mm machine guns. Do not engage with enemy armour unless they are lightly armoured (with armour less than 20 mm of thickness) or open vehicles (other anti-aircraft vehicles, Soviet SPGs, etc). Due to being a wheeled vehicle, the T17E2 has enough speed to capture enemy points and retreat. Use this tactic when there are no air engagements, go capture enemy points and avoid enemy contact unless you are in immediate danger or see an open vehicle, use your speed and low profile to your advantage. Bushes (both map props and tank decorators) are your friends in combat as they will camouflage you and reduce your tank silhouette. Be aware of your turret as, since it is open top, enemy planes will be able to kill your gunner in a strafe. Be aware that enemy tanks machine guns will be able to fire between the turret shield and kill your gunner (where the optics are at).
Anti-air duty:
Since the Staghound AA has plenty of ammo, the player will be able to "spray and pray", shooting prolonged bursts at an aircraft and hoping for some hits. This is only safe when the Staghound is in or near friendly territory, since long bursts of MG fire will usually draw enemy tanks' attention if you are near enemy territory. Or, the player can choose to be more accurate and shoot less. First find a hard cover taller than you and stay next to it. This way the target plane will not likely to hit you. When you see an enemy plane, fire off some short bursts (lasting ~1 second) towards it to draw its attention (tracer rounds work the best here). Quite a percentage of pilots in Ground RB tend to go for SPAA kills, so there is a chance that the plane will actually go after you. If it does, keep firing short bursts to "guide" it to you. Once its wingspan occupies around 1/5 of your reticle, start shooting long bursts or keep firing until it dies. Aim slightly above the plane's rudder tip to compensate for the bullet drop, as well as slightly drawing circles when you fire to increase the bullet spread so they are more likely to hit. In a head on like this, most planes will not survive undamaged. If they are not dead, you can still pour bullets at it as it zooms away. However if it lands hits around or on you, it might be a good idea to move into cover and wait for another chance to attack, since you don't have a lot of crew to spare. Other than head-ons, the Staghound AA is also good at killing nearby planes, as the large ammo box allows for long bursts to get the correct lead and deal some damage.
Anti-tank duty:
The twin M2 Browning MG on the Staghound is only capable of gunning down lightly-armoured vehicles, which are quite likely to appear on low BR battlefields. Targets like those (e.g. other SPAAs, tank destroyers, light tanks, or even some medium tanks) are your primary prey. Against SPAAs, tank destroyers, and most light tanks, you should have no problem destroying them, just fire at them before they spot you or shoot at you. Against better armoured tanks like T-28E, your MG become less useful due to their limited penetration of only 31 mm. If the enemy tank does not notice you or is reloading or disarmed, you can break their tracks and/or gun barrels for your teammates to finish them, so you can get assists. You can also try targeting their turret ring, side, copula, or rear armour if possible.
Enemies worth noting:
- Ju 87: the Ju 87 Stuka is commonly seen in ground battles. It has great bombload for an attacker/dive bomber, being able to carry huge bombs of up to 1,000 kg. If a Ju 87 is spotted carrying bombs, it is not recommended to draw its attention and go for a head-on, since whether you kill it or not it will still be able to drop its bombs around you, and a single 500 kg or 1,000 kg bomb landing anywhere near you will be more than enough to destroy you with the blast and shrapnel. Therefore, it is better to stay concealed, wait until they dropped all of their bombs on some unlucky teammate, then start firing. The Stuka is rather clumsy and cannot regain much altitude after a dive, so it tends to stay low and strafe around. This is your time: fire off some shots, and once you start getting "Hit"s, lengthen the burst for greater damage.
- AS 42, Flakpanzer 38: other SPAAs can be just as dangerous as tanks because their autocannons are great at tearing through light armour like that of a Staghound AA. If these SPAAs do not have the HVAP belt, then the armour of the Staghound can resist the shots, but it is better to assume that they do have HVAP. Their 64 mm penetration allows them to easily penetrate the Staghound AA's frontal armour, and the fast rate of fire will quickly finish off all 3 of your crew members. Thus stay in cover and do not go out if they know your presence. Peek out when they are distracted, their light armour cannot withstand your 12.7 mm bullets at all.
Pros and cons
Pros:
- The twin .50 cal MG is potent against both aircraft and lightly-armoured ground targets
- High rate of fire sends more bullets towards target, dealing greater damage
- Good mobility on road
- Fast turret rotation, good for aiming at fast moving targets
- More efficient than tracked vehicles when turning, due to it having all-wheel drive
- Frontal hull and all-round turret armour is thick against some cannons (e.g. H.35, I-Go Ko)
Cons:
- Extremely slow and sluggish on bad road conditions like water, sand, snow, etc.
- Cannot pivot turn like a tank, difficult to navigate in confined spaces
- Low penetration makes heavily-armoured tanks impossible to destroy
- Armour is still weak against proper tanks like Pz.III M, Crusader II
- Turret is open-topped, allowing aircraft to knock out the turret crew
History
Development
The T17E2 started as an armoured car requested by US Army Ordnance in July 1941. The request asked for a medium armoured car for combat services. Two companies, Ford Motor Company and Chevrolet, submitted designs to this request, Ford's was an all driven 6x6 wheeled vehicle and Chevrolet's was an all driven 4x4 wheeled vehicle. These two were called T17 and T17E1 respectively, both were powered by two Hercules JXD engines in order to standardize on parts. These two vehicles were to use a turret developed by Rock Island Arsenal with a 37 mm cannon and machine guns, this would house a crew of five. Despite their development, the United States interest on the design waned and were never adopted fully by their armed forces, instead taking in the lighter M8 Greyhound car and using the T17 until the M8 production could be started. Had it been adopted, it would've been designated the M6.
British Adoption
During the T17's development, the British Purchasing Commission was also looking for a medium armoured car that could be used in the current campaign in North Africa. British requirements were a bit different than the American's and asked for the turret of the car to house at least two people and with a radio in the turret rather than in the hull. The British soon adopted the car and named it the "Deerhound", with production starting in October 1942. The T17E1 was also adopted as the "Staghound" and the British requested a production of 300 for testing, after which they then ordered another 1,500 for use. Production for the T17E1 also started on October 1942. When the US Army standardized their armoured cars to the M8 Greyhounds, the British vouched for the T17E1 production to continue for their use, to which the T17 was cancelled in early 1943 and only T17E1 were brought in by Lend-Lease. About 4,000 T17E1 "Staghounds" were produced in total for British use.
T17E2
While the armoured car variants of the T17 served as a light reconnaissance force and armoured car regiments, some were converted into self-propelled anti-aircraft guns. The T17E1 was modified with a new turret developed by Frazer-Nash that equipped two .50 cal M2 Browning machine guns, this modified vehicle was given the name T17E2. The turret was open-topped, had an electric-hydraulic traverse system, and reduced the number of crew on the T17E2 to three: the commander, gunner, and driver. About 789 Staghounds were converted into the T17E2, also named the "Staghound AA", in the period of October 1943 and April 1944.
Media
- Skins
- Images
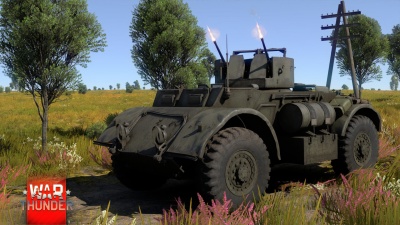
Front view

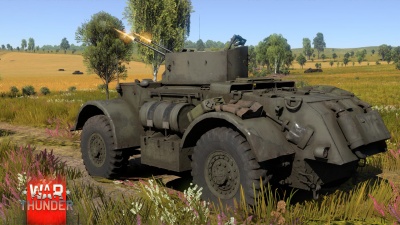
Right view
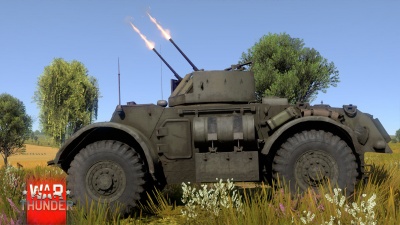
Left view
Rear view


- Videos
See also
- BTR-152A: A Soviet SPAA which also features dual-mounted machine guns atop an armoured car.
- AC Mk II AA: The succeeding vehicle in the British SPAA branch, featuring 20 mm autocannons.
External links
| Chevrolet Motor Division of General Motors Company | |
|---|---|
| SPAAs | Staghound AA |
| Note | Chevrolet is a division of General Motors (GM). |
| Britain anti-aircraft vehicles | |
|---|---|
| Crusader AA | Crusader AA Mk I · Crusader AA Mk II |
| Wheeled | Staghound AA · AEC AA |
| Radar SPAAG | Chieftain Marksman |
| Missile SPAA | Stormer HVM |
| Other | Light AA Mk I · Falcon |
| Canada | Skink |
| South Africa | Ystervark · Bosvark · ZA-35 |
