Difference between revisions of "Leclerc"
(Added PDV.) (Tag: Visual edit) |
(Complete re-write, included normal tables.) (Tag: Visual edit) |
||
| Line 6: | Line 6: | ||
{{break}} | {{break}} | ||
The '''{{Specs|name}}''' is a rank {{Specs|rank}} French medium tank {{Battle-rating}}. It was introduced in [[Update 1.89 "Imperial Navy"]]. | The '''{{Specs|name}}''' is a rank {{Specs|rank}} French medium tank {{Battle-rating}}. It was introduced in [[Update 1.89 "Imperial Navy"]]. | ||
| + | |||
| + | Developed by GIAT in the late 1980s, this variant of the Leclerc (the Serie 1) was the first production model. Despite this, it sports numerous modern technologies, a powerful NATO-compliant 120mm cannon equipped with an autoloader (as with many French tanks) and a powerful, advanced diesel engine with a gas turbine 'charger'. | ||
== General info == | == General info == | ||
| Line 11: | Line 13: | ||
[[File:Leclerc Serie 1 Protection Density Visualisation.png|thumb|Leclerc Serie 1 [[Protection Density Visualisation]]]]<!--''Describe armour protection. Note the most well protected and key weak areas. Appreciate the layout of modules as well as the number and location of crew members. Is the level of armour protection sufficient, is the placement of modules helpful for survival in combat?'' | [[File:Leclerc Serie 1 Protection Density Visualisation.png|thumb|Leclerc Serie 1 [[Protection Density Visualisation]]]]<!--''Describe armour protection. Note the most well protected and key weak areas. Appreciate the layout of modules as well as the number and location of crew members. Is the level of armour protection sufficient, is the placement of modules helpful for survival in combat?'' | ||
''If necessary use a visual template to indicate the most secure and weak zones of the armour.''--> | ''If necessary use a visual template to indicate the most secure and weak zones of the armour.''--> | ||
| − | The Leclerc is | + | [[File:Leclerc layout overview.png|thumb|Leclerc S1 Internal Layout]] |
| − | + | The Leclerc MBT is generally well protected with a well-designed layout resulting in good survivability. It does, however, have a number of prominent weak spots which are not easily hidden - most notable of which is the gun mantlet, which is mostly unprotected and can easily be penetrated to disable the cannon breech and often the tank commander, who sits on the exposed side of the mantlet (right side, looking from the front of the vehicle). The LFP (lower front plate) and UFP (upper front plate) are both weakly protected, with only the central front plate providing sufficient protection against incoming rounds. The Leclerc's turret cheeks are extremely well protected by modular composite armour, combining hard metals, semi-reactive and ceramic layers, protecting against even the most powerful kinetic rounds and most chemical rounds. | |
| − | |||
| − | |||
| − | |||
| − | + | Despite only seating three crew members, the Leclerc's survivability proves to be reasonable, with spaced out crew members, a blow-out compartment for the primary ammunition storage and the turret crew placed as low as feasible. As such, even successful penetration of the Leclerc is unlikely to disable the vehicle immediately - and even a vehicle fire or crew knockout will not stop the vehicle from reloading, ready to fire back. It is possible to destroy the Leclerc with one round by hitting the two crew on the right (viewed from the front). | |
| − | |||
| − | |||
=== Mobility === | === Mobility === | ||
<!--''Write about the mobility of the ground vehicle. Estimate the specific power and manoeuvrability, as well as the maximum speed forwards and backwards.''--> | <!--''Write about the mobility of the ground vehicle. Estimate the specific power and manoeuvrability, as well as the maximum speed forwards and backwards.''--> | ||
| − | The Leclerc | + | The Leclerc is powered by an excellent V8 diesel engine with a gas turbine auxiliary charger, producing a peak of 1474.5 horsepower at 2500 RPM, transferred to the drive sprockets via a transmission with 8 forward and 4 backward gears. With a maximum power-to-weight ratio of 27.01, the Leclerc is more than capable of reaching these speeds, with excellent acceleration and maneuverability characteristics to boot. The Leclerc will easily keep up with most of its counterparts such as the [[M1A2 Abrams]] or the [[Leopard 2A5]], and as such can comfortably reach strategic positions quickly or make its way into cap points with haste. It can also quickly escape sub-optimal situations, with a perfectly reasonable 38km/h reverse speed. |
| − | + | {| class="wikitable" style="text-align:center" | |
| + | |- | ||
| + | ! colspan="3" |Mobility Characteristics | ||
| + | |- | ||
| + | !Weight (tons) | ||
| + | ! colspan="1" |Add-on Armour | ||
| + | weight (tons) | ||
| + | ! colspan="1" |Max speed (km/h) | ||
| + | |- | ||
| + | | rowspan="2" |54.6|| colspan="1" rowspan="2" |N/A|| colspan="1" |78 (AB) | ||
| + | |- | ||
| + | |70 (RB/SB) | ||
| + | |- | ||
| + | ! colspan="3" |Engine power (horsepower) | ||
| + | |- | ||
| + | ! colspan="1" |Mode | ||
| + | !Stock | ||
| + | !Upgraded | ||
| + | |- | ||
| + | |''Arcade'' | ||
| + | |2,285 | ||
| + | | | ||
| + | |- | ||
| + | |''Realistic/Simulator'' | ||
| + | |1,304 | ||
| + | |1,474 | ||
| + | |- | ||
| + | ! colspan="3" |Power-to-weight ratio (hp/ton) | ||
| + | |- | ||
| + | ! colspan="1" |Mode | ||
| + | !Stock | ||
| + | !Upgraded | ||
| + | |- | ||
| + | |''Arcade'' | ||
| + | |41.85 | ||
| + | | | ||
| + | |- | ||
| + | |''Realistic/Simulator'' | ||
| + | |23.88 | ||
| + | |27.00 | ||
| + | |} | ||
== Armaments == | == Armaments == | ||
=== Main armament === | === Main armament === | ||
| Line 30: | Line 67: | ||
{{main|GIAT CN120-26 F1 (120 mm)}} | {{main|GIAT CN120-26 F1 (120 mm)}} | ||
| − | The Leclerc | + | The Leclerc Serie 1 mounts a 120 mm GIAT CN120-26/52 smoothbore cannon, fitted with a two-plane stabiliser and an autoloading system. The CN120 is a competitive cannon, displaying excellent performance with the OFL 120 F1 APFSDS round, up to a maximum of 528 mm of penetration at 0°. Combined with the consistent 6 second reload (independent of crew), this 120 mm cannon is more than competitive when compared to the offerings on its contemporaries. However, it's important to note that the OFL 120 F1 round is a tier 4 modification, and as such a stock Leclerc will be required to use the OCC 120 G1 HEAT-FS round - which, while capable, can prove somewhat unreliable when used against late vehicles with ERA and composite armour. |
| + | |||
| + | {| class="wikitable" style="text-align:center" | ||
| + | |- | ||
| + | ! colspan="6" |[[GIAT CN120-26 F1 (120 mm)|GIAT CN120-26/52 120 mm]] | ||
| + | |- | ||
| + | ! colspan="3" rowspan="1" style="width:5em" |Capacity | ||
| + | ! rowspan="1" |Vertical guidance | ||
| + | ! rowspan="1" |Horizontal guidance | ||
| + | ! rowspan="1" |Stabilizer | ||
| + | |- | ||
| + | | colspan="3" |40||-8°/+20°||±180°||Two-plane | ||
| + | |- | ||
| + | ! colspan="6" |Turret rotation speed (°/s) | ||
| + | |- | ||
| + | ! style="width:4em" |Mode | ||
| + | ! style="width:4em" |Stock | ||
| + | ! style="width:4em" |Upgraded | ||
| + | ! style="width:4em" |Prior + Full crew | ||
| + | ! style="width:4em" |Prior + Expert qualif. | ||
| + | ! style="width:4em" |Prior + Ace qualif. | ||
| + | |- | ||
| + | |''Arcade''||28.60||_.__||_.__||_.__||_.__ | ||
| + | |- | ||
| + | |''Realistic''||17.90||_.__||_.__||_.__||_.__ | ||
| + | |- | ||
| + | ! colspan="4" |Reloading rate (seconds) | ||
| + | |- | ||
| + | ! colspan="1" style="width:4em" |Stock | ||
| + | ! colspan="1" style="width:4em" |Prior + Full crew | ||
| + | ! colspan="1" style="width:4em" |Prior + Expert qualif. | ||
| + | ! colspan="1" style="width:4em" |Prior + Ace qualif. | ||
| + | |- | ||
| + | |6.00||6.00||6.00||6.00 | ||
| + | |} | ||
| + | |||
| + | {| class="wikitable sortable" style="text-align:center" width="100%" | ||
| + | ! colspan="8" |Penetration statistics | ||
| + | |- | ||
| + | ! rowspan="2" data-sort-type="text" |Ammunition | ||
| + | ! rowspan="2" class="unsortable" |Type of | ||
| + | warhead | ||
| + | ! colspan="6" |'''Penetration''' '''''in mm''''' '''@ 0° Angle of Attack''' | ||
| + | |- | ||
| + | !10m | ||
| + | !100m | ||
| + | !500m | ||
| + | !1000m | ||
| + | !1500m | ||
| + | !2000m | ||
| + | |- | ||
| + | |OCC 120 G1||HEAT-FS||480||480||480||480||480||480 | ||
| + | |- | ||
| + | |OFL 120 F1||APFSDS||528||527||519||511||503||494 | ||
| + | |} | ||
| + | {| class="wikitable sortable" style="text-align:center" width="100%" | ||
| + | ! colspan="11" |Shell details | ||
| + | |- | ||
| + | ! rowspan="2" data-sort-type="text" |Ammunition | ||
| + | ! rowspan="2" class="unsortable" |Type of | ||
| + | warhead | ||
| + | ! rowspan="2" |Velocity | ||
| + | in m/s | ||
| + | ! rowspan="2" |Projectile | ||
| + | Mass in kg | ||
| + | ! rowspan="2" |''Fuse delay'' | ||
| + | ''in m:'' | ||
| + | ! rowspan="2" |''Fuse sensitivity'' | ||
| + | ''in mm:'' | ||
| + | ! rowspan="2" |''Explosive Mass in g'' ''(TNT equivalent):'' | ||
| + | ! rowspan="2" |''Normalization At 30°'' | ||
| + | ''from horizontal:'' | ||
| + | ! colspan="3" |''Ricochet:'' | ||
| + | |- | ||
| + | !0% | ||
| + | !50% | ||
| + | !100% | ||
| + | |- | ||
| + | |OCC 120 G1 | ||
| + | |HEAT-FS | ||
| + | |1,100 | ||
| + | |14.4 | ||
| + | |N/A | ||
| + | |0.1 | ||
| + | |2,150 | ||
| + | |N/A | ||
| + | |65° | ||
| + | |72° | ||
| + | |75° | ||
| + | |- | ||
| + | |OFL 120 F1||APFSDS||1,790||3.8||N/A||N/A||4,100||N/A||78°||80°||81° | ||
| + | |} | ||
=== Machine guns === | === Machine guns === | ||
<!--''Offensive and anti-aircraft machine guns not only allow you to fight some aircraft but also are effective against lightly armoured vehicles. Evaluate machine guns and give recommendations on its use.''--> | <!--''Offensive and anti-aircraft machine guns not only allow you to fight some aircraft but also are effective against lightly armoured vehicles. Evaluate machine guns and give recommendations on its use.''--> | ||
{{main|M2HB (12.7 mm)}} | {{main|M2HB (12.7 mm)}} | ||
| − | + | The Leclerc mounts a single coaxial 12.7mm machine gun. While this coaxial mount limits it to +20° of elevation, if it can be placed on target it can prove effective against low-flying aircraft. Besides this, it can be useful for clearing out light obstacles, knocking out crew on open-top vehicles, and marking targets. | |
| + | ==== Optics and night vision ==== | ||
| + | The Leclerc receives night vision imagers once the tier 4 modification 'NVD' is researched. This unlocks 800 x 600 resolution thermal sights for both the gunner and commander, as well as standard image intensifiers for all crew (available in third person view in AB/RB additionally) | ||
| + | {| class="wikitable" style="text-align:center" | ||
| + | ! colspan="7" |{{PAGENAME}} [[Optics]] | ||
| + | |- | ||
| + | ! rowspan="3" |Type of optic | ||
| + | ! rowspan="3" |Magnification | ||
| + | ! colspan="5" |[[Night Vision Devices]] | ||
| + | |- | ||
| + | ! colspan="3" |Image Intensifier | ||
| + | ! rowspan="2" |{{Annotation|Thermal Imager<br>Resolution|The higher the resolution the clearer and more detailed the image is}} | ||
| + | ! rowspan="2" |Notes | ||
| + | |- | ||
| + | !{{Annotation|Resolution|The higher the resolution the clearer and more detailed the image is}} | ||
| + | !{{Annotation|Light Mult|By how much the image intensifier amplifies the existing light, primarily useful for comparing image intensifiers}} | ||
| + | !{{Annotation|Noise Level|How much noise is present in the image (how grainy the image is)}} | ||
| + | |- | ||
| + | !Gunner's Sight | ||
| + | |8.0x - 12.0x||--||--||--||800 x 600||Intensifier & thermal sights unlocked by 'NVD' modification (tier 4) | ||
| + | |- | ||
| + | !Commander's View | ||
| + | |6.0x||--||--||--||800 x 600||Intensifier & thermal sights unlocked by 'NVD' modification (tier 4) | ||
| + | |- | ||
| + | !Driver's View | ||
| + | |1.0x||1200 x 800||7.0||High||N/A||Intensifier unlocked by 'NVD' modification (tier 4) | ||
| + | |} | ||
==Usage in battles== | ==Usage in battles== | ||
<!--''Describe the tactics of playing in the vehicle, the features of using vehicles in the team and advice on tactics. Refrain from creating a "guide" - do not impose a single point of view but instead give the reader food for thought. Describe the most dangerous enemies and give recommendations on fighting them. If necessary, note the specifics of the game in different modes (AB, RB, SB).''--> | <!--''Describe the tactics of playing in the vehicle, the features of using vehicles in the team and advice on tactics. Refrain from creating a "guide" - do not impose a single point of view but instead give the reader food for thought. Describe the most dangerous enemies and give recommendations on fighting them. If necessary, note the specifics of the game in different modes (AB, RB, SB).''--> | ||
| − | The Leclerc is | + | The Leclerc is an extremely capable MBT, and can be deadly in the right hands. It can prove somewhat vulnerable in close-range engagements, where its numerous weak points are easily targeted, and as such it's preferable to make use of its high round velocity to snipe, or its excellent mobility to flank enemies. |
| + | '''Rural Combat''' | ||
| + | |||
| + | The Leclerc's OFL 120 F1 round, with its 1,790 m/s muzzle velocity and high penetration values is a potent sniping round. As such, on open maps (such as [[Kursk (Ground Forces)|Kursk]] or [[Maginot Line (Ground Forces)|Maginot Line]]), it's recommended to operate the Leclerc as a sniper - this allows it to both employ these round characteristics optimally and avoid the Leclerc's large weak spots being easy targets. On maps where flanking is viable (for example, the eastern hill on Maginot Line), the Leclerc's excellent power to weight ratio can be used to access and push through these routes. | ||
| + | |||
| + | '''Urban Combat''' | ||
| + | |||
| + | The Leclerc is less comfortable in urban combat situations, although still more than capable. On maps such as [[Alaska]], it's preferable to take flanking routes around the edges of urban regions where possible or cap points on the outskirts of the map (such as the A point in Alaska Domination), avoiding close quarters. In situations where avoiding close quarters is mostly impossible, it's best to play conservatively and maintain full awareness of enemy presence (audio is extremely important information in War Thunder - you can hear most vehicles coming!). Fortunately the Leclerc has a respectable reverse speed of 38 km/h and providing your engine, transmission and driver remain intact after a penetration it's more than capable of reversing out of trouble. | ||
| + | |||
| + | '''Notable Targets''' | ||
| + | |||
| + | <u>[[Challenger 2]]:</u> The CR2's turret cheeks are essentially immune to even OFL 120 F1 - and the Challenger is deadly accurate at long range. As such, sniping matches with the Challenger 2 should be avoided at all costs, instead attempt to flank it where possible. If there is no opportunity to get closer, move around between shots and try to land a shot on the gun mantlet or the UFP/LFP. | ||
| + | |||
| + | <u>[[M1A1 Abrams|M1A1]]/[[M1A2 Abrams]]:</u> The Abrams is a deadly opponent, and thanks to the crew and module spacing will often survive multiple shots. In any engagement, first try to disable the cannon breech - this avoids the Abrams firing back and with your quick reload you'll often have time to disable its mobility entirely. | ||
| + | |||
| + | <u>[[Leopard 2A5]]:</u> The Leopard 2A5 is a dangerous opponent, with a small gun mantlet weak spot and impenetrable turret cheeks. Fortunately, the OFL 120 F1 round can punch straight through the hull. If the opportunity for a hull shot does not arise, try to shoot through the gun mantlet or turret ring where possible. | ||
===Modules=== | ===Modules=== | ||
{| class="wikitable" | {| class="wikitable" | ||
| Line 63: | Line 232: | ||
| Filters|| | | Filters|| | ||
| Crew Replenishment | | Crew Replenishment | ||
| − | | Elevation Mechanism||Smoke grenade | + | | Elevation Mechanism||Laser rangefinder||Smoke grenade |
|- | |- | ||
| IV | | IV | ||
| Transmission||Engine | | Transmission||Engine | ||
| | | | ||
| − | | Artillery Support||OFL 120 F1|| | + | | Artillery Support||OFL 120 F1||NVD |
|- | |- | ||
|} | |} | ||
| − | + | The OFL 120 F1 round is the most important module to research for the Leclerc, followed closely by NVD (thermals help maintain a comfortable advantage over opponents). | |
| − | |||
| − | |||
| − | + | Parts and FPE should be the first modules researched, followed by Adjustment of Fire, Crew Replenishment, your choice of Laser Rangefinder or Smoke Grenades, then OFL 120 F1, NVD, and ideally mobility upgrades afterwards. | |
===Pros and cons=== | ===Pros and cons=== | ||
| Line 82: | Line 249: | ||
'''Pros:''' | '''Pros:''' | ||
| − | * | + | * Six second autoloader is very competitive |
| − | * | + | * Extremely good composite protection on turret cheeks and centre frontal plate |
| − | * | + | * Well-spaced crew and modules |
| − | * | + | * Blow-out contained primary ammunition storage |
| − | * | + | * Extremely mobile, with excellent acceleration and maneuverability characteristics |
| + | * Very effective 528 mm kinetic round | ||
'''Cons:''' | '''Cons:''' | ||
| − | * | + | * Only three crew members |
| − | * | + | * Numerous large vulnerabilities |
| + | * Only HEAT-FS available stock, has to research APFSDS as a tier 4 modification | ||
== History == | == History == | ||
Revision as of 02:08, 11 December 2019
Contents
Description

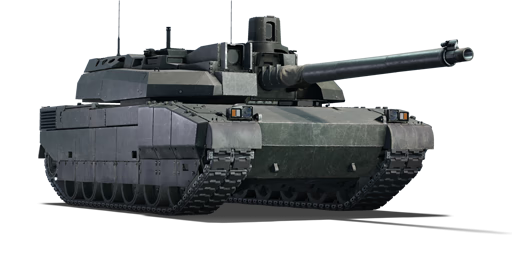
The Leclerc Serie 1 is a rank VII French medium tank
with a battle rating of 11.7 (AB/RB/SB). It was introduced in Update 1.89 "Imperial Navy".
Developed by GIAT in the late 1980s, this variant of the Leclerc (the Serie 1) was the first production model. Despite this, it sports numerous modern technologies, a powerful NATO-compliant 120mm cannon equipped with an autoloader (as with many French tanks) and a powerful, advanced diesel engine with a gas turbine 'charger'.
General info
Survivability and armour


The Leclerc MBT is generally well protected with a well-designed layout resulting in good survivability. It does, however, have a number of prominent weak spots which are not easily hidden - most notable of which is the gun mantlet, which is mostly unprotected and can easily be penetrated to disable the cannon breech and often the tank commander, who sits on the exposed side of the mantlet (right side, looking from the front of the vehicle). The LFP (lower front plate) and UFP (upper front plate) are both weakly protected, with only the central front plate providing sufficient protection against incoming rounds. The Leclerc's turret cheeks are extremely well protected by modular composite armour, combining hard metals, semi-reactive and ceramic layers, protecting against even the most powerful kinetic rounds and most chemical rounds.
Despite only seating three crew members, the Leclerc's survivability proves to be reasonable, with spaced out crew members, a blow-out compartment for the primary ammunition storage and the turret crew placed as low as feasible. As such, even successful penetration of the Leclerc is unlikely to disable the vehicle immediately - and even a vehicle fire or crew knockout will not stop the vehicle from reloading, ready to fire back. It is possible to destroy the Leclerc with one round by hitting the two crew on the right (viewed from the front).
Mobility
The Leclerc is powered by an excellent V8 diesel engine with a gas turbine auxiliary charger, producing a peak of 1474.5 horsepower at 2500 RPM, transferred to the drive sprockets via a transmission with 8 forward and 4 backward gears. With a maximum power-to-weight ratio of 27.01, the Leclerc is more than capable of reaching these speeds, with excellent acceleration and maneuverability characteristics to boot. The Leclerc will easily keep up with most of its counterparts such as the M1A2 Abrams or the Leopard 2A5, and as such can comfortably reach strategic positions quickly or make its way into cap points with haste. It can also quickly escape sub-optimal situations, with a perfectly reasonable 38km/h reverse speed.
| Mobility Characteristics | ||
|---|---|---|
| Weight (tons) | Add-on Armour
weight (tons) |
Max speed (km/h) |
| 54.6 | N/A | 78 (AB) |
| 70 (RB/SB) | ||
| Engine power (horsepower) | ||
| Mode | Stock | Upgraded |
| Arcade | 2,285 | |
| Realistic/Simulator | 1,304 | 1,474 |
| Power-to-weight ratio (hp/ton) | ||
| Mode | Stock | Upgraded |
| Arcade | 41.85 | |
| Realistic/Simulator | 23.88 | 27.00 |
Armaments
Main armament
The Leclerc Serie 1 mounts a 120 mm GIAT CN120-26/52 smoothbore cannon, fitted with a two-plane stabiliser and an autoloading system. The CN120 is a competitive cannon, displaying excellent performance with the OFL 120 F1 APFSDS round, up to a maximum of 528 mm of penetration at 0°. Combined with the consistent 6 second reload (independent of crew), this 120 mm cannon is more than competitive when compared to the offerings on its contemporaries. However, it's important to note that the OFL 120 F1 round is a tier 4 modification, and as such a stock Leclerc will be required to use the OCC 120 G1 HEAT-FS round - which, while capable, can prove somewhat unreliable when used against late vehicles with ERA and composite armour.
| GIAT CN120-26/52 120 mm | |||||
|---|---|---|---|---|---|
| Capacity | Vertical guidance | Horizontal guidance | Stabilizer | ||
| 40 | -8°/+20° | ±180° | Two-plane | ||
| Turret rotation speed (°/s) | |||||
| Mode | Stock | Upgraded | Prior + Full crew | Prior + Expert qualif. | Prior + Ace qualif. |
| Arcade | 28.60 | _.__ | _.__ | _.__ | _.__ |
| Realistic | 17.90 | _.__ | _.__ | _.__ | _.__ |
| Reloading rate (seconds) | |||||
| Stock | Prior + Full crew | Prior + Expert qualif. | Prior + Ace qualif. | ||
| 6.00 | 6.00 | 6.00 | 6.00 | ||
| Penetration statistics | |||||||
|---|---|---|---|---|---|---|---|
| Ammunition | Type of
warhead |
Penetration in mm @ 0° Angle of Attack | |||||
| 10m | 100m | 500m | 1000m | 1500m | 2000m | ||
| OCC 120 G1 | HEAT-FS | 480 | 480 | 480 | 480 | 480 | 480 |
| OFL 120 F1 | APFSDS | 528 | 527 | 519 | 511 | 503 | 494 |
| Shell details | ||||||||||
|---|---|---|---|---|---|---|---|---|---|---|
| Ammunition | Type of
warhead |
Velocity
in m/s |
Projectile
Mass in kg |
Fuse delay
in m: |
Fuse sensitivity
in mm: |
Explosive Mass in g (TNT equivalent): | Normalization At 30°
from horizontal: |
Ricochet: | ||
| 0% | 50% | 100% | ||||||||
| OCC 120 G1 | HEAT-FS | 1,100 | 14.4 | N/A | 0.1 | 2,150 | N/A | 65° | 72° | 75° |
| OFL 120 F1 | APFSDS | 1,790 | 3.8 | N/A | N/A | 4,100 | N/A | 78° | 80° | 81° |
Machine guns
The Leclerc mounts a single coaxial 12.7mm machine gun. While this coaxial mount limits it to +20° of elevation, if it can be placed on target it can prove effective against low-flying aircraft. Besides this, it can be useful for clearing out light obstacles, knocking out crew on open-top vehicles, and marking targets.
Optics and night vision
The Leclerc receives night vision imagers once the tier 4 modification 'NVD' is researched. This unlocks 800 x 600 resolution thermal sights for both the gunner and commander, as well as standard image intensifiers for all crew (available in third person view in AB/RB additionally)
| Leclerc Optics | ||||||
|---|---|---|---|---|---|---|
| Type of optic | Magnification | Night Vision Devices | ||||
| Image Intensifier | Thermal Imager Resolution |
Notes | ||||
| Resolution | Light Mult | Noise Level | ||||
| Gunner's Sight | 8.0x - 12.0x | -- | -- | -- | 800 x 600 | Intensifier & thermal sights unlocked by 'NVD' modification (tier 4) |
| Commander's View | 6.0x | -- | -- | -- | 800 x 600 | Intensifier & thermal sights unlocked by 'NVD' modification (tier 4) |
| Driver's View | 1.0x | 1200 x 800 | 7.0 | High | N/A | Intensifier unlocked by 'NVD' modification (tier 4) |
Usage in battles
The Leclerc is an extremely capable MBT, and can be deadly in the right hands. It can prove somewhat vulnerable in close-range engagements, where its numerous weak points are easily targeted, and as such it's preferable to make use of its high round velocity to snipe, or its excellent mobility to flank enemies.
Rural Combat
The Leclerc's OFL 120 F1 round, with its 1,790 m/s muzzle velocity and high penetration values is a potent sniping round. As such, on open maps (such as Kursk or Maginot Line), it's recommended to operate the Leclerc as a sniper - this allows it to both employ these round characteristics optimally and avoid the Leclerc's large weak spots being easy targets. On maps where flanking is viable (for example, the eastern hill on Maginot Line), the Leclerc's excellent power to weight ratio can be used to access and push through these routes.
Urban Combat
The Leclerc is less comfortable in urban combat situations, although still more than capable. On maps such as Alaska, it's preferable to take flanking routes around the edges of urban regions where possible or cap points on the outskirts of the map (such as the A point in Alaska Domination), avoiding close quarters. In situations where avoiding close quarters is mostly impossible, it's best to play conservatively and maintain full awareness of enemy presence (audio is extremely important information in War Thunder - you can hear most vehicles coming!). Fortunately the Leclerc has a respectable reverse speed of 38 km/h and providing your engine, transmission and driver remain intact after a penetration it's more than capable of reversing out of trouble.
Notable Targets
Challenger 2: The CR2's turret cheeks are essentially immune to even OFL 120 F1 - and the Challenger is deadly accurate at long range. As such, sniping matches with the Challenger 2 should be avoided at all costs, instead attempt to flank it where possible. If there is no opportunity to get closer, move around between shots and try to land a shot on the gun mantlet or the UFP/LFP.
M1A1/M1A2 Abrams: The Abrams is a deadly opponent, and thanks to the crew and module spacing will often survive multiple shots. In any engagement, first try to disable the cannon breech - this avoids the Abrams firing back and with your quick reload you'll often have time to disable its mobility entirely.
Leopard 2A5: The Leopard 2A5 is a dangerous opponent, with a small gun mantlet weak spot and impenetrable turret cheeks. Fortunately, the OFL 120 F1 round can punch straight through the hull. If the opportunity for a hull shot does not arise, try to shoot through the gun mantlet or turret ring where possible.
Modules
| Tier | Mobility | Protection | Firepower | |||
|---|---|---|---|---|---|---|
| I | Tracks | Parts | Horizontal Drive | |||
| II | Suspension | Brake System | FPE | Adjustment of Fire | ||
| III | Filters | Crew Replenishment | Elevation Mechanism | Laser rangefinder | Smoke grenade | |
| IV | Transmission | Engine | Artillery Support | OFL 120 F1 | NVD | |
The OFL 120 F1 round is the most important module to research for the Leclerc, followed closely by NVD (thermals help maintain a comfortable advantage over opponents).
Parts and FPE should be the first modules researched, followed by Adjustment of Fire, Crew Replenishment, your choice of Laser Rangefinder or Smoke Grenades, then OFL 120 F1, NVD, and ideally mobility upgrades afterwards.
Pros and cons
Pros:
- Six second autoloader is very competitive
- Extremely good composite protection on turret cheeks and centre frontal plate
- Well-spaced crew and modules
- Blow-out contained primary ammunition storage
- Extremely mobile, with excellent acceleration and maneuverability characteristics
- Very effective 528 mm kinetic round
Cons:
- Only three crew members
- Numerous large vulnerabilities
- Only HEAT-FS available stock, has to research APFSDS as a tier 4 modification
History
Development of the Leclerc main battle tank dates back to 1964, when the French military initiated a study on possible replacements for the AMX-30 tank, about to be introduced into service at the time. By the early ‘70s, the inferiority of the AMX-30 compared to more modern Soviet T-series MBTs had become obvious. As a result, work on developing a replacement officially began, with first specifications being drawn up by 1977.
In 1980, France and Germany began joint development of a new main battle tank. However, similarly to the previous Europanzer development decades ago, the joint effort quickly came to an end shortly afterwards due to various disagreements, with France continuing work on its own.
The new main battle tank was intended to offer cutting-edge performance by making use of the latest equipment available. However, as the per unit price was projected to be substantial, France sought partnership with another state to reduce these costs. Eventually, a partnership was established with the UAE, who would be the second and only other primary operator of the new tank, other than France itself.
Thus, in 1986 the tank received its name “Leclerc”, with six initial prototypes being produced. Mass production subsequently started in 1990 and went on until 2007. During production, the Leclerc was built in various batches and series, each introducing various tweaks and changes to the design, while some also incorporated major upgrades.
The Leclerc saw service as part of a number of UN peacekeeping missions, primarily in Kosovo and Lebanon, with reported favourable performance. Most recently, the UAE deployed a number of its Leclercs to Yemen, with some vehicles getting damaged. As of the end of production in 2007, a total of around 860 Leclercs were built for both French and UAE forces combined.
- From Devblog
Media

See also
Links to the articles on the War Thunder Wiki that you think will be useful for the reader, for example:
- reference to the series of the vehicles;
- links to approximate analogues of other nations and research trees.
External links
| France medium tanks | |
|---|---|
| M4 Derivatives | M4A1 (FL10) · M4A4 (SA50) |
| AMX-50 | AMX M4 · AMX-50 (TOA100) · AMX-50 (TO90/930) |
| AMX-30 | AMX-30 · AMX-30 (1972) · AMX-30B2 · AMX-30B2 BRENUS · AMX-30 ACRA · AMX-30 Super |
| AMX-32/40 | AMX-32 · AMX-32 (105) · AMX-40 |
| Leclerc | Leclerc · Leclerc S2 · Leclerc SXXI · Leclerc AZUR |
| Other | D2 · S.35 · Lorraine 40t |
| Germany | Panther "Dauphiné" |
| USA | ▄M4A1 · ▄M4A3 (105) · ▄M4A4 · ▄M26 |
