Difference between revisions of "2C bis"
m |
(Edits) |
||
| Line 6: | Line 6: | ||
== Description == | == Description == | ||
<!-- ''In the description, the first part should be about the history of the creation and combat usage of the vehicle, as well as its key features. In the second part, tell the reader about the ground vehicle in the game. Insert a screenshot of the vehicle, so that if the novice player does not remember the vehicle by name, he will immediately understand what kind of vehicle the article is talking about.'' --> | <!-- ''In the description, the first part should be about the history of the creation and combat usage of the vehicle, as well as its key features. In the second part, tell the reader about the ground vehicle in the game. Insert a screenshot of the vehicle, so that if the novice player does not remember the vehicle by name, he will immediately understand what kind of vehicle the article is talking about.'' --> | ||
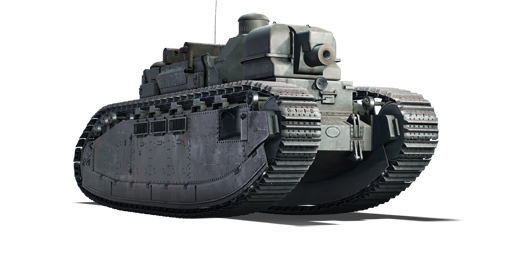
| − | The '''{{Specs|name}}''' is a premium rank {{Specs|rank}} French heavy tank {{Battle-rating}}. It was introduced in [[Update "Apex Predators"]]. Often called a "super heavy" tank, the 2C bis is a modification of the FCM 2C. It differs from the standard 2C primarily in that it mounts a cast turret housing a 155 mm howitzer. It also lacks the machine gun mounts on the sides of the vehicle. Only one FCM 2C was modified in this way: No. 99 "Champagne". | + | The '''{{Specs|name}}''' is a premium rank {{Specs|rank}} French heavy tank {{Battle-rating}}. It was introduced in [[Update "Apex Predators"]]. |
| + | |||
| + | Often called a "super heavy" tank, the 2C bis is a modification of the FCM 2C. It differs from the standard 2C primarily in that it mounts a cast turret housing a 155 mm howitzer. It also lacks the machine gun mounts on the sides of the vehicle. Only one FCM 2C was modified in this way: No. 99 "Champagne". | ||
== General info == | == General info == | ||
=== Survivability and armour === | === Survivability and armour === | ||
{{Specs-Tank-Armour}} | {{Specs-Tank-Armour}} | ||
| − | <!-- ''Describe armour protection. Note the most well protected and key weak areas. Appreciate the layout of modules as well as the number and location of crew members. Is the level of armour protection sufficient, is the placement of modules helpful for survival in combat? If necessary use a visual template to indicate the most secure and weak zones of the armour.'' --> | + | <!-- ''Describe armour protection. Note the most well protected and key weak areas. Appreciate the layout of modules as well as the number and location of crew members. Is the level of armour protection sufficient, is the placement of modules helpful for survival in combat? If necessary use a visual template to indicate the most secure and weak zones of the armour.'' --> |
| − | The 2C bis' true survivability lies in | + | Being comprised of large, flat, vertical armour plates, the 2C bis does not have a revolutionary armour scheme. Many dedicated anti-tank guns such as the Soviet 45 mm 45-K, the US 37 mm M5/M6 guns, and the British 40 mm 2-pounder can penetrate this tank frontally from medium to short range without any problem. Larger cannons will have no issue dealing with the 2C bis. Autocannons can also be a threat, especially from the thinly armoured sides. However, some slight angling can somewhat mitigate this issue. The large tracks of the 2C bis can obscure the front plate and make it harder to penetrate. |
| + | |||
| + | The 2C bis' true survivability lies in its crew count. 12 crew members are place throughout the vehicle, meaning that even if the crew up front is entirely knocked out with an APHE shell, there are a number of aft-facing members ready to replace them. This can give the 2C bis a near comical amount of survivability as it can be continuously penetrated, seemingly disabled, and suddenly it can return to battle. | ||
'''Armour type:''' | '''Armour type:''' | ||
| Line 39: | Line 43: | ||
{{Specs-Tank-Mobility}} | {{Specs-Tank-Mobility}} | ||
<!-- ''Write about the mobility of the ground vehicle. Estimate the specific power and manoeuvrability, as well as the maximum speed forwards and backwards.'' --> | <!-- ''Write about the mobility of the ground vehicle. Estimate the specific power and manoeuvrability, as well as the maximum speed forwards and backwards.'' --> | ||
| − | The 2C bis utilizes a diesel-electric hybrid drive system. Two Sautter-Harlé inline 6 diesel engines power electric generators which then engage with electric motors at the rear sprocket. Like the Pz.Bef.Wg.VI P, this means that the 2C bis can neutral steer and theoretically go just as fast in reverse. In addition, the 2C bis accelerates to | + | The 2C bis utilizes a diesel-electric hybrid drive system. Two Sautter-Harlé inline 6 diesel engines power electric generators which then engage with electric motors at the rear sprocket. Like the Pz.Bef.Wg.VI P, this means that the 2C bis can neutral steer and theoretically go just as fast in reverse. In addition, the 2C bis accelerates to its top speed quickly, but this is only 15 km/h. The 2C will certainly be the last tank to the fight, but on the other hand the quick reverse acceleration can prove helpful in close quarters. |
{{tankMobility}} | {{tankMobility}} | ||
| Line 51: | Line 55: | ||
{{Specs-Tank-Weapon|1}} | {{Specs-Tank-Weapon|1}} | ||
<!-- ''Give the reader information about the characteristics of the main gun. Assess its effectiveness in a battle based on the reloading speed, ballistics and the power of shells. Do not forget about the flexibility of the fire, that is how quickly the cannon can be aimed at the target, open fire on it and aim at another enemy. Add a link to the main article on the gun: <code><nowiki>{{main|Name of the weapon}}</nowiki></code>. Describe in general terms the ammunition available for the main gun. Give advice on how to use them and how to fill the ammunition storage.'' --> | <!-- ''Give the reader information about the characteristics of the main gun. Assess its effectiveness in a battle based on the reloading speed, ballistics and the power of shells. Do not forget about the flexibility of the fire, that is how quickly the cannon can be aimed at the target, open fire on it and aim at another enemy. Add a link to the main article on the gun: <code><nowiki>{{main|Name of the weapon}}</nowiki></code>. Describe in general terms the ammunition available for the main gun. Give advice on how to use them and how to fill the ammunition storage.'' --> | ||
| − | {{main|Schneider 155 C (155 mm)}} | + | {{main|Schneider 155 C (155 mm)}} |
| − | + | The 2C bis has a 155 mm Schneider howitzer in its two man cast turret. Its velocity is extremely low and its reload rate is abysmal. The armament takes time and practice to utilize effectively, especially with its limited elevation and depression angles. However, with 58 mm of HE penetration, the Mle1915 shell will obliterate whatever it touches at the BR of the 2C bis. As long as the shell makes contact anywhere, it is almost guaranteed to knock a vehicle out. Open-topped vehicles can even be knocked out by splash damage, as this is basically an artillery piece on tracks. | |
{| class="wikitable" style="text-align:center" width="100%" | {| class="wikitable" style="text-align:center" width="100%" | ||
| Line 142: | Line 146: | ||
== Usage in battles == | == Usage in battles == | ||
<!-- ''Describe the tactics of playing in the vehicle, the features of using vehicles in the team and advice on tactics. Refrain from creating a "guide" - do not impose a single point of view but instead give the reader food for thought. Describe the most dangerous enemies and give recommendations on fighting them. If necessary, note the specifics of the game in different modes (AB, RB, SB).'' --> | <!-- ''Describe the tactics of playing in the vehicle, the features of using vehicles in the team and advice on tactics. Refrain from creating a "guide" - do not impose a single point of view but instead give the reader food for thought. Describe the most dangerous enemies and give recommendations on fighting them. If necessary, note the specifics of the game in different modes (AB, RB, SB).'' --> | ||
| − | As stated before, slight angling at longer ranges can increase survivability and make the | + | As stated before, slight angling at longer ranges can increase survivability and make the armour somewhat useful. If you are not sure about how far a target is, use the rangefinder, even at close range. It is actually rather fast in the 2C bis, and a miss will have you waiting a long time to reload. The dreadful top speed will sometimes work in your favour, being that the first "wave" of enemy vehicles has already been dealt with. The 2C bis does not do well against multiple vehicles. The quick reverse acceleration can work in your favour in urban environments. |
| − | Sitting in the rear and lobbing artillery at the enemy is a possible strategy, but the low velocity and high arc of the rounds make this difficult. Eventually, a dedicated anti-tank SPG will likely disable or knock out the vehicle. The 2C bis performs better at mid-range encounters where tracking targets can be easier. Surprisingly despite | + | Sitting in the rear and lobbing artillery at the enemy is a possible strategy, but the low velocity and high arc of the rounds make this difficult. Eventually, a dedicated anti-tank SPG will likely disable or knock out the vehicle. The 2C bis performs better at mid-range encounters where tracking targets can be easier. Surprisingly, despite its size, getting "Shadow Strikes" is possible in urban areas. Use your machine guns to clear obstacles that may trigger the HE shell's fuse prematurely. |
| − | |||
| − | |||
=== Pros and cons === | === Pros and cons === | ||
<!-- ''Summarise and briefly evaluate the vehicle in terms of its characteristics and combat effectiveness. Mark its pros and cons in a bulleted list. Try not to use more than 6 points for each of the characteristics. Avoid using categorical definitions such as "bad", "good" and the like - use substitutions with softer forms such as "inadequate" and "effective".'' --> | <!-- ''Summarise and briefly evaluate the vehicle in terms of its characteristics and combat effectiveness. Mark its pros and cons in a bulleted list. Try not to use more than 6 points for each of the characteristics. Avoid using categorical definitions such as "bad", "good" and the like - use substitutions with softer forms such as "inadequate" and "effective".'' --> | ||
| − | |||
'''Pros:''' | '''Pros:''' | ||
| − | * Has a dozen | + | * Has a dozen crew members, highly survivable |
* 155 mm howitzer will decimate anything even above its BR | * 155 mm howitzer will decimate anything even above its BR | ||
* Neutral steering gives the tank decent reflex mobility | * Neutral steering gives the tank decent reflex mobility | ||
| Line 167: | Line 168: | ||
* Limited turret traverse, very prone to flanking | * Limited turret traverse, very prone to flanking | ||
* Poor elevation and depression angles | * Poor elevation and depression angles | ||
| − | |||
== History == | == History == | ||
<!-- ''Describe the history of the creation and combat usage of the vehicle in more detail than in the introduction. If the historical reference turns out to be too long, take it to a separate article, taking a link to the article about the vehicle and adding a block "/History" (example: <nowiki>https://wiki.warthunder.com/(Vehicle-name)/History</nowiki>) and add a link to it here using the <code>main</code> template. Be sure to reference text and sources by using <code><nowiki><ref></ref></nowiki></code>, as well as adding them at the end of the article with <code><nowiki><references /></nowiki></code>. This section may also include the vehicle's dev blog entry (if applicable) and the in-game encyclopedia description (under <code><nowiki>=== In-game description ===</nowiki></code>, also if applicable).'' --> | <!-- ''Describe the history of the creation and combat usage of the vehicle in more detail than in the introduction. If the historical reference turns out to be too long, take it to a separate article, taking a link to the article about the vehicle and adding a block "/History" (example: <nowiki>https://wiki.warthunder.com/(Vehicle-name)/History</nowiki>) and add a link to it here using the <code>main</code> template. Be sure to reference text and sources by using <code><nowiki><ref></ref></nowiki></code>, as well as adding them at the end of the article with <code><nowiki><references /></nowiki></code>. This section may also include the vehicle's dev blog entry (if applicable) and the in-game encyclopedia description (under <code><nowiki>=== In-game description ===</nowiki></code>, also if applicable).'' --> | ||
| − | + | The FCM 2C was a French "super heavy" tank designed to conquer the "no man's land" of WW1. It was dimensionally the largest tank ever produced, and for a time the heaviest. Ready for production by February 1918, the war ended before any of the vehicles were completed, and so the order of 300 was eventually reduced to just 10, finished in 1921. The standard 2C mounted a 75 mm APX 1897 field gun, similar to the cannon which would be mounted on the [[M3 GMC]] tank destroyer. The 2C had many innovative design features for the time, including a hybrid drive, leaf spring suspension, the world's first three-man turret, and stroboscopic cupolas. All of the 2Cs were named after ancient regions of France. | |
| − | One 2C, No. 99 "Champagne" was given a new two man cast turret with a 155 mm howitzer. The commander was given his own compartment behind the turret. The side machine gun ports were also removed. This variant would be known as the 2C bis. Eventually, Champagne would be returned to | + | One 2C, No. 99 "Champagne", was given a new two-man cast turret with a 155 mm howitzer. The commander was given his own compartment behind the turret. The side machine gun ports were also removed. This variant would be known as the 2C bis. Eventually, Champagne would be returned to its original configuration and its turret would be used as a makeshift static emplacement in the Mareth Line. Champagne would be the only 2C to survive the invasion of France, with the other nine tanks either being scuttled by their own crew to prevent capture, or breaking down. |
| − | |||
== Media == | == Media == | ||
<!-- ''Excellent additions to the article would be video guides, screenshots from the game, and photos.'' --> | <!-- ''Excellent additions to the article would be video guides, screenshots from the game, and photos.'' --> | ||
| − | |||
| − | + | {{Youtube-gallery|QmaE2bomv14|'''GIANT DERP LAND BATTLESHIP {{!}} 155mm 70 TON MONSTER''' - ''PhlyDaily''|'''Trenchwarmer {{!}} Char 2C''' - ''Tank Encyclopedia''}} | |
| − | |||
| − | '' | ||
== See also == | == See also == | ||
| Line 197: | Line 193: | ||
* ''topic on the official game forum;'' | * ''topic on the official game forum;'' | ||
* ''other literature.'' --> | * ''other literature.'' --> | ||
| − | |||
| − | + | * [[wt:en/news/8033-development-char-2bis-the-beast-of-champagne-en|[Devblog] Char 2bis: the Beast of Champagne]] | |
| − | + | * [https://tanks-encyclopedia.com/ww2/france/fcm-2c.php <nowiki>[Tank Encyclopedia]</nowiki> Char 2C] | |
| − | |||
| − | |||
| − | |||
| − | |||
| − | |||
| − | |||
{{France heavy tanks}} | {{France heavy tanks}} | ||
{{France premium ground vehicles}} | {{France premium ground vehicles}} | ||
Revision as of 20:30, 27 December 2022

Contents
Description
The Char FCM 2C bis is a premium rank I French heavy tank with a battle rating of 1.7 (AB/RB/SB). It was introduced in Update "Apex Predators".
Often called a "super heavy" tank, the 2C bis is a modification of the FCM 2C. It differs from the standard 2C primarily in that it mounts a cast turret housing a 155 mm howitzer. It also lacks the machine gun mounts on the sides of the vehicle. Only one FCM 2C was modified in this way: No. 99 "Champagne".
General info
Survivability and armour
Being comprised of large, flat, vertical armour plates, the 2C bis does not have a revolutionary armour scheme. Many dedicated anti-tank guns such as the Soviet 45 mm 45-K, the US 37 mm M5/M6 guns, and the British 40 mm 2-pounder can penetrate this tank frontally from medium to short range without any problem. Larger cannons will have no issue dealing with the 2C bis. Autocannons can also be a threat, especially from the thinly armoured sides. However, some slight angling can somewhat mitigate this issue. The large tracks of the 2C bis can obscure the front plate and make it harder to penetrate.
The 2C bis' true survivability lies in its crew count. 12 crew members are place throughout the vehicle, meaning that even if the crew up front is entirely knocked out with an APHE shell, there are a number of aft-facing members ready to replace them. This can give the 2C bis a near comical amount of survivability as it can be continuously penetrated, seemingly disabled, and suddenly it can return to battle.
Armour type:
- Rolled homogeneous armour (hull, side, side skirts, roof)
- Cast homogeneous armour (turret, 155 mm gun mantlet, cupola)
| Armour | Front (Slope angle) | Sides | Rear | Roof |
|---|---|---|---|---|
| Hull | 49 mm (0°) Front plate 22 mm (69°) Front glacis 15 mm (73°) Lower glacis |
22 mm (0°) | 15 mm (62°) Top 22 mm (0°) Bottom |
13 mm (0°) |
| Turret | 35 mm Turret front 35 mm Gun mantlet |
35 mm | 35 mm | 35 mm |
| Cupola | 30 mm | 30 mm | 30 mm | 30 mm |
Notes:
Mobility
The 2C bis utilizes a diesel-electric hybrid drive system. Two Sautter-Harlé inline 6 diesel engines power electric generators which then engage with electric motors at the rear sprocket. Like the Pz.Bef.Wg.VI P, this means that the 2C bis can neutral steer and theoretically go just as fast in reverse. In addition, the 2C bis accelerates to its top speed quickly, but this is only 15 km/h. The 2C will certainly be the last tank to the fight, but on the other hand the quick reverse acceleration can prove helpful in close quarters.
| Game Mode | Max Speed (km/h) | Weight (tons) | Engine power (horsepower) | Power-to-weight ratio (hp/ton) | |||
|---|---|---|---|---|---|---|---|
| Forward | Reverse | Stock | Upgraded | Stock | Upgraded | ||
| Arcade | 16 | 16 | 70 | _,___ | 954 | __.__ | 13.63 |
| Realistic | 16 | 16 | _,___ | 500 | __.__ | 7.14 | |
Modifications and economy
| Mobility | Protection | Firepower | ||||||||||||||||
|---|---|---|---|---|---|---|---|---|---|---|---|---|---|---|---|---|---|---|
|
|
|
Armaments
Main armament
The 2C bis has a 155 mm Schneider howitzer in its two man cast turret. Its velocity is extremely low and its reload rate is abysmal. The armament takes time and practice to utilize effectively, especially with its limited elevation and depression angles. However, with 58 mm of HE penetration, the Mle1915 shell will obliterate whatever it touches at the BR of the 2C bis. As long as the shell makes contact anywhere, it is almost guaranteed to knock a vehicle out. Open-topped vehicles can even be knocked out by splash damage, as this is basically an artillery piece on tracks.
| 155 mm Schneider 155 C | Turret rotation speed (°/s) | Reloading rate (seconds) | |||||||||||
|---|---|---|---|---|---|---|---|---|---|---|---|---|---|
| Mode | Capacity | Vertical | Horizontal | Stabilizer | Stock | Upgraded | Full | Expert | Aced | Stock | Full | Expert | Aced |
| Arcade | 24 | ±10° | ±100° | N/A | __._ | __._ | __._ | __._ | __._ | _.__ | _.__ | _.__ | _.__ |
| Realistic | __._ | __._ | __._ | __._ | __._ | ||||||||
Ammunition
| Penetration statistics | |||||||
|---|---|---|---|---|---|---|---|
| Ammunition | Type of warhead |
Penetration @ 0° Angle of Attack (mm) | |||||
| 10 m | 100 m | 500 m | 1,000 m | 1,500 m | 2,000 m | ||
| Mle1915 | HE | 58 | 58 | 58 | 58 | 58 | 58 |
| Shell details | |||||||||
|---|---|---|---|---|---|---|---|---|---|
| Ammunition | Type of warhead |
Velocity (m/s) |
Projectile mass (kg) |
Fuse delay | Fuse sensitivity (mm) |
Explosive mass (TNT equivalent) (kg) |
Ricochet | ||
| 0% | 50% | 100% | |||||||
| Mle1915 | HE | 240 | 43.2 | 0 | 0.1 | 7.65 | 79° | 80° | 81° |
Ammo racks
| Full ammo |
1st rack empty |
2nd rack empty |
3rd rack empty |
4th rack empty |
5th rack empty |
6th rack empty |
Visual discrepancy |
|---|---|---|---|---|---|---|---|
| 24 | __ (+__) | __ (+__) | __ (+__) | __ (+__) | __ (+__) | __ (+__) | __ |
Machine guns
The rear turret has decent horizontal arcs but suffers from rather poor vertical arcs and slow rotation speed, making this turret very situational. The frontal machine gun can be used to knock small obstacles out of the way as to prevent the HE shell from detonating on them.
| 8 mm Hotchkiss Mle 1914 | ||||
|---|---|---|---|---|
| Mount | Capacity (Belt) | Fire rate | Vertical | Horizontal |
| Hull | 5,000 (250) | 450 | __° | __° |
| Rear | 5,000 (250) | 450 | __° | -130°/+120° |
Usage in battles
As stated before, slight angling at longer ranges can increase survivability and make the armour somewhat useful. If you are not sure about how far a target is, use the rangefinder, even at close range. It is actually rather fast in the 2C bis, and a miss will have you waiting a long time to reload. The dreadful top speed will sometimes work in your favour, being that the first "wave" of enemy vehicles has already been dealt with. The 2C bis does not do well against multiple vehicles. The quick reverse acceleration can work in your favour in urban environments.
Sitting in the rear and lobbing artillery at the enemy is a possible strategy, but the low velocity and high arc of the rounds make this difficult. Eventually, a dedicated anti-tank SPG will likely disable or knock out the vehicle. The 2C bis performs better at mid-range encounters where tracking targets can be easier. Surprisingly, despite its size, getting "Shadow Strikes" is possible in urban areas. Use your machine guns to clear obstacles that may trigger the HE shell's fuse prematurely.
Pros and cons
Pros:
- Has a dozen crew members, highly survivable
- 155 mm howitzer will decimate anything even above its BR
- Neutral steering gives the tank decent reflex mobility
- Can climb over rough terrain with ease due to its World War I design
Cons:
- Extremely huge, easily spotted and targeted by any enemy
- 155 mm howitzer has very long reload time and awful shell velocity
- Awfully slow top speed
- Armour is mediocre at best
- Limited turret traverse, very prone to flanking
- Poor elevation and depression angles
History
The FCM 2C was a French "super heavy" tank designed to conquer the "no man's land" of WW1. It was dimensionally the largest tank ever produced, and for a time the heaviest. Ready for production by February 1918, the war ended before any of the vehicles were completed, and so the order of 300 was eventually reduced to just 10, finished in 1921. The standard 2C mounted a 75 mm APX 1897 field gun, similar to the cannon which would be mounted on the M3 GMC tank destroyer. The 2C had many innovative design features for the time, including a hybrid drive, leaf spring suspension, the world's first three-man turret, and stroboscopic cupolas. All of the 2Cs were named after ancient regions of France.
One 2C, No. 99 "Champagne", was given a new two-man cast turret with a 155 mm howitzer. The commander was given his own compartment behind the turret. The side machine gun ports were also removed. This variant would be known as the 2C bis. Eventually, Champagne would be returned to its original configuration and its turret would be used as a makeshift static emplacement in the Mareth Line. Champagne would be the only 2C to survive the invasion of France, with the other nine tanks either being scuttled by their own crew to prevent capture, or breaking down.
Media
See also
Links to the articles on the War Thunder Wiki that you think will be useful for the reader, for example:
- reference to the series of the vehicles;
- links to approximate analogues of other nations and research trees.
External links
| France heavy tanks | |
|---|---|
| B1 | B1 bis · B1 ter |
| 2C | 2C · 2C bis |
| ARL-44 | ARL-44 (ACL-1) |
| AMX-50 | Somua SM · AMX-50 Surbaissé · AMX-50 Surblindé |
| USA | ▄M4A3E2 |
| France premium ground vehicles | |
|---|---|
| Light tanks | AMD.35 (SA35) · H.39 "Cambronne" · LVT-4/40 · AMX-13 (SS.11) · AMX-13-M24 · E.B.R. (1954) · E.B.R. (1963) · VBCI-2 (MCT30) |
| Medium tanks | M4A1 (FL10) · Panther "Dauphiné" · AMX-30 · AMX-30 Super · AMX-50 (TO90/930) |
| Heavy tanks | B1 ter · 2C bis · Somua SM |
| Tank destroyers | Lorraine 155 Mle.50 |
