Difference between revisions of "Type 87"
(→See also: Changed formatting) |
(Edits) |
||
| Line 13: | Line 13: | ||
== General info == | == General info == | ||
=== Survivability and armour === | === Survivability and armour === | ||
| − | <!--''Describe armour protection. Note the most well protected and key weak areas. Appreciate the layout of modules as well as the number and location of crew members. Is the level of armour protection sufficient, is the placement of modules helpful for survival in combat?'' | + | <!-- ''Describe armour protection. Note the most well protected and key weak areas. Appreciate the layout of modules as well as the number and location of crew members. Is the level of armour protection sufficient, is the placement of modules helpful for survival in combat? If necessary use a visual template to indicate the most secure and weak zones of the armour.'' --> |
| − | |||
'''Armour type:''' | '''Armour type:''' | ||
| Line 34: | Line 33: | ||
<!-- ''Write about the mobility of the ground vehicle. Estimate the specific power and manoeuvrability, as well as the maximum speed forwards and backwards.'' --> | <!-- ''Write about the mobility of the ground vehicle. Estimate the specific power and manoeuvrability, as well as the maximum speed forwards and backwards.'' --> | ||
| − | {{tankMobility|abMinHp= | + | {{tankMobility|abMinHp=1,023|rbMinHp=637}} |
== Armaments == | == Armaments == | ||
=== Main armament === | === Main armament === | ||
| − | <!--''Give the reader information about the characteristics of the main gun. Assess its effectiveness in a battle based on the reloading speed, ballistics and the power of shells. Do not forget about the flexibility of the fire, that is how quickly the cannon can be aimed at the target, open fire on it and aim at another enemy. Add a link to the main article on the gun: <code><nowiki>{{main|Name of the weapon}}</nowiki></code>. Describe in general terms the ammunition available for the main gun. Give advice on how to use them and how to fill the ammunition storage.''--> | + | <!-- ''Give the reader information about the characteristics of the main gun. Assess its effectiveness in a battle based on the reloading speed, ballistics and the power of shells. Do not forget about the flexibility of the fire, that is how quickly the cannon can be aimed at the target, open fire on it and aim at another enemy. Add a link to the main article on the gun: <code><nowiki>{{main|Name of the weapon}}</nowiki></code>. Describe in general terms the ammunition available for the main gun. Give advice on how to use them and how to fill the ammunition storage.'' --> |
{{main|Oerlikon KDA (35 mm)}} | {{main|Oerlikon KDA (35 mm)}} | ||
| Line 51: | Line 50: | ||
For ammunition you can choose one main and one secondary belt. The secondary belt only has 40 shells, but it can be used to attack the enemy from capture points, as it rearms significantly faster. However, the secondary belt can be used in place of the main one for self-defence while the main belt rearms, so as to not leave the Type 87 defenceless. | For ammunition you can choose one main and one secondary belt. The secondary belt only has 40 shells, but it can be used to attack the enemy from capture points, as it rearms significantly faster. However, the secondary belt can be used in place of the main one for self-defence while the main belt rearms, so as to not leave the Type 87 defenceless. | ||
| − | + | {| class="wikitable" style="text-align:center" width="100%" | |
| + | |- | ||
| + | ! colspan="6" | [[Oerlikon KDA (35 mm)|35 mm Oerlikon KDA]] (x2) || colspan="5" | Turret rotation speed (°/s) || colspan="4" | Reloading rate (seconds) | ||
| + | |- | ||
| + | ! Mode !! Capacity (Belt) !! Fire rate !! Vertical !! Horizontal !! Stabilizer | ||
| + | ! Stock !! Upgraded !! Full !! Expert !! Aced | ||
| + | ! Stock !! Full !! Expert !! Aced | ||
| + | |- | ||
| + | ! ''Arcade'' | ||
| + | | rowspan="2" | 680 (320) || rowspan="2" | 550 || rowspan="2" | -5°/+80° || rowspan="2" | ±180° || rowspan="2" | Two-plane || 79.3 || __._ || __._ || __._ || __._ || rowspan="2" | _.__ || rowspan="2" | _.__ || rowspan="2" | _.__ || rowspan="2" | _.__ | ||
| + | |- | ||
| + | ! ''Realistic'' | ||
| + | | 53.5 || __._ || __._ || __._ || __._ | ||
| + | |- | ||
| + | |} | ||
| − | *'''Default''' | + | ==== Ammunition ==== |
| + | * '''Default:''' {{Annotation|API-T|Armour-piercing incendiary tracer}}{{-}}{{Annotation|HEI-T*|High-explosive incendiary tracer (self-destroying)}} - can attack planes and light tanks alike. HEI-T does fatal damage to aeroplanes, but has 3 mm penetration, being useless against tanks. API-T penetration is about 64 mm at 100 m at a flat angle. Keep in mind that it can fail to penetrate medium tanks. Against planes, API-T does kinetic damage and may rip off their wings on a good hit. | ||
| + | * '''DM11A1:''' {{Annotation|HEI-T*|High-explosive incendiary tracer (self-destroying)}}{{-}}{{Annotation|HEI-T*|High-explosive incendiary tracer (self-destroying)}}{{-}}{{Annotation|HEI-T*|High-explosive incendiary tracer (self-destroying)}}{{-}}{{Annotation|API-T|Armour-piercing incendiary tracer}} - 75% of this belt does critical damage to aircraft but does nothing to ground vehicles. | ||
| + | * '''DM13:''' {{Annotation|API-T|Armour-piercing incendiary tracer}}{{-}}{{Annotation|API-T|Armour-piercing incendiary tracer}}{{-}}{{Annotation|API-T|Armour-piercing incendiary tracer}}{{-}}{{Annotation|HEI-T*|High-explosive incendiary tracer (self-destroying)}} - 75% of this belt does significant damage to light tanks but does less damage to aircraft. | ||
| + | * '''DM23:''' {{Annotation|APDS|Armour-piercing discarding sabot}}{{-}}{{Annotation|APDS|Armour-piercing discarding sabot}}{{-}}{{Annotation|APDS|Armour-piercing discarding sabot}}{{-}}{{Annotation|APDS|Armour-piercing discarding sabot}} - APDS has better penetration value, easily penetrating 100 mm at 100 m at a flat angle, penetrating even decently protected tanks from the side and can threaten lightly armoured tanks even at 2km range. Cannot be chosen as the main belt. | ||
| − | + | '''Note''': HEI-T does no damage to armoured targets, but critically damages planes. Penetration numbers are displayed for strongest shell in belt. | |
| − | + | {| class="wikitable sortable" style="text-align:center" width="100%" | |
| − | + | ! colspan="8" | Penetration statistics | |
| − | + | |- | |
| − | + | ! rowspan="2" data-sort-type="text" | Belt | |
| − | + | ! colspan="6" | '''Penetration @ 0° Angle of Attack (mm)''' | |
| − | {| class="wikitable" style="text-align:center" | ||
| − | ! colspan=" | ||
|- | |- | ||
| − | ! | + | ! 10 m !! 100 m !! 500 m !! 1,000 m !! 1,500 m !! 2,000 m |
| − | ! | ||
| − | |||
|- | |- | ||
| − | + | | Default || 68 || 65 || 52 || 40 || 30 || 23 | |
| − | |||
| − | |||
| − | |||
| − | |||
| − | |||
|- | |- | ||
| − | | | + | | DM11A1 || 68 || 65 || 52 || 40 || 30 || 23 |
|- | |- | ||
| − | | | + | | DM13 || 68 || 65 || 52 || 40 || 30 || 23 |
|- | |- | ||
| − | | | + | | DM23 || 127 || 125 || 119 || 111 || 104 || 97 |
|- | |- | ||
| − | |||
|} | |} | ||
| − | ''' | + | ==== [[Ammo racks]] ==== |
| + | <!-- [[File:Ammoracks_{{PAGENAME}}.png|right|thumb|x250px|[[Ammo racks]] of the {{PAGENAME}}]] --> | ||
| + | <!-- '''Last updated:''' --> | ||
| + | {| class="wikitable" style="text-align:center" | ||
| + | |- | ||
| + | ! Full<br>ammo | ||
| + | ! 1st<br>rack empty | ||
| + | ! 2nd<br>rack empty | ||
| + | ! 3rd<br>rack empty | ||
| + | ! 4th<br>rack empty | ||
| + | ! 5th<br>rack empty | ||
| + | ! 6th<br>rack empty | ||
| + | ! Visual<br>discrepancy | ||
| + | |- | ||
| + | | '''2''' || __ ''(+__)'' || __ ''(+__)'' || __ ''(+__)'' || __ ''(+__)'' || __ ''(+__)'' || __ ''(+__)'' || __ | ||
| + | |- | ||
| + | |} | ||
===Radars=== | ===Radars=== | ||
| Line 112: | Line 135: | ||
! {{Annotation|Minimum<br/>target speed|The minimum speed a target must be moving, relative to the radar, in order to be tracked by the radar}} | ! {{Annotation|Minimum<br/>target speed|The minimum speed a target must be moving, relative to the radar, in order to be tracked by the radar}} | ||
|- | |- | ||
| − | | 15,000 m || 75 m || ±100° || -20°/+85° || 15 m/s (54 km/h) | + | | 15,000 m || 75 m || ±100° || -20°/+85° || 15 m/s (54 km/h) |
|- | |- | ||
|} | |} | ||
== Usage in battles == | == Usage in battles == | ||
| − | <!--''Describe the tactics of playing in the vehicle, the features of using vehicles in the team and advice on tactics. Refrain from creating a "guide" - do not impose a single point of view but give the reader food for thought. Describe the most dangerous enemies and give recommendations on fighting them. If necessary, note the specifics of the game in different modes (AB, RB, SB).''--> | + | <!-- ''Describe the tactics of playing in the vehicle, the features of using vehicles in the team and advice on tactics. Refrain from creating a "guide" - do not impose a single point of view but instead give the reader food for thought. Describe the most dangerous enemies and give recommendations on fighting them. If necessary, note the specifics of the game in different modes (AB, RB, SB).'' --> |
As an Anti-Aircraft vehicle, you should push with your team and defend cap points by protecting allies from aircraft with your powerful 35 mm guns. It should not be a problem to stay away from the main battle unless you are being pushed or your position is being overrun. In case if you see enemy light SPG or light tank, you can try to destroy them as well. With APDS belt you may dare to attack decently armoured medium tanks from the side, but you only have enough ammo for one or two encounters, so make it count. | As an Anti-Aircraft vehicle, you should push with your team and defend cap points by protecting allies from aircraft with your powerful 35 mm guns. It should not be a problem to stay away from the main battle unless you are being pushed or your position is being overrun. In case if you see enemy light SPG or light tank, you can try to destroy them as well. With APDS belt you may dare to attack decently armoured medium tanks from the side, but you only have enough ammo for one or two encounters, so make it count. | ||
| Line 127: | Line 150: | ||
In case if you are fighting multiple attackers or rocket helicopters, avoid being carpet-bombed, as the Type 87 is not built to survive such attacks. Be especially careful with Soviet helicopters, as they can carry both rockets and missiles. Remember - radar lock will help your gun to stay on target even when you are moving, and so, if you see a wall of rockets approaching you, sidestep it and don't just stand there and take it. | In case if you are fighting multiple attackers or rocket helicopters, avoid being carpet-bombed, as the Type 87 is not built to survive such attacks. Be especially careful with Soviet helicopters, as they can carry both rockets and missiles. Remember - radar lock will help your gun to stay on target even when you are moving, and so, if you see a wall of rockets approaching you, sidestep it and don't just stand there and take it. | ||
| − | ===Modules=== | + | |
| + | === Modules === | ||
{| class="wikitable" | {| class="wikitable" | ||
| − | !Tier | + | ! Tier |
| − | ! colspan="2" |Mobility | + | ! colspan="2" | Mobility |
| − | !Protection | + | ! Protection |
| − | ! colspan="3" |Firepower | + | ! colspan="3" | Firepower |
|- | |- | ||
| − | |I | + | | I |
| − | |Tracks | + | | Tracks |
| | | | ||
| − | |Parts | + | | Parts |
| − | |DM11A1 | + | | DM11A1 |
| − | |Horizontal Drive | + | | Horizontal Drive |
| | | | ||
|- | |- | ||
| − | |II | + | | II |
| − | |Suspension | + | | Suspension |
| − | |Brake System | + | | Brake System |
| − | |FPE | + | | FPE |
| − | |DM13 | + | | DM13 |
| − | |Adjustment of Fire | + | | Adjustment of Fire |
| − | |LWS/LR | + | | LWS/LR |
|- | |- | ||
| − | |III | + | | III |
| − | |Filters | + | | Filters |
| | | | ||
| − | |Crew Replenishment | + | | Crew Replenishment |
| | | | ||
| − | |Elevation Mechanism | + | | Elevation Mechanism |
| | | | ||
|- | |- | ||
| − | |IV | + | | IV |
| − | |Transmission | + | | Transmission |
| − | |Engine | + | | Engine |
| − | |Smoke grenade | + | | Smoke grenade |
| − | |DM23 | + | | DM23 |
| − | |Artillery Support | + | | Artillery Support |
| − | |NVD | + | | NVD |
|- | |- | ||
|} | |} | ||
| + | |||
=== Pros and cons === | === Pros and cons === | ||
| − | <!--'' | + | <!-- ''Summarise and briefly evaluate the vehicle in terms of its characteristics and combat effectiveness. Mark its pros and cons in a bulleted list. Try not to use more than 6 points for each of the characteristics. Avoid using categorical definitions such as "bad", "good" and the like - use substitutions with softer forms such as "inadequate" and "effective".'' --> |
| − | '''Pros''' | + | '''Pros:''' |
* Powerful, fast-firing 35 mm twin Oerlikon KDA cannon | * Powerful, fast-firing 35 mm twin Oerlikon KDA cannon | ||
| Line 186: | Line 211: | ||
== History == | == History == | ||
| − | ''Describe the history of the creation and combat usage of the | + | ''Describe the history of the creation and combat usage of the vehicle in more detail than in the introduction. If the historical reference turns out to be too long, take it to a separate article, taking a link to the article about the vehicle and adding a block "/History" (example: <nowiki>https://wiki.warthunder.com/(Vehicle-name)/History</nowiki>) and add a link to it here using the <code>main</code> template. Be sure to reference text and sources by using <code><nowiki><ref></ref></nowiki></code>, as well as adding them at the end of the article with <code><nowiki><references /></nowiki></code>. This section may also include the vehicle's dev blog entry (if applicable) and the in-game encyclopedia description (under <code><nowiki>=== In-game description ===</nowiki></code>, also if applicable).'' |
== Media == | == Media == | ||
| − | <!--'' | + | <!-- ''Excellent additions to the article would be video guides, screenshots from the game, and photos.'' --> |
| − | [https://live.warthunder.com/feed/camouflages/?vehicleCountry=japan&vehicleType=tank&vehicleClass=spaa&vehicle=jp_type_87 '''Skins''' and '''camouflages''' for the Type 87 from live.warthunder.com.] | + | * [https://live.warthunder.com/feed/camouflages/?vehicleCountry=japan&vehicleType=tank&vehicleClass=spaa&vehicle=jp_type_87 '''Skins''' and '''camouflages''' for the Type 87 from live.warthunder.com.] |
== See also == | == See also == | ||
| Line 214: | Line 239: | ||
== External links == | == External links == | ||
| − | <!--''Paste links to sources and external resources, such as:'' | + | <!-- ''Paste links to sources and external resources, such as:'' |
* ''topic on the official game forum;'' | * ''topic on the official game forum;'' | ||
* ''encyclopedia page on tank;'' | * ''encyclopedia page on tank;'' | ||
| − | * ''other literature.''--> | + | * ''other literature.'' --> |
| − | * [ | + | * [[wt:en/news/4512-development-type-87-the-japanese-gepard-en/|[Devblog] Type 87: The Japanese Gepard]] |
{{Japan anti-aircraft vehicles}} | {{Japan anti-aircraft vehicles}} | ||
Revision as of 18:07, 13 November 2020
Contents
Description

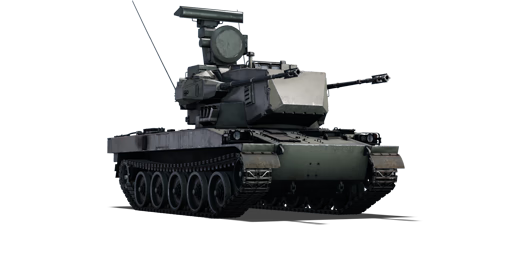
The Twin 35 mm Self-Propelled Gun Type 87 is a rank VI Japanese self-propelled anti-aircraft vehicle
with a battle rating of 8.3 (AB/RB/SB). It was introduced in Update 1.67 "Assault". It is incredibly similar to the German Flakpanzer Gepard, using the same 35 mm Oerlikon KDA autocannons with a similar turret. The key difference is that the Type 87 uses a modified chassis of the Type 74, compared to the Gepard being mounted on the Leopard I chassis.
The Type 87 performs fairly well at its rank, being able to effectively engage aircraft quite well thanks to its high rate of fire, quick turret traverse and radar systems. It is also capable of fighting lightly armoured tanks such as most infantry fighting vehicles (BMP, Warrior, M3 Bradley) and effectively killing them in seconds with its rapid-fire guns. The Type 87's default belts have less penetration than its predecessor, the M42 Duster SDF, although this is not much of a difference (72 mm on M42 compared to 68 mm on Type 87), however the Type 87 gains the ability to fight other MBTs when it unlocks the Armour Piercing belts, which have 116 mm of penetration at 100 m. While this is not advised, it is an incredibly handy ability to have in an emergency.
The Type 87 is also extremely proficient at shooting down helicopters - the AH-1G is a common nuisance that the Type 87 has no difficulty in destroying. However, for more modern helicopters, most notably the Kamov Ka-50, the Type 87 is harmless.
General info
Survivability and armour
Armour type:
- Aluminum Alloy AMS 4050A (Turret)
- Rolled homogeneous armour (Hull)
| Armour | Front (Slope angle) | Sides | Rear | Roof |
|---|---|---|---|---|
| Hull | 30 mm (78°) Front glacis 30 mm (21-63°) Lower glacis |
20 mm | 20 mm (16°) Top 20 mm (49°) Bottom |
15 mm |
| Turret | 25 mm (6-37°) 20 mm (76°) Turret underside |
20 mm Turret side 10 mm Cannons |
15 mm (3°) | 15 mm 20 mm (69°) Turret underside |
Mobility
| Game Mode | Max Speed (km/h) | Weight (tons) | Engine power (horsepower) | Power-to-weight ratio (hp/ton) | |||
|---|---|---|---|---|---|---|---|
| Forward | Reverse | Stock | Upgraded | Stock | Upgraded | ||
| Arcade | 58 | 9 | 38 | 1,023 | 1,660 | 26.92 | 43.68 |
| Realistic | 54 | 8 | 637 | 870 | 16.76 | 22.89 | |
Armaments
Main armament
Main weapons are the 35 mm Oerlikon KDA autocannons, which are essentially the same as Gepard's. They are different from KDE gun variant of type 89 if you used it - they use completely different ammunition and fire much faster.
Guns will overheat if fired for longer than 15 seconds. They will cool off in about 30 seconds, but you can unjam them earlier by switching between ammunition belts.
The guns are placed close to the centre of a turret, typically, if you missed one shot, you probably missed both shots. For this reason SPAA relies more on precise lengthy bursts with enemy flight path prediction, rather than "fire a 30 shot burst there and forget about it" of Chieftain Marksman. You have more ammunition for the gun than British equivalent, to compensate for this.
35 mm gun is slightly weaker than the Bofors of M42. One thing to keep in mind is with this vehicle you are hunting jets and jets suffer much heavier stress from the speed they employ. This heavier stress equates to greater damage caused by even one or two hits of 35 mm HEI-T which will explode them or rip off their wings. For best results, you just need to hit them once or twice, which 35 mm guns are much better at doing.
For ammunition you can choose one main and one secondary belt. The secondary belt only has 40 shells, but it can be used to attack the enemy from capture points, as it rearms significantly faster. However, the secondary belt can be used in place of the main one for self-defence while the main belt rearms, so as to not leave the Type 87 defenceless.
| 35 mm Oerlikon KDA (x2) | Turret rotation speed (°/s) | Reloading rate (seconds) | ||||||||||||
|---|---|---|---|---|---|---|---|---|---|---|---|---|---|---|
| Mode | Capacity (Belt) | Fire rate | Vertical | Horizontal | Stabilizer | Stock | Upgraded | Full | Expert | Aced | Stock | Full | Expert | Aced |
| Arcade | 680 (320) | 550 | -5°/+80° | ±180° | Two-plane | 79.3 | __._ | __._ | __._ | __._ | _.__ | _.__ | _.__ | _.__ |
| Realistic | 53.5 | __._ | __._ | __._ | __._ | |||||||||
Ammunition
- Default: API-T · HEI-T* - can attack planes and light tanks alike. HEI-T does fatal damage to aeroplanes, but has 3 mm penetration, being useless against tanks. API-T penetration is about 64 mm at 100 m at a flat angle. Keep in mind that it can fail to penetrate medium tanks. Against planes, API-T does kinetic damage and may rip off their wings on a good hit.
- DM11A1: HEI-T* · HEI-T* · HEI-T* · API-T - 75% of this belt does critical damage to aircraft but does nothing to ground vehicles.
- DM13: API-T · API-T · API-T · HEI-T* - 75% of this belt does significant damage to light tanks but does less damage to aircraft.
- DM23: APDS · APDS · APDS · APDS - APDS has better penetration value, easily penetrating 100 mm at 100 m at a flat angle, penetrating even decently protected tanks from the side and can threaten lightly armoured tanks even at 2km range. Cannot be chosen as the main belt.
Note: HEI-T does no damage to armoured targets, but critically damages planes. Penetration numbers are displayed for strongest shell in belt.
| Penetration statistics | |||||||
|---|---|---|---|---|---|---|---|
| Belt | Penetration @ 0° Angle of Attack (mm) | ||||||
| 10 m | 100 m | 500 m | 1,000 m | 1,500 m | 2,000 m | ||
| Default | 68 | 65 | 52 | 40 | 30 | 23 | |
| DM11A1 | 68 | 65 | 52 | 40 | 30 | 23 | |
| DM13 | 68 | 65 | 52 | 40 | 30 | 23 | |
| DM23 | 127 | 125 | 119 | 111 | 104 | 97 | |
Ammo racks
| Full ammo |
1st rack empty |
2nd rack empty |
3rd rack empty |
4th rack empty |
5th rack empty |
6th rack empty |
Visual discrepancy |
|---|---|---|---|---|---|---|---|
| 2 | __ (+__) | __ (+__) | __ (+__) | __ (+__) | __ (+__) | __ (+__) | __ |
Radars
The Type 87 is equipped with a MPDR 12 search radar and an Albis tracking radar. Both radars are mounted at the rear of the turret, with the search radar mounted on top of an arm and the tracking radar mounted at the base of the arm. The radar system is capable of tracking a target while scanning, but can only track targets within a 200° arc from the front of the turret. It is not possible to fold the radars at this time.
Search radar of this tank may often fail to catch passing by planes at closer ranges, which can be still locked on by tracking radar. In such case, you can try to go to sniper mode and aim crosshairs at enemy aircraft, then press "lock on" key to trigger manual tracking radar scan (will be visible by a quick sweep on radar display). If it failed, then the enemy plane has way too low relative speed to be consistently tracked.
| MPDR 12 - Target Detection Radar | ||||
|---|---|---|---|---|
| Maximum Detection Range |
Minimum Detection Range |
Max Azimuth Scan Angle |
Max Elevation Scan Angle |
Minimum relative speed |
| 15,000 m | 500 m | 360° | ??? | 10 m/s (36 km/h) |
| Albis - Target Tracking Radar | ||||
| Maximum Tracking Range |
Minimum Tracking Range |
Azimuth Tracking Angle |
Elevation Tracking Angle |
Minimum target speed |
| 15,000 m | 75 m | ±100° | -20°/+85° | 15 m/s (54 km/h) |
Usage in battles
As an Anti-Aircraft vehicle, you should push with your team and defend cap points by protecting allies from aircraft with your powerful 35 mm guns. It should not be a problem to stay away from the main battle unless you are being pushed or your position is being overrun. In case if you see enemy light SPG or light tank, you can try to destroy them as well. With APDS belt you may dare to attack decently armoured medium tanks from the side, but you only have enough ammo for one or two encounters, so make it count.
Despite having radar, staying too far away from allies in arcade mode may backfire, as shells still take some time to reach enemy aircraft and hostile bombers only have to be 1.8 km away from them to drop bombs in the most efficient way possible, and it doesn't take a long time for them to reach that distance. If enemy aircraft is constantly wiggling, radar supported aim will also go all over the place, so try to guess where they are going, or press them to force them to change direction to one away from your allies.
In case if you actually got attacked by ground forces, you should then aim for cannon barrels and tracks of enemy vehicles. Your hull armour may deflect inbound shots if angled correctly, but don't expect your turret to do the same, as its armour is very thin and generally will be penetrated by everything at your battle rating and rank. Keep in mind, that your tank is a hull breakable vehicle, so avoid being hit by HEAT-FS rounds or by large kinetic shells into the engine compartment area.
Use Hydropneumatic suspension to get better search radar coverage and gun depression on your targets, or to keep yourself standing flat. Standing flat is important, as being angled too much may add horizontal targeting error.
In case if you are fighting multiple attackers or rocket helicopters, avoid being carpet-bombed, as the Type 87 is not built to survive such attacks. Be especially careful with Soviet helicopters, as they can carry both rockets and missiles. Remember - radar lock will help your gun to stay on target even when you are moving, and so, if you see a wall of rockets approaching you, sidestep it and don't just stand there and take it.
Modules
| Tier | Mobility | Protection | Firepower | |||
|---|---|---|---|---|---|---|
| I | Tracks | Parts | DM11A1 | Horizontal Drive | ||
| II | Suspension | Brake System | FPE | DM13 | Adjustment of Fire | LWS/LR |
| III | Filters | Crew Replenishment | Elevation Mechanism | |||
| IV | Transmission | Engine | Smoke grenade | DM23 | Artillery Support | NVD |
Pros and cons
Pros:
- Powerful, fast-firing 35 mm twin Oerlikon KDA cannon
- Quick with the Type 74 chassis, up to 58 km/h
- Hydropneumatic suspension with the Type 74 chassis
- Can engage tanks from their sides
Cons
- -5 degrees of gun depression (bad compared to the Flakpanzer Gepard)
- 30 mm armour maximum
- Any main ammunition belts other than the default cost 6,600 silver lions
- You can only have one secondary belt selected with a meagre ammo count
- Spinning radar dish may make you more visible in tank realistic battles
History
Describe the history of the creation and combat usage of the vehicle in more detail than in the introduction. If the historical reference turns out to be too long, take it to a separate article, taking a link to the article about the vehicle and adding a block "/History" (example: https://wiki.warthunder.com/(Vehicle-name)/History) and add a link to it here using the main template. Be sure to reference text and sources by using <ref></ref>, as well as adding them at the end of the article with <references />. This section may also include the vehicle's dev blog entry (if applicable) and the in-game encyclopedia description (under === In-game description ===, also if applicable).
Media
See also
- Vehicles equipped with the same chassis
The Type 87 is based on a modified Type 74 hull
- Vehicles equipped with the same guns
- Other vehicles of similar configuration and role
External links
| Japan anti-aircraft vehicles | |
|---|---|
| Ke-Ni Derivatives | Ta-Se · So-Ki |
| Wheeled | Type 94 |
| Tracked | SUB-I-II |
| Radar SPAAG | Type 87 |
| Missile SPAA | Type 93 · Type 81 (C) |
| USA | ▅M16 MGMC · ▅M19A1 · ▅M42 |
