Difference between revisions of "Object 279"
SpitfireMKI (talk | contribs) (→Pros and cons) (Tag: Visual edit) |
Colok76286 (talk | contribs) (Edits) |
||
| (35 intermediate revisions by 18 users not shown) | |||
| Line 1: | Line 1: | ||
{{Specs-Card | {{Specs-Card | ||
|code=ussr_object_279 | |code=ussr_object_279 | ||
| + | |images={{Specs-Card-Image|GarageImage_{{PAGENAME}}.jpg}} | ||
|market=Object 279 (USSR) | |market=Object 279 (USSR) | ||
}} | }} | ||
| Line 6: | Line 7: | ||
== Description == | == Description == | ||
<!-- ''In the description, the first part should be about the history of the creation and combat usage of the vehicle, as well as its key features. In the second part, tell the reader about the ground vehicle in the game. Insert a screenshot of the vehicle, so that if the novice player does not remember the vehicle by name, he will immediately understand what kind of vehicle the article is talking about.'' --> | <!-- ''In the description, the first part should be about the history of the creation and combat usage of the vehicle, as well as its key features. In the second part, tell the reader about the ground vehicle in the game. Insert a screenshot of the vehicle, so that if the novice player does not remember the vehicle by name, he will immediately understand what kind of vehicle the article is talking about.'' --> | ||
| − | |||
| − | |||
The '''{{Specs|name}}''' is a gift rank {{Specs|rank}} Soviet heavy tank {{Battle-rating}}. It was introduced during [[Update 1.97 "Viking Fury"]] as a reward for the [[wt:en/news/6669-special-space-race-en|"Space Race" event]]. | The '''{{Specs|name}}''' is a gift rank {{Specs|rank}} Soviet heavy tank {{Battle-rating}}. It was introduced during [[Update 1.97 "Viking Fury"]] as a reward for the [[wt:en/news/6669-special-space-race-en|"Space Race" event]]. | ||
| + | |||
| + | The Object 279's unique look comes with its design as being more capable of cross-country travelling in a possible nuclear warfare scenario. This produces its unique hull shape, four track designs, and a large 130 mm cannon to deal with threats. | ||
== General info == | == General info == | ||
=== Survivability and armour === | === Survivability and armour === | ||
| − | ''Describe armour protection. Note the most well protected and key weak areas. Appreciate the layout of modules as well as the number and location of crew members. Is the level of armour protection sufficient, is the placement of modules helpful for survival in combat? If necessary use a visual template to indicate the most secure and weak zones of the armour.'' | + | {{Specs-Tank-Armour}} |
| + | <!-- ''Describe armour protection. Note the most well protected and key weak areas. Appreciate the layout of modules as well as the number and location of crew members. Is the level of armour protection sufficient, is the placement of modules helpful for survival in combat? If necessary use a visual template to indicate the most secure and weak zones of the armour.'' --> | ||
| + | |||
| + | This tank is the peak of steel armour design, having its armour only consist of homogeneous steel armour. It is also arguably the most well-armoured heavy tank in the game. Getting the exact armour thickness of this tank is quite tricky due to the cast nature of its outer shell. But that won't affect the way one may view its survivability, at the very least the armour thickness of the hull may reach up to 300 mm when faced frontally (excluding the driver's hatch, which is 30 mm flat). The middle of the hull (area below the driver's hatch) is the least angled part of the tank besides the tank's rear, and thus is usually the first spot that is shot at, whereas the sides surrounding this area (left and right parts of the hull when faced front) can reach absurd amounts of thickness, even reaching up to 1000 mm due to extreme angles. However, this will not stop any APFSDS rounds, which are abundant at its BR. Most, if not all tanks at your BR can penetrate you from the front. | ||
| + | |||
| + | The turret is arguably the most armoured part of this tank. Again, getting the exact thickness is difficult but it is guaranteed to be very hard to penetrate, even APFSDS shells will have trouble going through certain spots of this tank. The only prominent weak spot of this turret is the mantlet and machine gun port on the left side of the gun when faced front. Going through the mantlet will more or less only break the gun breech in most cases. One usually shoots the rear side of the turret because that is where the ready rack is located. | ||
| + | |||
| + | It is important to mention the cramped crew spacing. It is like most, if not all, Soviet tank designs where the engineers threw the entire concept of crew comfort out the window. This is important when it comes to the survivability of the crew whenever a shell is able to punch through its stubborn shell. The crew spacing is quite cramped and thus more susceptible to shrapnel damage caused by spalling. On the bright side, most nations have given up on the concept of APHE shell at around this tank's BR so the chances of one-shots are reduced to a degree. Though there are unlucky times when a shell goes through the plate and hit the ready rack behind the gun breech. | ||
| + | |||
| + | Another feature worth mentioning on this vehicle are its self sealing fuel tanks located along the tracks of the tank. To the inexperienced player, these may be an appealing target but that is not recommended unless the intention was to interrupt a repair, most of the time this will only cause a fire and maybe break some tracks (causing a fire is pointless due to the self extinguishing feature). A more recommended target on the side is the bulge made to accommodate the size of the turret (this bulge is also present on the T-62), it is the flattest part of the tank, besides the rear. | ||
| + | |||
| + | All around, this tank is a very hard nut to crack but one should not rely on its armour to stop incoming projectiles. It shares at least some similarities with the T-10M and it has a similar playstyle. | ||
=== Mobility === | === Mobility === | ||
| − | ''Write about the mobility of the ground vehicle. Estimate the specific power and manoeuvrability, as well as the maximum speed forwards and backwards.'' | + | {{Specs-Tank-Mobility}} |
| + | <!-- ''Write about the mobility of the ground vehicle. Estimate the specific power and manoeuvrability, as well as the maximum speed forwards and backwards.'' --> | ||
{{tankMobility|abMinHp=1,291|rbMinHp=884}} | {{tankMobility|abMinHp=1,291|rbMinHp=884}} | ||
| + | |||
| + | The mobility is good for a vehicle of its size and weight, with a -18 km/h reverse speed, meaning it can actually back out of situations. As a heavy tank, the turning capabilities remain sub-par and the Object 279 loses a lot of speed when turning. | ||
| + | |||
| + | === Modifications and economy === | ||
| + | {{Specs-Economy}} | ||
== Armaments == | == Armaments == | ||
| + | {{Specs-Tank-Armaments}} | ||
=== Main armament === | === Main armament === | ||
| + | {{Specs-Tank-Weapon|1}} | ||
| + | <!-- ''Give the reader information about the characteristics of the main gun. Assess its effectiveness in a battle based on the reloading speed, ballistics and the power of shells. Do not forget about the flexibility of the fire, that is how quickly the cannon can be aimed at the target, open fire on it and aim at another enemy. Add a link to the main article on the gun: <code><nowiki>{{main|Name of the weapon}}</nowiki></code>. Describe in general terms the ammunition available for the main gun. Give advice on how to use them and how to fill the ammunition storage.'' --> | ||
{{main|M-65 (130 mm)}} | {{main|M-65 (130 mm)}} | ||
| − | + | The main armament is a powerful 130 mm gun. It has decent ballistics and, coupled with the rangefinder, HE filler, and penetration comparable to some APFSDS shells, it is an extremely effective main armament. | |
{| class="wikitable" style="text-align:center" width="100%" | {| class="wikitable" style="text-align:center" width="100%" | ||
| Line 34: | Line 55: | ||
|- | |- | ||
! ''Arcade'' | ! ''Arcade'' | ||
| − | | rowspan="2" | 40 || rowspan="2" | -5°/+ | + | | rowspan="2" | 40 || rowspan="2" | -5°/+17° || rowspan="2" | ±180° || rowspan="2" | Two-plane || 14.56 || 20.16 || 24.48 || 27.07 || 28.80 || rowspan="2" | 11.18 || rowspan="2" | 9.89 || rowspan="2" | 9.12 || rowspan="2" | 8.60 |
|- | |- | ||
! ''Realistic'' | ! ''Realistic'' | ||
| − | | 10. | + | | 10.71 || 12.60 || 15.30 || 16.92 || 18.00 |
|- | |- | ||
|} | |} | ||
| Line 51: | Line 72: | ||
! 10 m !! 100 m !! 500 m !! 1,000 m !! 1,500 m !! 2,000 m | ! 10 m !! 100 m !! 500 m !! 1,000 m !! 1,500 m !! 2,000 m | ||
|- | |- | ||
| − | | BR-482B || APCBC || | + | | BR-482B || APCBC || 363 || 359 || 342 || 322 || 303 || 285 |
|- | |- | ||
| OF-482M || HE || 31 || 31 || 31 || 31 || 31 || 31 | | OF-482M || HE || 31 || 31 || 31 || 31 || 31 || 31 | ||
| Line 70: | Line 91: | ||
! 0% !! 50% !! 100% | ! 0% !! 50% !! 100% | ||
|- | |- | ||
| − | | BR-482B || APCBC || | + | | BR-482B || APCBC || 1,000 || 33.3 || 1.2 || 19 || 177.1 || 48° || 63° || 71° |
|- | |- | ||
| − | | OF-482M || HE || 900 || 33.7 || | + | | OF-482M || HE || 900 || 33.7 || 0 || 0 || 2,650 || 79° || 80° || 81° |
|- | |- | ||
|} | |} | ||
==== [[Ammo racks]] ==== | ==== [[Ammo racks]] ==== | ||
| − | + | [[File:Ammoracks_{{PAGENAME}}.png|right|thumb|x200px|[[Ammo racks]] of the {{PAGENAME}}]] | |
| + | <!-- '''Last updated: 2.1.0.85''' --> | ||
{| class="wikitable" style="text-align:center" | {| class="wikitable" style="text-align:center" | ||
|- | |- | ||
! Full<br>ammo | ! Full<br>ammo | ||
| + | ! Ammo<br>type | ||
! 1st<br>rack empty | ! 1st<br>rack empty | ||
! 2nd<br>rack empty | ! 2nd<br>rack empty | ||
| Line 89: | Line 112: | ||
! Visual<br>discrepancy | ! Visual<br>discrepancy | ||
|- | |- | ||
| − | | '''40''' || | + | | '''40''' || ''Projectiles'' <br> ''Propellants'' || 31 ''(+9)'' <br> 36 ''(+4)'' || 28 ''(+12)'' <br> 31 ''(+9)'' || 19 ''(+21)'' <br> 24 ''(+16)'' || 17 ''(+23)'' <br> 19 ''(+21)'' || 14 ''(+26)'' <br> 14 ''(+26)'' || 1 ''(+39)'' <br> 1 ''(+39)'' || No |
|- | |- | ||
|} | |} | ||
| + | '''Notes''': | ||
| − | + | * Projectiles and propellant bags are modeled individually and disappear after having been shot or loaded. | |
| − | + | * Both racks 6 are first stage ammo racks for projectiles and propellant bags. They represent 13 shots and get filled first when loading up the tank. | |
| − | + | * They are also emptied early: the rack depletion order at full capacity is: 6 - 1 - 2 until 5. | |
| − | + | * Simply not firing when the gun is loaded will move ammo from racks 1-5 into racks 6. Firing will interrupt the restocking of the ready racks. | |
| − | |||
| − | |||
| − | |||
| − | |||
| − | |||
| − | |||
| − | |||
| − | |||
| − | |||
| − | |||
| − | |||
=== Machine guns === | === Machine guns === | ||
| + | {{Specs-Tank-Weapon|2}} | ||
<!-- ''Offensive and anti-aircraft machine guns not only allow you to fight some aircraft but also are effective against lightly armoured vehicles. Evaluate machine guns and give recommendations on its use.'' --> | <!-- ''Offensive and anti-aircraft machine guns not only allow you to fight some aircraft but also are effective against lightly armoured vehicles. Evaluate machine guns and give recommendations on its use.'' --> | ||
{{main|KPVT (14.5 mm)}} | {{main|KPVT (14.5 mm)}} | ||
| − | {| class="wikitable" style="text-align:center" | + | {| class="wikitable" style="text-align:center" width="50%" |
|- | |- | ||
! colspan="5" | [[KPVT (14.5 mm)|14.5 mm KPVT]] | ! colspan="5" | [[KPVT (14.5 mm)|14.5 mm KPVT]] | ||
|- | |- | ||
| − | ! Mount | + | ! Mount !! Capacity (Belt) !! Fire rate !! Vertical !! Horizontal |
| − | ! Capacity | ||
| − | ! | ||
| − | ! Vertical | ||
| − | ! Horizontal | ||
|- | |- | ||
| Coaxial || 800 (50) || 600 || N/A || N/A | | Coaxial || 800 (50) || 600 || N/A || N/A | ||
|- | |- | ||
|} | |} | ||
| + | The KPVT is an very effective machine gun, on par with certain autocannons in terms of penetration, and can easily shred lightly armoured vehicles or even the sides of certain MBTs thanks it its 45 mm of penetration. The muzzle velocity of the KPVT is almost the same as the main gun, meaning it can be used as an ranging machine gun. | ||
== Usage in battles == | == Usage in battles == | ||
| − | ''Describe the tactics of playing in the vehicle, the features of using vehicles in the team and advice on tactics. Refrain from creating a "guide" - do not impose a single point of view but instead give the reader food for thought. Describe the most dangerous enemies and give recommendations on fighting them. If necessary, note the specifics of the game in different modes (AB, RB, SB).'' | + | <!-- ''Describe the tactics of playing in the vehicle, the features of using vehicles in the team and advice on tactics. Refrain from creating a "guide" - do not impose a single point of view but instead give the reader food for thought. Describe the most dangerous enemies and give recommendations on fighting them. If necessary, note the specifics of the game in different modes (AB, RB, SB).'' --> |
| − | + | The Object 279 is in a position where its main gun can penetrate most things it faces, and the large HE filler guarantees a one shot. However, the hull is weak, unless you are in a full downtier, it should definitely not be relied on. The turret, on the other hand, is incredibly strong. The Object 279 plays quite well like a TD, using your 1,000 m/s APHE shell and strong turret armour to quickly peek and take pot-shots at enemy positions. This strategy is effective in uptiers. In a full downtier you can use it like a heavy tank, rushing caps and storming enemy positions, but HEATFS is abundant even at 7.7 and will end you fast. | |
| − | |||
| − | |||
| − | |||
| − | |||
| − | |||
| − | |||
| − | |||
| − | |||
| − | |||
| − | |||
| − | |||
| − | |||
| − | |||
| − | |||
| − | |||
| − | |||
| − | |||
| − | |||
| − | |||
| − | |||
| − | |||
| − | |||
| − | |||
| − | |||
| − | |||
| − | |||
| − | |||
| − | |||
| − | |||
| − | |||
| − | |||
| − | |||
| − | |||
| − | |||
| − | |||
| − | |||
=== Pros and cons === | === Pros and cons === | ||
| Line 172: | Line 147: | ||
'''Pros:''' | '''Pros:''' | ||
| − | * Great 130 mm gun | + | * Great 130 mm gun; able to one-shot majority of the enemy tanks |
* Main gun has a two-plane stabilizer | * Main gun has a two-plane stabilizer | ||
| − | * | + | * Good overall mobility for its weight |
| − | * Rangefinder and NVD | + | * Access to Rangefinder and NVD |
| + | * Coaxial 14.5 mm machine gun is great for dealing with light vehicles and aircraft | ||
| + | * Fuel tanks are self-sealing and will extinguish by themselves without incurring damage | ||
| + | * Extremely angled and thick cast armour | ||
| + | * Quick reloading speed for the size of the gun, first stage ammo consists of a 13 shell auto loader | ||
| + | * Can survive multiple hits from an ATGM frontally | ||
| + | * Turret is extraordinary though, even against modern Sabot | ||
| + | * Good reverse speed | ||
| + | * Secondary machine gun can act as a ranging MG | ||
'''Cons:''' | '''Cons:''' | ||
| Line 181: | Line 164: | ||
* Inadequate turret traverse speed | * Inadequate turret traverse speed | ||
* Inadequate depression angle, a feature shared by all Soviet tanks | * Inadequate depression angle, a feature shared by all Soviet tanks | ||
| − | * | + | * Vulnerable to high calibre HE; pylons connecting tank to tracks make for very appealing targets for such shells |
| + | * Most tanks at your BR can penetrate you from the front | ||
| + | * Very long main gun barrel can be a liability, allowing observant enemies to spot the tank hiding around corners | ||
| + | * Low muzzle velocity compared to APFSDS and APDS shells commonly found at this BR | ||
| + | * No laser rangefinder | ||
== History == | == History == | ||
| − | ''Describe the history of the creation and combat usage of the vehicle in more detail than in the introduction. If the historical reference turns out to be too long, take it to a separate article, taking a link to the article about the vehicle and adding a block "/History" (example: <nowiki>https://wiki.warthunder.com/(Vehicle-name)/History</nowiki>) and add a link to it here using the <code>main</code> template. Be sure to reference text and sources by using <code><nowiki><ref></ref></nowiki></code>, as well as adding them at the end of the article with <code><nowiki><references /></nowiki></code>. This section may also include the vehicle's dev blog entry (if applicable) and the in-game encyclopedia description (under <code><nowiki>=== In-game description ===</nowiki></code>, also if applicable).'' | + | <!-- ''Describe the history of the creation and combat usage of the vehicle in more detail than in the introduction. If the historical reference turns out to be too long, take it to a separate article, taking a link to the article about the vehicle and adding a block "/History" (example: <nowiki>https://wiki.warthunder.com/(Vehicle-name)/History</nowiki>) and add a link to it here using the <code>main</code> template. Be sure to reference text and sources by using <code><nowiki><ref></ref></nowiki></code>, as well as adding them at the end of the article with <code><nowiki><references /></nowiki></code>. This section may also include the vehicle's dev blog entry (if applicable) and the in-game encyclopedia description (under <code><nowiki>=== In-game description ===</nowiki></code>, also if applicable).'' --> |
| + | [[File:Object 279 in the Kubinka Tank Museum.jpg|right|thumb|Object 279 in the Kubinka Tank Museum]] | ||
| + | The Object 279 Kotin was conceived in 1959. It was supposed to be a breakthrough tank that was also able to withstand a nuclear blast's shockwave. The development of the design started at the Kirov Plant in Leningrad, the head designer was L. Troyanov. The project was started in 1957 under the requirements of 1956. The pre-production Object 279 was completed at the end of 1959. | ||
| + | |||
| + | Although 3 vehicles were built in total, the project was later abandoned in favour of lighter vehicles which ended the Soviet heavy tank programs, due to Soviet leader at the time, Nikita Khrushchev's decision on July 22, 1960, to stop the production of tanks weighing more than 50 metric tons, in favour of smaller and lighter tanks. | ||
| + | |||
| + | {{Youtube-gallery|okTc-87-XvU|Object 279 testing footage}} | ||
| + | {{Clear}} | ||
== Media == | == Media == | ||
<!-- ''Excellent additions to the article would be video guides, screenshots from the game, and photos.'' --> | <!-- ''Excellent additions to the article would be video guides, screenshots from the game, and photos.'' --> | ||
| − | <gallery mode="packed"> | + | |
| + | ;Skins | ||
| + | |||
| + | * [https://live.warthunder.com/feed/camouflages/?vehicle=ussr_object_279 Skins and camouflages for the {{PAGENAME}} from live.warthunder.com.] | ||
| + | |||
| + | ;Images | ||
| + | <gallery mode="packed" heights="200"> | ||
File:GarageImage Object 279 black.jpg|Black camouflage for the Object 279 earned through the Space Race event | File:GarageImage Object 279 black.jpg|Black camouflage for the Object 279 earned through the Space Race event | ||
File:Object 279 WTWallpaper 001.jpg | File:Object 279 WTWallpaper 001.jpg | ||
</gallery> | </gallery> | ||
| + | |||
| + | ;Videos | ||
| + | {{Youtube-gallery|PosWOnOGkSo|'''Best experimental vehicles''' discusses the {{PAGENAME}} at 1:53 - ''War Thunder Official Channel''}} | ||
== See also == | == See also == | ||
| Line 200: | Line 203: | ||
== External links == | == External links == | ||
| − | ''Paste links to sources and external resources, such as:'' | + | <!-- ''Paste links to sources and external resources, such as:'' |
| + | * ''topic on the official game forum;'' | ||
| + | * ''other literature.'' --> | ||
| − | * | + | * [[wikipedia:Object_279|[Wikipedia] Object 279]] |
| − | |||
| − | |||
{{USSR heavy tanks}} | {{USSR heavy tanks}} | ||
Revision as of 19:47, 10 November 2021

Contents
Description
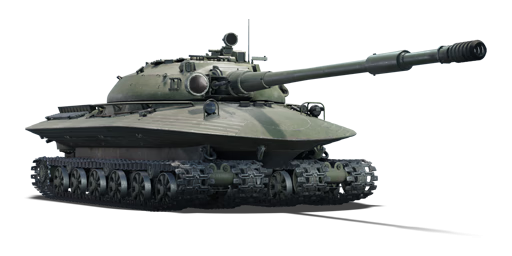
The Object 279 is a gift rank VI Soviet heavy tank with a battle rating of 9.0 (AB/RB/SB). It was introduced during Update 1.97 "Viking Fury" as a reward for the "Space Race" event.
The Object 279's unique look comes with its design as being more capable of cross-country travelling in a possible nuclear warfare scenario. This produces its unique hull shape, four track designs, and a large 130 mm cannon to deal with threats.
General info
Survivability and armour
This tank is the peak of steel armour design, having its armour only consist of homogeneous steel armour. It is also arguably the most well-armoured heavy tank in the game. Getting the exact armour thickness of this tank is quite tricky due to the cast nature of its outer shell. But that won't affect the way one may view its survivability, at the very least the armour thickness of the hull may reach up to 300 mm when faced frontally (excluding the driver's hatch, which is 30 mm flat). The middle of the hull (area below the driver's hatch) is the least angled part of the tank besides the tank's rear, and thus is usually the first spot that is shot at, whereas the sides surrounding this area (left and right parts of the hull when faced front) can reach absurd amounts of thickness, even reaching up to 1000 mm due to extreme angles. However, this will not stop any APFSDS rounds, which are abundant at its BR. Most, if not all tanks at your BR can penetrate you from the front.
The turret is arguably the most armoured part of this tank. Again, getting the exact thickness is difficult but it is guaranteed to be very hard to penetrate, even APFSDS shells will have trouble going through certain spots of this tank. The only prominent weak spot of this turret is the mantlet and machine gun port on the left side of the gun when faced front. Going through the mantlet will more or less only break the gun breech in most cases. One usually shoots the rear side of the turret because that is where the ready rack is located.
It is important to mention the cramped crew spacing. It is like most, if not all, Soviet tank designs where the engineers threw the entire concept of crew comfort out the window. This is important when it comes to the survivability of the crew whenever a shell is able to punch through its stubborn shell. The crew spacing is quite cramped and thus more susceptible to shrapnel damage caused by spalling. On the bright side, most nations have given up on the concept of APHE shell at around this tank's BR so the chances of one-shots are reduced to a degree. Though there are unlucky times when a shell goes through the plate and hit the ready rack behind the gun breech.
Another feature worth mentioning on this vehicle are its self sealing fuel tanks located along the tracks of the tank. To the inexperienced player, these may be an appealing target but that is not recommended unless the intention was to interrupt a repair, most of the time this will only cause a fire and maybe break some tracks (causing a fire is pointless due to the self extinguishing feature). A more recommended target on the side is the bulge made to accommodate the size of the turret (this bulge is also present on the T-62), it is the flattest part of the tank, besides the rear.
All around, this tank is a very hard nut to crack but one should not rely on its armour to stop incoming projectiles. It shares at least some similarities with the T-10M and it has a similar playstyle.
Mobility
| Game Mode | Max Speed (km/h) | Weight (tons) | Engine power (horsepower) | Power-to-weight ratio (hp/ton) | |||
|---|---|---|---|---|---|---|---|
| Forward | Reverse | Stock | Upgraded | Stock | Upgraded | ||
| Arcade | 59 | 20 | 60.4 | 1,291 | 1,908 | 21.37 | 31.59 |
| Realistic | 56 | 18 | 884 | 1,000 | 14.64 | 16.56 | |
The mobility is good for a vehicle of its size and weight, with a -18 km/h reverse speed, meaning it can actually back out of situations. As a heavy tank, the turning capabilities remain sub-par and the Object 279 loses a lot of speed when turning.
Modifications and economy
| Mobility | Protection | Firepower | ||||||||||||||||||||
|---|---|---|---|---|---|---|---|---|---|---|---|---|---|---|---|---|---|---|---|---|---|---|
|
|
|
Armaments
Main armament
The main armament is a powerful 130 mm gun. It has decent ballistics and, coupled with the rangefinder, HE filler, and penetration comparable to some APFSDS shells, it is an extremely effective main armament.
| 130 mm M-65 | Turret rotation speed (°/s) | Reloading rate (seconds) | |||||||||||
|---|---|---|---|---|---|---|---|---|---|---|---|---|---|
| Mode | Capacity | Vertical | Horizontal | Stabilizer | Stock | Upgraded | Full | Expert | Aced | Stock | Full | Expert | Aced |
| Arcade | 40 | -5°/+17° | ±180° | Two-plane | 14.56 | 20.16 | 24.48 | 27.07 | 28.80 | 11.18 | 9.89 | 9.12 | 8.60 |
| Realistic | 10.71 | 12.60 | 15.30 | 16.92 | 18.00 | ||||||||
Ammunition
| Penetration statistics | |||||||
|---|---|---|---|---|---|---|---|
| Ammunition | Type of warhead |
Penetration @ 0° Angle of Attack (mm) | |||||
| 10 m | 100 m | 500 m | 1,000 m | 1,500 m | 2,000 m | ||
| BR-482B | APCBC | 363 | 359 | 342 | 322 | 303 | 285 |
| OF-482M | HE | 31 | 31 | 31 | 31 | 31 | 31 |
| Shell details | |||||||||
|---|---|---|---|---|---|---|---|---|---|
| Ammunition | Type of warhead |
Velocity (m/s) |
Projectile Mass (kg) |
Fuse delay (m) |
Fuse sensitivity (mm) |
Explosive Mass (TNT equivalent) (g) |
Ricochet | ||
| 0% | 50% | 100% | |||||||
| BR-482B | APCBC | 1,000 | 33.3 | 1.2 | 19 | 177.1 | 48° | 63° | 71° |
| OF-482M | HE | 900 | 33.7 | 0 | 0 | 2,650 | 79° | 80° | 81° |
Ammo racks

| Full ammo |
Ammo type |
1st rack empty |
2nd rack empty |
3rd rack empty |
4th rack empty |
5th rack empty |
6th rack empty |
Visual discrepancy |
|---|---|---|---|---|---|---|---|---|
| 40 | Projectiles Propellants |
31 (+9) 36 (+4) |
28 (+12) 31 (+9) |
19 (+21) 24 (+16) |
17 (+23) 19 (+21) |
14 (+26) 14 (+26) |
1 (+39) 1 (+39) |
No |
Notes:
- Projectiles and propellant bags are modeled individually and disappear after having been shot or loaded.
- Both racks 6 are first stage ammo racks for projectiles and propellant bags. They represent 13 shots and get filled first when loading up the tank.
- They are also emptied early: the rack depletion order at full capacity is: 6 - 1 - 2 until 5.
- Simply not firing when the gun is loaded will move ammo from racks 1-5 into racks 6. Firing will interrupt the restocking of the ready racks.
Machine guns
| 14.5 mm KPVT | ||||
|---|---|---|---|---|
| Mount | Capacity (Belt) | Fire rate | Vertical | Horizontal |
| Coaxial | 800 (50) | 600 | N/A | N/A |
The KPVT is an very effective machine gun, on par with certain autocannons in terms of penetration, and can easily shred lightly armoured vehicles or even the sides of certain MBTs thanks it its 45 mm of penetration. The muzzle velocity of the KPVT is almost the same as the main gun, meaning it can be used as an ranging machine gun.
Usage in battles
The Object 279 is in a position where its main gun can penetrate most things it faces, and the large HE filler guarantees a one shot. However, the hull is weak, unless you are in a full downtier, it should definitely not be relied on. The turret, on the other hand, is incredibly strong. The Object 279 plays quite well like a TD, using your 1,000 m/s APHE shell and strong turret armour to quickly peek and take pot-shots at enemy positions. This strategy is effective in uptiers. In a full downtier you can use it like a heavy tank, rushing caps and storming enemy positions, but HEATFS is abundant even at 7.7 and will end you fast.
Pros and cons
Pros:
- Great 130 mm gun; able to one-shot majority of the enemy tanks
- Main gun has a two-plane stabilizer
- Good overall mobility for its weight
- Access to Rangefinder and NVD
- Coaxial 14.5 mm machine gun is great for dealing with light vehicles and aircraft
- Fuel tanks are self-sealing and will extinguish by themselves without incurring damage
- Extremely angled and thick cast armour
- Quick reloading speed for the size of the gun, first stage ammo consists of a 13 shell auto loader
- Can survive multiple hits from an ATGM frontally
- Turret is extraordinary though, even against modern Sabot
- Good reverse speed
- Secondary machine gun can act as a ranging MG
Cons:
- Inadequate turret traverse speed
- Inadequate depression angle, a feature shared by all Soviet tanks
- Vulnerable to high calibre HE; pylons connecting tank to tracks make for very appealing targets for such shells
- Most tanks at your BR can penetrate you from the front
- Very long main gun barrel can be a liability, allowing observant enemies to spot the tank hiding around corners
- Low muzzle velocity compared to APFSDS and APDS shells commonly found at this BR
- No laser rangefinder
History

The Object 279 Kotin was conceived in 1959. It was supposed to be a breakthrough tank that was also able to withstand a nuclear blast's shockwave. The development of the design started at the Kirov Plant in Leningrad, the head designer was L. Troyanov. The project was started in 1957 under the requirements of 1956. The pre-production Object 279 was completed at the end of 1959.
Although 3 vehicles were built in total, the project was later abandoned in favour of lighter vehicles which ended the Soviet heavy tank programs, due to Soviet leader at the time, Nikita Khrushchev's decision on July 22, 1960, to stop the production of tanks weighing more than 50 metric tons, in favour of smaller and lighter tanks.
Media
- Skins
- Images

Black camouflage for the Object 279 earned through the Space Race event


- Videos
See also
Links to the articles on the War Thunder Wiki that you think will be useful for the reader, for example:
- reference to the series of the vehicles;
- links to approximate analogues of other nations and research trees.
External links
| USSR heavy tanks | |
|---|---|
| KV-1 | KV-1 (L-11) · KV-1 (ZiS-5) · KV-1E · KV-1S |
| KV-2 | KV-2 (1939) · KV-2 (1940) · KV-2 (ZiS-6) |
| Other KVs | KV-85 · KV-122 · KV-220 |
| IS-1/2 | IS-1 · IS-2 · IS-2 (1944) · IS-2 No.321 · IS-2 "Revenge" · Object 248 |
| Other IS tanks | IS-3 · IS-4M · IS-6 · IS-7 |
| T-10 | T-10A · T-10M |
| Multi-turreted | T-35 · SMK |
| Other | Object 279 |
| Lend-Lease | ▂MK-II "Matilda" |
