Difference between revisions of "Ho-Ni I"
Inceptor57 (talk | contribs) |
|||
| Line 2: | Line 2: | ||
== Description == | == Description == | ||
| − | ''In the description, the first part needs to be about the history of the creation and combat usage of the vehicle, as well as its key features. In the second part, tell the reader about the ground vehicle in the game. Insert the screenshot of the vehicle. If the novice player does not remember the vehicle by name, they will immediately understand what kind of vehicle it is talking about.'' | + | <!--''In the description, the first part needs to be about the history of the creation and combat usage of the vehicle, as well as its key features. In the second part, tell the reader about the ground vehicle in the game. Insert the screenshot of the vehicle. If the novice player does not remember the vehicle by name, they will immediately understand what kind of vehicle it is talking about.''--> |
| + | [[File:GarageImage_{{PAGENAME}}.jpg|420px|thumb|left]] | ||
| + | {{break}} | ||
| + | The '''{{specs|name}}''' is a Rank {{specs|rank}} Japanese tank destroyer {{Battle-rating|1}}. It was introduced along with the entire Japanese Ground Forces tree in [[Update_1.65_"Way_of_the_Samurai"|Update 1.65 "Way of the Samurai"]] | ||
| + | |||
| + | '''Mobility''': | ||
| + | |||
| + | The Ho-Ni I is based off tha Chi-Ha chassis, which Japanese ground forces will be familiar with since it is featured on other japanese early tanks: [[Type 97 Chi-Ha|Chi-Ha]],[[Type 97 Chi-Ha Kai|Chi-Ha Kai]],[[Type 4 Ho-Ro|Ho-Ro]] and [[Type 3 Ho-Ni_III|Ho-Ni III]]. Since this chassis is well known, let's describe what's new: the gun mount. | ||
| + | |||
| + | '''Firepower''': | ||
| + | |||
| + | In War Thunder, Japanese ground forces have some kind of a "tradition" to mount their next turreted tank's gun on an older chassis: The [[Type 3 75 mm tank gun|Type 90]] is found on the later [[Type 3 Chi-Nu|Chi-Nu]] tank in a turreted format. Same thing goes with the [[Type 5 Na-To|Na-To]] and its [[Type 5 75 mm Tank Gun|Type 5]] later mounted on the following turreted tanks:[[Type 4 Chi-To|Chi-To]][[Type 4 Chi-To Late|Late]] and [[Type 5 Chi-Ri_II|Chi-Ri II]](with a bonus 2-shot *autoloader*). That way, you can experiment the amazing firepower of a decent BR 3.3 gun at BR 2.0 ! | ||
| + | |||
| + | Plus, for a 75 mm gun, the [[Type 3 75 mm tank gun|Type 90]]'s HE shells have 11 mm of penetration, which is more than other guns of the same caliber such as the one equipped on a [[Pz.Kpfw. V Ausf. D|Panther D]] (10 mm) or a [[Medium Tank M4A2 (76) W Sherman|M4A2 (76) ''Sherman'']] (7 mm) . This increased HE cabability is not to be ignored at such a low BR. | ||
| + | |||
| + | It fires smoke shells. | ||
| + | |||
| + | Only one flaw tatters this SPG's perfection: it has no machine gun to take out light targets and it's reload rate is quite long for this low BR (target roof armour of light vehicles). | ||
| + | |||
| + | '''Armour''': | ||
| + | |||
| + | There is many downsides to this configuration: the Ho-Ni I comes in as an open-topped SPG with only 3 crew members, with 2 of them in the superstructure, exposed to any strafing plane or back MG fire. Death can rain fast on the Ho-Ni I. (For only 0.3 more BR, the [[Ho-Ni III]] is completely closed and has a crew count of 5.) From the front, beware HMGs at close ranges since 25 mm of almost flat armour is not enough to protect your crew. There is also no gun mantlet so that even a lucky MG bullet can hit either commander of gunner. Little consolation: there is extra 25 mm plates around the gun's hole, protecting most of the commander's and gunner's body with a cumulative 50 mm of armour ! At this BR, this is enough to block incoming shots from 500+ m. | ||
== General info == | == General info == | ||
=== Survivability and armour === | === Survivability and armour === | ||
| − | ''Describe armour protection. Note the most well protected and key weak areas. Appreciate the layout of modules as well as the number and location of crew members. Is the level of armour protection sufficient, is the placement of modules helpfull for survival in combat?'' | + | <!--''Describe armour protection. Note the most well protected and key weak areas. Appreciate the layout of modules as well as the number and location of crew members. Is the level of armour protection sufficient, is the placement of modules helpfull for survival in combat?'' |
| − | ''If necessary use a visual template to indicate the most secure and weak zones of the armour.'' | + | ''If necessary use a visual template to indicate the most secure and weak zones of the armour.''--> |
| + | '''Armour type:''' | ||
| + | * Rolled homogeneous armour | ||
| + | {| class="wikitable" | ||
| + | |- | ||
| + | ! Armour !! Front !! Sides !! Rear !! Roof | ||
| + | |- | ||
| + | | Hull || 25 mm (12-32°) ''Front plate'' <br> 15 mm (63°), 17 mm (81°) ''Front glacis'' <br> 15 mm (37-59°) ''Lower glacis'' || 25 mm (40°) ''Top left'' <br> 25 mm (24-27°) ''Top right'' <br> 20 mm ''Bottom'' || 17 mm (69°) ''Top'' <br> 20 mm (4-72°) ''Bottom'' || 12 mm | ||
| + | |- | ||
| + | | Superstructure || 25 mm (14-15°) || 25 mm (0-11°) || N/A || 10 mm | ||
| + | |- | ||
| + | |} | ||
| + | '''Notes:''' | ||
| + | * Suspension wheels and tracks are both 15 mm thick | ||
| + | * Belly armour is 8.5 mm thick. | ||
| + | * Roof superstructure armour will not protect crew from strafe fire. | ||
=== Mobility === | === Mobility === | ||
| − | ''Write about the mobility of the ground vehicle. Estimate the specific power and maneuverability as well as the maximum speed forward and backward.'' | + | <!--''Write about the mobility of the ground vehicle. Estimate the specific power and maneuverability as well as the maximum speed forward and backward.''--> |
| + | {| class="wikitable" style="text-align:center" | ||
| + | |- | ||
| + | !colspan="3" | Mobility characteristic | ||
| + | |- | ||
| + | ! Weight (tons) | ||
| + | !colspan="1" | Add-on Armor<br>weight (tons) | ||
| + | !colspan="1" | Max speed (km/h) | ||
| + | |- | ||
| + | |rowspan="2" | 14.8 || colspan="1" rowspan="2" | N/A || colspan="1" | 44 (AB) | ||
| + | |- | ||
| + | |40 (RB/SB) | ||
| + | |- | ||
| + | !colspan="3" | Engine power (horsepower) | ||
| + | |- | ||
| + | !colspan="1" | Mode | ||
| + | !Stock | ||
| + | !Upgraded | ||
| + | |- | ||
| + | |''Arcade'' | ||
| + | |243 | ||
| + | |324 | ||
| + | |- | ||
| + | |''Realistic/Simulator'' | ||
| + | |150 | ||
| + | |170 | ||
| + | |- | ||
| + | !colspan="3" | Power-to-weight ratio (hp/ton) | ||
| + | |- | ||
| + | !colspan="1" | Mode | ||
| + | !Stock | ||
| + | !Upgraded | ||
| + | |- | ||
| + | |''Arcade'' | ||
| + | |16.42 | ||
| + | |21.89 | ||
| + | |- | ||
| + | |''Realistic/Simulator'' | ||
| + | |10.13 | ||
| + | |11.49 | ||
| + | |- | ||
| + | |} | ||
== Armaments == | == Armaments == | ||
=== Main armament === | === Main armament === | ||
| − | ''Give the reader information about the characteristics of the main gun. Assess its effectiveness in a battle based on the reloading speed, ballistics and the power of shells. Do not forget about the flexibilty of the fire, that is how quickly the cannon can be aimed at the target, open fire on it and aim at another enemy. Add a link to the main article on the gun: <code><nowiki>{{main|Name of the weapon}}</nowiki></code>. Describe in general terms the ammunition available for the main gun. Give advice on how to use them and how to fill the ammunition storage.'' | + | <!--''Give the reader information about the characteristics of the main gun. Assess its effectiveness in a battle based on the reloading speed, ballistics and the power of shells. Do not forget about the flexibilty of the fire, that is how quickly the cannon can be aimed at the target, open fire on it and aim at another enemy. Add a link to the main article on the gun: <code><nowiki>{{main|Name of the weapon}}</nowiki></code>. Describe in general terms the ammunition available for the main gun. Give advice on how to use them and how to fill the ammunition storage.''--> |
| + | {{main|Type 90 (75 mm)}} | ||
| + | |||
| + | {| class="wikitable" style="text-align:center" | ||
| + | |- | ||
| + | ! colspan="6" | [[Type 90 (75 mm)|75 mm Type 90]] | ||
| + | |- | ||
| + | ! colspan="3" rowspan="1" style="width:5em" |Capacity | ||
| + | ! rowspan="1" | Vertical <br> guidance | ||
| + | ! rowspan="1" | Horizontal <br> guidance | ||
| + | ! rowspan="1" | Stabilizer | ||
| + | |- | ||
| + | | colspan="3" | 40 || -10°/+20° || ±10° || N/A | ||
| + | |- | ||
| + | ! colspan="6" | Turret rotation speed (°/s) | ||
| + | |- | ||
| + | ! style="width:4em" |Mode | ||
| + | ! style="width:4em" |Stock | ||
| + | ! style="width:4em" |Upgraded | ||
| + | ! style="width:4em" |Prior + Full crew | ||
| + | ! style="width:4em" |Prior + Expert qualif. | ||
| + | ! style="width:4em" |Prior + Ace qualif. | ||
| + | |- | ||
| + | | ''Arcade'' || 9.5 || 13.2 || 16.0 || 28.3 || __.__ | ||
| + | |- | ||
| + | | ''Realistic'' || 9.5 || 11.2 || 13.6 || 15.0 || __.__ | ||
| + | |- | ||
| + | ! colspan="4" | Reloading rate (seconds) | ||
| + | |- | ||
| + | ! colspan="1" style="width:4em" |Stock | ||
| + | ! colspan="1" style="width:4em" |Prior + Full crew | ||
| + | ! colspan="1" style="width:4em" |Prior + Expert qualif. | ||
| + | ! colspan="1" style="width:4em" |Prior + Ace qualif. | ||
| + | |- | ||
| + | | 7.8 || 6.9 || 6.4 || __.__ | ||
| + | |- | ||
| + | |} | ||
| − | === | + | ===== Ammunition ===== |
| − | '' | + | {| class="wikitable sortable" style="text-align:center" width="100%" |
| + | ! colspan="8" | Penetration statistics | ||
| + | |- | ||
| + | ! rowspan="2" data-sort-type="text" | Ammunition | ||
| + | ! rowspan="2" class="unsortable" | Type of <br /> warhead | ||
| + | ! colspan="6" | '''Penetration''' '''''in mm''''' '''@ 90°''' | ||
| + | |- | ||
| + | ! 10m | ||
| + | ! 100m | ||
| + | ! 500m | ||
| + | ! 1000m | ||
| + | ! 1500m | ||
| + | ! 2000m | ||
| + | |- | ||
| + | | Type 1 APHE || APHE || 97 || 93 || 83 || 71 || 61 || 51 || | ||
| + | |- | ||
| + | | Type 94 HE || HE || 11 || 11 || 11 || 11 || 11 || 11 | ||
| + | |- | ||
| + | |} | ||
| + | {| class="wikitable sortable" style="text-align:center" width="100%" | ||
| + | ! colspan="11" | Shell details | ||
| + | |- | ||
| + | ! rowspan="2" data-sort-type="text" | Ammunition | ||
| + | ! rowspan="2" class="unsortable" | Type of <br /> warhead | ||
| + | ! rowspan="2" |Velocity <br /> in m/s | ||
| + | ! rowspan="2" |Projectile<br />Mass in kg | ||
| + | ! rowspan="2" | ''Fuse delay'' | ||
| + | ''in m:'' | ||
| + | ! rowspan="2" | ''Fuse sensitivity'' | ||
| + | ''in mm:'' | ||
| + | ! rowspan="2" | ''Explosive Mass in g<br /> (TNT equivalent):'' | ||
| + | ! rowspan="2" | ''Normalization At 30° <br> from horizontal:'' | ||
| + | ! colspan="3" | ''Ricochet:'' | ||
| + | |- | ||
| + | ! 0% | ||
| + | ! 50% | ||
| + | ! 100% | ||
| + | |- | ||
| + | | Type 1 APHE || APHE || 668 || 6.6 || 1.3 || 15 || 67.84 || -1° || 47° || 60° || 65° | ||
| + | |- | ||
| + | | Type 94 HE || HE || 522 || 6.0 || 0.1 || 0.1 || 810 || +0° || 79° || 80° || 81° | ||
| + | |- | ||
| + | |} | ||
| + | {| class="wikitable sortable" style="text-align:center" | ||
| + | ! colspan="7" | Smoke characteristic | ||
| + | |- | ||
| + | ! Ammunition | ||
| + | ! Velocity <br /> in m/s | ||
| + | ! Projectile<br />Mass in kg | ||
| + | ! ''Screen radius <br /> in m'' | ||
| + | ! ''Screen time <br /> in s'' | ||
| + | ! ''Screen hold time <br /> in s:'' | ||
| + | ! ''Explosive Mass in g<br /> (TNT equivalent):'' | ||
| + | |- | ||
| + | | Type 90 Smoke || 570 || 5.7 || 13 || 5 || 20 || 100 | ||
| + | |- | ||
| + | |} | ||
| − | === | + | ===== [[Ammo racks|Ammo racks]] ===== |
| − | '' | + | [[File:Ammoracks {{PAGENAME}}.png|right|thumbnail|[[Ammo racks|Ammo racks]] of the Ho-Ni I.]] |
| + | {| class="wikitable sortable" style="text-align:center" | ||
| + | |- | ||
| + | ! class="wikitable unsortable" |Full<br /> ammo | ||
| + | ! class="wikitable unsortable" |1st<br /> rack empty | ||
| + | ! class="wikitable unsortable" |2nd<br /> rack empty | ||
| + | ! class="wikitable unsortable" |3rd<br /> rack empty | ||
| + | ! class="wikitable unsortable" |Visual<br /> discrepancy | ||
| + | |- | ||
| + | || '''40''' || 37 ''(+3)'' || 24 ''(+16)'' || 1 ''(+39)'' || style="text-align:left" | no | ||
| + | |- | ||
| + | |} | ||
== Usage in the battles == | == Usage in the battles == | ||
| − | ''Describe the tactics of playing in the vehicle, the features of using vehicles in the team and advice on tactics. Refrain from creating a "guide" - do not impose a single point of view but give the reader food for thought. Describe the most dangerous enemies and give recommendations on fighting them. If necessary, note the specifics of the game in different modes (AB, RB, SB).'' | + | <!--''Describe the tactics of playing in the vehicle, the features of using vehicles in the team and advice on tactics. Refrain from creating a "guide" - do not impose a single point of view but give the reader food for thought. Describe the most dangerous enemies and give recommendations on fighting them. If necessary, note the specifics of the game in different modes (AB, RB, SB).''--> |
| + | The Ho-Ni I should be played like most open crew compartment, fixed gun tank destroyers, fighting from a distance from the front-lines and delivering support fire. The thin armour means the Ho-Ni I will not survive a direct confrontation with any enemy tank and will require the vehicle to obtain the fighting advantage of being able to target the enemy first to ensure any chance of victory. The Ho-Ni I should also be wary of enemy aerial attacks as the open compartment and three-man crew means that an accurate strafing fire could potentially knock out the entire crew. | ||
| + | |||
| + | At its battle rating, the worst the Ho-Ni I could face are the German [[Panzer IV E]] and British [[Cromwell V]] and [[Matilda II]]. The two medium tanks have sufficient armour to withstand the 75 mm gun while the Matilda II requires precise shot in order to destroy it frontally. All of these tanks have guns able to shred the Ho-Ni I apart if they could get a bead on the it. | ||
=== Pros and cons === | === Pros and cons === | ||
| − | ''Summarize and briefly evaluate the vehicle in terms of its characteristics and combat effectiveness. Mark its pros and cons in a bulleted list. Do not use more than 6 points for each of the characteristics. Avoid using categorical definitions such as "bad", "good" and the like - they have a substitution in the form of softer "inadequate", "effective".'' | + | <!--''Summarize and briefly evaluate the vehicle in terms of its characteristics and combat effectiveness. Mark its pros and cons in a bulleted list. Do not use more than 6 points for each of the characteristics. Avoid using categorical definitions such as "bad", "good" and the like - they have a substitution in the form of softer "inadequate", "effective".''--> |
| − | |||
'''Pros:''' | '''Pros:''' | ||
| − | * | + | * 75 mm cannon is great, reloads fast and causes massive damages upon penetration. |
| − | + | * Very low BR, has a good chance of being matched with lower BR tanks. | |
| + | * While at the same time will be able to match enemies on and above it's BR rather equally. | ||
| + | * Mobility is decent due to being built on a Chi-Ha chassis. | ||
| + | * Gun is able to effectively penetrate all tanks frontally from BR 1.0 to 3.0. | ||
| + | * Similar play style as the German Marder with better gun depression. | ||
| + | * Good gun traverse speed | ||
| + | * Powerfull HE shell (11 mm of penetration) | ||
| + | * Has smoke shells | ||
'''Cons:''' | '''Cons:''' | ||
| − | * | + | * Tall profile. |
| + | * Overall armour is thin. | ||
| + | * Poor cross country performance due to narrow tracks. | ||
| + | * Exposed crew space makes it vulnerable to air attacks. | ||
| + | * Reverse speed is abysmal. | ||
| + | * Only two types of shell. | ||
| + | * Only 3 crew member. | ||
| + | * Rather small traverse angle | ||
== History == | == History == | ||
| − | ''Describe the history of the creation and combat usage of the ground vehicle in more detail than in the introduction. If the historical reference turns out to be too big, take it to a separate article, taking a link to an article about the vehicle and adding a block "/historical reference" (example: https://wiki.warthunder.com/Name-vehicles/historical reference) and add a link to it here using the <code>main</code> template. Be sure to include links to sources at the end of the article.'' | + | <!--''Describe the history of the creation and combat usage of the ground vehicle in more detail than in the introduction. If the historical reference turns out to be too big, take it to a separate article, taking a link to an article about the vehicle and adding a block "/historical reference" (example: https://wiki.warthunder.com/Name-vehicles/historical reference) and add a link to it here using the <code>main</code> template. Be sure to include links to sources at the end of the article.''--> |
| + | The creation of their own independent armoured division had Japan also envision an enlargement of their artillery forces. They decided to build a series of assault guns based off the [[Type 97 Chi-Ha]] chassis. One of the first of these design was the '''Ho-Ni I''' which had the Type 97 chassis fitted with a 75 mm Type 90 field gun.<ref name="ZalogaJapaneseTank">Zaloga Steven. ''Japanese Tanks 1939-1945'' Great Britain: Osprey Publishing Ltd., 2007</ref> | ||
== Media == | == Media == | ||
| Line 51: | Line 248: | ||
* ''topic on the official game forum;'' | * ''topic on the official game forum;'' | ||
* ''other literature.'' | * ''other literature.'' | ||
| + | |||
| + | {{Japan tank destroyers}} | ||
Revision as of 17:55, 8 December 2018
Contents
Description

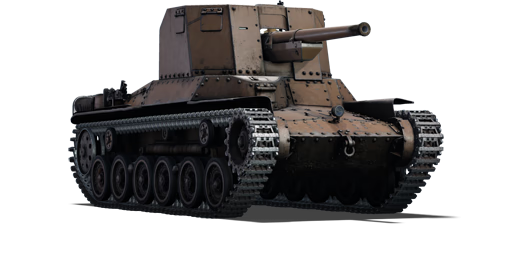
The Type 1 Ho-Ni I is a Rank II Japanese tank destroyer
with a battle rating of 2.0 (AB/RB/SB). It was introduced along with the entire Japanese Ground Forces tree in Update 1.65 "Way of the Samurai"
Mobility:
The Ho-Ni I is based off tha Chi-Ha chassis, which Japanese ground forces will be familiar with since it is featured on other japanese early tanks: Chi-Ha,Chi-Ha Kai,Ho-Ro and Ho-Ni III. Since this chassis is well known, let's describe what's new: the gun mount.
Firepower:
In War Thunder, Japanese ground forces have some kind of a "tradition" to mount their next turreted tank's gun on an older chassis: The Type 90 is found on the later Chi-Nu tank in a turreted format. Same thing goes with the Na-To and its Type 5 later mounted on the following turreted tanks:Chi-ToLate and Chi-Ri II(with a bonus 2-shot *autoloader*). That way, you can experiment the amazing firepower of a decent BR 3.3 gun at BR 2.0 !
Plus, for a 75 mm gun, the Type 90's HE shells have 11 mm of penetration, which is more than other guns of the same caliber such as the one equipped on a Panther D (10 mm) or a M4A2 (76) Sherman (7 mm) . This increased HE cabability is not to be ignored at such a low BR.
It fires smoke shells.
Only one flaw tatters this SPG's perfection: it has no machine gun to take out light targets and it's reload rate is quite long for this low BR (target roof armour of light vehicles).
Armour:
There is many downsides to this configuration: the Ho-Ni I comes in as an open-topped SPG with only 3 crew members, with 2 of them in the superstructure, exposed to any strafing plane or back MG fire. Death can rain fast on the Ho-Ni I. (For only 0.3 more BR, the Ho-Ni III is completely closed and has a crew count of 5.) From the front, beware HMGs at close ranges since 25 mm of almost flat armour is not enough to protect your crew. There is also no gun mantlet so that even a lucky MG bullet can hit either commander of gunner. Little consolation: there is extra 25 mm plates around the gun's hole, protecting most of the commander's and gunner's body with a cumulative 50 mm of armour ! At this BR, this is enough to block incoming shots from 500+ m.
General info
Survivability and armour
Armour type:
- Rolled homogeneous armour
| Armour | Front | Sides | Rear | Roof |
|---|---|---|---|---|
| Hull | 25 mm (12-32°) Front plate 15 mm (63°), 17 mm (81°) Front glacis 15 mm (37-59°) Lower glacis |
25 mm (40°) Top left 25 mm (24-27°) Top right 20 mm Bottom |
17 mm (69°) Top 20 mm (4-72°) Bottom |
12 mm |
| Superstructure | 25 mm (14-15°) | 25 mm (0-11°) | N/A | 10 mm |
Notes:
- Suspension wheels and tracks are both 15 mm thick
- Belly armour is 8.5 mm thick.
- Roof superstructure armour will not protect crew from strafe fire.
Mobility
| Mobility characteristic | ||
|---|---|---|
| Weight (tons) | Add-on Armor weight (tons) |
Max speed (km/h) |
| 14.8 | N/A | 44 (AB) |
| 40 (RB/SB) | ||
| Engine power (horsepower) | ||
| Mode | Stock | Upgraded |
| Arcade | 243 | 324 |
| Realistic/Simulator | 150 | 170 |
| Power-to-weight ratio (hp/ton) | ||
| Mode | Stock | Upgraded |
| Arcade | 16.42 | 21.89 |
| Realistic/Simulator | 10.13 | 11.49 |
Armaments
Main armament
| 75 mm Type 90 | |||||
|---|---|---|---|---|---|
| Capacity | Vertical guidance |
Horizontal guidance |
Stabilizer | ||
| 40 | -10°/+20° | ±10° | N/A | ||
| Turret rotation speed (°/s) | |||||
| Mode | Stock | Upgraded | Prior + Full crew | Prior + Expert qualif. | Prior + Ace qualif. |
| Arcade | 9.5 | 13.2 | 16.0 | 28.3 | __.__ |
| Realistic | 9.5 | 11.2 | 13.6 | 15.0 | __.__ |
| Reloading rate (seconds) | |||||
| Stock | Prior + Full crew | Prior + Expert qualif. | Prior + Ace qualif. | ||
| 7.8 | 6.9 | 6.4 | __.__ | ||
Ammunition
| Penetration statistics | ||||||||
|---|---|---|---|---|---|---|---|---|
| Ammunition | Type of warhead |
Penetration in mm @ 90° | ||||||
| 10m | 100m | 500m | 1000m | 1500m | 2000m | |||
| Type 1 APHE | APHE | 97 | 93 | 83 | 71 | 61 | 51 | |
| Type 94 HE | HE | 11 | 11 | 11 | 11 | 11 | 11 | |
| Shell details | ||||||||||
|---|---|---|---|---|---|---|---|---|---|---|
| Ammunition | Type of warhead |
Velocity in m/s |
Projectile Mass in kg |
Fuse delay
in m: |
Fuse sensitivity
in mm: |
Explosive Mass in g (TNT equivalent): |
Normalization At 30° from horizontal: |
Ricochet: | ||
| 0% | 50% | 100% | ||||||||
| Type 1 APHE | APHE | 668 | 6.6 | 1.3 | 15 | 67.84 | -1° | 47° | 60° | 65° |
| Type 94 HE | HE | 522 | 6.0 | 0.1 | 0.1 | 810 | +0° | 79° | 80° | 81° |
| Smoke characteristic | ||||||
|---|---|---|---|---|---|---|
| Ammunition | Velocity in m/s |
Projectile Mass in kg |
Screen radius in m |
Screen time in s |
Screen hold time in s: |
Explosive Mass in g (TNT equivalent): |
| Type 90 Smoke | 570 | 5.7 | 13 | 5 | 20 | 100 |
Ammo racks

| Full ammo |
1st rack empty |
2nd rack empty |
3rd rack empty |
Visual discrepancy |
|---|---|---|---|---|
| 40 | 37 (+3) | 24 (+16) | 1 (+39) | no |
Usage in the battles
The Ho-Ni I should be played like most open crew compartment, fixed gun tank destroyers, fighting from a distance from the front-lines and delivering support fire. The thin armour means the Ho-Ni I will not survive a direct confrontation with any enemy tank and will require the vehicle to obtain the fighting advantage of being able to target the enemy first to ensure any chance of victory. The Ho-Ni I should also be wary of enemy aerial attacks as the open compartment and three-man crew means that an accurate strafing fire could potentially knock out the entire crew.
At its battle rating, the worst the Ho-Ni I could face are the German Panzer IV E and British Cromwell V and Matilda II. The two medium tanks have sufficient armour to withstand the 75 mm gun while the Matilda II requires precise shot in order to destroy it frontally. All of these tanks have guns able to shred the Ho-Ni I apart if they could get a bead on the it.
Pros and cons
Pros:
- 75 mm cannon is great, reloads fast and causes massive damages upon penetration.
- Very low BR, has a good chance of being matched with lower BR tanks.
- While at the same time will be able to match enemies on and above it's BR rather equally.
- Mobility is decent due to being built on a Chi-Ha chassis.
- Gun is able to effectively penetrate all tanks frontally from BR 1.0 to 3.0.
- Similar play style as the German Marder with better gun depression.
- Good gun traverse speed
- Powerfull HE shell (11 mm of penetration)
- Has smoke shells
Cons:
- Tall profile.
- Overall armour is thin.
- Poor cross country performance due to narrow tracks.
- Exposed crew space makes it vulnerable to air attacks.
- Reverse speed is abysmal.
- Only two types of shell.
- Only 3 crew member.
- Rather small traverse angle
History
The creation of their own independent armoured division had Japan also envision an enlargement of their artillery forces. They decided to build a series of assault guns based off the Type 97 Chi-Ha chassis. One of the first of these design was the Ho-Ni I which had the Type 97 chassis fitted with a 75 mm Type 90 field gun.[1]
Media
An excellent addition to the article will be video guides, as well as screenshots from the game and photos.
Read also
Links to the articles on the War Thunder Wiki that you think will be useful for the reader, for example,
- reference to the series of the vehicles;
- links to approximate analogues of other nations and research trees.
ETC.
Sources
Paste links to sources and external resources, such as:
- topic on the official game forum;
- other literature.
| Japan tank destroyers | |
|---|---|
| Ro-Go Derivatives | Ro-Go Exp. |
| Chi-Ha Derivatives | Ho-Ni I · Ho-Ni III · Ho-Ro · Chi-Ha LG |
| Ho-Ri | Ho-Ri Prototype · Ho-Ri Production |
| Other | Na-To |
| JGSDF | |
| SPRG | Type 60 (C) |
| SPH | Type 75 · Type 99 |
| ATGM | Type 60 ATM |
| Rocket | Type 75 MLRS |
| USA | ▅M36 |
- ↑ Zaloga Steven. Japanese Tanks 1939-1945 Great Britain: Osprey Publishing Ltd., 2007
