Difference between revisions of "T26E5"
Inceptor57 (talk | contribs) (→Description: Updated to new format) |
YT_Necros99_ (talk | contribs) (→Media) (Tag: Visual edit) |
||
| (29 intermediate revisions by 11 users not shown) | |||
| Line 6: | Line 6: | ||
{{Specs-Card | {{Specs-Card | ||
|code=us_t26e5 | |code=us_t26e5 | ||
| − | |images={{Specs-Card-Image|GarageImage_{{PAGENAME}}.jpg | + | |images={{Specs-Card-Image|GarageImage_{{PAGENAME}}.jpg}} |
}} | }} | ||
== Description == | == Description == | ||
<!-- ''In the description, the first part should be about the history of the creation and combat usage of the vehicle, as well as its key features. In the second part, tell the reader about the ground vehicle in the game. Insert a screenshot of the vehicle, so that if the novice player does not remember the vehicle by name, he will immediately understand what kind of vehicle the article is talking about.'' --> | <!-- ''In the description, the first part should be about the history of the creation and combat usage of the vehicle, as well as its key features. In the second part, tell the reader about the ground vehicle in the game. Insert a screenshot of the vehicle, so that if the novice player does not remember the vehicle by name, he will immediately understand what kind of vehicle the article is talking about.'' --> | ||
| + | The '''{{Specs|name}}''' is a rank {{Specs|rank}} American heavy tank {{Battle-rating}}. It was introduced in [[Update "Ground Breaking"]]. | ||
| − | + | It is a American assault tank intended to be used like [[M4A3E2]]. It is based on the [[M26]] Pershing, uses the same 90 mm M3 gun but has additional armour on the front and the turret. Therefore, the T26E5 is able to effectively compete with late World war II vehicle even more than its predecessor thanks to the additional armour. | |
| − | |||
| − | |||
== General info == | == General info == | ||
| Line 20: | Line 19: | ||
{{Specs-Tank-Armour}} | {{Specs-Tank-Armour}} | ||
<!-- ''Describe armour protection. Note the most well protected and key weak areas. Appreciate the layout of modules as well as the number and location of crew members. Is the level of armour protection sufficient, is the placement of modules helpful for survival in combat? If necessary use a visual template to indicate the most secure and weak zones of the armour.'' --> | <!-- ''Describe armour protection. Note the most well protected and key weak areas. Appreciate the layout of modules as well as the number and location of crew members. Is the level of armour protection sufficient, is the placement of modules helpful for survival in combat? If necessary use a visual template to indicate the most secure and weak zones of the armour.'' --> | ||
| − | The frontal armour is quite strong, able to resist | + | The frontal armour is quite strong, able to resist the Panther's gun or even the Tiger II's Kwk 43 gun if well-angled. A notable weak spot on the front glacis is the machine gun port but it is a small target difficult to hit with precision. The other notable weak spot is the lower front plate. With only 120 mm LOS thickness, it is not able to resist most guns and there is no transmission block to absorb a penetrating shell. Side armour can protect you to a certain degree when angled. When not angling, any gun will punch right through your side armour. |
| − | The turret armour is strong, consisting of variable thickness armour ranging from 150 to 300 mm thickness | + | The turret armour is strong, consisting of variable thickness armour ranging from 150 to 300 mm thickness. It is the strongest near the gun mantlet. There are not many weak spots on the turret except the rear and side rear as there is only 100 to 120 mm armour. Any penetrating shell hitting the turret from the side or rear will most likely knock out all of your crew members in the turret as well as detonate the first-stage ammo rack. |
| − | The cupola with only 76 mm thickness can be penetrated by an APHE shell, taking out your gunner and commander | + | The cupola with only 76 mm thickness can be penetrated by an APHE shell, taking out your gunner and commander. Because of the small cupola size, it remains a spot difficult to hit it in the first place. |
| − | Survivability is | + | Survivability is average. You have 5 crew members like a majority of tank at your rank, but because of the cramped space a single powerful enough APHE shell like the IS-2's BR-471 shell can tkae out all your crew members in one shot. |
| − | + | With only 25 mm roof armour, the T26E5 will be easy to penetrate for fighters sporting 30 mm cannons. | |
'''Armour type:''' | '''Armour type:''' | ||
| Line 39: | Line 38: | ||
! Armour !! Front (Slope angle) !! Sides !! Rear !! Roof | ! Armour !! Front (Slope angle) !! Sides !! Rear !! Roof | ||
|- | |- | ||
| − | | Hull || 152.6 mm (46°) ''Upper glacis'' <br> 242 mm (21-35°) ''Upper bulge'' <br> 25.4 mm ''MG port'' <br> 101.6 mm ( | + | | Hull || 152.6 mm (46°) ''Upper front glacis'' <br> 242 mm (21-35°) ''Upper front bulge'' <br> 25.4 mm ''MG port'' <br> 101.6 mm (31°) ''Lower front glacis'' || 76.2 mm ''Fighting compartment'' <br> 50.8 mm ''Engine compartment'' || 50.8 mm (7°) ''Upper rear plate'' <br> 22.2 mm (72°) ''Lower rear glacis'' || 152.6 mm (44°) ''Front glacis'' <br> 22.2 mm (0-20°) ''Fighting & engine compartments'' <br> 5 mm (10°) ''Engine vents'' |
|- | |- | ||
| Turret || 170-229 mm (24°) ''Turret front'' <br> 177.5 mm (cylindrical) ''Gun mantlet''|| 160 mm (cylindrical) ''Front & centre'' <br> 110 mm (8°) ''Rear'' || 127 mm (2°) || 25 mm (0-7°) | | Turret || 170-229 mm (24°) ''Turret front'' <br> 177.5 mm (cylindrical) ''Gun mantlet''|| 160 mm (cylindrical) ''Front & centre'' <br> 110 mm (8°) ''Rear'' || 127 mm (2°) || 25 mm (0-7°) | ||
| Line 52: | Line 51: | ||
=== Mobility === | === Mobility === | ||
| − | {{Specs-Tank-Mobility}} | + | {{Specs-Tank-Mobility}} |
<!-- ''Write about the mobility of the ground vehicle. Estimate the specific power and manoeuvrability, as well as the maximum speed forwards and backwards.'' --> | <!-- ''Write about the mobility of the ground vehicle. Estimate the specific power and manoeuvrability, as well as the maximum speed forwards and backwards.'' --> | ||
The T26E5 use the same engine as the M26 Pershing. It has a poor power-to-weight ratio and its top speed is 40-43 km/h. But expect the average cruising speed to be closer to 30 km/h. When off-road the speed will drop even more. Lacking neutral steering, it might be difficult for the heavy tank to turn in urban environment. As such, the player should plan the route they want to take carefully and avoid flanking manoeuvres that will take a lot of time. | The T26E5 use the same engine as the M26 Pershing. It has a poor power-to-weight ratio and its top speed is 40-43 km/h. But expect the average cruising speed to be closer to 30 km/h. When off-road the speed will drop even more. Lacking neutral steering, it might be difficult for the heavy tank to turn in urban environment. As such, the player should plan the route they want to take carefully and avoid flanking manoeuvres that will take a lot of time. | ||
| Line 67: | Line 66: | ||
<!-- ''Give the reader information about the characteristics of the main gun. Assess its effectiveness in a battle based on the reloading speed, ballistics and the power of shells. Do not forget about the flexibility of the fire, that is how quickly the cannon can be aimed at the target, open fire on it and aim at another enemy. Add a link to the main article on the gun: <code><nowiki>{{main|Name of the weapon}}</nowiki></code>. Describe in general terms the ammunition available for the main gun. Give advice on how to use them and how to fill the ammunition storage.'' --> | <!-- ''Give the reader information about the characteristics of the main gun. Assess its effectiveness in a battle based on the reloading speed, ballistics and the power of shells. Do not forget about the flexibility of the fire, that is how quickly the cannon can be aimed at the target, open fire on it and aim at another enemy. Add a link to the main article on the gun: <code><nowiki>{{main|Name of the weapon}}</nowiki></code>. Describe in general terms the ammunition available for the main gun. Give advice on how to use them and how to fill the ammunition storage.'' --> | ||
{{main|M3 (90 mm)}} | {{main|M3 (90 mm)}} | ||
| + | ''Give the reader information about the characteristics of the main gun. Assess its effectiveness in a battle based on the reloading speed, ballistics and the power of shells. Do not forget about the flexibility of the fire, that is how quickly the cannon can be aimed at the target, open fire on it and aim at another enemy. Add a link to the main article on the gun: <code><nowiki>{{main|Name of the weapon}}</nowiki></code>. Describe in general terms the ammunition available for the main gun. Give advice on how to use them and how to fill the ammunition storage.'' | ||
{| class="wikitable" style="text-align:center" width="100%" | {| class="wikitable" style="text-align:center" width="100%" | ||
| Line 77: | Line 77: | ||
|- | |- | ||
! ''Arcade'' | ! ''Arcade'' | ||
| − | | rowspan="2" | 70 || rowspan="2" | -10°/+20° || rowspan="2" | ±180° || rowspan="2" | N/A || | + | | rowspan="2" | 70 || rowspan="2" | -10°/+20° || rowspan="2" | ±180° || rowspan="2" | N/A || __._ || __._ || __._ || __._ || __._ || rowspan="2" | _.__ || rowspan="2" | _.__ || rowspan="2" | _.__ || rowspan="2" | _.__ |
|- | |- | ||
! ''Realistic'' | ! ''Realistic'' | ||
| − | | | + | | __._ || __._ || __._ || __._ || __._ |
|- | |- | ||
|} | |} | ||
==== Ammunition ==== | ==== Ammunition ==== | ||
| − | The T26E5 | + | The T26E5 use the same 90 mm M3 cannon as the M26 and fires the same ammunition. Once unlocked, the T26E5 will have an APBC shell as its default round. The APBC has decent characteristics but because it doesn't have any explosive filler, it should be replaced by the APCBC shell as soon as possible. The APCR shot can be used to penetrate some heavily armoured vehicle such as the [[Tiger II (H)]], the [[Ferdinand]] or the [[Jagdtiger]] but the player should be aware of the poor post-penetration damage of the APCR projectile. Thus, the APCR should be used as a last resort against an already disabled tank. The HE shell can be used to damage lightly armoured vehicles and the smoke shell can be used to provide smoke cover for teammates or to blind entrenched enemy tanks. |
| − | { | + | {| class="wikitable sortable" style="text-align:center" width="100%" |
| + | ! colspan="8" | Penetration statistics | ||
| + | |- | ||
| + | ! rowspan="2" data-sort-type="text" | Ammunition | ||
| + | ! rowspan="2" | Type of<br>warhead | ||
| + | ! colspan="6" | Penetration @ 0° Angle of Attack (mm) | ||
| + | |- | ||
| + | ! 10 m !! 100 m !! 500 m !! 1,000 m !! 1,500 m !! 2,000 m | ||
| + | |- | ||
| + | | T33 shot || APBC || 175 || 172 || 160 || 146 || 132 || 122 | ||
| + | |- | ||
| + | | M82 shot || APCBC || 173 || 170 || 159 || 147 || 135 || 124 | ||
| + | |- | ||
| + | | M304 shot || APCR || 287 || 281 || 259 || 234 || 211 || 191 | ||
| + | |- | ||
| + | | M71 shell || HE || 13 || 13 || 13 || 13 || 13 || 13 | ||
| + | |- | ||
| + | |} | ||
| + | {| class="wikitable sortable" style="text-align:center" width="100%" | ||
| + | ! colspan="10" | Shell details | ||
| + | |- | ||
| + | ! rowspan="2" data-sort-type="text" | Ammunition | ||
| + | ! rowspan="2" | Type of<br>warhead | ||
| + | ! rowspan="2" | Velocity<br>(m/s) | ||
| + | ! rowspan="2" | Projectile<br>Mass (kg) | ||
| + | ! rowspan="2" | Fuse delay<br>(m) | ||
| + | ! rowspan="2" | Fuse sensitivity<br>(mm) | ||
| + | ! rowspan="2" | Explosive Mass<br>(TNT equivalent) (g) | ||
| + | ! colspan="3" | Ricochet | ||
| + | |- | ||
| + | ! 0% !! 50% !! 100% | ||
| + | |- | ||
| + | | T33 shot || APBC || 853 ||10.9 || N/A || N/A || N/A || 47 || 60 || 65 | ||
| + | |- | ||
| + | | M82 shot || APCBC || 813 || 10.9 || 1.2 || 14 || 137.2 || 48 || 63 || 71 | ||
| + | |- | ||
| + | | M304 shot || APCR || 1,021 || 7.6 || N/A || N/A || N/A || 66 || 70 || 72 | ||
| + | |- | ||
| + | | M71 shell || HE || 823 || 10.6 || 0 || 0.1 || 925 || 79 || 80 || 81 | ||
| + | |- | ||
| + | |} | ||
| + | {| class="wikitable" style="text-align:center" | ||
| + | ! colspan="7" | Smoke shell characteristics | ||
| + | |- | ||
| + | ! Ammunition | ||
| + | ! Velocity<br>(m/s) | ||
| + | ! Projectile<br>Mass (kg) | ||
| + | ! Screen radius<br>(m) | ||
| + | ! Screen deploy time<br>(s) | ||
| + | ! Screen hold time<br>(s) | ||
| + | ! Explosive Mass<br>(TNT equivalent) (g) | ||
| + | |- | ||
| + | | M313 || 821 || 10.7 || 13 || 5 || 20 || 50 | ||
| + | |- | ||
| + | |} | ||
==== [[Ammo racks]] ==== | ==== [[Ammo racks]] ==== | ||
| − | <!-- '''Last updated: | + | <!-- [[File:Ammoracks_{{PAGENAME}}.png|right|thumb|x250px|[[Ammo racks]] of the {{PAGENAME}}]] --> |
| + | <!-- '''Last updated:''' --> | ||
{| class="wikitable" style="text-align:center" | {| class="wikitable" style="text-align:center" | ||
|- | |- | ||
| Line 100: | Line 155: | ||
! 5th<br>rack empty | ! 5th<br>rack empty | ||
! 6th<br>rack empty | ! 6th<br>rack empty | ||
| − | |||
| − | |||
| − | |||
! Visual<br>discrepancy | ! Visual<br>discrepancy | ||
|- | |- | ||
| − | | '''70''' || | + | | '''70''' || __ ''(+__)'' || __ ''(+__)'' || __ ''(+__)'' || __ ''(+__)'' || __ ''(+__)'' || __ ''(+__)'' || __ |
|- | |- | ||
|} | |} | ||
| − | |||
| − | |||
| − | |||
| − | |||
| − | |||
| − | |||
| − | |||
| − | |||
| − | |||
| − | |||
=== Machine guns === | === Machine guns === | ||
{{Specs-Tank-Weapon|2}} | {{Specs-Tank-Weapon|2}} | ||
| − | |||
<!-- ''Offensive and anti-aircraft machine guns not only allow you to fight some aircraft but also are effective against lightly armoured vehicles. Evaluate machine guns and give recommendations on its use.'' --> | <!-- ''Offensive and anti-aircraft machine guns not only allow you to fight some aircraft but also are effective against lightly armoured vehicles. Evaluate machine guns and give recommendations on its use.'' --> | ||
{{main|M2HB (12.7 mm)|M1919A4 (7.62 mm)}} | {{main|M2HB (12.7 mm)|M1919A4 (7.62 mm)}} | ||
| − | The 12.7 mm M2HB Browning can shred light tanks and also engage low-flying aircraft to a certain degree. The coaxial | + | The 12.7 mm M2HB Browning can shred light tanks and also engage low-flying aircraft to a certain degree. The coaxial low-calibre machine gun is not able to damage anything except open-topped vehicles. |
{| class="wikitable" style="text-align:center" width="50%" | {| class="wikitable" style="text-align:center" width="50%" | ||
| Line 133: | Line 174: | ||
! Mount !! Capacity (Belt) !! Fire rate !! Vertical !! Horizontal | ! Mount !! Capacity (Belt) !! Fire rate !! Vertical !! Horizontal | ||
|- | |- | ||
| − | | Pintle || 600 (200) || 577 || -10°/+ | + | | Pintle || 600 (200)|| 577 || -10°/+30° || ±60° |
|- | |- | ||
|} | |} | ||
| Line 142: | Line 183: | ||
! Mount !! Capacity (Belt) !! Fire rate !! Vertical !! Horizontal | ! Mount !! Capacity (Belt) !! Fire rate !! Vertical !! Horizontal | ||
|- | |- | ||
| − | | Coaxial || | + | | Coaxial || 3000 (250) || 500 || N/A || N/A |
|- | |- | ||
|} | |} | ||
| Line 148: | Line 189: | ||
== Usage in battles == | == Usage in battles == | ||
<!-- ''Describe the tactics of playing in the vehicle, the features of using vehicles in the team and advice on tactics. Refrain from creating a "guide" - do not impose a single point of view but instead give the reader food for thought. Describe the most dangerous enemies and give recommendations on fighting them. If necessary, note the specifics of the game in different modes (AB, RB, SB).'' --> | <!-- ''Describe the tactics of playing in the vehicle, the features of using vehicles in the team and advice on tactics. Refrain from creating a "guide" - do not impose a single point of view but instead give the reader food for thought. Describe the most dangerous enemies and give recommendations on fighting them. If necessary, note the specifics of the game in different modes (AB, RB, SB).'' --> | ||
| − | + | ''Describe the tactics of playing in the vehicle, the features of using vehicles in the team and advice on tactics. Refrain from creating a "guide" - do not impose a single point of view but instead give the reader food for thought. Describe the most dangerous enemies and give recommendations on fighting them. If necessary, note the specifics of the game in different modes (AB, RB, SB).'' | |
=== Pros and cons === | === Pros and cons === | ||
<!-- ''Summarise and briefly evaluate the vehicle in terms of its characteristics and combat effectiveness. Mark its pros and cons in a bulleted list. Try not to use more than 6 points for each of the characteristics. Avoid using categorical definitions such as "bad", "good" and the like - use substitutions with softer forms such as "inadequate" and "effective".'' --> | <!-- ''Summarise and briefly evaluate the vehicle in terms of its characteristics and combat effectiveness. Mark its pros and cons in a bulleted list. Try not to use more than 6 points for each of the characteristics. Avoid using categorical definitions such as "bad", "good" and the like - use substitutions with softer forms such as "inadequate" and "effective".'' --> | ||
| − | |||
'''Pros:''' | '''Pros:''' | ||
| − | * | + | * Thicker armour compared to other M26 Pershings |
* 90 mm M3 cannon is a noticeable upgrade from the Jumbo's 76 mm M1 cannon | * 90 mm M3 cannon is a noticeable upgrade from the Jumbo's 76 mm M1 cannon | ||
* APCR shell is able to penetrate most heavily armoured targets | * APCR shell is able to penetrate most heavily armoured targets | ||
* Weak spots are relatively small and difficult to hit | * Weak spots are relatively small and difficult to hit | ||
| − | * | + | * Similar playstyle with the M4A3E2 (76) W Jumbo |
| − | |||
| − | |||
| − | |||
| − | |||
| − | |||
| − | |||
| − | |||
'''Cons:''' | '''Cons:''' | ||
| − | * 90 mm | + | * 90 mm is inadequate in uptiers |
| − | * | + | * Long 88 and 122 mm cannons can still penetrate it frontally if not angled |
| − | * | + | * Relatively slow compared to other M26 Pershings |
| − | * | + | * Side armour can easily be penetrated by most weapons at its BR |
| − | |||
* Average survivability | * Average survivability | ||
| − | |||
| − | |||
| − | |||
== History == | == History == | ||
<!-- ''Describe the history of the creation and combat usage of the vehicle in more detail than in the introduction. If the historical reference turns out to be too long, take it to a separate article, taking a link to the article about the vehicle and adding a block "/History" (example: <nowiki>https://wiki.warthunder.com/(Vehicle-name)/History</nowiki>) and add a link to it here using the <code>main</code> template. Be sure to reference text and sources by using <code><nowiki><ref></ref></nowiki></code>, as well as adding them at the end of the article with <code><nowiki><references /></nowiki></code>. This section may also include the vehicle's dev blog entry (if applicable) and the in-game encyclopedia description (under <code><nowiki>=== In-game description ===</nowiki></code>, also if applicable).'' --> | <!-- ''Describe the history of the creation and combat usage of the vehicle in more detail than in the introduction. If the historical reference turns out to be too long, take it to a separate article, taking a link to the article about the vehicle and adding a block "/History" (example: <nowiki>https://wiki.warthunder.com/(Vehicle-name)/History</nowiki>) and add a link to it here using the <code>main</code> template. Be sure to reference text and sources by using <code><nowiki><ref></ref></nowiki></code>, as well as adding them at the end of the article with <code><nowiki><references /></nowiki></code>. This section may also include the vehicle's dev blog entry (if applicable) and the in-game encyclopedia description (under <code><nowiki>=== In-game description ===</nowiki></code>, also if applicable).'' --> | ||
| − | + | Successful combat use of the assault M4A3E2 tank with enhanced armor spurred the decision to create a similar modification of the M26. Chrysler started production of the improved vehicles in July 1945. Trials revealed that it was necessary to reduce its off-road speed to avoid damage to the suspension. A total of 27 vehicles were manufactured to take part in trials and experiments. | |
| − | |||
| − | |||
| − | |||
| − | |||
| − | |||
| − | |||
| − | |||
| − | |||
| − | |||
== Media == | == Media == | ||
| Line 199: | Line 219: | ||
* [https://live.warthunder.com/feed/camouflages/?vehicle=us_t26e5 Skins and camouflages for the {{PAGENAME}} from live.warthunder.com.] | * [https://live.warthunder.com/feed/camouflages/?vehicle=us_t26e5 Skins and camouflages for the {{PAGENAME}} from live.warthunder.com.] | ||
| − | |||
| − | |||
| − | |||
== See also == | == See also == | ||
| Line 219: | Line 236: | ||
* ''other literature.'' | * ''other literature.'' | ||
| − | |||
| − | |||
| − | |||
| − | |||
{{USA heavy tanks}} | {{USA heavy tanks}} | ||
Revision as of 19:30, 6 November 2021
| This page is about the American heavy tank T26E5. For the other T26, see T26E1-1. |

Contents
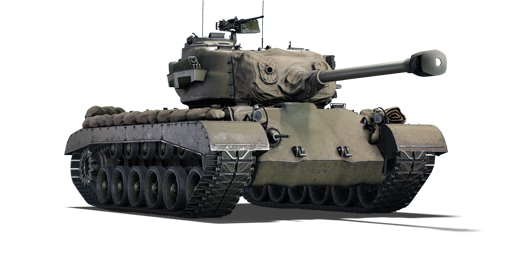
Description
The Assault tank T26E5 is a rank IV American heavy tank with a battle rating of 6.7 (AB/RB/SB). It was introduced in Update "Ground Breaking".
It is a American assault tank intended to be used like M4A3E2. It is based on the M26 Pershing, uses the same 90 mm M3 gun but has additional armour on the front and the turret. Therefore, the T26E5 is able to effectively compete with late World war II vehicle even more than its predecessor thanks to the additional armour.
General info
Survivability and armour
The frontal armour is quite strong, able to resist the Panther's gun or even the Tiger II's Kwk 43 gun if well-angled. A notable weak spot on the front glacis is the machine gun port but it is a small target difficult to hit with precision. The other notable weak spot is the lower front plate. With only 120 mm LOS thickness, it is not able to resist most guns and there is no transmission block to absorb a penetrating shell. Side armour can protect you to a certain degree when angled. When not angling, any gun will punch right through your side armour.
The turret armour is strong, consisting of variable thickness armour ranging from 150 to 300 mm thickness. It is the strongest near the gun mantlet. There are not many weak spots on the turret except the rear and side rear as there is only 100 to 120 mm armour. Any penetrating shell hitting the turret from the side or rear will most likely knock out all of your crew members in the turret as well as detonate the first-stage ammo rack.
The cupola with only 76 mm thickness can be penetrated by an APHE shell, taking out your gunner and commander. Because of the small cupola size, it remains a spot difficult to hit it in the first place.
Survivability is average. You have 5 crew members like a majority of tank at your rank, but because of the cramped space a single powerful enough APHE shell like the IS-2's BR-471 shell can tkae out all your crew members in one shot.
With only 25 mm roof armour, the T26E5 will be easy to penetrate for fighters sporting 30 mm cannons.
Armour type:
- Rolled homogeneous armour (Hull sides, rear and roof)
- Cast homogeneous armour (Front hull, turret, gun mantlet, cupola)
| Armour | Front (Slope angle) | Sides | Rear | Roof |
|---|---|---|---|---|
| Hull | 152.6 mm (46°) Upper front glacis 242 mm (21-35°) Upper front bulge 25.4 mm MG port 101.6 mm (31°) Lower front glacis |
76.2 mm Fighting compartment 50.8 mm Engine compartment |
50.8 mm (7°) Upper rear plate 22.2 mm (72°) Lower rear glacis |
152.6 mm (44°) Front glacis 22.2 mm (0-20°) Fighting & engine compartments 5 mm (10°) Engine vents |
| Turret | 170-229 mm (24°) Turret front 177.5 mm (cylindrical) Gun mantlet |
160 mm (cylindrical) Front & centre 110 mm (8°) Rear |
127 mm (2°) | 25 mm (0-7°) |
| Cupola | 76.2 mm (conical) | 25 mm | ||
Notes:
- Suspension wheels, tracks and torsion bars are 20 mm thick.
- Mudguards and storage boxes are 4 mm thick.
Mobility
The T26E5 use the same engine as the M26 Pershing. It has a poor power-to-weight ratio and its top speed is 40-43 km/h. But expect the average cruising speed to be closer to 30 km/h. When off-road the speed will drop even more. Lacking neutral steering, it might be difficult for the heavy tank to turn in urban environment. As such, the player should plan the route they want to take carefully and avoid flanking manoeuvres that will take a lot of time.
| Game Mode | Max Speed (km/h) | Weight (tons) | Engine power (horsepower) | Power-to-weight ratio (hp/ton) | |||
|---|---|---|---|---|---|---|---|
| Forward | Reverse | Stock | Upgraded | Stock | Upgraded | ||
| Arcade | 43 | 14 | 46.4 | 646 | 954 | 13.92 | 20.56 |
| Realistic | 41 | 13 | 442 | 500 | 9.53 | 10.78 | |
Modifications and economy
| Mobility | Protection | Firepower | ||||||||||||||||||||
|---|---|---|---|---|---|---|---|---|---|---|---|---|---|---|---|---|---|---|---|---|---|---|
|
|
|
Armaments
Main armament
Give the reader information about the characteristics of the main gun. Assess its effectiveness in a battle based on the reloading speed, ballistics and the power of shells. Do not forget about the flexibility of the fire, that is how quickly the cannon can be aimed at the target, open fire on it and aim at another enemy. Add a link to the main article on the gun: {{main|Name of the weapon}}. Describe in general terms the ammunition available for the main gun. Give advice on how to use them and how to fill the ammunition storage.
| 90 mm M3 | Turret rotation speed (°/s) | Reloading rate (seconds) | |||||||||||
|---|---|---|---|---|---|---|---|---|---|---|---|---|---|
| Mode | Capacity | Vertical | Horizontal | Stabilizer | Stock | Upgraded | Full | Expert | Aced | Stock | Full | Expert | Aced |
| Arcade | 70 | -10°/+20° | ±180° | N/A | __._ | __._ | __._ | __._ | __._ | _.__ | _.__ | _.__ | _.__ |
| Realistic | __._ | __._ | __._ | __._ | __._ | ||||||||
Ammunition
The T26E5 use the same 90 mm M3 cannon as the M26 and fires the same ammunition. Once unlocked, the T26E5 will have an APBC shell as its default round. The APBC has decent characteristics but because it doesn't have any explosive filler, it should be replaced by the APCBC shell as soon as possible. The APCR shot can be used to penetrate some heavily armoured vehicle such as the Tiger II (H), the Ferdinand or the Jagdtiger but the player should be aware of the poor post-penetration damage of the APCR projectile. Thus, the APCR should be used as a last resort against an already disabled tank. The HE shell can be used to damage lightly armoured vehicles and the smoke shell can be used to provide smoke cover for teammates or to blind entrenched enemy tanks.
| Penetration statistics | |||||||
|---|---|---|---|---|---|---|---|
| Ammunition | Type of warhead |
Penetration @ 0° Angle of Attack (mm) | |||||
| 10 m | 100 m | 500 m | 1,000 m | 1,500 m | 2,000 m | ||
| T33 shot | APBC | 175 | 172 | 160 | 146 | 132 | 122 |
| M82 shot | APCBC | 173 | 170 | 159 | 147 | 135 | 124 |
| M304 shot | APCR | 287 | 281 | 259 | 234 | 211 | 191 |
| M71 shell | HE | 13 | 13 | 13 | 13 | 13 | 13 |
| Shell details | |||||||||
|---|---|---|---|---|---|---|---|---|---|
| Ammunition | Type of warhead |
Velocity (m/s) |
Projectile Mass (kg) |
Fuse delay (m) |
Fuse sensitivity (mm) |
Explosive Mass (TNT equivalent) (g) |
Ricochet | ||
| 0% | 50% | 100% | |||||||
| T33 shot | APBC | 853 | 10.9 | N/A | N/A | N/A | 47 | 60 | 65 |
| M82 shot | APCBC | 813 | 10.9 | 1.2 | 14 | 137.2 | 48 | 63 | 71 |
| M304 shot | APCR | 1,021 | 7.6 | N/A | N/A | N/A | 66 | 70 | 72 |
| M71 shell | HE | 823 | 10.6 | 0 | 0.1 | 925 | 79 | 80 | 81 |
| Smoke shell characteristics | ||||||
|---|---|---|---|---|---|---|
| Ammunition | Velocity (m/s) |
Projectile Mass (kg) |
Screen radius (m) |
Screen deploy time (s) |
Screen hold time (s) |
Explosive Mass (TNT equivalent) (g) |
| M313 | 821 | 10.7 | 13 | 5 | 20 | 50 |
Ammo racks
| Full ammo |
1st rack empty |
2nd rack empty |
3rd rack empty |
4th rack empty |
5th rack empty |
6th rack empty |
Visual discrepancy |
|---|---|---|---|---|---|---|---|
| 70 | __ (+__) | __ (+__) | __ (+__) | __ (+__) | __ (+__) | __ (+__) | __ |
Machine guns
The 12.7 mm M2HB Browning can shred light tanks and also engage low-flying aircraft to a certain degree. The coaxial low-calibre machine gun is not able to damage anything except open-topped vehicles.
| 12.7 mm M2HB | ||||
|---|---|---|---|---|
| Mount | Capacity (Belt) | Fire rate | Vertical | Horizontal |
| Pintle | 600 (200) | 577 | -10°/+30° | ±60° |
| 7.62 mm M1919A4 | ||||
|---|---|---|---|---|
| Mount | Capacity (Belt) | Fire rate | Vertical | Horizontal |
| Coaxial | 3000 (250) | 500 | N/A | N/A |
Usage in battles
Describe the tactics of playing in the vehicle, the features of using vehicles in the team and advice on tactics. Refrain from creating a "guide" - do not impose a single point of view but instead give the reader food for thought. Describe the most dangerous enemies and give recommendations on fighting them. If necessary, note the specifics of the game in different modes (AB, RB, SB).
Pros and cons
Pros:
- Thicker armour compared to other M26 Pershings
- 90 mm M3 cannon is a noticeable upgrade from the Jumbo's 76 mm M1 cannon
- APCR shell is able to penetrate most heavily armoured targets
- Weak spots are relatively small and difficult to hit
- Similar playstyle with the M4A3E2 (76) W Jumbo
Cons:
- 90 mm is inadequate in uptiers
- Long 88 and 122 mm cannons can still penetrate it frontally if not angled
- Relatively slow compared to other M26 Pershings
- Side armour can easily be penetrated by most weapons at its BR
- Average survivability
History
Successful combat use of the assault M4A3E2 tank with enhanced armor spurred the decision to create a similar modification of the M26. Chrysler started production of the improved vehicles in July 1945. Trials revealed that it was necessary to reduce its off-road speed to avoid damage to the suspension. A total of 27 vehicles were manufactured to take part in trials and experiments.
Media
- Skins
See also
External links
Paste links to sources and external resources, such as:
- topic on the official game forum;
- other literature.
| USA heavy tanks | |
|---|---|
| M4 Jumbo | M4A3E2 · Cobra King · M4A3E2 (76) W |
| M6 | M6A1 · T1E1 · T1E1 (90) · M6A2E1 |
| T26 | T26E1-1 · T26E5 |
| T29/30/34 | T29 · T30 · T34 |
| T32 | T32 · T32E1 |
| M103 | M103 |
| Others | T14 |
