Difference between revisions of "Type 60 ATM"
m (Added Pros+Cons and Battle Usage) (Tag: Visual edit) |
Inceptor57 (talk | contribs) m (→Machine guns) |
||
| (3 intermediate revisions by 3 users not shown) | |||
| Line 2: | Line 2: | ||
== Description == | == Description == | ||
| − | ''In the description, the first part needs to be about the history of the creation and combat usage of the vehicle, as well as its key features. In the second part, tell the reader about the ground vehicle in the game. Insert the screenshot of the vehicle. If the novice player does not remember the vehicle by name, they will immediately understand what kind of vehicle it is talking about.'' | + | <!--''In the description, the first part needs to be about the history of the creation and combat usage of the vehicle, as well as its key features. In the second part, tell the reader about the ground vehicle in the game. Insert the screenshot of the vehicle. If the novice player does not remember the vehicle by name, they will immediately understand what kind of vehicle it is talking about.''--> |
| + | [[File:GarageImage_{{PAGENAME}}.jpg|420px|thumb|left]] | ||
| + | {{Break}} | ||
| + | The '''{{Specs|name}}''' is a Rank {{Specs|rank}} Japanese tank destroyers {{Battle-rating|1}}. It was introduced in [[Update 1.67 "Assault"]]. | ||
== General info == | == General info == | ||
=== Survivability and armour === | === Survivability and armour === | ||
| − | ''Describe armour protection. Note the most well protected and key weak areas. Appreciate the layout of modules as well as the number and location of crew members. Is the level of armour protection sufficient, is the placement of modules | + | <!--''Describe armour protection. Note the most well protected and key weak areas. Appreciate the layout of modules as well as the number and location of crew members. Is the level of armour protection sufficient, is the placement of modules helpful for survival in combat?'' |
| − | ''If necessary use a visual template to indicate the most secure and weak zones of the armour.'' | + | ''If necessary use a visual template to indicate the most secure and weak zones of the armour.''--> |
| + | '''Armour type:''' | ||
| + | * Rolled homogeneous armour | ||
| + | * Cast homogeneous armour (Machine gun port, Cupola) | ||
| + | {| class="wikitable" | ||
| + | |- | ||
| + | ! Armour !! Front (Slope angle) !! Sides !! Rear !! Roof | ||
| + | |- | ||
| + | | Hull || 20 mm (35-43°) ''Front glacis'' <br> 20 mm (30°) ''Lower glacis'' <br> 20 mm (7-65°) ''Machine gun port'' || 12.7 mm || 20 mm (1°) || 10 mm <br> 20 mm ''Driver's hatches'' | ||
| + | |- | ||
| + | | Missile platform || N/A || 10 mm || N/A || 10 mm | ||
| + | |- | ||
| + | ! Armour !! Sides !! Roof | ||
| + | |- | ||
| + | | Cupola || 20 mm || 10 mm | ||
| + | |- | ||
| + | |} | ||
| + | '''Notes:''' | ||
| + | * Suspension wheels and tracks are both 15 mm thick, while torsion bar chassis is 12 mm thick. | ||
| + | * Belly armour is 10 mm thick. | ||
=== Mobility === | === Mobility === | ||
| − | ''Write about the mobility of the ground vehicle. Estimate the specific power and maneuverability as well as the maximum speed forward and backward.'' | + | <!--''Write about the mobility of the ground vehicle. Estimate the specific power and maneuverability as well as the maximum speed forward and backward.''--> |
| + | {| class="wikitable" style="text-align:center" | ||
| + | |- | ||
| + | !colspan="3" | Mobility characteristic | ||
| + | |- | ||
| + | ! Weight (tons) | ||
| + | !colspan="1" | Add-on Armour<br>weight (tons) | ||
| + | !colspan="1" | Max speed (km/h) | ||
| + | |- | ||
| + | |rowspan="2" | 12.0 || colspan="1" rowspan="2" | N/A || colspan="1" | 42 (AB) | ||
| + | |- | ||
| + | |38 (RB/SB) | ||
| + | |- | ||
| + | !colspan="3" | Engine power (horsepower) | ||
| + | |- | ||
| + | !colspan="1" | Mode | ||
| + | !Stock | ||
| + | !Upgraded | ||
| + | |- | ||
| + | |''Arcade'' | ||
| + | |312 | ||
| + | |___ | ||
| + | |- | ||
| + | |''Realistic/Simulator'' | ||
| + | |195 | ||
| + | |___ | ||
| + | |- | ||
| + | !colspan="3" | Power-to-weight ratio (hp/ton) | ||
| + | |- | ||
| + | !colspan="1" | Mode | ||
| + | !Stock | ||
| + | !Upgraded | ||
| + | |- | ||
| + | |''Arcade'' | ||
| + | |26.00 | ||
| + | |__.__ | ||
| + | |- | ||
| + | |''Realistic/Simulator'' | ||
| + | |16.25 | ||
| + | |__.__ | ||
| + | |- | ||
| + | |} | ||
== Armaments == | == Armaments == | ||
=== Main armament === | === Main armament === | ||
| − | ''Give the reader information about the characteristics of the main gun. Assess its effectiveness in a battle based on the reloading speed, ballistics and the power of shells. Do not forget about the | + | <!--''Give the reader information about the characteristics of the main gun. Assess its effectiveness in a battle based on the reloading speed, ballistics and the power of shells. Do not forget about the flexibility of the fire, that is how quickly the cannon can be aimed at the target, open fire on it and aim at another enemy. Add a link to the main article on the gun: <code><nowiki>{{main|Name of the weapon}}</nowiki></code>. Describe in general terms the ammunition available for the main gun. Give advice on how to use them and how to fill the ammunition storage.''--> |
| − | === | + | {| class="wikitable" style="text-align:center" |
| − | '' | + | |- |
| + | ! colspan="6" | 120 mm Type 64 MAT ATGM | ||
| + | |- | ||
| + | ! colspan="2" rowspan="1" style="width:5em" |Capacity | ||
| + | ! rowspan="1" | Fire rate <br> (shots/minute) | ||
| + | ! rowspan="1" | Vertical <br> guidance | ||
| + | ! rowspan="1" | Horizontal <br> guidance | ||
| + | ! rowspan="1" | Stabilizer | ||
| + | |- | ||
| + | | colspan="2" | 6 || 3 || N/A || N/A || Two-plane | ||
| + | |- | ||
| + | ! colspan="6" | Turret rotation speed (°/s) | ||
| + | |- | ||
| + | ! style="width:4em" |Mode | ||
| + | ! style="width:4em" |Stock | ||
| + | ! style="width:4em" |Upgraded | ||
| + | ! style="width:4em" |Prior + Full crew | ||
| + | ! style="width:4em" |Prior + Expert qualif. | ||
| + | ! style="width:4em" |Prior + Ace qualif. | ||
| + | |- | ||
| + | | ''Arcade'' || 25.9 ||N/A|| __.__ || __.__ || __.__ | ||
| + | |- | ||
| + | | ''Realistic'' || 17.5 ||N/A|| __.__ || __.__ || __.__ | ||
| + | |- | ||
| + | ! colspan="4" | Reloading rate (seconds) | ||
| + | |- | ||
| + | ! colspan="1" style="width:4em" |Stock | ||
| + | ! colspan="1" style="width:4em" |Prior + Full crew | ||
| + | ! colspan="1" style="width:4em" |Prior + Expert qualif. | ||
| + | ! colspan="1" style="width:4em" |Prior + Ace qualif. | ||
| + | |- | ||
| + | | 13.0 || __.__ || __.__ || __.__ | ||
| + | |- | ||
| + | |} | ||
| + | |||
| + | |||
| + | ===== Ammunition ===== | ||
| + | {| class="wikitable sortable" style="text-align:center" width="100%" | ||
| + | ! colspan="8" | Penetration statistics | ||
| + | |- | ||
| + | ! rowspan="2" data-sort-type="text" | Ammunition | ||
| + | ! rowspan="2" class="unsortable" | Type of <br /> warhead | ||
| + | ! colspan="6" | '''Penetration''' '''''in mm''''' '''@ 90°''' | ||
| + | |- | ||
| + | ! 10 m | ||
| + | ! 100 m | ||
| + | ! 500 m | ||
| + | ! 1,000 m | ||
| + | ! 1,500 m | ||
| + | ! 2,000 m | ||
| + | |- | ||
| + | | Type 64 || ATGM || 500 || 500 || 500 || 500 || 500 || 500 | ||
| + | |- | ||
| + | |} | ||
| + | {| class="wikitable sortable" style="text-align:center" width="100%" | ||
| + | ! colspan="12" | Shell details | ||
| + | |- | ||
| + | ! rowspan="2" data-sort-type="text" | Ammunition | ||
| + | ! rowspan="2" class="unsortable" | Type of <br /> warhead | ||
| + | ! rowspan="2" |Maximum Velocity <br /> in m/s | ||
| + | ! rowspan="2" |Projectile<br />Mass in kg | ||
| + | ! rowspan="2" | Range (m) | ||
| + | ! rowspan="2" | ''Fuse delay'' | ||
| + | ''in m:'' | ||
| + | ! rowspan="2" | ''Fuse sensitivity'' | ||
| + | ''in mm:'' | ||
| + | ! rowspan="2" | ''Explosive Mass in g<br /> (TNT equivalent):'' | ||
| + | ! rowspan="2" | ''Normalization At 30° <br> from horizontal:'' | ||
| + | ! colspan="3" | ''Ricochet:'' | ||
| + | |- | ||
| + | ! 0% | ||
| + | ! 50% | ||
| + | ! 100% | ||
| + | |- | ||
| + | | Type 64 || ATGM || 85 || 16 || 2,000 || 0.0 || 0.1 || 4,550 || +0° || 80° || 82° || 90° | ||
| + | |- | ||
| + | |} | ||
| + | |||
| + | ===== [[Ammo racks|Ammo racks]] ===== | ||
| + | {| class="wikitable sortable" style="text-align:center" | ||
| + | |- | ||
| + | ! class="wikitable unsortable" |Full<br /> ammo | ||
| + | ! class="wikitable unsortable" |1st<br /> rack empty | ||
| + | ! class="wikitable unsortable" |2nd<br /> rack empty | ||
| + | ! class="wikitable unsortable" |3rd<br /> rack empty | ||
| + | ! class="wikitable unsortable" |4th<br /> rack empty | ||
| + | ! class="wikitable unsortable" |5th<br /> rack empty | ||
| + | ! class="wikitable unsortable" |6th<br /> rack empty | ||
| + | ! class="wikitable unsortable" |Visual<br /> discrepancy | ||
| + | |- | ||
| + | || '''6''' || XX ''(X+)'' || ''(+)'' || ''(+)'' || ''(+)'' || ''(+)'' || ''(+)'' || style="text-align:left" | no | ||
| + | |- | ||
| + | |} | ||
=== Machine guns === | === Machine guns === | ||
| − | ''Offensive and anti-aircraft machine guns not only allow you to fight some aircraft, but also are effective against lightly armoured vehicles. Evaluate machine guns and give recommendations on its use.'' | + | <!--''Offensive and anti-aircraft machine guns not only allow you to fight some aircraft, but also are effective against lightly armoured vehicles. Evaluate machine guns and give recommendations on its use.''--> |
| + | {{main|M2HB (12.7 mm)|M1919A4(7.62 mm)}} | ||
| + | |||
| + | The Type 60 ATM comes equipped with a coaxial 12.7mm M2HB Browning machine gun and a smaller 7.62mm Browning machine gun. The 7.62mm is virtually useless, and can sometimes come in handy for clearing some debris. The 12.7mm machine gun helps to deter any enemy aircraft due to the weak armour on the top of the vehicle. | ||
| + | |||
| + | {| class="wikitable" style="text-align:center" | ||
| + | |- | ||
| + | ! colspan="7" | [[M2HB (12.7 mm)|12.7 mm M2HB]] | ||
| + | |- | ||
| + | ! colspan="7" | ''Pintle mount'' | ||
| + | |- | ||
| + | ! colspan="4" rowspan="1" style="width:5em" |Capacity (Belt capacity) | ||
| + | ! rowspan="1" | Fire rate <br> (shots/minute) | ||
| + | ! rowspan="1" | Vertical <br> guidance | ||
| + | ! rowspan="1" | Horizontal <br> guidance | ||
| + | |- | ||
| + | | colspan="4" | 2,500 (200) || 577 || -5°/+25° || ±45° | ||
| + | |- | ||
| + | |} | ||
| + | {| class="wikitable" style="text-align:center" | ||
| + | |- | ||
| + | ! colspan="7" | [[M1919A4 (7.62 mm)|7.62 mm M1919A4]] | ||
| + | |- | ||
| + | ! colspan="7" | ''Coaxial mount'' | ||
| + | |- | ||
| + | ! colspan="4" rowspan="1" style="width:5em" |Capacity (Belt capacity) | ||
| + | ! rowspan="1" | Fire rate <br> (shots/minute) | ||
| + | ! rowspan="1" | Vertical <br> guidance | ||
| + | ! rowspan="1" | Horizontal <br> guidance | ||
| + | |- | ||
| + | | colspan="4" | 3,000 (250) || 500 || ±22° || ±22° | ||
| + | |- | ||
| + | |} | ||
== Usage in the battles == | == Usage in the battles == | ||
| − | The Type 60 | + | The Type 60 ATM struggles in close quarters and is completely unsuited for urban battlefields. When playing the Type 60 ATGM consider all your flanking routes as your high damage potential can be most effectively harnessed in these environments. Avoid all major sight-lines, and pick your targets carefully. The cover is your best friend, finding positions, where you can scout enemy vehicles for your team, can often be more beneficial than attempting to kill enemy tanks. |
| − | The Type 60 | + | The Type 60 ATM often plays out as a support vehicle instead of a tank destroyer. |
| − | The Type 60 | + | The Type 60 ATM's biggest threats in battle are many. Avoid all vehicles at all costs to prevent dying; almost every shell at your BR will kill you with ease. The vehicle will often face front when you fire where 3 of your crew are crammed together, 2 of which are the gunner and driver. |
=== Pros and cons === | === Pros and cons === | ||
| − | |||
'''Pros:''' | '''Pros:''' | ||
| − | + | * Good manoeuvrability | |
| − | * Type 64 ATGM's provide exceptional | + | * Type 64 ATGM's provide exceptional firepower |
* Upwards facing launchers can allow for behind cover firing, however, this means there's a minimum range | * Upwards facing launchers can allow for behind cover firing, however, this means there's a minimum range | ||
* High crew count | * High crew count | ||
* Has scouting | * Has scouting | ||
| − | |||
| − | |||
| − | |||
'''Cons:''' | '''Cons:''' | ||
| − | + | * Very limited main ammunation | |
| − | * | + | * Slow missile speed |
| − | * | + | * Need a visual target for accurate hit, otherwise the missile goes anywhere |
| + | * Can't move while the missile flies to the target | ||
| + | * Need a certain range for effective hit | ||
* Very long reload after each missile is fired | * Very long reload after each missile is fired | ||
| − | * | + | * Missiles tends to be sometimes inaccurate |
* Highly visible profile, with the sore Japanese green and tall design | * Highly visible profile, with the sore Japanese green and tall design | ||
| − | + | * Little to no armour, most shells immediately destroy this vehicle | |
| − | * | + | * Limited maximum speed to 38 kph along with mediocre mobility |
== History == | == History == | ||
| Line 58: | Line 243: | ||
== Read also == | == Read also == | ||
| − | ''Links to the articles on the War Thunder Wiki that you think will be useful for the reader | + | <!--''Links to the articles on the War Thunder Wiki that you think will be useful for the reader,''--> |
| + | * [http://warthunder.com/en/news/4585-development-type-60-atm-death-on-a-wire-en/ [Devblog<nowiki>]</nowiki> Type 60 ATM: Death on a Wire] | ||
| − | |||
| − | |||
| − | |||
| − | |||
== Sources == | == Sources == | ||
| Line 70: | Line 252: | ||
* ''topic on the official game forum;'' | * ''topic on the official game forum;'' | ||
* ''other literature.'' | * ''other literature.'' | ||
| + | |||
| + | {{Japan tank destroyers}} | ||
Revision as of 06:34, 26 March 2019
Contents
Description

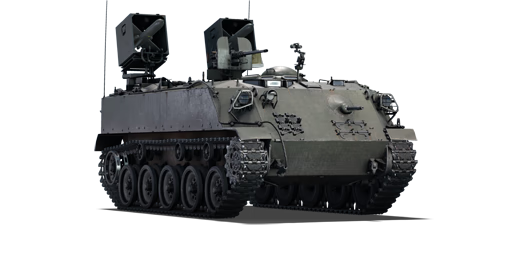
The Type 60 ATM is a Rank IV Japanese tank destroyers
with a battle rating of 6.7 (AB/RB/SB). It was introduced in Update 1.67 "Assault".
General info
Survivability and armour
Armour type:
- Rolled homogeneous armour
- Cast homogeneous armour (Machine gun port, Cupola)
| Armour | Front (Slope angle) | Sides | Rear | Roof |
|---|---|---|---|---|
| Hull | 20 mm (35-43°) Front glacis 20 mm (30°) Lower glacis 20 mm (7-65°) Machine gun port |
12.7 mm | 20 mm (1°) | 10 mm 20 mm Driver's hatches |
| Missile platform | N/A | 10 mm | N/A | 10 mm |
| Armour | Sides | Roof | ||
| Cupola | 20 mm | 10 mm |
Notes:
- Suspension wheels and tracks are both 15 mm thick, while torsion bar chassis is 12 mm thick.
- Belly armour is 10 mm thick.
Mobility
| Mobility characteristic | ||
|---|---|---|
| Weight (tons) | Add-on Armour weight (tons) |
Max speed (km/h) |
| 12.0 | N/A | 42 (AB) |
| 38 (RB/SB) | ||
| Engine power (horsepower) | ||
| Mode | Stock | Upgraded |
| Arcade | 312 | ___ |
| Realistic/Simulator | 195 | ___ |
| Power-to-weight ratio (hp/ton) | ||
| Mode | Stock | Upgraded |
| Arcade | 26.00 | __.__ |
| Realistic/Simulator | 16.25 | __.__ |
Armaments
Main armament
| 120 mm Type 64 MAT ATGM | |||||
|---|---|---|---|---|---|
| Capacity | Fire rate (shots/minute) |
Vertical guidance |
Horizontal guidance |
Stabilizer | |
| 6 | 3 | N/A | N/A | Two-plane | |
| Turret rotation speed (°/s) | |||||
| Mode | Stock | Upgraded | Prior + Full crew | Prior + Expert qualif. | Prior + Ace qualif. |
| Arcade | 25.9 | N/A | __.__ | __.__ | __.__ |
| Realistic | 17.5 | N/A | __.__ | __.__ | __.__ |
| Reloading rate (seconds) | |||||
| Stock | Prior + Full crew | Prior + Expert qualif. | Prior + Ace qualif. | ||
| 13.0 | __.__ | __.__ | __.__ | ||
Ammunition
| Penetration statistics | |||||||
|---|---|---|---|---|---|---|---|
| Ammunition | Type of warhead |
Penetration in mm @ 90° | |||||
| 10 m | 100 m | 500 m | 1,000 m | 1,500 m | 2,000 m | ||
| Type 64 | ATGM | 500 | 500 | 500 | 500 | 500 | 500 |
| Shell details | |||||||||||
|---|---|---|---|---|---|---|---|---|---|---|---|
| Ammunition | Type of warhead |
Maximum Velocity in m/s |
Projectile Mass in kg |
Range (m) | Fuse delay
in m: |
Fuse sensitivity
in mm: |
Explosive Mass in g (TNT equivalent): |
Normalization At 30° from horizontal: |
Ricochet: | ||
| 0% | 50% | 100% | |||||||||
| Type 64 | ATGM | 85 | 16 | 2,000 | 0.0 | 0.1 | 4,550 | +0° | 80° | 82° | 90° |
Ammo racks
| Full ammo |
1st rack empty |
2nd rack empty |
3rd rack empty |
4th rack empty |
5th rack empty |
6th rack empty |
Visual discrepancy |
|---|---|---|---|---|---|---|---|
| 6 | XX (X+) | (+) | (+) | (+) | (+) | (+) | no |
Machine guns
The Type 60 ATM comes equipped with a coaxial 12.7mm M2HB Browning machine gun and a smaller 7.62mm Browning machine gun. The 7.62mm is virtually useless, and can sometimes come in handy for clearing some debris. The 12.7mm machine gun helps to deter any enemy aircraft due to the weak armour on the top of the vehicle.
| 12.7 mm M2HB | ||||||
|---|---|---|---|---|---|---|
| Pintle mount | ||||||
| Capacity (Belt capacity) | Fire rate (shots/minute) |
Vertical guidance |
Horizontal guidance | |||
| 2,500 (200) | 577 | -5°/+25° | ±45° | |||
| 7.62 mm M1919A4 | ||||||
|---|---|---|---|---|---|---|
| Coaxial mount | ||||||
| Capacity (Belt capacity) | Fire rate (shots/minute) |
Vertical guidance |
Horizontal guidance | |||
| 3,000 (250) | 500 | ±22° | ±22° | |||
Usage in the battles
The Type 60 ATM struggles in close quarters and is completely unsuited for urban battlefields. When playing the Type 60 ATGM consider all your flanking routes as your high damage potential can be most effectively harnessed in these environments. Avoid all major sight-lines, and pick your targets carefully. The cover is your best friend, finding positions, where you can scout enemy vehicles for your team, can often be more beneficial than attempting to kill enemy tanks.
The Type 60 ATM often plays out as a support vehicle instead of a tank destroyer.
The Type 60 ATM's biggest threats in battle are many. Avoid all vehicles at all costs to prevent dying; almost every shell at your BR will kill you with ease. The vehicle will often face front when you fire where 3 of your crew are crammed together, 2 of which are the gunner and driver.
Pros and cons
Pros:
- Good manoeuvrability
- Type 64 ATGM's provide exceptional firepower
- Upwards facing launchers can allow for behind cover firing, however, this means there's a minimum range
- High crew count
- Has scouting
Cons:
- Very limited main ammunation
- Slow missile speed
- Need a visual target for accurate hit, otherwise the missile goes anywhere
- Can't move while the missile flies to the target
- Need a certain range for effective hit
- Very long reload after each missile is fired
- Missiles tends to be sometimes inaccurate
- Highly visible profile, with the sore Japanese green and tall design
- Little to no armour, most shells immediately destroy this vehicle
- Limited maximum speed to 38 kph along with mediocre mobility
History
Describe the history of the creation and combat usage of the ground vehicle in more detail than in the introduction. If the historical reference turns out to be too big, take it to a separate article, taking a link to an article about the vehicle and adding a block "/historical reference" (example: https://wiki.warthunder.com/Name-vehicles/historical reference) and add a link to it here using the main template. Be sure to include links to sources at the end of the article.
Media
An excellent addition to the article will be video guides, as well as screenshots from the game and photos.
Read also
Sources
Paste links to sources and external resources, such as:
- topic on the official game forum;
- other literature.
| Japan tank destroyers | |
|---|---|
| Ro-Go Derivatives | Ro-Go Exp. |
| Chi-Ha Derivatives | Ho-Ni I · Ho-Ni III · Ho-Ro · Chi-Ha LG |
| Ho-Ri | Ho-Ri Prototype · Ho-Ri Production |
| Other | Na-To |
| JGSDF | |
| SPRG | Type 60 (C) |
| SPH | Type 75 · Type 99 |
| ATGM | Type 60 ATM |
| Rocket | Type 75 MLRS |
| USA | ▅M36 |
