Difference between revisions of "Ho-Ni III"
(→Description) |
(added expert qualification stats) (Tag: Visual edit) |
||
| (30 intermediate revisions by 9 users not shown) | |||
| Line 1: | Line 1: | ||
| + | {{Specs-Card|code=jp_type_3_ho_ni_III}} | ||
{{About | {{About | ||
| − | |about= | + | |about=tank destroyer '''{{PAGENAME}}''' |
| − | |usage= the | + | |usage=the preceding vehicle of similar name |
| − | |link= Ho-Ni I | + | |link=Ho-Ni I |
| − | |||
| − | |||
| − | |||
| − | |||
}} | }} | ||
== Description == | == Description == | ||
| − | <!-- ''In the description, the first part | + | <!--''In the description, the first part needs to be about the history of the creation and combat usage of the vehicle, as well as its key features. In the second part, tell the reader about the ground vehicle in the game. Insert the screenshot of the vehicle. If the novice player does not remember the vehicle by name, they will immediately understand what kind of vehicle it is talking about.''--> |
| − | The '''{{Specs|name}}''' | + | [[File:GarageImage_{{PAGENAME}}.jpg|420px|thumb|left]] |
| − | + | {{break}} | |
| − | + | The '''{{Specs|name}}''' is a Rank {{Specs|rank}} Japanese tank destroyer {{Battle-rating}}. It was introduced along with the entire Japanese Ground Forces tree in [[Update 1.65 "Way of the Samurai"]]. It handles and plays very similarly to the Ho-Ni I before it, but has been refined with the addition of more crew, a faster reload time, and most importantly, armor around the gun crew. However, it pays a slight cost of reduced top speed. | |
== General info == | == General info == | ||
=== Survivability and armour === | === Survivability and armour === | ||
| − | + | <!--''Describe armour protection. Note the most well protected and key weak areas. Appreciate the layout of modules as well as the number and location of crew members. Is the level of armour protection sufficient, is the placement of modules helpful for survival in combat?'' | |
| − | <!-- ''Describe armour protection. Note the most well protected and key weak areas. Appreciate the layout of modules as well as the number and location of crew members. Is the level of armour protection sufficient, is the placement of modules helpful for survival in combat? If necessary use a visual template to indicate the most secure and weak zones of the armour.'' --> | + | |
| + | ''If necessary use a visual template to indicate the most secure and weak zones of the armour.''--> | ||
| + | Having 25mm of armor coverage around the entire gun crew, the Ho-Ni III no longer needs to fear artillery shrapnel or strafing runs from fighter aircraft. Do note however that it's still vulnerable to bombs, rockets and artillery hits! | ||
| − | + | However, if the Ho-Ni III takes a hit, it is now much more likely to survive with more crew, as three of them must be knocked out for it to be inoperable. | |
| − | Another small | + | Another small armor increase is seen on the front of the tank, with the driver and radio station protected with another 10mm of armor, leaving it at still a poor 35mm. |
'''Armour type:''' | '''Armour type:''' | ||
| Line 44: | Line 43: | ||
=== Mobility === | === Mobility === | ||
| − | + | <!--''Write about the mobility of the ground vehicle. Estimate the specific power and maneuverability as well as the maximum speed forward and backward.''--> | |
| − | <!-- ''Write about the mobility of the ground vehicle. Estimate the specific power and | ||
| − | + | The only drawback of the Ho-Ni III compared to its previous version, is that the tank has a slight decrease in top speed. On flat grass, it reaches a top speed of 32km/h, compared to the Ho-Ni I's top speed of 36km/h. | |
| − | + | {| class="wikitable" style="text-align:center" | |
| − | + | |- | |
| − | === | + | ! colspan="3" | Mobility characteristic |
| − | + | |- | |
| + | ! Weight (tons) | ||
| + | ! colspan="1" | Add-on Armour<br>weight (tons) | ||
| + | ! colspan="1" | Max speed (km/h) | ||
| + | |- | ||
| + | | rowspan="2" | 16.8 || colspan="1" rowspan="2" | N/A || colspan="1" | 44 (AB) | ||
| + | |- | ||
| + | |40 (RB/SB) | ||
| + | |- | ||
| + | ! colspan="3" | Engine power (horsepower) | ||
| + | |- | ||
| + | ! colspan="1" | Mode | ||
| + | !Stock | ||
| + | !Upgraded | ||
| + | |- | ||
| + | |''Arcade'' | ||
| + | |263 | ||
| + | |324 | ||
| + | |- | ||
| + | |''Realistic/Simulator'' | ||
| + | |150 | ||
| + | |170 | ||
| + | |- | ||
| + | ! colspan="3" | Power-to-weight ratio (hp/ton) | ||
| + | |- | ||
| + | ! colspan="1" | Mode | ||
| + | !Stock | ||
| + | !Upgraded | ||
| + | |- | ||
| + | |''Arcade'' | ||
| + | |15.65 | ||
| + | |19.29 | ||
| + | |- | ||
| + | |''Realistic/Simulator'' | ||
| + | |8.93 | ||
| + | |10.12 | ||
| + | |- | ||
| + | |} | ||
== Armaments == | == Armaments == | ||
| − | |||
=== Main armament === | === Main armament === | ||
| − | + | <!--''Give the reader information about the characteristics of the main gun. Assess its effectiveness in a battle based on the reloading speed, ballistics and the power of shells. Do not forget about the flexibility of the fire, that is how quickly the cannon can be aimed at the target, open fire on it and aim at another enemy. Add a link to the main article on the gun: <code><nowiki>{{main|Name of the weapon}}</nowiki></code>. Describe in general terms the ammunition available for the main gun. Give advice on how to use them and how to fill the ammunition storage.''--> | |
| − | <!-- ''Give the reader information about the characteristics of the main gun. Assess its effectiveness in a battle based on the reloading speed, ballistics and the power of shells. Do not forget about the flexibility of the fire, that is how quickly the cannon can be aimed at the target, open fire on it and aim at another enemy. Add a link to the main article on the gun: <code><nowiki>{{main|Name of the weapon}}</nowiki></code>. Describe in general terms the ammunition available for the main gun. Give advice on how to use them and how to fill the ammunition storage.'' --> | ||
{{main|Type 3 (75 mm)}} | {{main|Type 3 (75 mm)}} | ||
| − | The | + | The Ho-Ni III features a virtually identical 75mm gun as on the previous Ho-Ni I, still being a great cannon, even with a slightly higher battle rating. With the addition of two dedicated loaders, the gun also gets almost a second cut down on its reload time, making it capable of even more destruction. |
| − | {| class="wikitable" style="text-align:center | + | {| class="wikitable" style="text-align:center" |
|- | |- | ||
| − | ! colspan=" | + | ! colspan="6" | [[Type 3 (75 mm)|75 mm Type 3]] |
|- | |- | ||
| − | ! | + | ! colspan="3" rowspan="1" style="width:5em" |Capacity |
| − | + | ! rowspan="1" | Vertical <br> guidance | |
| − | + | ! rowspan="1" | Horizontal <br> guidance | |
| + | ! rowspan="1" | Stabilizer | ||
|- | |- | ||
| − | + | | colspan="3" | 46 || -10°/+20° || ±10° || N/A | |
| − | | | ||
|- | |- | ||
| − | ! ''Realistic'' | + | ! colspan="6" | Turret rotation speed (°/s) |
| − | | 9.52 || 11.20 || | + | |- |
| + | ! style="width:4em" |Mode | ||
| + | ! style="width:4em" |Stock | ||
| + | ! style="width:4em" |Upgraded | ||
| + | ! style="width:4em" |Prior + Full crew | ||
| + | ! style="width:4em" |Prior + Expert qualif. | ||
| + | ! style="width:4em" |Prior + Ace qualif. | ||
| + | |- | ||
| + | | ''Arcade'' || 14.09 || 19.50 || __.__ || 26.2 || 27.86 | ||
| + | |- | ||
| + | | ''Realistic'' || 9.52 || 11.20 || __.__ || 15.0 || 16.00 | ||
| + | |- | ||
| + | ! colspan="4" | Reloading rate (seconds) | ||
| + | |- | ||
| + | ! colspan="1" style="width:4em" |Stock | ||
| + | ! colspan="1" style="width:4em" |Prior + Full crew | ||
| + | ! colspan="1" style="width:4em" |Prior + Expert qualif. | ||
| + | ! colspan="1" style="width:4em" |Prior + Ace qualif. | ||
| + | |- | ||
| + | | 7.15 || __.__ || 5.8 || 5.50 | ||
|- | |- | ||
|} | |} | ||
| − | ==== Ammunition ==== | + | ===== Ammunition ===== |
| − | {{:Type | + | {| class="wikitable sortable" style="text-align:center" width="100%" |
| + | ! colspan="8" | Penetration statistics | ||
| + | |- | ||
| + | ! rowspan="2" data-sort-type="text" | Ammunition | ||
| + | ! rowspan="2" class="unsortable" | Type of <br /> warhead | ||
| + | ! colspan="6" | '''Penetration''' '''''in mm''''' '''@ 90°''' | ||
| + | |- | ||
| + | ! 10m | ||
| + | ! 100m | ||
| + | ! 500m | ||
| + | ! 1000m | ||
| + | ! 1500m | ||
| + | ! 2000m | ||
| + | |- | ||
| + | | Type 1 APHE || APHE || 102 || 100 || 91 || 81 || 72 || 64 | ||
| + | |- | ||
| + | | Type 94 HE || HE || 11 || 11 || 11 || 11 || 11 || 11 | ||
| + | |- | ||
| + | |} | ||
| + | {| class="wikitable sortable" style="text-align:center" width="100%" | ||
| + | ! colspan="11" | Shell details | ||
| + | |- | ||
| + | ! rowspan="2" data-sort-type="text" | Ammunition | ||
| + | ! rowspan="2" class="unsortable" | Type of <br /> warhead | ||
| + | ! rowspan="2" |Velocity <br /> in m/s | ||
| + | ! rowspan="2" |Projectile<br />Mass in kg | ||
| + | ! rowspan="2" | ''Fuse delay'' | ||
| + | ''in m:'' | ||
| + | ! rowspan="2" | ''Fuse sensitivity'' | ||
| + | ''in mm:'' | ||
| + | ! rowspan="2" | ''Explosive Mass in g<br /> (TNT equivalent):'' | ||
| + | ! rowspan="2" | ''Normalization At 30° <br> from horizontal:'' | ||
| + | ! colspan="3" | ''Ricochet:'' | ||
| + | |- | ||
| + | ! 0% | ||
| + | ! 50% | ||
| + | ! 100% | ||
| + | |- | ||
| + | | Type 1 APHE || APHE || 668 || 6.56 || 1.3 || 15 || 67.84 || -1° || 47° || 60° || 65° | ||
| + | |- | ||
| + | | Type 94 HE || HE || 522 || 6.02 || 0.1 || 0.1 || 810 || +0° || 79° || 80° || 81° | ||
| + | |- | ||
| + | |} | ||
| + | {| class="wikitable sortable" style="text-align:center" | ||
| + | ! colspan="7" | Smoke characteristic | ||
| + | |- | ||
| + | ! Ammunition | ||
| + | ! Velocity <br /> in m/s | ||
| + | ! Projectile<br />Mass in kg | ||
| + | ! ''Screen radius <br /> in m'' | ||
| + | ! ''Screen time <br /> in s'' | ||
| + | ! ''Screen hold time <br /> in s:'' | ||
| + | ! ''Explosive Mass in g<br /> (TNT equivalent):'' | ||
| + | |- | ||
| + | | Type 90 Smoke || 570 || 5.72 || 13 || 5 || 20 || 100 | ||
| + | |- | ||
| + | |} | ||
| − | ==== [[Ammo racks]] ==== | + | ===== [[Ammo racks|Ammo racks]] ===== |
| − | [[File:Ammoracks_{{PAGENAME}}.png|right| | + | [[File:Ammoracks_{{PAGENAME}}.png|right|thumbnail|x250px|Ammo racks of the {{PAGENAME}}.]] |
| − | + | {| class="wikitable sortable" style="text-align:center" | |
| − | {| class="wikitable" style="text-align:center" | ||
|- | |- | ||
| − | ! Full<br>ammo | + | ! class="wikitable unsortable" |Full<br /> ammo |
| − | ! 1st<br>rack empty | + | ! class="wikitable unsortable" |1st<br /> rack empty |
| − | ! 2nd<br>rack empty | + | ! class="wikitable unsortable" |2nd<br /> rack empty |
| − | ! 3rd<br>rack empty | + | ! class="wikitable unsortable" |3rd<br /> rack empty |
| − | ! 4th<br>rack empty | + | ! class="wikitable unsortable" |4th<br /> rack empty |
| − | ! 5th<br>rack empty | + | ! class="wikitable unsortable" |5th<br /> rack empty |
| − | ! Visual<br>discrepancy | + | ! class="wikitable unsortable" |Visual<br /> discrepancy |
|- | |- | ||
| − | | '''46''' || | + | || '''46''' || 45 ''(+1)'' || 41 ''(+5)'' || 37 ''(+9)'' || 24 ''(+22)'' || 1 ''(+45)'' || style="text-align:left" | no |
|- | |- | ||
|} | |} | ||
| − | |||
| − | + | Turret empty: 37 (+9) | |
| − | |||
== Usage in battles == | == Usage in battles == | ||
| − | + | ''Describe the tactics of playing in the vehicle, the features of using vehicles in the team and advice on tactics. Refrain from creating a "guide" - do not impose a single point of view but give the reader food for thought. Describe the most dangerous enemies and give recommendations on fighting them. If necessary, note the specifics of the game in different modes (AB, RB, SB).'' | |
| − | |||
| − | |||
| − | |||
| − | |||
| − | |||
| − | |||
=== Pros and cons === | === Pros and cons === | ||
| − | <!-- '' | + | <!--''Summarize and briefly evaluate the vehicle in terms of its characteristics and combat effectiveness. Mark its pros and cons in a bulleted list. Try not to use more than 6 points for each of the characteristics. Avoid using categorical definitions such as "bad", "good" and the like - they have a substitution in the form of softer "inadequate", "effective".''--> |
'''Pros:''' | '''Pros:''' | ||
| − | * Effective | + | * Effective 75mm gun with APHE can penetrate all enemies at its rank |
| − | + | * Fully enclosed crew compartment = better protection from strafing airplanes | |
| − | * Fully enclosed crew compartment | ||
| − | |||
| − | |||
'''Cons:''' | '''Cons:''' | ||
| − | * | + | * Thin armour; close-quarters fighting is not advised |
| − | * | + | * No coaxial machine gun to use against airplanes or GAZ trucks. |
| − | |||
| − | |||
== History == | == History == | ||
| − | + | ''Describe the history of the creation and combat usage of the ground vehicle in more detail than in the introduction. If the historical reference turns out to be too big, take it to a separate article, taking a link to an article about the vehicle and adding a block "/ History" (example: <nowiki>https://wiki.warthunder.com/(Vehicle-name)/History</nowiki>) and add a link to it here using the <code>main</code> template. Be sure to reference text and sources by using <code><nowiki><ref></nowiki></code>, as well as adding them at the end of the article.'' | |
| − | |||
| − | |||
| − | |||
| − | |||
| − | |||
== Media == | == Media == | ||
| − | <!-- ''Excellent additions to the article would be video guides, screenshots from the game, and photos.'' --> | + | <!--''Excellent additions to the article would be video guides, screenshots from the game, and photos.''--> |
| + | Skin and Camouflages for the [https://live.warthunder.com/feed/camouflages/?vehicleCountry=japan&vehicleType=tank&vehicleClass=tank_destroyer&vehicle=jp_type_3_ho_ni_III Ho-Ni III] in Warthunder Live. | ||
| − | + | == See also == | |
| − | + | ''Links to the articles on the War Thunder Wiki that you think will be useful for the reader, for example:'' | |
| − | |||
| − | |||
* ''reference to the series of the vehicles;'' | * ''reference to the series of the vehicles;'' | ||
| − | * ''links to approximate analogues of other nations and research trees.'' | + | * ''links to approximate analogues of other nations and research trees.'' |
| − | |||
| − | |||
| − | |||
| − | |||
| − | |||
| − | |||
| − | |||
== External links == | == External links == | ||
| − | <!-- ''Paste links to sources and external resources, such as:'' | + | <!--''Paste links to sources and external resources, such as:'' |
* ''topic on the official game forum;'' | * ''topic on the official game forum;'' | ||
| − | * ''other literature.'' --> | + | * ''encyclopedia page on tank;'' |
| + | * ''other literature.''--> | ||
| − | * [ | + | * [https://warthunder.com/en/news/4361-development-type-3-ho-ni-iii-the-japanese-marder-en/ [Devblog<nowiki>]</nowiki> Type 3 Ho-Ni III: The Japanese Marder] |
| − | * [[Wikipedia:Type_3_Ho-Ni_III|[Wikipedia] Type 3 Ho-Ni III]] | + | * [[Wikipedia:Type_3_Ho-Ni_III|[Wikipedia<nowiki>]</nowiki> Type 3 Ho-Ni III]] |
| − | |||
{{Japan tank destroyers}} | {{Japan tank destroyers}} | ||
Revision as of 18:21, 29 June 2019
Contents
| This page is about the tank destroyer Ho-Ni III. For the preceding vehicle of similar name, see Ho-Ni I. |
Description

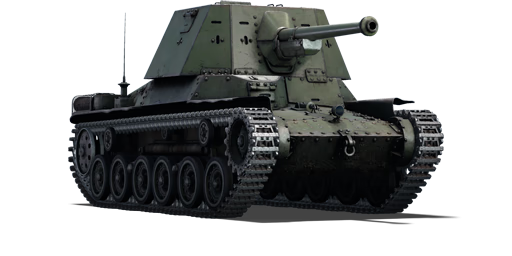
The Type 3 Ho-Ni III is a Rank II Japanese tank destroyer
with a battle rating of 2.3 (AB/RB/SB). It was introduced along with the entire Japanese Ground Forces tree in Update 1.65 "Way of the Samurai". It handles and plays very similarly to the Ho-Ni I before it, but has been refined with the addition of more crew, a faster reload time, and most importantly, armor around the gun crew. However, it pays a slight cost of reduced top speed.
General info
Survivability and armour
Having 25mm of armor coverage around the entire gun crew, the Ho-Ni III no longer needs to fear artillery shrapnel or strafing runs from fighter aircraft. Do note however that it's still vulnerable to bombs, rockets and artillery hits!
However, if the Ho-Ni III takes a hit, it is now much more likely to survive with more crew, as three of them must be knocked out for it to be inoperable.
Another small armor increase is seen on the front of the tank, with the driver and radio station protected with another 10mm of armor, leaving it at still a poor 35mm.
Armour type:
- Rolled homogeneous armour
| Armour | Front | Sides | Rear | Roof |
|---|---|---|---|---|
| Hull | 25 mm (12-31°) Front plate 17 mm (80-81°) Front glacis 15 mm (63°) Joint plate 15 mm (37-59°) Lower glacis |
25 mm (40°) Top Left 20 mm (24-27°) Top Right 20 mm Bottom |
17 mm (69°) Top 20 mm (4-58°) Bottom |
12 mm |
| Superstructure | 25 mm (15-16°) Front 25 mm (3-47°) Gun mantlet |
25 mm (24-26°) | 25 mm (10-11°) | 10 mm |
Notes:
- Suspension wheels and tracks are both 15 mm thick.
- Driver's port on the front plate is 10 mm thick.
- An extra 10 mm of armour is plated on top of the bow machine gun area, left from the driver's position.
Mobility
The only drawback of the Ho-Ni III compared to its previous version, is that the tank has a slight decrease in top speed. On flat grass, it reaches a top speed of 32km/h, compared to the Ho-Ni I's top speed of 36km/h.
| Mobility characteristic | ||
|---|---|---|
| Weight (tons) | Add-on Armour weight (tons) |
Max speed (km/h) |
| 16.8 | N/A | 44 (AB) |
| 40 (RB/SB) | ||
| Engine power (horsepower) | ||
| Mode | Stock | Upgraded |
| Arcade | 263 | 324 |
| Realistic/Simulator | 150 | 170 |
| Power-to-weight ratio (hp/ton) | ||
| Mode | Stock | Upgraded |
| Arcade | 15.65 | 19.29 |
| Realistic/Simulator | 8.93 | 10.12 |
Armaments
Main armament
The Ho-Ni III features a virtually identical 75mm gun as on the previous Ho-Ni I, still being a great cannon, even with a slightly higher battle rating. With the addition of two dedicated loaders, the gun also gets almost a second cut down on its reload time, making it capable of even more destruction.
| 75 mm Type 3 | |||||
|---|---|---|---|---|---|
| Capacity | Vertical guidance |
Horizontal guidance |
Stabilizer | ||
| 46 | -10°/+20° | ±10° | N/A | ||
| Turret rotation speed (°/s) | |||||
| Mode | Stock | Upgraded | Prior + Full crew | Prior + Expert qualif. | Prior + Ace qualif. |
| Arcade | 14.09 | 19.50 | __.__ | 26.2 | 27.86 |
| Realistic | 9.52 | 11.20 | __.__ | 15.0 | 16.00 |
| Reloading rate (seconds) | |||||
| Stock | Prior + Full crew | Prior + Expert qualif. | Prior + Ace qualif. | ||
| 7.15 | __.__ | 5.8 | 5.50 | ||
Ammunition
| Penetration statistics | |||||||
|---|---|---|---|---|---|---|---|
| Ammunition | Type of warhead |
Penetration in mm @ 90° | |||||
| 10m | 100m | 500m | 1000m | 1500m | 2000m | ||
| Type 1 APHE | APHE | 102 | 100 | 91 | 81 | 72 | 64 |
| Type 94 HE | HE | 11 | 11 | 11 | 11 | 11 | 11 |
| Shell details | ||||||||||
|---|---|---|---|---|---|---|---|---|---|---|
| Ammunition | Type of warhead |
Velocity in m/s |
Projectile Mass in kg |
Fuse delay
in m: |
Fuse sensitivity
in mm: |
Explosive Mass in g (TNT equivalent): |
Normalization At 30° from horizontal: |
Ricochet: | ||
| 0% | 50% | 100% | ||||||||
| Type 1 APHE | APHE | 668 | 6.56 | 1.3 | 15 | 67.84 | -1° | 47° | 60° | 65° |
| Type 94 HE | HE | 522 | 6.02 | 0.1 | 0.1 | 810 | +0° | 79° | 80° | 81° |
| Smoke characteristic | ||||||
|---|---|---|---|---|---|---|
| Ammunition | Velocity in m/s |
Projectile Mass in kg |
Screen radius in m |
Screen time in s |
Screen hold time in s: |
Explosive Mass in g (TNT equivalent): |
| Type 90 Smoke | 570 | 5.72 | 13 | 5 | 20 | 100 |
Ammo racks

| Full ammo |
1st rack empty |
2nd rack empty |
3rd rack empty |
4th rack empty |
5th rack empty |
Visual discrepancy |
|---|---|---|---|---|---|---|
| 46 | 45 (+1) | 41 (+5) | 37 (+9) | 24 (+22) | 1 (+45) | no |
Turret empty: 37 (+9)
Usage in battles
Describe the tactics of playing in the vehicle, the features of using vehicles in the team and advice on tactics. Refrain from creating a "guide" - do not impose a single point of view but give the reader food for thought. Describe the most dangerous enemies and give recommendations on fighting them. If necessary, note the specifics of the game in different modes (AB, RB, SB).
Pros and cons
Pros:
- Effective 75mm gun with APHE can penetrate all enemies at its rank
- Fully enclosed crew compartment = better protection from strafing airplanes
Cons:
- Thin armour; close-quarters fighting is not advised
- No coaxial machine gun to use against airplanes or GAZ trucks.
History
Describe the history of the creation and combat usage of the ground vehicle in more detail than in the introduction. If the historical reference turns out to be too big, take it to a separate article, taking a link to an article about the vehicle and adding a block "/ History" (example: https://wiki.warthunder.com/(Vehicle-name)/History) and add a link to it here using the main template. Be sure to reference text and sources by using <ref>, as well as adding them at the end of the article.
Media
Skin and Camouflages for the Ho-Ni III in Warthunder Live.
See also
Links to the articles on the War Thunder Wiki that you think will be useful for the reader, for example:
- reference to the series of the vehicles;
- links to approximate analogues of other nations and research trees.
External links
| Japan tank destroyers | |
|---|---|
| Ro-Go Derivatives | Ro-Go Exp. |
| Chi-Ha Derivatives | Ho-Ni I · Ho-Ni III · Ho-Ro · Chi-Ha LG |
| Ho-Ri | Ho-Ri Prototype · Ho-Ri Production |
| Other | Na-To |
| JGSDF | |
| SPRG | Type 60 (C) |
| SPH | Type 75 · Type 99 |
| ATGM | Type 60 ATM |
| Rocket | Type 75 MLRS |
| USA | ▅M36 |
