Difference between revisions of "Caernarvon"
(→Description: Updated to new standard) |
|||
| (38 intermediate revisions by 14 users not shown) | |||
| Line 1: | Line 1: | ||
| − | {{Specs-Card|code=uk_fv221_caernarvon}} | + | {{Specs-Card |
| + | |code=uk_fv221_caernarvon | ||
| + | |images={{Specs-Card-Image|GarageImage_{{PAGENAME}}.jpg}} | ||
| + | }} | ||
== Description == | == Description == | ||
| − | ''In the description, the first part | + | <!-- ''In the description, the first part should be about the history of the creation and combat usage of the vehicle, as well as its key features. In the second part, tell the reader about the ground vehicle in the game. Insert a screenshot of the vehicle, so that if the novice player does not remember the vehicle by name, he will immediately understand what kind of vehicle the article is talking about.'' --> |
| + | In 1949, work on the chassis for the new "Universal Tank" project was nearing completion. However, development of the gun and turret of what would later become the [[Conqueror]] was still yet to begin. In order to expedite testing and training, the new hull was fitted with the 20-pounder-equipped turret of the [[Centurion Mk 3]], producing the '''FV 221 Caernarvon'''. Units were sent to the British Army of the Rhine, Bovington, Libya, and the Middle East for troop trials, identifying a number of issues with the chassis design. Once the Conqueror finally entered service in 1955, all Caernarvon units were re-equipped with the new turret and served until the Conqueror's replacement in the 1960s. | ||
| + | |||
| + | Introduced along with the initial British ground tree in [[Update 1.55 "Royal Armour"]], the Caernarvon is the heavier counterpart to the early Centurion series, featuring the same firepower and gun handling characteristics, alongside thicker armour and surprisingly adequate mobility for its size. The Caernarvon works well in a supportive, sniping role, utilising its highly penetrating and easy-to-aim cannon to disable opponents from afar, while minimising the chance of damage through the thick armour. However, it can also be effective in more urban brawls, taking advantage of the two-plane gun stabilizer, decent protection, and reasonable mobility, making the Caernarvon a very versatile vehicle for any location or situation. | ||
== General info == | == General info == | ||
=== Survivability and armour === | === Survivability and armour === | ||
| − | ''Describe armour protection. Note the most well protected and key weak areas. Appreciate the layout of modules as well as the number and location of crew members. Is the level of armour protection sufficient, is the placement of modules | + | {{Specs-Tank-Armour}} |
| + | <!-- ''Describe armour protection. Note the most well protected and key weak areas. Appreciate the layout of modules as well as the number and location of crew members. Is the level of armour protection sufficient, is the placement of modules helpful for survival in combat? If necessary use a visual template to indicate the most secure and weak zones of the armour.'' --> | ||
| − | '' | + | '''Armour type:''' |
| + | |||
| + | * Rolled homogeneous armour (hull, turret roof, cupola roof) | ||
| + | * Cast homogeneous armour (turret, cupola) | ||
| + | * Structural steel (side skirts, mudguards, storage boxes) | ||
| + | |||
| + | {| class="wikitable" | ||
| + | |- | ||
| + | ! Armour !! Front (Slope angle) !! Sides !! Rear !! Roof | ||
| + | |- | ||
| + | | Hull || 127 mm (60°) ''Upper glacis'' <br> 76.2 mm (44°) ''Lower glacis'' || 50.8 + 4 mm || 38.1 mm ''Upper plate'' <br> 20 mm (61°) ''Lower glacis'' || 127 mm (30°) ''Front glacis'' <br> 50.8 mm (0-7°) ''Driver compartment'' <br> 18 mm ''Centre'' <br> 8 mm ''Engine vent'' <br> 8 + 18 mm (7°) ''Radiator vent'' | ||
| + | |- | ||
| + | | Turret || 120 + 152 mm (cylindrical) ''Turret front - Centre'' <br> 89-152 mm (5-11°) ''Turret front - Sides '' <br> 100-152 mm (cylindrical) ''Gun mantlet'' <br> 200 mm ''MG port'' || 89 mm (5-9°) || 89 mm ''Bustle'' <br> 89 mm (17-22°) ''Turret base'' || 50.8 mm (19°) ''Front'' <br> 29 mm ''Centre'' <br> 50.8 mm (4-32°) ''Peripheral edge'' | ||
| + | |- | ||
| + | | Cupola || 152 mm (cylindrical) ''Base'' <br> 29 mm (51-75°) ''Upper part'' || 152 mm (cylindrical) ''Front half'' <br> 90 mm (cylindrical) ''Rear half'' || 90 mm (cylindrical) || 29 mm | ||
| + | |- | ||
| + | |} | ||
| + | '''Notes:''' | ||
| + | |||
| + | * Suspension wheels and bogies are 20 mm thick while tracks are 30 mm thick. | ||
| + | * Steel boxes and side skirts located on the hull and turret sides add 4 mm of armour. | ||
=== Mobility === | === Mobility === | ||
| − | ''Write about the mobility of the ground vehicle. Estimate the specific power and | + | {{Specs-Tank-Mobility}} |
| + | <!-- ''Write about the mobility of the ground vehicle. Estimate the specific power and manoeuvrability, as well as the maximum speed forwards and backwards.'' --> | ||
| + | |||
| + | {{tankMobility|abMinHp= 1046|rbMinHp= 716}} | ||
| + | |||
| + | === Modifications and economy === | ||
| + | {{Specs-Economy}} | ||
== Armaments == | == Armaments == | ||
| + | {{Specs-Tank-Armaments}} | ||
=== Main armament === | === Main armament === | ||
| − | ''Give the reader information about the characteristics of the main gun. Assess its effectiveness in a battle based on the reloading speed, ballistics and the power of shells. Do not forget about the | + | {{Specs-Tank-Weapon|1}} |
| + | <!-- ''Give the reader information about the characteristics of the main gun. Assess its effectiveness in a battle based on the reloading speed, ballistics and the power of shells. Do not forget about the flexibility of the fire, that is how quickly the cannon can be aimed at the target, open fire on it and aim at another enemy. Add a link to the main article on the gun: <code><nowiki>{{main|Name of the weapon}}</nowiki></code>. Describe in general terms the ammunition available for the main gun. Give advice on how to use them and how to fill the ammunition storage.'' --> | ||
| + | {{main|20pdr OQF Mk.I (84 mm)}} | ||
| + | |||
| + | {| class="wikitable" style="text-align:center" width="100%" | ||
| + | |- | ||
| + | ! colspan="5" | [[20pdr OQF Mk.I (84 mm)|84 mm 20pdr OQF Mk.I]] || colspan="5" | Turret rotation speed (°/s) || colspan="4" | Reloading rate (seconds) | ||
| + | |- | ||
| + | ! Mode !! Capacity !! Vertical !! Horizontal !! Stabilizer | ||
| + | ! Stock !! Upgraded !! Full !! Expert !! Aced | ||
| + | ! Stock !! Full !! Expert !! Aced | ||
| + | |- | ||
| + | ! ''Arcade'' | ||
| + | | rowspan="2" | 65 || rowspan="2" | -10°/+20° || rowspan="2" | ±180° || rowspan="2" | Two-plane || 16.18 || 22.40 ||27.20|| 30.08 || 32.00 || rowspan="2" | 8.19 || rowspan="2" | 7.25 || rowspan="2" | 6.68 || rowspan="2" | 6.30 | ||
| + | |- | ||
| + | ! ''Realistic'' | ||
| + | | 11.90 || 14.00 || 17.00 || 18.80 || 20.00 | ||
| + | |- | ||
| + | |} | ||
| + | |||
| + | ==== Ammunition ==== | ||
| + | The AP round is good to knock out crew members as it creates spalling. The solid shot does usually more damage inside enemy tanks than the APDS but its penetration power is lesser. When using APDS, target ammo racks (which it will easily set off). Know the weak spots on most vehicles s well as the crew's and modules' positions as you don't have rounds with explosive filler. The APDS shot can penetrate any Panthers' UFP, and also the Ferdinand's and Ho-Ri's frontal armour. | ||
| − | === | + | {{:20pdr OQF Mk.I (84 mm)/Ammunition|Shot Mk.1, Shot Mk.3, Shell Mk.1, 20pdr Shell SS Mk.1}} |
| − | '' | + | |
| + | ==== [[Ammo racks]] ==== | ||
| + | [[File:Ammoracks_{{PAGENAME}}.png|right|thumb|x250px|[[Ammo racks]] of the {{PAGENAME}}]] | ||
| + | <!-- '''Last updated: 2.19.0.76''' --> | ||
| + | {| class="wikitable" style="text-align:center" | ||
| + | |- | ||
| + | ! Full<br>ammo | ||
| + | ! 1st<br>rack empty | ||
| + | ! 2nd<br>rack empty | ||
| + | ! 3rd<br>rack empty | ||
| + | ! 4th<br>rack empty | ||
| + | ! 5th<br>rack empty | ||
| + | |- | ||
| + | | '''65''' || 63 ''(+2)'' || 61 ''(+4)'' || 53 ''(+12)'' || 45 ''(+20)'' || 37 ''(+28)'' | ||
| + | |- | ||
| + | ! 6th<br>rack empty | ||
| + | ! 7th<br>rack empty | ||
| + | ! 8th<br>rack empty | ||
| + | ! 9th<br>rack empty | ||
| + | ! Visual<br>discrepancy | ||
| + | ! | ||
| + | |- | ||
| + | | 29 ''(+36)'' || 9 ''(+56)'' || 5 ''(+60)'' || 1 ''(+64)'' || No | ||
| + | ! | ||
| + | |- | ||
| + | |} | ||
| + | '''Notes''': | ||
| + | |||
| + | * Shells are modelled individually and disappear from the rack after having been loaded in the breech. | ||
| + | * Racks 8 and 9 are first stage ammo racks. They total 8 shells and get filled first when loading up the tank. | ||
=== Machine guns === | === Machine guns === | ||
| − | ''Offensive and anti-aircraft machine guns not only allow you to fight some aircraft | + | {{Specs-Tank-Weapon|2}} |
| + | <!-- ''Offensive and anti-aircraft machine guns not only allow you to fight some aircraft but also are effective against lightly armoured vehicles. Evaluate machine guns and give recommendations on its use.'' --> | ||
| + | {{main|BESA (7.92 mm)}} | ||
| + | |||
| + | {| class="wikitable" style="text-align:center" width="50%" | ||
| + | |- | ||
| + | ! colspan="5" | [[BESA (7.92 mm)|7.92 mm BESA]] | ||
| + | |- | ||
| + | ! Mount !! Capacity (Belt) !! Fire rate !! Vertical !! Horizontal | ||
| + | |- | ||
| + | | Coaxial || 3,600 (225) || 600 || N/A || N/A | ||
| + | |- | ||
| + | |} | ||
| + | The small calibre of the BESA machine gun makes it largely ineffective against all armoured vehicles but the ones with an open compartment. It still can be used to ping targets as a rangefinding help or to mow down minor obstacles blocking your line of sight. | ||
| + | |||
| + | == Usage in battles == | ||
| + | <!-- ''Describe the tactics of playing in the vehicle, the features of using vehicles in the team and advice on tactics. Refrain from creating a "guide" - do not impose a single point of view but instead give the reader food for thought. Describe the most dangerous enemies and give recommendations on fighting them. If necessary, note the specifics of the game in different modes (AB, RB, SB).'' --> | ||
| + | |||
| + | ;Arcade Battles | ||
| + | |||
| + | In Arcade Battles, it is recommended to take mostly APDS shells, because the gameplay is much more reactive and it's more important to penetrate an enemy vehicle wherever you hit - because you don't have time to aim, or the enemies are very fast-moving due to increased horsepower. | ||
| + | |||
| + | In terms of game strategies, the Caernarvon is very versatile (almost MBT-like). You can get into sniping positions and rain shells on all enemies that enter your line of sight (or target the more armoured vehicles such as the Ferdinand and the Ho-Ri Production, which are impenetrable to many tanks around 6.7); you can also serve as a breakthrough tank, not because of armour, but because of speed and the stabilizer which allows you to shoot on the move at enemies that dare block your path; or, you can flank, although that role is often taken by much faster vehicles such as Ru 251, BMP-1 and R3. | ||
| + | |||
| + | To succeed in Arcade, you must learn to use your advantages, most notably the stabilizer and the APDS round. For example, whenever you are in a stand-off with a non-stabilized tank - get into cover, and when they try to drive out to hold your angle, you can also drive out and shoot them, because your gun will be ready to fire faster than theirs, even though they started driving out of cover before you. | ||
| − | + | ;Realistic Battles | |
| − | ' | + | |
| + | In Realistic Battles, most players prefer to take out the solid shot, because it has the potential to damage many more components while maintaining decent penetration values. However, you should take your time to aim this shot, because it will not penetrate some tougher enemies (e.g. Ferdinand, Ho-Ri Production, or IS-3/IS-4), or take some APDS rounds with you. | ||
| + | |||
| + | When playing the Caernarvon in Realistic Battles, try to play a supportive role. You don't know where the enemies are, and your armour will not save you from an ambush, so rely on your teammates to lead the way. Here, the sniping strategy is much more viable, because your round velocities are very high, making aiming over 1 km much easier, moreover 10 degrees of depression allow you to play in hilly areas and take pot shots at unsuspecting enemies (especially the Soviet tanks, who lack gun depression). You can still push forward with your team because your stabilizer still allows you to take much more accurate reactive shots (or when on the move). | ||
| + | |||
| + | To succeed in Realistic, you must use cover and let your teammates take the shots. Usually, you will be able to return fire to avenge a teammate, and most of the time you get the kill, due to easy gun handling. | ||
=== Pros and cons === | === Pros and cons === | ||
| − | '' | + | <!-- ''Summarise and briefly evaluate the vehicle in terms of its characteristics and combat effectiveness. Mark its pros and cons in a bulleted list. Try not to use more than 6 points for each of the characteristics. Avoid using categorical definitions such as "bad", "good" and the like - use substitutions with softer forms such as "inadequate" and "effective".'' --> |
| + | '''Pros:''' | ||
| − | + | * The Caernarvon is like a beefed up Centurion Mk 3 | |
| − | * | + | ** Same armament as the Centurion Mk 3, has a very good stock round and access to APDS, no learning curve |
| + | ** Upper front plate is extremely strong - it has 127 mm thickness at a 60° angle | ||
| + | ** Hull roof and most of the turret roof is 51 mm thick, so it will sustain heavy tank HE | ||
| + | * Gun reloads a bit faster than enemies with the same calibre | ||
| + | * Fast turret and hull traverse | ||
| + | * Good acceleration | ||
| + | * Brake system is very responsive | ||
| + | * Access to gun stabilizer | ||
| + | * Extremely strong gun mantlet | ||
| + | * Armour profile on the turret face is inconsistent - enemies think twice before firing | ||
'''Cons:''' | '''Cons:''' | ||
| − | * | + | |
| + | * Although it is designated as a heavy tank, the Centurion turret sabotages its armour and it will be destroyed almost on autopilot by anyone familiar with the Centurion weakspots (almost everybody at this point) | ||
| + | * Lower glacis is still a weak spot, roof still can be breached by artillery tanks | ||
| + | * Large ammo rack behind LFP (can be removed by bringing less than 34 shells) | ||
| + | * APDS shot has little post-penetrative spalling | ||
| + | * No explosive filler in any regular shells | ||
| + | * Weak side armour, should not be exposed in any way when engaging an enemy | ||
| + | * Top armour covering the engine is still only 8 mm | ||
| + | * HEATFS shells can often easily penetrate the armour, even from the front | ||
== History == | == History == | ||
| − | ''Describe the history of the creation and combat usage of the | + | <!-- ''Describe the history of the creation and combat usage of the vehicle in more detail than in the introduction. If the historical reference turns out to be too long, take it to a separate article, taking a link to the article about the vehicle and adding a block "/History" (example: <nowiki>https://wiki.warthunder.com/(Vehicle-name)/History</nowiki>) and add a link to it here using the <code>main</code> template. Be sure to reference text and sources by using <code><nowiki><ref></ref></nowiki></code>, as well as adding them at the end of the article with <code><nowiki><references /></nowiki></code>. This section may also include the vehicle's dev blog entry (if applicable) and the in-game encyclopedia description (under <code><nowiki>=== In-game description ===</nowiki></code>, also if applicable).'' --> |
| + | ===Development=== | ||
| + | In 1944, General Staff started a project called ''A45 Infantry Support Tank'', which started around the same time as the development of the [[Centurion Mk 3|A41 Centurion]] cruiser tank. This project, after the war, was redesignated from a typical "Infantry Tank" and instead focused on a new role of a "Universal Tank" design in the form of the FV 200 series. The "Universal Tank" concept was to design a vehicle that would have a mobility comparable to that of cruiser tanks, but with the armour and firepower of heavy tanks. The FV 200 series designation was adopted and was to serve as a line of vehicles that used the same hull and chassis in different roles like armour recovery vehicles and self-propelled guns. The first tank of this series was to be the FV 201, which would be 55 tons and had the 20-pounder gun. | ||
| + | |||
| + | In 1949, a new requirement for the project called for the use of a 120 mm gun, possibly in response to the reveal of the Soviet [[IS-3]] heavy tank in the Berlin Victory Parade in 1945. This new requirement would delay the initial deadlines for the tank as no gun of that calibre had been developed yet. As a interim development before such a gun could be made, the FV 201 hull was mounted with a turret from a Centurion Mk.2, which had a 17-pounder gun. This Centurion turret mated FV 201 tank was designated the '''FV 221 Caernavon''', with a ''Mark I'' for the 17-pounder. The later combination of the [[Centurion Mk 3]] turret instead of the Mk.2 upped the armament of the tank to the more powerful 20-pounder gun, this version named the ''Mark II''. About 21 units of the Caernarvon Mark II was made in this method. | ||
| + | |||
| + | ===Successor=== | ||
| + | The Caernarvon, powerful as it was at the time period, was intended to fulfill the role of the new "Main Battle Tank" concept in the FV 200 series. However, the success of the lighter Centurion cruiser tank made it apparent that the Centurion was more capable in that role than the heavier and less mobile Caernarvon. Thus, this role was not given to the Caernarvon and its design was used instead for further chassis development for future tank development. In 1955, the basis of the Caernarvon was built into the first [[Conqueror|Conqueror]] tank. Several Caernarvon Mk.II's were rebuilt into Conqueror Mk. 2 standards in between 1958 and 1959. | ||
== Media == | == Media == | ||
| − | '' | + | <!-- ''Excellent additions to the article would be video guides, screenshots from the game, and photos.'' --> |
| + | |||
| + | ;Skins | ||
| + | |||
| + | * [https://live.warthunder.com/feed/camouflages/?vehicle=uk_fv221_caernarvon Skins and camouflages for the {{PAGENAME}} from live.warthunder.com.] | ||
| + | |||
| + | ;Videos | ||
| + | {{Youtube-gallery|gR3JPNt0iPw|'''Heavyweight Brits''' discusses the {{PAGENAME}} at 5:02 - ''War Thunder Official Channel''|9ayZTC2A6Ks|'''T34 vs Caernarvon''' - ''War Thunder Official Channel''|Fjh-tTr6TPs|'''Best Combo #2''' discusses the {{PAGENAME}} at 2:00 - ''War Thunder Official Channel''|fvOxbA46lZc|'''Caernarvon - How To Master It - Tank Review''' - ''Napalmratte''}} | ||
| − | == | + | == See also == |
| − | ''Links to the articles on the War Thunder Wiki that you think will be useful for the reader, for example | + | <!-- ''Links to the articles on the War Thunder Wiki that you think will be useful for the reader, for example:'' |
* ''reference to the series of the vehicles;'' | * ''reference to the series of the vehicles;'' | ||
| − | * ''links to approximate analogues of other nations and research trees.'' | + | * ''links to approximate analogues of other nations and research trees.'' --> |
| − | + | ||
| + | ;Vehicles equipped with the same chassis | ||
| + | |||
| + | * [[Conqueror]] | ||
| + | |||
| + | ;Other vehicles of similar configuration and role | ||
| + | |||
| + | * [[T34]] | ||
| − | == | + | == External links == |
| − | ''Paste links to sources and external resources, such as:'' | + | <!-- ''Paste links to sources and external resources, such as:'' |
* ''topic on the official game forum;'' | * ''topic on the official game forum;'' | ||
| − | * ''other literature.'' | + | * ''other literature.'' --> |
| + | |||
| + | * [[wikipedia:Conqueror_(tank)|[Wikipedia] Conqueror (tank)]] | ||
| + | * [https://tanks-encyclopedia.com/coldwar-uk-tank-medium-gun-fv221-caernarvon/ <nowiki>[Tanks Encyclopedia]</nowiki> Tank, Medium Gun, FV221 Caernarvon] | ||
| + | |||
| + | {{Britain heavy tanks}} | ||
Latest revision as of 19:57, 25 October 2023

Contents
Description
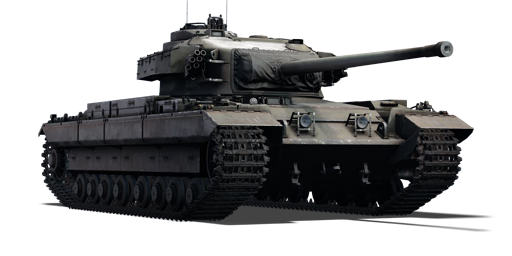
In 1949, work on the chassis for the new "Universal Tank" project was nearing completion. However, development of the gun and turret of what would later become the Conqueror was still yet to begin. In order to expedite testing and training, the new hull was fitted with the 20-pounder-equipped turret of the Centurion Mk 3, producing the FV 221 Caernarvon. Units were sent to the British Army of the Rhine, Bovington, Libya, and the Middle East for troop trials, identifying a number of issues with the chassis design. Once the Conqueror finally entered service in 1955, all Caernarvon units were re-equipped with the new turret and served until the Conqueror's replacement in the 1960s.
Introduced along with the initial British ground tree in Update 1.55 "Royal Armour", the Caernarvon is the heavier counterpart to the early Centurion series, featuring the same firepower and gun handling characteristics, alongside thicker armour and surprisingly adequate mobility for its size. The Caernarvon works well in a supportive, sniping role, utilising its highly penetrating and easy-to-aim cannon to disable opponents from afar, while minimising the chance of damage through the thick armour. However, it can also be effective in more urban brawls, taking advantage of the two-plane gun stabilizer, decent protection, and reasonable mobility, making the Caernarvon a very versatile vehicle for any location or situation.
General info
Survivability and armour
Armour type:
- Rolled homogeneous armour (hull, turret roof, cupola roof)
- Cast homogeneous armour (turret, cupola)
- Structural steel (side skirts, mudguards, storage boxes)
| Armour | Front (Slope angle) | Sides | Rear | Roof |
|---|---|---|---|---|
| Hull | 127 mm (60°) Upper glacis 76.2 mm (44°) Lower glacis |
50.8 + 4 mm | 38.1 mm Upper plate 20 mm (61°) Lower glacis |
127 mm (30°) Front glacis 50.8 mm (0-7°) Driver compartment 18 mm Centre 8 mm Engine vent 8 + 18 mm (7°) Radiator vent |
| Turret | 120 + 152 mm (cylindrical) Turret front - Centre 89-152 mm (5-11°) Turret front - Sides 100-152 mm (cylindrical) Gun mantlet 200 mm MG port |
89 mm (5-9°) | 89 mm Bustle 89 mm (17-22°) Turret base |
50.8 mm (19°) Front 29 mm Centre 50.8 mm (4-32°) Peripheral edge |
| Cupola | 152 mm (cylindrical) Base 29 mm (51-75°) Upper part |
152 mm (cylindrical) Front half 90 mm (cylindrical) Rear half |
90 mm (cylindrical) | 29 mm |
Notes:
- Suspension wheels and bogies are 20 mm thick while tracks are 30 mm thick.
- Steel boxes and side skirts located on the hull and turret sides add 4 mm of armour.
Mobility
| Game Mode | Max Speed (km/h) | Weight (tons) | Engine power (horsepower) | Power-to-weight ratio (hp/ton) | |||
|---|---|---|---|---|---|---|---|
| Forward | Reverse | Stock | Upgraded | Stock | Upgraded | ||
| Arcade | 37 | 13 | 61 | 1046 | 1,545 | 17.15 | 25.33 |
| Realistic | 34 | 12 | 716 | 810 | 11.74 | 13.28 | |
Modifications and economy
| Mobility | Protection | Firepower | ||||||||||||||||||||
|---|---|---|---|---|---|---|---|---|---|---|---|---|---|---|---|---|---|---|---|---|---|---|
|
|
|
Armaments
Main armament
| 84 mm 20pdr OQF Mk.I | Turret rotation speed (°/s) | Reloading rate (seconds) | |||||||||||
|---|---|---|---|---|---|---|---|---|---|---|---|---|---|
| Mode | Capacity | Vertical | Horizontal | Stabilizer | Stock | Upgraded | Full | Expert | Aced | Stock | Full | Expert | Aced |
| Arcade | 65 | -10°/+20° | ±180° | Two-plane | 16.18 | 22.40 | 27.20 | 30.08 | 32.00 | 8.19 | 7.25 | 6.68 | 6.30 |
| Realistic | 11.90 | 14.00 | 17.00 | 18.80 | 20.00 | ||||||||
Ammunition
The AP round is good to knock out crew members as it creates spalling. The solid shot does usually more damage inside enemy tanks than the APDS but its penetration power is lesser. When using APDS, target ammo racks (which it will easily set off). Know the weak spots on most vehicles s well as the crew's and modules' positions as you don't have rounds with explosive filler. The APDS shot can penetrate any Panthers' UFP, and also the Ferdinand's and Ho-Ri's frontal armour.
| Penetration statistics | |||||||
|---|---|---|---|---|---|---|---|
| Ammunition | Type of warhead |
Penetration @ 0° Angle of Attack (mm) | |||||
| 10 m | 100 m | 500 m | 1,000 m | 1,500 m | 2,000 m | ||
| Shot Mk.1 | APCBC | 232 | 229 | 216 | 201 | 187 | 173 |
| Shot Mk.3 | APDS | 384 | 380 | 363 | 343 | 324 | 306 |
| Shell Mk.1 | HE | 15 | 15 | 15 | 15 | 15 | 15 |
| Shell details | ||||||||||||
|---|---|---|---|---|---|---|---|---|---|---|---|---|
| Ammunition | Type of warhead |
Velocity (m/s) |
Projectile mass (kg) |
Fuse delay (m) |
Fuse sensitivity (mm) |
Explosive mass (TNT equivalent) (kg) |
Ricochet | |||||
| 0% | 50% | 100% | ||||||||||
| Shot Mk.1 | APCBC | 1,000 | 9.1 | - | - | - | 48° | 63° | 71° | |||
| Shot Mk.3 | APDS | 1,430 | 3.22 | - | - | - | 75° | 78° | 80° | |||
| Shell Mk.1 | HE | 600 | 7.5 | 0.2 | 0.1 | 1.13 | 79° | 80° | 81° | |||
| Smoke shell characteristics | ||||||
|---|---|---|---|---|---|---|
| Ammunition | Velocity (m/s) |
Projectile mass (kg) |
Screen radius (m) |
Screen deploy time (s) |
Screen hold time (s) |
Explosive mass (TNT equivalent) (g) |
| 20pdr Shell SS Mk.1 | 250 | 9.3 | 9 | 5 | 20 | 50 |
Ammo racks

| Full ammo |
1st rack empty |
2nd rack empty |
3rd rack empty |
4th rack empty |
5th rack empty |
|---|---|---|---|---|---|
| 65 | 63 (+2) | 61 (+4) | 53 (+12) | 45 (+20) | 37 (+28) |
| 6th rack empty |
7th rack empty |
8th rack empty |
9th rack empty |
Visual discrepancy |
|
| 29 (+36) | 9 (+56) | 5 (+60) | 1 (+64) | No |
Notes:
- Shells are modelled individually and disappear from the rack after having been loaded in the breech.
- Racks 8 and 9 are first stage ammo racks. They total 8 shells and get filled first when loading up the tank.
Machine guns
| 7.92 mm BESA | ||||
|---|---|---|---|---|
| Mount | Capacity (Belt) | Fire rate | Vertical | Horizontal |
| Coaxial | 3,600 (225) | 600 | N/A | N/A |
The small calibre of the BESA machine gun makes it largely ineffective against all armoured vehicles but the ones with an open compartment. It still can be used to ping targets as a rangefinding help or to mow down minor obstacles blocking your line of sight.
Usage in battles
- Arcade Battles
In Arcade Battles, it is recommended to take mostly APDS shells, because the gameplay is much more reactive and it's more important to penetrate an enemy vehicle wherever you hit - because you don't have time to aim, or the enemies are very fast-moving due to increased horsepower.
In terms of game strategies, the Caernarvon is very versatile (almost MBT-like). You can get into sniping positions and rain shells on all enemies that enter your line of sight (or target the more armoured vehicles such as the Ferdinand and the Ho-Ri Production, which are impenetrable to many tanks around 6.7); you can also serve as a breakthrough tank, not because of armour, but because of speed and the stabilizer which allows you to shoot on the move at enemies that dare block your path; or, you can flank, although that role is often taken by much faster vehicles such as Ru 251, BMP-1 and R3.
To succeed in Arcade, you must learn to use your advantages, most notably the stabilizer and the APDS round. For example, whenever you are in a stand-off with a non-stabilized tank - get into cover, and when they try to drive out to hold your angle, you can also drive out and shoot them, because your gun will be ready to fire faster than theirs, even though they started driving out of cover before you.
- Realistic Battles
In Realistic Battles, most players prefer to take out the solid shot, because it has the potential to damage many more components while maintaining decent penetration values. However, you should take your time to aim this shot, because it will not penetrate some tougher enemies (e.g. Ferdinand, Ho-Ri Production, or IS-3/IS-4), or take some APDS rounds with you.
When playing the Caernarvon in Realistic Battles, try to play a supportive role. You don't know where the enemies are, and your armour will not save you from an ambush, so rely on your teammates to lead the way. Here, the sniping strategy is much more viable, because your round velocities are very high, making aiming over 1 km much easier, moreover 10 degrees of depression allow you to play in hilly areas and take pot shots at unsuspecting enemies (especially the Soviet tanks, who lack gun depression). You can still push forward with your team because your stabilizer still allows you to take much more accurate reactive shots (or when on the move).
To succeed in Realistic, you must use cover and let your teammates take the shots. Usually, you will be able to return fire to avenge a teammate, and most of the time you get the kill, due to easy gun handling.
Pros and cons
Pros:
- The Caernarvon is like a beefed up Centurion Mk 3
- Same armament as the Centurion Mk 3, has a very good stock round and access to APDS, no learning curve
- Upper front plate is extremely strong - it has 127 mm thickness at a 60° angle
- Hull roof and most of the turret roof is 51 mm thick, so it will sustain heavy tank HE
- Gun reloads a bit faster than enemies with the same calibre
- Fast turret and hull traverse
- Good acceleration
- Brake system is very responsive
- Access to gun stabilizer
- Extremely strong gun mantlet
- Armour profile on the turret face is inconsistent - enemies think twice before firing
Cons:
- Although it is designated as a heavy tank, the Centurion turret sabotages its armour and it will be destroyed almost on autopilot by anyone familiar with the Centurion weakspots (almost everybody at this point)
- Lower glacis is still a weak spot, roof still can be breached by artillery tanks
- Large ammo rack behind LFP (can be removed by bringing less than 34 shells)
- APDS shot has little post-penetrative spalling
- No explosive filler in any regular shells
- Weak side armour, should not be exposed in any way when engaging an enemy
- Top armour covering the engine is still only 8 mm
- HEATFS shells can often easily penetrate the armour, even from the front
History
Development
In 1944, General Staff started a project called A45 Infantry Support Tank, which started around the same time as the development of the A41 Centurion cruiser tank. This project, after the war, was redesignated from a typical "Infantry Tank" and instead focused on a new role of a "Universal Tank" design in the form of the FV 200 series. The "Universal Tank" concept was to design a vehicle that would have a mobility comparable to that of cruiser tanks, but with the armour and firepower of heavy tanks. The FV 200 series designation was adopted and was to serve as a line of vehicles that used the same hull and chassis in different roles like armour recovery vehicles and self-propelled guns. The first tank of this series was to be the FV 201, which would be 55 tons and had the 20-pounder gun.
In 1949, a new requirement for the project called for the use of a 120 mm gun, possibly in response to the reveal of the Soviet IS-3 heavy tank in the Berlin Victory Parade in 1945. This new requirement would delay the initial deadlines for the tank as no gun of that calibre had been developed yet. As a interim development before such a gun could be made, the FV 201 hull was mounted with a turret from a Centurion Mk.2, which had a 17-pounder gun. This Centurion turret mated FV 201 tank was designated the FV 221 Caernavon, with a Mark I for the 17-pounder. The later combination of the Centurion Mk 3 turret instead of the Mk.2 upped the armament of the tank to the more powerful 20-pounder gun, this version named the Mark II. About 21 units of the Caernarvon Mark II was made in this method.
Successor
The Caernarvon, powerful as it was at the time period, was intended to fulfill the role of the new "Main Battle Tank" concept in the FV 200 series. However, the success of the lighter Centurion cruiser tank made it apparent that the Centurion was more capable in that role than the heavier and less mobile Caernarvon. Thus, this role was not given to the Caernarvon and its design was used instead for further chassis development for future tank development. In 1955, the basis of the Caernarvon was built into the first Conqueror tank. Several Caernarvon Mk.II's were rebuilt into Conqueror Mk. 2 standards in between 1958 and 1959.
Media
- Skins
- Videos
See also
- Vehicles equipped with the same chassis
- Other vehicles of similar configuration and role
External links
| Britain heavy tanks | |
|---|---|
| Matilda | Matilda III · Matilda Hedgehog |
| Churchill | Churchill I · Churchill III · Churchill VII · Churchill Crocodile · Churchill NA75 · Black Prince |
| Post-war | Caernarvon · Conqueror |
| Other | Independent · Excelsior · TOG II |
