Difference between revisions of "AMX-13 DCA 40"
m (→See also) (Tag: Visual edit) |
|||
| (43 intermediate revisions by 12 users not shown) | |||
| Line 1: | Line 1: | ||
| − | {{Specs-Card|code=fr_amx_13_dca_40}} | + | {{About |
| + | | about = French SPAA '''{{PAGENAME}}''' | ||
| + | | usage = other versions | ||
| + | | link = AMX-13 (Family) | ||
| + | }} | ||
| + | {{Specs-Card | ||
| + | |code=fr_amx_13_dca_40 | ||
| + | |images={{Specs-Card-Image|GarageImage_{{PAGENAME}}.jpg}} | ||
| + | }} | ||
== Description == | == Description == | ||
| − | ''In the description, the first part | + | <!--''In the description, the first part should be about the history of the creation and combat usage of the vehicle, as well as its key features. In the second part, tell the reader about the ground vehicle in the game. Insert a screenshot of the vehicle, so that if the novice player does not remember the vehicle by name, he will immediately understand what kind of vehicle the article is talking about.''--> |
| + | The '''AMX-13 Défense Contre Avions (DCA) canon de 40 mm''' is the fourth variant of the [[AMX-13 (Family)|AMX-13 light tank family]]. Due to a scarcity of self-propelled anti-air (SPAA) vehicles in France following World War II, attempts were undertaken in the 1950s to repurpose existing tank chassis for anti-air tasks. The main weapon of the prototype is a 40 mm Mle51 T1 cannon based on the 40 mm Bofors L/70 cannon. The resulting vehicle is called the AMX-13 Défense Contre Avions (DCA) canon de 40 mm, and it is comprised of an [[AMX-13|AMX-13/75 FL10]] chassis with a rear-mounted armoured SAMM S-980 turret that allows firing at 90° elevation. With its sloped sides and full 360° traverse, the turret provided adequate overall protection. | ||
| + | |||
| + | Introduced in [[Update 1.75 "La Résistance"]], the AMX-13 DCA canon de 40 mm is extremely versatile, as it can effectively execute both anti-air and anti-tank duties. It possesses an autocannon with a decent firing rate and accuracy that can easily knock down enemy aircraft. This, combined with the deadly firepower it has access to, makes it an extremely dangerous vehicle. Furthermore, its mobility can be used to flank across the battlefields and engage poorly armoured vehicles in the enemy team early in the battle. Its interchangeable ammunition belts enable this vehicle to quickly convert between different types of ammunition. This vehicle is a tremendous beast in the right hands, easily capable of destroying many tanks in battle. | ||
== General info == | == General info == | ||
=== Survivability and armour === | === Survivability and armour === | ||
| − | ''Describe armour protection. Note the most well protected and key weak areas. Appreciate the layout of modules as well as the number and location of crew members. Is the level of armour protection sufficient, is the placement of modules | + | {{Specs-Tank-Armour}} |
| + | <!-- ''Describe armour protection. Note the most well protected and key weak areas. Appreciate the layout of modules as well as the number and location of crew members. Is the level of armour protection sufficient, is the placement of modules helpful for survival in combat? If necessary use a visual template to indicate the most secure and weak zones of the armour.'' --> | ||
| + | |||
| + | This tank has 20 mm of armour, all around, barely angled but for the UFP, this won't protect it from antitank rounds nor from autocannon fire but it can certainly deflect poorly-aimed HMG bursts, but not for too long. If taking too long bursts (or if the enemy gets too close), some bullets may find their way through the two ''large holes'' in the turret front, near the gun area (there is also two smaller holes in the turret's back). In sum, this tank's armour is not to be trusted, but it will save you from stray bullets and medium to long range MG/HMG fire. | ||
| + | |||
| + | {| class="wikitable" | ||
| + | |- | ||
| + | ! Armour !! Front (Slope angle) !! Sides !! Rear !! Roof | ||
| + | |- | ||
| + | | Hull || 20 mm (66°) ''Upper Glacis''<br> 40 mm (cylindrical) ''Transmission housing'' <br> 20 mm (51°) ''Lower Glacis'' || 20 mm ''Sides'' <br> 20 mm (13-15°) ''Turret base'' || 15 mm ''upper plate'' <br> 15 mm (58°) ''Lower glacis'' || 20 mm (24°) ''Front glacis'' <br> 10 mm ''Centre and rear''<br> 5mm ''Vents'' | ||
| + | |- | ||
| + | | Turret || 20 mm (24-54°) ''Gun shield'' || 20 mm (14-15°) || 20 mm (conical) ''Top'' <br> 20 mm (cylindrical) ''Bottom'' || N/A | ||
| + | |- | ||
| + | |} | ||
| + | '''Notes:'''<br> | ||
| + | ''Turret:'' | ||
| + | |||
| + | * Turret frontal armour is split in two for gun clearance. | ||
| + | * Round hole below gun hole in front of the turret. | ||
| + | * Two small holes in the turret's back armour | ||
| + | * Turret ring is 30 mm thick. | ||
| + | * Gun breech is 150 mm thick. | ||
| + | * Turret basket is 5 mm thick. | ||
| + | |||
| + | ''Hull:'' | ||
| − | + | * Suspension wheels and tracks are 15 mm thick. | |
| + | * Storage boxes are 4 mm thick. | ||
=== Mobility === | === Mobility === | ||
| − | ''Write about the mobility of the ground vehicle. Estimate the specific power and | + | {{Specs-Tank-Mobility}} |
| + | <!-- ''Write about the mobility of the ground vehicle. Estimate the specific power and manoeuvrability, as well as the maximum speed forwards and backwards.'' --> | ||
| + | |||
| + | {{tankMobility|abMinHp= 302|rbMinHp= 239}} | ||
| + | |||
| + | French ground forces players should be used to the AMX-13 chassis as it is the basis for most French light tanks. With its turret being a little bit heavier and its engine 31 hp less powerful, this tank is slower than the usual [[AMX-13]]. It can still carry its user wherever it wants, as long as the situation does not require fast escape manoeuvres: with only -6 km/h backwards, it is difficult to quickly get out of an unwanted situation. | ||
| + | |||
| + | === Modifications and economy === | ||
| + | {{Specs-Economy}} | ||
== Armaments == | == Armaments == | ||
| + | {{Specs-Tank-Armaments}} | ||
=== Main armament === | === Main armament === | ||
| − | ''Give the reader information about the characteristics of the main gun. Assess its effectiveness in a battle based on the reloading speed, ballistics and the power of shells. Do not forget about the | + | {{Specs-Tank-Weapon|1}} |
| + | <!-- ''Give the reader information about the characteristics of the main gun. Assess its effectiveness in a battle based on the reloading speed, ballistics and the power of shells. Do not forget about the flexibility of the fire, that is how quickly the cannon can be aimed at the target, open fire on it and aim at another enemy. Add a link to the main article on the gun: <code><nowiki>{{main|Name of the weapon}}</nowiki></code>. Describe in general terms the ammunition available for the main gun. Give advice on how to use them and how to fill the ammunition storage.'' --> | ||
| + | {{main|Mle51 T1 (40 mm)}} | ||
| + | |||
| + | {| class="wikitable" style="text-align:center" width="100%" | ||
| + | |- | ||
| + | ! colspan="6" | [[Mle51 T1 (40 mm)|40 mm Mle51 T1]] || colspan="5" | Turret rotation speed (°/s) || Reloading rate (seconds) | ||
| + | |- | ||
| + | ! Mode !! Capacity (Belt) !! Fire rate !! Vertical !! Horizontal !! Stabilizer | ||
| + | ! Stock !! Upgraded !! Full !! Expert !! Aced | ||
| + | ! Autoloader | ||
| + | |- | ||
| + | ! ''Arcade'' | ||
| + | | rowspan="2" | 404 (4) || rowspan="2" | 240 || rowspan="2" | -5°/+85° || rowspan="2" | ±180° || rowspan="2" | - || 79.2 || 109.7 || 133.2 || 147.3 || 156.7 || rowspan="2" | 0.50 | ||
| + | |- | ||
| + | ! ''Realistic'' | ||
| + | | 53.5 || 63.0 || 76.5 || 84.6 || 90.0 | ||
| + | |- | ||
| + | |} | ||
| + | |||
| + | The gun is this vehicle's main appeal. Being twice as fast-firing as its predecessor makes it easier to get planes down, but you will still have to aim. As for engaging tanks, with up to 94 mm max penetration, you will start to struggle firing at most enemies since their frontal armour is strong enough to block incoming 40 mm rounds, though with some precision, medium tanks and even heavy tanks can fall victim to your gun. Lightly armoured tanks and SPAAs are easy targets with your 4-rounds bursts. | ||
| + | |||
| + | ==== Ammunition ==== | ||
| + | |||
| + | * '''Default:''' {{Annotation|AP-T|Armour-piercing tracer}}{{-}}{{Annotation|HEFI-T*|High-explosive fragmentation incendiary tracer (self-destroying)}} - The standard belt can fulfill both roles (anti-air and lightly armoured vehicles) but with a lower rate of fire. | ||
| + | * '''40 mm HE-T:''' {{Annotation|HEFI-T*|High-explosive fragmentation incendiary tracer (self-destroying)}}{{-}}{{Annotation|HEFI-T*|High-explosive fragmentation incendiary tracer (self-destroying)}}{{-}}{{Annotation|HEFI-T*|High-explosive fragmentation incendiary tracer (self-destroying)}}{{-}}{{Annotation|AP-T|Armour-piercing tracer}} - This belt is adapted for targeting aircraft with its high-explosive shells. | ||
| + | * '''40 mm AP-T:''' {{Annotation|AP-T|Armour-piercing tracer}}{{-}}{{Annotation|AP-T|Armour-piercing tracer}}{{-}}{{Annotation|AP-T|Armour-piercing tracer}}{{-}}{{Annotation|HEFI-T*|High-explosive fragmentation incendiary tracer (self-destroying)}} - This belt is adapted for targeting lightly armoured vehicles with its armour-piercing rounds. | ||
| + | |||
| + | {{:Mle51 T1 (40 mm)/Ammunition|HEFI-T*, AP-T}} | ||
| + | |||
| + | ==== [[Ammo racks]] ==== | ||
| + | [[File:Ammoracks_{{PAGENAME}}.png|right|thumb|x250px|[[Ammo racks]] of the {{PAGENAME}}]] | ||
| + | <!-- '''Last updated: 1.101.1.33''' --> | ||
| + | {| class="wikitable" style="text-align:center" | ||
| + | |- | ||
| + | ! Full<br>ammo | ||
| + | ! 1st<br>rack empty | ||
| + | ! 2nd<br>rack empty | ||
| + | ! 3rd<br>rack empty | ||
| + | ! 4th<br>rack empty | ||
| + | ! 5th<br>rack empty | ||
| + | |- | ||
| + | | '''101''' || 93 ''(+8)'' || 85 ''(+16)'' || 77 ''(+24)'' || 61 ''(+40)'' || 41 ''(+60)'' | ||
| + | |- | ||
| + | ! 6th<br>rack empty | ||
| + | ! 7th<br>rack empty | ||
| + | ! 8th<br>rack empty | ||
| + | ! 9th<br>rack empty | ||
| + | ! Visual<br>discrepancy | ||
| + | ! | ||
| + | |- | ||
| + | | 25 ''(+76)'' || 17 ''(+84)''|| 9 ''(+92)'' || 1 ''(+100)'' || No | ||
| + | ! | ||
| + | |- | ||
| + | |} | ||
| + | '''Notes''': | ||
| + | |||
| + | * Ammunition is organized in clips of 4 rounds. | ||
| + | * Racks are subdivided in sets of 4 clips. | ||
| + | * Clips disappear when all clips in the set have been shot or loaded. | ||
| + | |||
| + | == Usage in battles == | ||
| + | <!-- ''Describe the tactics of playing in the vehicle, the features of using vehicles in the team and advice on tactics. Refrain from creating a "guide" - do not impose a single point of view but instead give the reader food for thought. Describe the most dangerous enemies and give recommendations on fighting them. If necessary, note the specifics of the game in different modes (AB, RB, SB).'' --> | ||
| + | This SPAA is quite versatile as it can take down both tanks and planes with mitigated efficiency. It has an autocannon that does not fire fast enough to engage planes efficiently, nor does it penetrate enough to shred tanks. As it is, this SPAA is good for front-line use: providing cover for incoming ground attackers to its allies while also securing flanks from fast-movers. | ||
| + | |||
| + | Good at engaging both tanks and planes, its versatile belts allow this vehicle to switch roles in a split second. In the right hands, in a downtier, this SPAA is an absolute monster, easily capable of ace matches against tanks. | ||
| + | |||
| + | '''SPAA use:''' | ||
| + | |||
| + | It is easier to aim at targets coming towards you: stay with your team and fire when the plane is ~500 m away: an hitting round will shred it in no time. Any other SPAA tactics apply normally to this vehicle. | ||
| + | |||
| + | '''Front-line use:''' | ||
| + | |||
| + | Do not engage tanks frontally: prefer lateral engagements, to surprise your foes. If it happens that the enemy team is composed of medium/light tanks, there is a great chance that you can knock some of them out, but be sure to have an escape route as any tank noticing you counters those flanking manoeuvres. Heavy tanks at this BR are usually very hard to get trough, even from the side, engage at your own risk. | ||
| + | |||
| + | Even though your gun has SPAA - Level Penetration, It can go through pretty much any tank side that it faces. Even the Tiger II. And it's from this that the DCA 40 gets it's charm tactic: | ||
| + | |||
| + | # Take out the gun | ||
| + | # Take out the track | ||
| + | # Take out the machine gun | ||
| + | # Take out the tank | ||
| + | |||
| + | Knowing this, you can win battles against Panthers, Tigers (I and II), and many tanks you might find in an uptier at medium range, even when taking this tank into a higher tier than it could face. | ||
| + | |||
| + | Taking out the gun is fairly easy, your centre-mounted Bofors just needs to be aimed at the gun, and can take it out with 2 or 3 shots. | ||
| − | + | Once you've taken out the gun, go for the track or transmission. doing this will render any tank immobile for at least 20 seconds, which is more than enough. | |
| − | ' | ||
| − | + | 93 mm of penetration can go through almost any tank's side armour and rear armour in the game. Except for the Maus, of course, your gun can shred enemy tanks from the side. | |
| − | ' | ||
| − | + | It's worth mentioning that in a downtier against axis powers, you can penetrate every vehicle you see from the front except for some German casemates. In an uptier, if you must engage a heavily-armoured tank from the front, several well-placed shots to the cannon barrel will knock it out, and enable you to flank at your leisure and feast on their side armour. A more conservative way to play is to stay a few metres behind the front-line and spot flanking tanks while also watching the skies. | |
| − | ' | ||
=== Pros and cons === | === Pros and cons === | ||
| − | '' | + | <!-- ''Summarise and briefly evaluate the vehicle in terms of its characteristics and combat effectiveness. Mark its pros and cons in a bulleted list. Try not to use more than 6 points for each of the characteristics. Avoid using categorical definitions such as "bad", "good" and the like - use substitutions with softer forms such as "inadequate" and "effective".'' --> |
| + | '''Pros:''' | ||
| − | + | * Good top speed, and decent agility | |
| − | * | + | * Fast reload (unnoticeable reload) |
| + | * Fires twice as fast as its predecessor (240 rpm) | ||
| + | * Shells have a higher velocity compared to the standard Bofors 40 mm, making it easier to find hits | ||
| + | * Shells have amazing penetration | ||
| + | * Fast elevation speed | ||
| + | * +85° elevation angle | ||
| + | * UFP sloped at 67° may bounce some shots | ||
| + | * 5 mm thick turret basket act as leg protection for the crew (from HMG fire) | ||
| + | * Often knocks out planes with a single shot | ||
| + | * Each belt has both HE-T and AP-T ammo inside (great for multipurpose roles) | ||
| + | * Decent reverse speed | ||
| + | * Gun is hard to overheat | ||
| + | * If only loading approximately 50% ammo, shots to the right side of the turret will knock out one crew member and do no other damage | ||
| + | * Tons of ammo | ||
'''Cons:''' | '''Cons:''' | ||
| − | |||
| − | == | + | * Turret is literally an ammo rack |
| − | ''Describe the history of the creation and combat usage of the | + | * Bad gun depression |
| + | * Loader is exposed to MG fire | ||
| + | * Struggles to reach its top speed | ||
| + | * Vulnerable to HMG fire | ||
| + | * Most enemies that it faces are no longer vulnerable to side shots | ||
| + | * Turret prone to ammo-racking from strafing planes | ||
| + | |||
| + | == History == | ||
| + | <!-- ''Describe the history of the creation and combat usage of the vehicle in more detail than in the introduction. If the historical reference turns out to be too long, take it to a separate article, taking a link to the article about the vehicle and adding a block "/History" (example: <nowiki>https://wiki.warthunder.com/(Vehicle-name)/History</nowiki>) and add a link to it here using the <code>main</code> template. Be sure to reference text and sources by using <code><nowiki><ref></ref></nowiki></code>, as well as adding them at the end of the article with <code><nowiki><references /></nowiki></code>. This section may also include the vehicle's dev blog entry (if applicable) and the in-game encyclopedia description (under <code><nowiki>=== In-game description ===</nowiki></code>, also if applicable).'' --> | ||
| + | {{main|AMX-13#History|l1=History of the AMX-13}} | ||
| + | |||
| + | ===Design=== | ||
| + | The need for a SPAAG emerged in the 1950s for the French Army when the only AA vehicles left over from WW2 (M16 half-tracks mainly) became underpowered and thus obsolete. Several projects were launched using Bofors guns. Among them was the AMX-13 DCA canon de 40 mm using the hull of the AMX-13 on which was installed a specially designed SAMM S 980 turret housing the 40 mm Bofors L/70 gun. The turret offered good protection for the crew, 360° traverse and a 90° elevation angle. The Mle51 T1 gun fired 240 rounds per minute at 993 m/s. | ||
| + | |||
| + | ===Development=== | ||
| + | The development of the SAMM S 980 turret was stopped in 1957 and the Bofors gun production stopped in 1958. The experience gathered from similar single-gun SPAAG projects put the stress on numerous shortcomings when compared to twin-gun designs. | ||
| + | |||
| + | ===Combat usage=== | ||
| + | The {{PAGENAME}} never saw service or combat action in the French Army. | ||
== Media == | == Media == | ||
| − | '' | + | <!-- ''Excellent additions to the article would be video guides, screenshots from the game, and photos.'' --> |
| − | == | + | ;Skins |
| − | ''Links to the articles on the War Thunder Wiki that you think will be useful for the reader, for example | + | |
| + | * [https://live.warthunder.com/feed/camouflages/?vehicle=fr_amx_13_dca_40 Skins and camouflages for the {{PAGENAME}} from live.warthunder.com.] | ||
| + | |||
| + | ;Videos | ||
| + | {{Youtube-gallery|PosWOnOGkSo|'''Best experimental vehicles''' discusses the {{PAGENAME}} at 7:28 - ''War Thunder Official Channel''}} | ||
| + | |||
| + | == See also == | ||
| + | <!-- ''Links to the articles on the War Thunder Wiki that you think will be useful for the reader, for example:'' | ||
* ''reference to the series of the vehicles;'' | * ''reference to the series of the vehicles;'' | ||
| − | * ''links to approximate analogues of other nations and research trees.'' | + | * ''links to approximate analogues of other nations and research trees.'' --> |
| − | + | ||
| + | ;Vehicles equipped with the same chassis | ||
| + | |||
| + | * [[AMX-13 (Family)]] | ||
| − | == | + | ;Other vehicles of similar configuration and role |
| − | ''Paste links to sources and external resources, such as:'' | + | |
| + | * [[Lvkv 42]] | ||
| + | * [[ZSU-37]] | ||
| + | * [[LVT-4/40]] | ||
| + | * [[Crusader AA Mk I]] | ||
| + | * [[Ostwind]] | ||
| + | |||
| + | == External links == | ||
| + | <!-- ''Paste links to sources and external resources, such as:'' | ||
* ''topic on the official game forum;'' | * ''topic on the official game forum;'' | ||
| − | * '' | + | * ''other literature.'' --> |
| − | * | + | |
| + | * [[wt:en/news/5269-vehicle-amx-13-dca-40-anti-air-tank-en|[Vehicle] {{PAGENAME}}: Anti-Air Tank]] | ||
| + | * [[wikipedia:AMX-13|[Wikipedia] AMX-13]] | ||
| + | * [https://tanks-encyclopedia.com/coldwar/France/AMX-13-DCA.php <nowiki>[Tanks Encyclopedia]</nowiki> AMX-13 DCA] | ||
| + | |||
| + | {{TankManufacturer AMX}} | ||
| + | {{France anti-aircraft vehicles}} | ||
Latest revision as of 15:09, 9 November 2023
| This page is about the French SPAA AMX-13 DCA 40. For other versions, see AMX-13 (Family). |

Contents
Description
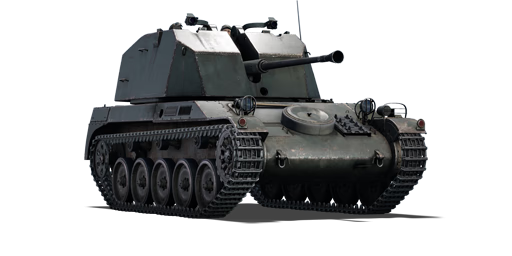
The AMX-13 Défense Contre Avions (DCA) canon de 40 mm is the fourth variant of the AMX-13 light tank family. Due to a scarcity of self-propelled anti-air (SPAA) vehicles in France following World War II, attempts were undertaken in the 1950s to repurpose existing tank chassis for anti-air tasks. The main weapon of the prototype is a 40 mm Mle51 T1 cannon based on the 40 mm Bofors L/70 cannon. The resulting vehicle is called the AMX-13 Défense Contre Avions (DCA) canon de 40 mm, and it is comprised of an AMX-13/75 FL10 chassis with a rear-mounted armoured SAMM S-980 turret that allows firing at 90° elevation. With its sloped sides and full 360° traverse, the turret provided adequate overall protection.
Introduced in Update 1.75 "La Résistance", the AMX-13 DCA canon de 40 mm is extremely versatile, as it can effectively execute both anti-air and anti-tank duties. It possesses an autocannon with a decent firing rate and accuracy that can easily knock down enemy aircraft. This, combined with the deadly firepower it has access to, makes it an extremely dangerous vehicle. Furthermore, its mobility can be used to flank across the battlefields and engage poorly armoured vehicles in the enemy team early in the battle. Its interchangeable ammunition belts enable this vehicle to quickly convert between different types of ammunition. This vehicle is a tremendous beast in the right hands, easily capable of destroying many tanks in battle.
General info
Survivability and armour
This tank has 20 mm of armour, all around, barely angled but for the UFP, this won't protect it from antitank rounds nor from autocannon fire but it can certainly deflect poorly-aimed HMG bursts, but not for too long. If taking too long bursts (or if the enemy gets too close), some bullets may find their way through the two large holes in the turret front, near the gun area (there is also two smaller holes in the turret's back). In sum, this tank's armour is not to be trusted, but it will save you from stray bullets and medium to long range MG/HMG fire.
| Armour | Front (Slope angle) | Sides | Rear | Roof |
|---|---|---|---|---|
| Hull | 20 mm (66°) Upper Glacis 40 mm (cylindrical) Transmission housing 20 mm (51°) Lower Glacis |
20 mm Sides 20 mm (13-15°) Turret base |
15 mm upper plate 15 mm (58°) Lower glacis |
20 mm (24°) Front glacis 10 mm Centre and rear 5mm Vents |
| Turret | 20 mm (24-54°) Gun shield | 20 mm (14-15°) | 20 mm (conical) Top 20 mm (cylindrical) Bottom |
N/A |
Notes:
Turret:
- Turret frontal armour is split in two for gun clearance.
- Round hole below gun hole in front of the turret.
- Two small holes in the turret's back armour
- Turret ring is 30 mm thick.
- Gun breech is 150 mm thick.
- Turret basket is 5 mm thick.
Hull:
- Suspension wheels and tracks are 15 mm thick.
- Storage boxes are 4 mm thick.
Mobility
| Game Mode | Max Speed (km/h) | Weight (tons) | Engine power (horsepower) | Power-to-weight ratio (hp/ton) | |||
|---|---|---|---|---|---|---|---|
| Forward | Reverse | Stock | Upgraded | Stock | Upgraded | ||
| Arcade | 66 | 8 | 14.5 | 302 | 515 | 20.83 | 35.52 |
| Realistic | 61 | 7 | 239 | 270 | 16.48 | 18.62 | |
French ground forces players should be used to the AMX-13 chassis as it is the basis for most French light tanks. With its turret being a little bit heavier and its engine 31 hp less powerful, this tank is slower than the usual AMX-13. It can still carry its user wherever it wants, as long as the situation does not require fast escape manoeuvres: with only -6 km/h backwards, it is difficult to quickly get out of an unwanted situation.
Modifications and economy
| Mobility | Protection | Firepower | ||||||||||||||||||||
|---|---|---|---|---|---|---|---|---|---|---|---|---|---|---|---|---|---|---|---|---|---|---|
|
|
|
Armaments
Main armament
| 40 mm Mle51 T1 | Turret rotation speed (°/s) | Reloading rate (seconds) | |||||||||
|---|---|---|---|---|---|---|---|---|---|---|---|
| Mode | Capacity (Belt) | Fire rate | Vertical | Horizontal | Stabilizer | Stock | Upgraded | Full | Expert | Aced | Autoloader |
| Arcade | 404 (4) | 240 | -5°/+85° | ±180° | - | 79.2 | 109.7 | 133.2 | 147.3 | 156.7 | 0.50 |
| Realistic | 53.5 | 63.0 | 76.5 | 84.6 | 90.0 | ||||||
The gun is this vehicle's main appeal. Being twice as fast-firing as its predecessor makes it easier to get planes down, but you will still have to aim. As for engaging tanks, with up to 94 mm max penetration, you will start to struggle firing at most enemies since their frontal armour is strong enough to block incoming 40 mm rounds, though with some precision, medium tanks and even heavy tanks can fall victim to your gun. Lightly armoured tanks and SPAAs are easy targets with your 4-rounds bursts.
Ammunition
- Default: AP-T · HEFI-T* - The standard belt can fulfill both roles (anti-air and lightly armoured vehicles) but with a lower rate of fire.
- 40 mm HE-T: HEFI-T* · HEFI-T* · HEFI-T* · AP-T - This belt is adapted for targeting aircraft with its high-explosive shells.
- 40 mm AP-T: AP-T · AP-T · AP-T · HEFI-T* - This belt is adapted for targeting lightly armoured vehicles with its armour-piercing rounds.
| Penetration statistics | |||||||
|---|---|---|---|---|---|---|---|
| Ammunition | Penetration @ 0° Angle of Attack (mm) | ||||||
| 10 m | 100 m | 500 m | 1,000 m | 1,500 m | 2,000 m | ||
| HEFI-T* | 12 | 11 | 10 | 8 | 6 | 5 | |
| AP-T | 94 | 90 | 77 | 62 | 50 | 41 | |
| Shell details | ||||||||||||
|---|---|---|---|---|---|---|---|---|---|---|---|---|
| Ammunition | Velocity (m/s) |
Projectile mass (kg) |
Fuse delay (m) |
Fuse sensitivity (mm) |
Explosive mass (TNT equivalent) (g) |
Ricochet | ||||||
| 0% | 50% | 100% | ||||||||||
| HEFI-T* | 1,005 | 0.96 | 0.1 | 0.1 | 145 | 79° | 80° | 81° | ||||
| AP-T | 1,025 | 0.93 | - | - | - | 47° | 60° | 65° | ||||
Ammo racks

| Full ammo |
1st rack empty |
2nd rack empty |
3rd rack empty |
4th rack empty |
5th rack empty |
|---|---|---|---|---|---|
| 101 | 93 (+8) | 85 (+16) | 77 (+24) | 61 (+40) | 41 (+60) |
| 6th rack empty |
7th rack empty |
8th rack empty |
9th rack empty |
Visual discrepancy |
|
| 25 (+76) | 17 (+84) | 9 (+92) | 1 (+100) | No |
Notes:
- Ammunition is organized in clips of 4 rounds.
- Racks are subdivided in sets of 4 clips.
- Clips disappear when all clips in the set have been shot or loaded.
Usage in battles
This SPAA is quite versatile as it can take down both tanks and planes with mitigated efficiency. It has an autocannon that does not fire fast enough to engage planes efficiently, nor does it penetrate enough to shred tanks. As it is, this SPAA is good for front-line use: providing cover for incoming ground attackers to its allies while also securing flanks from fast-movers.
Good at engaging both tanks and planes, its versatile belts allow this vehicle to switch roles in a split second. In the right hands, in a downtier, this SPAA is an absolute monster, easily capable of ace matches against tanks.
SPAA use:
It is easier to aim at targets coming towards you: stay with your team and fire when the plane is ~500 m away: an hitting round will shred it in no time. Any other SPAA tactics apply normally to this vehicle.
Front-line use:
Do not engage tanks frontally: prefer lateral engagements, to surprise your foes. If it happens that the enemy team is composed of medium/light tanks, there is a great chance that you can knock some of them out, but be sure to have an escape route as any tank noticing you counters those flanking manoeuvres. Heavy tanks at this BR are usually very hard to get trough, even from the side, engage at your own risk.
Even though your gun has SPAA - Level Penetration, It can go through pretty much any tank side that it faces. Even the Tiger II. And it's from this that the DCA 40 gets it's charm tactic:
- Take out the gun
- Take out the track
- Take out the machine gun
- Take out the tank
Knowing this, you can win battles against Panthers, Tigers (I and II), and many tanks you might find in an uptier at medium range, even when taking this tank into a higher tier than it could face.
Taking out the gun is fairly easy, your centre-mounted Bofors just needs to be aimed at the gun, and can take it out with 2 or 3 shots.
Once you've taken out the gun, go for the track or transmission. doing this will render any tank immobile for at least 20 seconds, which is more than enough.
93 mm of penetration can go through almost any tank's side armour and rear armour in the game. Except for the Maus, of course, your gun can shred enemy tanks from the side.
It's worth mentioning that in a downtier against axis powers, you can penetrate every vehicle you see from the front except for some German casemates. In an uptier, if you must engage a heavily-armoured tank from the front, several well-placed shots to the cannon barrel will knock it out, and enable you to flank at your leisure and feast on their side armour. A more conservative way to play is to stay a few metres behind the front-line and spot flanking tanks while also watching the skies.
Pros and cons
Pros:
- Good top speed, and decent agility
- Fast reload (unnoticeable reload)
- Fires twice as fast as its predecessor (240 rpm)
- Shells have a higher velocity compared to the standard Bofors 40 mm, making it easier to find hits
- Shells have amazing penetration
- Fast elevation speed
- +85° elevation angle
- UFP sloped at 67° may bounce some shots
- 5 mm thick turret basket act as leg protection for the crew (from HMG fire)
- Often knocks out planes with a single shot
- Each belt has both HE-T and AP-T ammo inside (great for multipurpose roles)
- Decent reverse speed
- Gun is hard to overheat
- If only loading approximately 50% ammo, shots to the right side of the turret will knock out one crew member and do no other damage
- Tons of ammo
Cons:
- Turret is literally an ammo rack
- Bad gun depression
- Loader is exposed to MG fire
- Struggles to reach its top speed
- Vulnerable to HMG fire
- Most enemies that it faces are no longer vulnerable to side shots
- Turret prone to ammo-racking from strafing planes
History
Design
The need for a SPAAG emerged in the 1950s for the French Army when the only AA vehicles left over from WW2 (M16 half-tracks mainly) became underpowered and thus obsolete. Several projects were launched using Bofors guns. Among them was the AMX-13 DCA canon de 40 mm using the hull of the AMX-13 on which was installed a specially designed SAMM S 980 turret housing the 40 mm Bofors L/70 gun. The turret offered good protection for the crew, 360° traverse and a 90° elevation angle. The Mle51 T1 gun fired 240 rounds per minute at 993 m/s.
Development
The development of the SAMM S 980 turret was stopped in 1957 and the Bofors gun production stopped in 1958. The experience gathered from similar single-gun SPAAG projects put the stress on numerous shortcomings when compared to twin-gun designs.
Combat usage
The AMX-13 DCA 40 never saw service or combat action in the French Army.
Media
- Skins
- Videos
See also
- Vehicles equipped with the same chassis
- Other vehicles of similar configuration and role
External links
| Ateliers de construction d'Issy-les-Moulineaux (AMX) | |
|---|---|
| Light tanks | |
| AMX-13 | AMX-13-M24 · AMX-13 (FL11) · AMX-13 · AMX-13 (SS.11) · AMX-13-90 · AMX-13 (HOT) |
| Armoured cars | AMX-10RC |
| Medium tanks | AMX M4 · AMX-50 (TOA100) |
| MBTs | |
| AMX-30 | AMX-30 · AMX-30 ACRA · AMX-30 (1972) · AMX-30B2 · AMX-30B2 BRENUS · AMX-30 Super |
| AMX-32/40 | AMX-32 (105) · AMX-32 · AMX-40 |
| Heavy tanks | AMX-50 Surbaissé · AMX-50 Surblindé |
| Tank destroyers | ELC bis · AMX-50 Foch |
| SPAAGs | AMX-13 DCA 40 · AMX-30 DCA |
| Export | AMX-13 |
| France anti-aircraft vehicles | |
|---|---|
| Wheeled/Half-tracked | P.7.T AA · CCKW 353 AA · TPK 6.41 |
| AMX-13 Derivatives | VTT DCA · AMX-13 DCA 40 |
| Radar SPAAG | AMX-30 DCA |
| Missile SPAA | SANTAL · Roland 1 · ▄ItO 90M |
| Other | AMX-10P |
