Difference between revisions of "Tiger II (10.5 cm Kw.K)"
(→Main armament: Updated) |
NoodleCup31 (talk | contribs) (Armor description, removed outdated points on the pros and cons) (Tag: Visual edit) |
||
| (41 intermediate revisions by 17 users not shown) | |||
| Line 1: | Line 1: | ||
| − | {{ | + | {{Relevance|br}} |
| − | + | {{Specs-Card|code=germ_pzkpfw_VI_ausf_b_tiger_IIh_kwk46}} | |
| − | |||
| − | | | ||
| − | }} | ||
| − | {{Specs-Card | ||
| − | |code=germ_pzkpfw_VI_ausf_b_tiger_IIh_kwk46 | ||
| − | |||
| − | }} | ||
== Description == | == Description == | ||
| − | <!-- ''In the description, the first part | + | <!--''In the description, the first part needs to be about the history of the creation and combat usage of the vehicle, as well as its key features. In the second part, tell the reader about the ground vehicle in the game. Insert the screenshot of the vehicle. If the novice player does not remember the vehicle by name, they will immediately understand what kind of vehicle it is talking about.''--> |
| − | + | [[File:GarageImage_{{PAGENAME}}.jpg|420px|thumb|left]] | |
| − | The '''{{Specs|name}}''' ( | + | {{break}} |
| + | The '''{{Specs|name}}''' (or just '''{{Specs|pseudonym}}''') is a Rank {{Specs|rank}} German heavy tank {{Battle-rating|5}}. It was introduced in during the Closed Beta Test for Ground Forces before Update 1.41. Increasing Tiger II's main cannon to a whopping [[KwK L/68 (105 mm)|10.5 cm cannon]], the Tiger II boasts a much more powerful armament than any of the preceding Tiger II tanks. | ||
== General info == | == General info == | ||
=== Survivability and armour === | === Survivability and armour === | ||
| − | |||
| − | |||
| − | |||
| − | '''Armour type:''' | + | * The armour on this variant is the same as on the regular Tiger II (H). The upper front plate provides excellent protection against any regular AP (APCBC, APHE etc.) shell you might face. The turret however is only 185mm and easily penetrated by most enemys, but you can make it very difficult to hit by "wiggling" the turret left and right which will often result in bounces or non-pens. The lower glacis is a weakspot but the transmission right behind it often takes most of the shrapnel, it can catch fire pretty easily though, meaning researching FPE should be done as soon as possible. |
| + | |||
| + | '''Armour type:''' | ||
*Rolled homogeneous armour | *Rolled homogeneous armour | ||
| − | *Cast homogeneous armour (Gun mantlet, Cupola, driver MG port) | + | *Cast homogeneous armour (Gun mantlet, Cupola, driver MG port) |
{| class="wikitable" | {| class="wikitable" | ||
| Line 33: | Line 26: | ||
| Turret || 185 mm (8°) ''Turret front'' <br> 200 mm ''Gun mantlet'' || 80 mm (19-21°) || 80 mm (20°) || 40 mm | | Turret || 185 mm (8°) ''Turret front'' <br> 200 mm ''Gun mantlet'' || 80 mm (19-21°) || 80 mm (20°) || 40 mm | ||
|- | |- | ||
| − | ! Armour !! Sides !! Roof | + | ! Armour !! Sides !! Roof |
|- | |- | ||
| Cupola || 150 mm || 150 mm | | Cupola || 150 mm || 150 mm | ||
| Line 41: | Line 34: | ||
* Suspension wheels are 20 mm thick while tracks are 30 mm thick. | * Suspension wheels are 20 mm thick while tracks are 30 mm thick. | ||
| − | * Some part of the turret side have track links on them, which gives an additional 30 mm of protection to the | + | * Some part of the turret side have track links on them, which gives an additional 30 mm of protection to the armor. |
| − | * The weak spot is the front of the turret (185 mm), but it is small and very difficult to hit at mid-long ranges, where it is also harder to penetrate. | + | * The weak spot is the front of the turret (185 mm), but it is small and very difficult to hit at mid-long ranges, where it is also harder to penetrate. |
| − | * Machine gun port could be marked as | + | * Machine gun port could be marked as close-range weak spot. Although most of it is still 150 mm thick, the angling is much worse. |
=== Mobility === | === Mobility === | ||
| − | + | <!--''Write about the mobility of the ground vehicle. Estimate the specific power and maneuverability as well as the maximum speed forward and backward.''--> | |
| − | <!-- ''Write about the mobility of the ground vehicle. Estimate the specific power and | + | {| class="wikitable" style="text-align:center" |
| − | + | |- | |
| − | + | ! colspan="3" | Mobility characteristic | |
| − | + | |- | |
| − | === | + | ! Weight (tons) |
| − | + | ! colspan="1" | Add-on Armor<br>weight (tons) | |
| + | ! colspan="1" | Max speed (km/h) | ||
| + | |- | ||
| + | | rowspan="2" | 70.5 || colspan="1" rowspan="2" | N/A || colspan="1" | 44 (AB) | ||
| + | |- | ||
| + | |42 (RB/SB) | ||
| + | |- | ||
| + | ! colspan="3" | Engine power (horsepower) | ||
| + | |- | ||
| + | ! colspan="1" | Mode | ||
| + | !Stock | ||
| + | !Upgraded | ||
| + | |- | ||
| + | |''Arcade'' | ||
| + | |1,162 | ||
| + | |1,431 | ||
| + | |- | ||
| + | |''Realistic/Simulator'' | ||
| + | |796 | ||
| + | |900 | ||
| + | |- | ||
| + | ! colspan="3" | Power-to-weight ratio (hp/ton) | ||
| + | |- | ||
| + | ! colspan="1" | Mode | ||
| + | !Stock | ||
| + | !Upgraded | ||
| + | |- | ||
| + | |''Arcade'' | ||
| + | |16.48 | ||
| + | |20.29 | ||
| + | |- | ||
| + | |''Realistic/Simulator'' | ||
| + | |11.29 | ||
| + | |12.77 | ||
| + | |- | ||
| + | |} | ||
== Armaments == | == Armaments == | ||
| − | |||
=== Main armament === | === Main armament === | ||
| − | + | <!--''Give the reader information about the characteristics of the main gun. Assess its effectiveness in a battle based on the reloading speed, ballistics and the power of shells. Do not forget about the flexibility of the fire, that is how quickly the cannon can be aimed at the target, open fire on it and aim at another enemy. Add a link to the main article on the gun: <code><nowiki>{{main|Name of the weapon}}</nowiki></code>. Describe in general terms the ammunition available for the main gun. Give advice on how to use them and how to fill the ammunition storage.''--> | |
| − | <!-- ''Give the reader information about the characteristics of the main gun. Assess its effectiveness in a battle based on the reloading speed, ballistics and the power of shells. Do not forget about the flexibility of the fire, that is how quickly the cannon can be aimed at the target, open fire on it and aim at another enemy. Add a link to the main article on the gun: <code><nowiki>{{main|Name of the weapon}}</nowiki></code>. Describe in general terms the ammunition available for the main gun. Give advice on how to use them and how to fill the ammunition storage.'' --> | + | {{main|KwK 43 (88 mm)}} |
| − | {{main|KwK | ||
| − | {| class="wikitable" style="text-align:center" width=" | + | {| class="wikitable" style="text-align:center" |
| + | |- | ||
| + | ! colspan="6" | [[KwK 43 (88 mm)|88 mm KwK 43]] | ||
| + | |- | ||
| + | ! colspan="3" rowspan="1" style="width:5em" |Capacity | ||
| + | ! rowspan="1" | Vertical <br> guidance | ||
| + | ! rowspan="1" | Horizontal <br> guidance | ||
| + | ! rowspan="1" | Stabilizer | ||
| + | |- | ||
| + | | colspan="3" | 54 || -8°/+15° || ±180° || N/A | ||
|- | |- | ||
| − | ! colspan=" | + | ! colspan="6" | Turret rotation speed (°/s) |
|- | |- | ||
| − | ! Mode | + | ! style="width:4em" |Mode |
| − | ! Stock ! | + | ! style="width:4em" |Stock |
| − | ! | + | ! style="width:4em" |Upgraded |
| + | ! style="width:4em" |Prior + Full crew | ||
| + | ! style="width:4em" |Prior + Expert qualif. | ||
| + | ! style="width:4em" |Prior + Ace qualif. | ||
|- | |- | ||
| − | + | | ''Arcade'' || 14.97 || 20.72 || __.__ || __.__ || 29.60 | |
| − | | | ||
|- | |- | ||
| − | + | | ''Realistic'' || 11.01 || 12.95 || __.__ || __.__ || 18.50 | |
| − | | 11. | + | |- |
| + | ! colspan="4" | Reloading rate (seconds) | ||
| + | |- | ||
| + | ! colspan="1" style="width:4em" |Stock | ||
| + | ! colspan="1" style="width:4em" |Prior + Full crew | ||
| + | ! colspan="1" style="width:4em" |Prior + Expert qualif. | ||
| + | ! colspan="1" style="width:4em" |Prior + Ace qualif. | ||
| + | |- | ||
| + | | 20.02 || __.__ || __.__ || 15.40 | ||
|- | |- | ||
|} | |} | ||
| − | ==== Ammunition ==== | + | ===== Ammunition ===== |
| − | {{: | + | {| class="wikitable sortable" style="text-align:center" width="100%" |
| + | ! colspan="8" | Penetration statistics | ||
| + | |- | ||
| + | ! rowspan="2" data-sort-type="text" | Ammunition | ||
| + | ! rowspan="2" class="unsortable" | Type of <br /> warhead | ||
| + | ! colspan="6" | '''Penetration''' '''''in mm''''' '''@ 90°''' | ||
| + | |- | ||
| + | ! 10m | ||
| + | ! 100m | ||
| + | ! 500m | ||
| + | ! 1000m | ||
| + | ! 1500m | ||
| + | ! 2000m | ||
| + | |- | ||
| + | | PzGr.Rot || APCBC || 249 || 247 || 234 || 218 || 204 || 191 | ||
| + | |- | ||
| + | | PzGr 40 || APCR || 276 || 272 || 247 || 220 || 207 || 170 | ||
| + | |- | ||
| + | | Sprgr || HE || 20 || 20 || 20 || 20 || 20 || 20 | ||
| + | |- | ||
| + | |} | ||
| + | {| class="wikitable sortable" style="text-align:center" width="100%" | ||
| + | ! colspan="11" | Shell details | ||
| + | |- | ||
| + | ! rowspan="2" data-sort-type="text" | Ammunition | ||
| + | ! rowspan="2" class="unsortable" | Type of <br /> warhead | ||
| + | ! rowspan="2" |Velocity <br /> in m/s | ||
| + | ! rowspan="2" |Projectile<br />Mass in kg | ||
| + | ! rowspan="2" | ''Fuse delay'' | ||
| + | ''in m:'' | ||
| + | ! rowspan="2" | ''Fuse sensitivity'' | ||
| + | ''in mm:'' | ||
| + | ! rowspan="2" | ''Explosive Mass in g<br /> (TNT equivalent):'' | ||
| + | ! rowspan="2" | ''Normalization At 30° <br> from horizontal:'' | ||
| + | ! colspan="3" | ''Ricochet:'' | ||
| + | |- | ||
| + | ! 0% | ||
| + | ! 50% | ||
| + | ! 100% | ||
| + | |- | ||
| + | | PzGr.Rot || APCBC || 1,005 || 16 || 0.8 || 28 || 343.2 || +4° || 48° || 63° || 71° | ||
| + | |- | ||
| + | | PzGr 40 || APCR || 1,150 || 10 || N/A || N/A || N/A || +1.5° || 66° || 70° || 72° | ||
| + | |- | ||
| + | | Sprgr || HE || 900 || 15 || 0.4 || 0.5 || 1,550 || +0° || 79° || 80° || 81° | ||
| + | |- | ||
| + | |} | ||
| − | ==== [[Ammo racks]] ==== | + | ===== [[Ammo racks|Ammo racks]] ===== |
| − | [[File:Ammoracks_{{PAGENAME}}.png|right| | + | [[File:Ammoracks_{{PAGENAME}}.png|right|thumbnail|[[Ammo racks|Ammo racks]] of the Tiger 105.]] |
| − | + | {| class="wikitable sortable" style="text-align:center" | |
| − | {| class="wikitable" style="text-align:center" | ||
|- | |- | ||
| − | ! Full<br>ammo | + | ! class="wikitable unsortable" |Full<br /> ammo |
| − | ! Ammo<br> | + | ! class="wikitable unsortable" |Ammo<br />Part |
| − | ! 1st<br>rack empty | + | ! class="wikitable unsortable" |1st<br /> rack empty |
| − | ! 2nd<br>rack empty | + | ! class="wikitable unsortable" |2nd<br /> rack empty |
| − | ! 3rd<br>rack empty | + | ! class="wikitable unsortable" |3rd<br /> rack empty |
| − | ! 4th<br>rack empty | + | ! class="wikitable unsortable" |4th<br /> rack empty |
| − | ! 5th<br>rack empty | + | ! class="wikitable unsortable" |5th<br /> rack empty |
| − | ! Visual<br>discrepancy | + | ! class="wikitable unsortable" |Visual<br /> discrepancy |
|- | |- | ||
| − | | '''54''' || style="text-align:right" | ''Projectiles''<br>''Propellants'' || 43 ''(+11)''<br>45 ''(+9)'' || 27 ''(+27)''<br>37 ''(+17)'' || 15 ''(+39)''<br>19 ''(+35)'' || 1 ''(+53)''<br>9 ''(+ | + | || '''54''' || style="text-align:right" | ''Projectiles''<br />''Propellants'' || 43 ''(+11)''<br />45 ''(+9)'' || 27 ''(+27)''<br />37 ''(+17)'' || 15 ''(+39)''<br />19 ''(+35)'' || 1 ''(+53)''<br />9 ''(+44)'' || <br />1 ''(+53)'' || style="text-align:left" | no |
|- | |- | ||
|} | |} | ||
| − | + | Right side empty: 27 ''(+27)'' | |
| − | |||
| − | |||
=== Machine guns === | === Machine guns === | ||
| − | + | <!--''Offensive and anti-aircraft machine guns not only allow you to fight some aircraft, but also are effective against lightly armoured vehicles. Evaluate machine guns and give recommendations on its use.''--> | |
| − | + | {{main|MG 34 (7.92 mm)}} | |
| − | <!-- ''Offensive and anti-aircraft machine guns not only allow you to fight some aircraft but also are effective against lightly armoured vehicles. Evaluate machine guns and give recommendations on its use.'' --> | ||
| − | {{main| | ||
| − | {| class="wikitable" style="text-align:center | + | {| class="wikitable" style="text-align:center" |
|- | |- | ||
| − | ! colspan=" | + | ! colspan="7" | [[MG 34 (7.92 mm)|7.92 mm MG 34]] |
|- | |- | ||
| − | ! | + | ! colspan="7" | ''Coaxial mount'' |
|- | |- | ||
| − | | | + | ! colspan="4" rowspan="1" style="width:5em" |Capacity (Belt capacity) |
| + | ! rowspan="1" | Fire rate <br> (shots/minute) | ||
| + | ! rowspan="1" | Vertical <br> guidance | ||
| + | ! rowspan="1" | Horizontal <br> guidance | ||
|- | |- | ||
| − | | | + | | colspan="4" | 5,850 (150) || 900 || N/A || N/A |
|- | |- | ||
|} | |} | ||
== Usage in battles == | == Usage in battles == | ||
| − | <!-- ''Describe the tactics of playing in the vehicle, the features of using vehicles in the team and advice on tactics. Refrain from creating a "guide" - do not impose a single point of view but | + | <!--''Describe the tactics of playing in the vehicle, the features of using vehicles in the team and advice on tactics. Refrain from creating a "guide" - do not impose a single point of view but give the reader food for thought. Describe the most dangerous enemies and give recommendations on fighting them. If necessary, note the specifics of the game in different modes (AB, RB, SB).''--> |
| − | This tank's best role is | + | This tank's best and almost only possible role so far is a sniper/support tank. Stay at distance, or your reload time and mobility will be the death of you. |
| − | Use your mobility to reach sniping zones and wait for enemy tanks to show up. Keep your distance to maximize the effectiveness of your | + | Use your mobility to reach sniping zones and wait for enemy tanks to show up. Keep your distance to maximize the effectiveness of your armor and use cover to reload without having to worry about being destroyed. Avoid close combat as much as possible since most of the other tanks at your battle rate can penetrate your armor very easily and your reload rate is 20 secs so if your shot doesn't penetrate you will be easily killed. |
=== Pros and cons === | === Pros and cons === | ||
| − | <!-- '' | + | <!--''Summarize and briefly evaluate the vehicle in terms of its characteristics and combat effectiveness. Mark its pros and cons in a bulleted list. Try not to use more than 6 points for each of the characteristics. Avoid using categorical definitions such as "bad", "good" and the like - they have a substitution in the form of softer "inadequate", "effective".''--> |
| − | |||
'''Pros:''' | '''Pros:''' | ||
| − | * | + | *Like with most German guns, the main gun is very accurate. |
| − | + | *With the high muzzle velocity, high armor penetration value, and high damage of the PzGr 39 shell, there's really no need to every load any other shell. | |
| − | * | + | *With the explosive mass of the PzGr 39 shell being equivalent to 343 grams of TNT, penetrating shells are devastating. They deal arguably more damage than any of the Russian 122mm shells do. Expect a lot of one shots. |
| − | * | + | *With the upgraded engine, transmission, and filters, the 10.5 Tiger II has nearly 300 (AB/ 200 in RB) more horsepower than a fully upgraded Tiger II H. This will make the 10.5 accelerate quicker and climb hills faster than any of the other Tiger II's. Including the Tiger II Sla 16. |
| − | * Upper front plate still borderlines on | + | *With the upgraded turret, the 10.5's turret traverse will be 20.5 degrees per second. This will help you defend against enemy medium or light tanks trying to execute a flanking maneuver. |
| − | + | *Upper front plate still borderlines on impenetrable. You'll only have to really worry about APDS and HEAT going through it. | |
| − | |||
| − | |||
'''Cons:''' | '''Cons:''' | ||
| − | * | + | *With the same lightly armored turret as the Tiger II H, expect nearly every enemy tank facing you to aim right for it. |
| − | * | + | *Even with an ACE crew, the main guns takes more than 15 seconds to reload. So close range brawls are not advised. |
| − | * Despite being quick and | + | *Despite being quick and maneuverable for a heavy tank, it's still not a medium tank. So don't expect to out maneuver any medium you're likely to face. |
| − | * | + | *Gun is easily disabled, rendering the tank helpless. |
== History == | == History == | ||
| − | <!-- ''Describe the history of the creation and combat usage of the vehicle in more detail than in the introduction. If the historical reference turns out to be too | + | <!--''Describe the history of the creation and combat usage of the ground vehicle in more detail than in the introduction. If the historical reference turns out to be too big, take it to a separate article, taking a link to an article about the vehicle and adding a block "/ History" (example: <nowiki>https://wiki.warthunder.com/(Vehicle-name)/History</nowiki>) and add a link to it here using the <code>main</code> template. Be sure to reference text and sources by using <code><nowiki><ref></nowiki></code>, as well as adding them at the end of the article.''--> |
===Tiger II=== | ===Tiger II=== | ||
| − | The ''[[Tiger II (H)|Tiger II]]'' with its 8.8 cm KwK 43 cannon was one of the most formidable | + | The ''[[Tiger II (H)|Tiger II]]'' with its 8.8 cm KwK 43 cannon was one of the most formidable tank in World War II. Its 150 mm thick front armor plate sloped was never penetrated by an Allied tank throughout the war and its cannon could destroy any Allied tank fielded in the war. However, some German higher-ups believe that the armament on the Tiger II was just not enough, something more was needed. |
===Concept=== | ===Concept=== | ||
| − | Ideas of rearming the Tiger II was brought up by Krupp in sometime in late 1944. The concept drawing Krupp made was for the Tiger II to be rearmed with a 10.5 cm KwK L/68 cannon. This design would require new mountings and new mechanical parts to be optimized for the larger 10.5 cm gun. While the idea was indeed a very interesting one to up gun the Tiger II, it was never implemented because of its | + | Ideas of rearming the Tiger II was brought up by Krupp in sometime in late 1944. The concept drawing Krupp made was for the Tiger II to be rearmed with a 10.5 cm KwK L/68 cannon. This design would require new mountings and new mechanical parts to be optimized for the larger 10.5 cm gun. While the idea was indeed a very interesting one to up gun the Tiger II, it was never implemented because of its draw backs. The 10.5 gun uses a two-piece ammunition, which requires the presence of another loader. This is impossible because the turret is already cramped as is with three people inside, and the addition of another will make the interior a very miserable place to be in. Plus, the fact the gun's ammunition is two-piece already means that the drawback behind this upgrade is a much slower fire rate. This causes the concept to be rejected by German high command, and if it wasn't, it certainly ended with Germany's surrender in May 1945. |
No prototypes were made and its existence is only proven by a concept drawing. | No prototypes were made and its existence is only proven by a concept drawing. | ||
| − | |||
| − | |||
| − | |||
| − | |||
| − | |||
| − | |||
| − | |||
| − | |||
== Media == | == Media == | ||
| − | <!-- '' | + | <!--''An excellent addition to the article will be video guides, as well as screenshots from the game and photos.''--> |
| − | + | ===Live.Warthunder=== | |
| − | |||
| − | |||
| − | + | * [https://live.warthunder.com/feed/camouflages/?q=#tigerii_kwk105 Camouflages and skins for the "Tiger II KwK 105" can be found on live.warthunder.com] | |
* [https://live.warthunder.com/post/675135/en/ RideR2's Realistic gunsight (TZF4a, TZF 5a/b/d/e/f/f2, TZF 9b/b1/c/d, TZF 12/a) for Pzkpfw II, Pzkpfw III, Pzkpfw IV, Pzkpfw V, Pzkpfw VI] | * [https://live.warthunder.com/post/675135/en/ RideR2's Realistic gunsight (TZF4a, TZF 5a/b/d/e/f/f2, TZF 9b/b1/c/d, TZF 12/a) for Pzkpfw II, Pzkpfw III, Pzkpfw IV, Pzkpfw V, Pzkpfw VI] | ||
| − | + | ===Images=== | |
| − | + | [[File:Tiger II 105 Concept.jpg|x300px|thumb|none|The Tiger II 10.5 cm Concept art from Krupp.]] | |
| − | File:Tiger II 105 Concept.jpg|The Tiger II 10.5 cm | ||
| − | |||
== See also == | == See also == | ||
''Links to the articles on the War Thunder Wiki that you think will be useful for the reader, for example:'' | ''Links to the articles on the War Thunder Wiki that you think will be useful for the reader, for example:'' | ||
| + | |||
* ''reference to the series of the vehicles;'' | * ''reference to the series of the vehicles;'' | ||
* ''links to approximate analogues of other nations and research trees.'' | * ''links to approximate analogues of other nations and research trees.'' | ||
| Line 185: | Line 260: | ||
== External links == | == External links == | ||
''Paste links to sources and external resources, such as:'' | ''Paste links to sources and external resources, such as:'' | ||
| + | |||
* ''topic on the official game forum;'' | * ''topic on the official game forum;'' | ||
| + | * ''encyclopedia page on tank;'' | ||
* ''other literature.'' | * ''other literature.'' | ||
{{Germany heavy tanks}} | {{Germany heavy tanks}} | ||
| − | |||
Revision as of 20:13, 25 February 2019
| Battle Ratings/Ranks subject to change The battle ratings and/or ranks depicted on this article may be outdated due to a recent update. They will be updated soon. |
Contents
Description
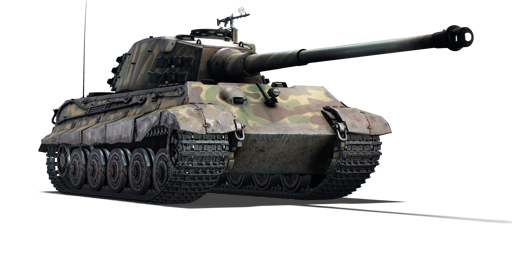
.jpg)
The Pz.Kpfw. VI Ausf. B mit 10.5cm KwK L/68 (or just Tiger II (10.5 cm Kw.K)) is a Rank IV German heavy tank
with a battle rating of 7.0 (AB/RB/SB). It was introduced in during the Closed Beta Test for Ground Forces before Update 1.41. Increasing Tiger II's main cannon to a whopping 10.5 cm cannon, the Tiger II boasts a much more powerful armament than any of the preceding Tiger II tanks.
General info
Survivability and armour
- The armour on this variant is the same as on the regular Tiger II (H). The upper front plate provides excellent protection against any regular AP (APCBC, APHE etc.) shell you might face. The turret however is only 185mm and easily penetrated by most enemys, but you can make it very difficult to hit by "wiggling" the turret left and right which will often result in bounces or non-pens. The lower glacis is a weakspot but the transmission right behind it often takes most of the shrapnel, it can catch fire pretty easily though, meaning researching FPE should be done as soon as possible.
Armour type:
- Rolled homogeneous armour
- Cast homogeneous armour (Gun mantlet, Cupola, driver MG port)
| Armour | Front (Slope angle) | Sides (Slope angle) | Rear (Slope angle) | Roof |
|---|---|---|---|---|
| Hull | 150 mm (50-51°) Front glacis 100 mm (50°) Lower glacis |
80 mm (27°) Top 80 + 5 mm Bottom |
80 mm (28°) | 40 mm |
| Turret | 185 mm (8°) Turret front 200 mm Gun mantlet |
80 mm (19-21°) | 80 mm (20°) | 40 mm |
| Armour | Sides | Roof | ||
| Cupola | 150 mm | 150 mm |
Notes:
- Suspension wheels are 20 mm thick while tracks are 30 mm thick.
- Some part of the turret side have track links on them, which gives an additional 30 mm of protection to the armor.
- The weak spot is the front of the turret (185 mm), but it is small and very difficult to hit at mid-long ranges, where it is also harder to penetrate.
- Machine gun port could be marked as close-range weak spot. Although most of it is still 150 mm thick, the angling is much worse.
Mobility
| Mobility characteristic | ||
|---|---|---|
| Weight (tons) | Add-on Armor weight (tons) |
Max speed (km/h) |
| 70.5 | N/A | 44 (AB) |
| 42 (RB/SB) | ||
| Engine power (horsepower) | ||
| Mode | Stock | Upgraded |
| Arcade | 1,162 | 1,431 |
| Realistic/Simulator | 796 | 900 |
| Power-to-weight ratio (hp/ton) | ||
| Mode | Stock | Upgraded |
| Arcade | 16.48 | 20.29 |
| Realistic/Simulator | 11.29 | 12.77 |
Armaments
Main armament
| 88 mm KwK 43 | |||||
|---|---|---|---|---|---|
| Capacity | Vertical guidance |
Horizontal guidance |
Stabilizer | ||
| 54 | -8°/+15° | ±180° | N/A | ||
| Turret rotation speed (°/s) | |||||
| Mode | Stock | Upgraded | Prior + Full crew | Prior + Expert qualif. | Prior + Ace qualif. |
| Arcade | 14.97 | 20.72 | __.__ | __.__ | 29.60 |
| Realistic | 11.01 | 12.95 | __.__ | __.__ | 18.50 |
| Reloading rate (seconds) | |||||
| Stock | Prior + Full crew | Prior + Expert qualif. | Prior + Ace qualif. | ||
| 20.02 | __.__ | __.__ | 15.40 | ||
Ammunition
| Penetration statistics | |||||||
|---|---|---|---|---|---|---|---|
| Ammunition | Type of warhead |
Penetration in mm @ 90° | |||||
| 10m | 100m | 500m | 1000m | 1500m | 2000m | ||
| PzGr.Rot | APCBC | 249 | 247 | 234 | 218 | 204 | 191 |
| PzGr 40 | APCR | 276 | 272 | 247 | 220 | 207 | 170 |
| Sprgr | HE | 20 | 20 | 20 | 20 | 20 | 20 |
| Shell details | ||||||||||
|---|---|---|---|---|---|---|---|---|---|---|
| Ammunition | Type of warhead |
Velocity in m/s |
Projectile Mass in kg |
Fuse delay
in m: |
Fuse sensitivity
in mm: |
Explosive Mass in g (TNT equivalent): |
Normalization At 30° from horizontal: |
Ricochet: | ||
| 0% | 50% | 100% | ||||||||
| PzGr.Rot | APCBC | 1,005 | 16 | 0.8 | 28 | 343.2 | +4° | 48° | 63° | 71° |
| PzGr 40 | APCR | 1,150 | 10 | N/A | N/A | N/A | +1.5° | 66° | 70° | 72° |
| Sprgr | HE | 900 | 15 | 0.4 | 0.5 | 1,550 | +0° | 79° | 80° | 81° |
Ammo racks
.png)
| Full ammo |
Ammo Part |
1st rack empty |
2nd rack empty |
3rd rack empty |
4th rack empty |
5th rack empty |
Visual discrepancy |
|---|---|---|---|---|---|---|---|
| 54 | Projectiles Propellants |
43 (+11) 45 (+9) |
27 (+27) 37 (+17) |
15 (+39) 19 (+35) |
1 (+53) 9 (+44) |
1 (+53) |
no |
Right side empty: 27 (+27)
Machine guns
| 7.92 mm MG 34 | ||||||
|---|---|---|---|---|---|---|
| Coaxial mount | ||||||
| Capacity (Belt capacity) | Fire rate (shots/minute) |
Vertical guidance |
Horizontal guidance | |||
| 5,850 (150) | 900 | N/A | N/A | |||
Usage in battles
This tank's best and almost only possible role so far is a sniper/support tank. Stay at distance, or your reload time and mobility will be the death of you.
Use your mobility to reach sniping zones and wait for enemy tanks to show up. Keep your distance to maximize the effectiveness of your armor and use cover to reload without having to worry about being destroyed. Avoid close combat as much as possible since most of the other tanks at your battle rate can penetrate your armor very easily and your reload rate is 20 secs so if your shot doesn't penetrate you will be easily killed.
Pros and cons
Pros:
- Like with most German guns, the main gun is very accurate.
- With the high muzzle velocity, high armor penetration value, and high damage of the PzGr 39 shell, there's really no need to every load any other shell.
- With the explosive mass of the PzGr 39 shell being equivalent to 343 grams of TNT, penetrating shells are devastating. They deal arguably more damage than any of the Russian 122mm shells do. Expect a lot of one shots.
- With the upgraded engine, transmission, and filters, the 10.5 Tiger II has nearly 300 (AB/ 200 in RB) more horsepower than a fully upgraded Tiger II H. This will make the 10.5 accelerate quicker and climb hills faster than any of the other Tiger II's. Including the Tiger II Sla 16.
- With the upgraded turret, the 10.5's turret traverse will be 20.5 degrees per second. This will help you defend against enemy medium or light tanks trying to execute a flanking maneuver.
- Upper front plate still borderlines on impenetrable. You'll only have to really worry about APDS and HEAT going through it.
Cons:
- With the same lightly armored turret as the Tiger II H, expect nearly every enemy tank facing you to aim right for it.
- Even with an ACE crew, the main guns takes more than 15 seconds to reload. So close range brawls are not advised.
- Despite being quick and maneuverable for a heavy tank, it's still not a medium tank. So don't expect to out maneuver any medium you're likely to face.
- Gun is easily disabled, rendering the tank helpless.
History
Tiger II
The Tiger II with its 8.8 cm KwK 43 cannon was one of the most formidable tank in World War II. Its 150 mm thick front armor plate sloped was never penetrated by an Allied tank throughout the war and its cannon could destroy any Allied tank fielded in the war. However, some German higher-ups believe that the armament on the Tiger II was just not enough, something more was needed.
Concept
Ideas of rearming the Tiger II was brought up by Krupp in sometime in late 1944. The concept drawing Krupp made was for the Tiger II to be rearmed with a 10.5 cm KwK L/68 cannon. This design would require new mountings and new mechanical parts to be optimized for the larger 10.5 cm gun. While the idea was indeed a very interesting one to up gun the Tiger II, it was never implemented because of its draw backs. The 10.5 gun uses a two-piece ammunition, which requires the presence of another loader. This is impossible because the turret is already cramped as is with three people inside, and the addition of another will make the interior a very miserable place to be in. Plus, the fact the gun's ammunition is two-piece already means that the drawback behind this upgrade is a much slower fire rate. This causes the concept to be rejected by German high command, and if it wasn't, it certainly ended with Germany's surrender in May 1945.
No prototypes were made and its existence is only proven by a concept drawing.
Media
Live.Warthunder
- Camouflages and skins for the "Tiger II KwK 105" can be found on live.warthunder.com
- RideR2's Realistic gunsight (TZF4a, TZF 5a/b/d/e/f/f2, TZF 9b/b1/c/d, TZF 12/a) for Pzkpfw II, Pzkpfw III, Pzkpfw IV, Pzkpfw V, Pzkpfw VI
Images

See also
Links to the articles on the War Thunder Wiki that you think will be useful for the reader, for example:
- reference to the series of the vehicles;
- links to approximate analogues of other nations and research trees.
External links
Paste links to sources and external resources, such as:
- topic on the official game forum;
- encyclopedia page on tank;
- other literature.
| Germany heavy tanks | |
|---|---|
| Tiger 1 (Henschel) | Tiger H1 · Tiger E · ␠Tiger |
| Tiger 1 (Porsche) | VK 45.01 (P) · Pz.Bef.Wg.VI P |
| Tiger 2 | Tiger II (P) · Tiger II (H) · Tiger II (H) Sla.16 · Tiger II (10.5 cm Kw.K) |
| Super heavy tanks | Maus · E-100 |
| Trophies | |
| Great Britain | ▀Pz.Kpfw. Churchill |
| USSR | ▀KV-IB · ▀KW I C 756 (r) · ▀KW II 754 (r) |
