|
|
| (62 intermediate revisions by 16 users not shown) |
| Line 1: |
Line 1: |
| − | {{About
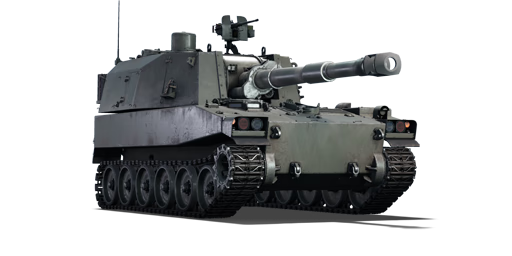
| + | {{Specs-Card|code=jp_type_75}} |
| − | | about = Japanese SPH '''{{PAGENAME}}'''
| |
| − | | usage = other versions
| |
| − | | link = Type 73 (Family)
| |
| − | }}
| |
| − | {{Specs-Card | |
| − | |code=jp_type_75 | |
| − | |images={{Specs-Card-Image|GarageImage_{{PAGENAME}}.jpg|ArtImage_{{PAGENAME}}.png}}
| |
| − | }} | |
| | | | |
| | == Description == | | == Description == |
| − | <!-- ''In the description, the first part should be about the history of the creation and combat usage of the vehicle, as well as its key features. In the second part, tell the reader about the ground vehicle in the game. Insert a screenshot of the vehicle, so that if the novice player does not remember the vehicle by name, he will immediately understand what kind of vehicle the article is talking about.'' --> | + | <!--In the description, the first part should be about the history of the creation and combat usage of the vehicle, as well as its key features. In the second part, tell the reader about the ground vehicle in the game. Insert a screenshot of the vehicle, so that if the novice player does not remember the vehicle by name, he will immediately understand what kind of vehicle the article is talking about.--> |
| − | The '''Type 75 155 mm {{Annotation|SPH|Self Propelled Howitzer}}''' (75式自走155mmりゅう弾砲) belonged to the second generation of Japanese self-propelled howitzers, along with the Type 74 105 mm SPH. These models were designed to replace the US-leased M44 155mm SPH and M52 105mm SPH, respectively. Development kicked off in 1965, aligning with the initiation of development phases for the [[Type 74 (Family)|Type 74 MBT]] and [[Type 73 (Family)|Type 73 APC]], resulting in shared component usage.
| + | <!--[[File:GarageImage_{{PAGENAME}}.jpg|420px|thumb|left]] |
| − | Following NATO standardization, the calibre of the new SPH was set at 155 mm. The prototype stage, initiated in 1969 under the 155HSP program, saw {{Annotation|MHI|Mitsubishi Heavy Industries}} developing the hull, while {{Annotation|JSW|Japan Steel Works}} worked on the domestic 155 mm cannon. Various iterations of the 155HSP, testing barrel lengths (L/24 & L/30), auto-loader mechanics, and additional features, culminated in the finalization of the vehicle in December 1974 as the Type 75 155 mm SPH, equipped with the domestic JSW L/30.
| + | {{break}}--> |
| − | | + | The '''{{Specs|name}}''' is a rank {{Specs|rank}} Japanese tank destroyer {{Battle-rating}}. It was introduced in [[Update 1.91 "Night Vision"]]. |
| − | It was introduced in [[Update 1.91 "Night Vision"]]. The standout feature of the Type 75, when compared to counterparts like the [[M109 (Family)|M109]], [[2S3M]], and similar vehicles, is the use of an automated 10-second loading feed. The L/30, while reasonably sized, provides slightly higher velocity than the 155 L/24 of the [[M109 (Family)|M109(G)]] but exhibits a greater drop than the 155 L/39 of the [[M109A1]] or 152 mm Warsaw Pact cannons. However, this drop can be mitigated by loading the domestic Type 75 HE shell, albeit at the expense of lower HE filler for increased velocity. The armour, typical of many self-propelled howitzers, only offers protection against distant rifle calibre fire and explosion fragments, rendering it unreliable in direct combat. | |
| − | | |
| − | ;Nicknames
| |
| − | | |
| − | * JGSDF Abbreviation: 75HSP / SP - <small>(Howitzer) Self-Propelled</small>
| |
| | | | |
| | == General info == | | == General info == |
| | === Survivability and armour === | | === Survivability and armour === |
| − | {{Specs-Tank-Armour}}
| + | ''Describe armour protection. Note the most well protected and key weak areas. Appreciate the layout of modules as well as the number and location of crew members. Is the level of armour protection sufficient, is the placement of modules helpful for survival in combat?'' |
| − | <!-- ''Describe armour protection. Note the most well protected and key weak areas. Appreciate the layout of modules as well as the number and location of crew members. Is the level of armour protection sufficient, is the placement of modules helpful for survival in combat? If necessary use a visual template to indicate the most secure and weak zones of the armour.'' -->
| |
| − | | |
| − | The armour of Type 75 SPH resists 7.62 mm machine gun fire from any side and can sustain 12.7 mm rounds when angled from any side, however, the hull is made out of aluminium, so it's actual effective armour is around 15 mm. Because of that, the tank can be knocked out by large-calibre HE shells.
| |
| | | | |
| − | For that reason, it is not recommended to drive to hostile tanks closer than 300 m and slightly angle to avoid being shot with MG from the side and about 700 m to avoid unnecessary damage. Slightly angle the tank towards passageways to have a chance of making a reply shot. Do not angle too much, to avoid exposing your sides or triggering fuses on rank V APHE, which mostly has 19 mm trigger with exception of German and some US tanks which have 14 mm sensitive fuse.
| + | ''If necessary use a visual template to indicate the most secure and weak zones of the armour.'' |
| − | | |
| − | Front of the hull can take the most of the MG punishment due to various modules taking damage for the crew, with high chance of just being set on fire instead, however, if enemy aims for the turret they will eventually hit weaker flat parts and hit the non-critical crew with a chance of taking out the gunner. Keep your opponents on your left to prevent that from happening.
| |
| − | | |
| − | The right front side of the hull houses the driver. They are sealed away from turret compartment by the engine and fuel tanks. The turret houses the rest of the crew. Quite often, explosive damage to one section does nothing to the other, however, pure AP shells can potentially penetrate modules and destroy crew in both of the sections, or hit the charges on the floor of the turret.
| |
| − | | |
| − | '''Armour type:'''
| |
| − | | |
| − | * Aluminium alloy 7039 (hull, turret)
| |
| − | | |
| − | {| class="wikitable"
| |
| − | |-
| |
| − | ! Armour !! Front (Slope angle) !! Sides !! Rear !! Roof
| |
| − | |-
| |
| − | | Hull || 30 mm (13°) ''Front glacis'' <br> 30 mm (52°) ''Lower glacis'' || 30 mm ''Top'' <br> 30 mm ''Bottom'' || 30 mm (1°) || 25 mm <br> 5 mm ''Radiators''
| |
| − | |-
| |
| − | | Turret || 30 mm (13-16°) ''Turret front'' <br> 30 mm ''Gun mantlet'' <br> 20 mm ''Barrel shroud'' || 30 mm (13-47°) || 30 mm (1°) || 25 mm <br> 30 mm ''Gun mantlet''
| |
| − | |-
| |
| − | |}
| |
| − | '''Notes:'''
| |
| − | | |
| − | * Suspension wheels and tracks are 20 mm thick.
| |
| − | * Belly armour is 25 mm thick.
| |
| − | * Belly armour above tracks is 35 mm thick.
| |
| − | * One 8 mm structural steel plate separates the engine compartment from the crew compartments.
| |
| | | | |
| | === Mobility === | | === Mobility === |
| − | {{Specs-Tank-Mobility}}
| |
| − | <!-- ''Write about the mobility of the ground vehicle. Estimate the specific power and manoeuvrability, as well as the maximum speed forwards and backwards.'' -->
| |
| | | | |
| − | {{tankMobility|abMinHp=738|rbMinHp=460}}
| + | * ''Write about the mobility of the ground vehicle. Estimate the specific power and manoeuvrability, as well as the maximum speed forwards and backwards.'' |
| − | | |
| − | The {{PAGENAME}} can move surprisingly fast and can challenge the [[T-54 (1947)]] when driving on flat terrain.
| |
| − | | |
| − | The problems start when the terrain is less than perfectly flat, as {{PAGENAME}}'s suspension is very stiff. Something as mundane as trenches will not just slow down stock {{PAGENAME}}, but stop it entirely and leave it struggling to drive over it. Upgrades to chassis make this problem less jarring but it still exists.
| |
| − | | |
| − | === Modifications and economy ===
| |
| − | {{Specs-Economy}}
| |
| | | | |
| | == Armaments == | | == Armaments == |
| − | {{Specs-Tank-Armaments}}
| |
| | === Main armament === | | === Main armament === |
| − | {{Specs-Tank-Weapon|1}}
| + | ''Give the reader information about the characteristics of the main gun. Assess its effectiveness in a battle based on the reloading speed, ballistics and the power of shells. Do not forget about the flexibility of the fire, that is how quickly the cannon can be aimed at the target, open fire on it and aim at another enemy. Add a link to the main article on the gun: <code><nowiki>{{main|Name of the weapon}}</nowiki></code>. Describe in general terms the ammunition available for the main gun. Give advice on how to use them and how to fill the ammunition storage.'' |
| − | <!-- ''Give the reader information about the characteristics of the main gun. Assess its effectiveness in a battle based on the reloading speed, ballistics and the power of shells. Do not forget about the flexibility of the fire, that is how quickly the cannon can be aimed at the target, open fire on it and aim at another enemy. Add a link to the main article on the gun: <code><nowiki>{{main|Name of the weapon}}</nowiki></code>. Describe in general terms the ammunition available for the main gun. Give advice on how to use them and how to fill the ammunition storage.'' -->
| |
| − | {{main|NSJ L/30 (155 mm)}}
| |
| − | | |
| − | [[File:Type 75 SPH firing over cover long range AB.jpg|thumb|x250px|right|In arcade mode, Type 75 SPH can act even as artillery - find a target about 1,200 meters away, go to sniper seat, aim at them, adjust the gun distance to their position and fire. There is nothing they can do about it because you can fire like this even over mountains. This trick is unlikely to work in RB due to inferior rangefinding capability.]]
| |
| − | 155 mm cannon of this tank destroyer is capable of launching High Explosive shells at the enemy. It does not carry any other offensive ammunition, however, it carries three different types of HE. What separates its gun from most of other "Demolition tanks" is that it has the autoloader, which allows it to reload at least three times faster than the ones that do not, which is insane. As a side effect, the reload speed is not affected by the crew skills and status and will always remain the same.
| |
| − | | |
| − | The gun is surprisingly accurate even when stock at up to ~700 m ranges and can still hit even past 1 kilometre away. While it does not hit the exact mark, it is usually good enough. However, when braking, the gun can bounce, so some care should be taken when fighting at close range.
| |
| − | | |
| − | When compared to the clearly similar artillery tanks, the {{PAGENAME}}'s weapon claims the middle ground with a focus on combat support and versatility.
| |
| − | | |
| − | {| class="wikitable" style="text-align:center" width="100%"
| |
| − | |-
| |
| − | ! colspan="5" | [[NSJ L/30 (155 mm)|155 mm NSJ L/30]] || colspan="5" | Turret rotation speed (°/s) || Reloading rate (seconds)
| |
| − | |-
| |
| − | ! Mode !! Capacity !! Vertical !! Horizontal !! Stabilizer
| |
| − | ! Stock !! Upgraded !! Full !! Expert !! Aced
| |
| − | ! Autoloader
| |
| − | |-
| |
| − | ! ''Arcade''
| |
| − | | rowspan="2" | 28 || rowspan="2" | -5°/+65° || rowspan="2" | ±180° || rowspan="2" | - || 10.6 || 14.6 || 17.8 || 19.6 || 20.9 || rowspan="2" | 10.00
| |
| − | |-
| |
| − | ! ''Realistic''
| |
| − | | 7.1 || 8.4 || 10.2 || 11.3 || 12.0
| |
| − | |-
| |
| − | |}
| |
| − | | |
| − | ==== Ammunition ====
| |
| − | | |
| − | * '''M107''': Your stock HE shell. It can essentially destroy almost any tank that doesn't have ERA shielding in one hit. As with other HE tanks, like the [[Ho-Ro]], it can't penetrate armour directly on many tanks, so one has to aim for cupolas, machine guns, chassis and other weak spots. For example the [[M103]] have great frontal armour, but it can be simply shot at the turret base, and the shockwave will breach hull roof armour and hit the ammo rack located just below the turret in the hull, resulting in instant destruction.
| |
| − | * '''M107 (PF)''': Also an HE shell like the M107, but with a 3 m proximity fuse, so it does not explode upon impact but earlier instead, when the radio fuse (inside the shell) detects an obstacle nearby. Notice that this is a proximity fuse, and not a radio fuse. This means that the fuse will not detect the aircraft unless in immediate proximity (3 m radius).
| |
| − | * '''Type 75''': This HE shell doesn't have a proximity fuse, but its muzzle velocity is faster, which make it more reliable at over 1 km range and allows for significantly easier and faster aim in RB. It was achieved by reducing its penetration power.
| |
| − | * '''M110''': It is also possible to fire a smoke shell to blind enemy snipers or to hide someone on your team.
| |
| − | | |
| − | {{:NSJ L/30 (155 mm)/Ammunition|M107, M107 (PF), Type 75, M110}}
| |
| − | | |
| − | ==== [[Ammo racks]] ====
| |
| − | [[File:Ammoracks_{{PAGENAME}}.png|right|thumb|x250px|[[Ammo racks]] of the {{PAGENAME}}]]
| |
| − | <!-- '''Last updated: 2.1.0.85''' -->
| |
| − | {| class="wikitable" style="text-align:center"
| |
| − | |-
| |
| − | ! Full<br>ammo
| |
| − | ! Ammo<br>part
| |
| − | ! 1st<br>rack empty
| |
| − | ! 2nd<br>rack empty
| |
| − | ! 3rd<br>rack empty
| |
| − | ! Visual<br>discrepancy
| |
| − | |-
| |
| − | | '''28''' || ''Projectiles'' <br> ''Propellants'' || 19 ''(+9)'' <br> 19 ''(+9)'' || 10 ''(+18)'' <br> 1 ''(+27)'' || 1 ''(+27)'' <br> N/A || No
| |
| − | |-
| |
| − | |}
| |
| − | '''Notes''':
| |
| − | | |
| − | * Projectiles and propellant bags are modeled individually and disappear after having been shot or loaded.
| |
| − | | |
| − | Projectiles:
| |
| − | | |
| − | * Racks 2 and 3 (autoloader magazines) are first stage ammo racks. They total 18 shells.
| |
| − | * These racks get filled first when loading up the tank and are also emptied first.
| |
| − | * As it is equipped with an autoloader, manual reloading of the gun is not possible.
| |
| − | * Once the autoloader magazines have been depleted, you can't shoot until the loader has restocked the autoloader. The restocking time is longer than the normal reload time of the gun. Take this into account when playing.
| |
| − | * Simply not firing when the gun is loaded will move ammo from rack 1 into racks 2 and 3. Firing will interrupt the restocking of the ready racks.
| |
| − | * The depletion order at full capacity is: 2 - 3 - 1.
| |
| − | | |
| − | Propellants:
| |
| − | | |
| − | * Rack 2 contains 18 propellant bags (14 from the forward rack + 4 from the rear rack)
| |
| − | * Rack 1 contains only 10 bags on the rear rack.
| |
| − | * Simply not firing when the gun is loaded will move ammo from rack 1 into rack 2. Firing will interrupt the restocking of the ready racks.
| |
| − | * The depletion order at full capacity is: 2 - 1.
| |
| − | | |
| − | ==== Optics and night vision ====
| |
| − | {| class="wikitable" style="text-align:center"
| |
| − | ! colspan="7" | {{PAGENAME}} [[Optics]]
| |
| − | |-
| |
| − | ! rowspan="3" |Type of optic
| |
| − | ! rowspan="3" |Magnification
| |
| − | ! colspan="5" |[[Night Vision Devices]]
| |
| − | |-
| |
| − | ! colspan="3" |Image Intensifier
| |
| − | ! rowspan="2" |{{Annotation|Thermal Imager<br>Resolution|The higher the resolution the clearer and more detailed the image is}}
| |
| − | ! rowspan="2" |Notes
| |
| − | |-
| |
| − | ! {{Annotation|Resolution|The higher the resolution the clearer and more detailed the image is}}
| |
| − | ! {{Annotation|Light Mult|By how much the image intensifier amplifies the existing light, primarily useful for comparing image intensifiers}}
| |
| − | ! {{Annotation|Noise Level|How much noise is present in the image (how grainy the image is)}}
| |
| − | |-
| |
| − | ! Gunner's Sight
| |
| − | | X4 || N/A || N/A || N/A || Not Fitted ||
| |
| − | |-
| |
| − | ! Commander's View
| |
| − | | X6 || N/A || N/A || N/A || Not Fitted ||
| |
| − | |-
| |
| − | ! Driver's View
| |
| − | | X1 / 3PV || 800X600 || ___ || high || Not Fitted || Only useable with an upgrade
| |
| − | |-
| |
| − | |}
| |
| | | | |
| | === Machine guns === | | === Machine guns === |
| − | {{Specs-Tank-Weapon|2}}
| + | ''Offensive and anti-aircraft machine guns not only allow you to fight some aircraft but also are effective against lightly armoured vehicles. Evaluate machine guns and give recommendations on its use.'' |
| − | <!-- ''Offensive and anti-aircraft machine guns not only allow you to fight some aircraft but also are effective against lightly armoured vehicles. Evaluate machine guns and give recommendations on its use.'' -->
| |
| − | {{main|M2HB (12.7 mm)}}
| |
| − | | |
| − | {| class="wikitable" style="text-align:center" width="50%"
| |
| − | |-
| |
| − | ! colspan="5" | [[M2HB (12.7 mm)|12.7 mm M2HB]]
| |
| − | |-
| |
| − | ! Mount !! Capacity (Belt) !! Fire rate !! Vertical !! Horizontal
| |
| − | |-
| |
| − | | Pintle || 600 (200) || 575 || -8°/+45° || ±180°
| |
| − | |-
| |
| − | |}
| |
| − | | |
| − | * The roof mounted 12.7 mm M2HB machine gun can be used to repel hostile light tanks and low flying aircraft.
| |
| | | | |
| | == Usage in battles == | | == Usage in battles == |
| − | <!-- ''Describe the tactics of playing in the vehicle, the features of using vehicles in the team and advice on tactics. Refrain from creating a "guide" - do not impose a single point of view but instead give the reader food for thought. Describe the most dangerous enemies and give recommendations on fighting them. If necessary, note the specifics of the game in different modes (AB, RB, SB).'' -->
| + | ''Describe the tactics of playing in the vehicle, the features of using vehicles in the team and advice on tactics. Refrain from creating a "guide" - do not impose a single point of view but instead give the reader food for thought. Describe the most dangerous enemies and give recommendations on fighting them. If necessary, note the specifics of the game in different modes (AB, RB, SB).'' |
| − | | |
| − | This vehicle is very powerful with its high explosive and fuze shells, however it comes at a cost. The Type 75 is the very definition of a glass cannon: this vehicle is incredible at close range engagements, but can not snipe long distances as it is an artillery howitzer. It is recommended that you watch your surroundings as this vehicle has so little armour that machines guns alone can penetrate your armour. Used right, this vehicle can dominate the battlefield as its proximity fuze shell can easily take out an enemy behind cover.
| |
| − | | |
| − | It is highly recommended to become familiar with large maps. Experiment on large maps using some landmarks to help with long distance aiming.
| |
| − | | |
| − | The Type 75 has an almost unique ability to annihilate tanks that are hiding behind cover completely, which is usually something only an ATGM carrier can do. Its HE shells allow to exploit weak spots and openings in the armour of battle tanks, which are normally not penetrable by contact explosives, although it's not 100% reliable and might take several shots. The HE-VT shell with a proximity fuse is perfect to engage targets while staying behind cover. Keep in mind that it must still fly at least 300 m away from your tank to activate, so it will not work at close range.
| |
| − | | |
| − | <gallery mode="packed-hover" heights="250px">
| |
| − | File:Type 75 SPH proximity fuse used on Ho-Ri.jpg|Proximity fuse of type 75 explodes mid-air before hitting Ho-Ri armour and penetrates ventilation to hit ammo rack. Ho-Ri explodes. Normally, the HE shell would hit the gun mantlet and set the engine on fire and nothing else, or just ricochet off the hull and away.
| |
| − | File:Type 75 SPH proximity fuse used on Type 60 ATM.jpg|Type 75 SPH uses proximity fuse on type 60 ATM that is completely hidden behind a hill. It exploded above the vertical ATGM tank, surprising and destroying it. Normally the shot would be impossible to land and type 60 ATM would just continue destroying any passing by tank - like nothing happened.
| |
| − | </gallery>
| |
| − | | |
| − | It will also react to the ground surface, so try to overshoot your opponent so that the shell remains higher than 3 m from the ground before it reaches your target. In many cases, the proximity fuse shell will detonate before reaching the enemy, due to nearby obstacles accidentally triggering the fuse.
| |
| − | | |
| − | Not every tank should be attacked with a proximity shell, as it's not always beneficial. For example, Soviet medium and heavy tanks do not have any glaring weak spots, which can be potentially hit by an airburst shockwave, so they should only be attacked by normal HE ammo. On contrary, their SPAA and light tanks are as vulnerable as they are dangerous, and so it is reasonable to try and spend some proximity shells to weed them out, instead of leaving your cover and risking being annihilated by suppressing fire.
| |
| | | | |
| | === Pros and cons === | | === Pros and cons === |
| − | <!-- ''Summarise and briefly evaluate the vehicle in terms of its characteristics and combat effectiveness. Mark its pros and cons in a bulleted list. Try not to use more than 6 points for each of the characteristics. Avoid using categorical definitions such as "bad", "good" and the like - use substitutions with softer forms such as "inadequate" and "effective".'' -->
| + | ''Summarise and briefly evaluate the vehicle in terms of its characteristics and combat effectiveness. Mark its pros and cons in a bulleted list. Try not to use more than 6 points for each of the characteristics. Avoid using categorical definitions such as "bad", "good" and the like - use substitutions with softer forms such as "inadequate" and "effective".'' |
| | | | |
| | '''Pros:''' | | '''Pros:''' |
| | | | |
| − | * Unlike almost all other heavy demolition tanks, like the [[FV4005]] and the [[2S3M]], the Type 75 has a fully automatic autoloader and will always reload about as fast as a medium tank | + | * Large gun can devastate enemies in one shot |
| − | * The low velocity of the stock shell makes it possible to fire from behind some hills while keeping most of the Type 75 hidden | + | * Good mobility |
| − | * Has the privilege of the proximity fuse shell, which allows tank destroyers to take out enemies behind cover and exploit their normally untouchable weaknesses | + | * Unlike a lot of other SPGs, has access to a turret |
| − | * Angled turret can sustain a point-blank fire of 12.7 mm and some damage can be taken without instantly exploding the tank or reducing reload speed down to 1.5 minutes like in the case of [[FV4005]], although an enemy should be kept on the left side to have a chance of survival | + | * Has a .50 caliber machine gun for deterring aircraft and choppers |
| | + | |
| | + | * |
| | | | |
| | '''Cons:''' | | '''Cons:''' |
| | | | |
| − | * Can be destroyed easily by large-calibre explosive shells or ATGM hitting the turret or the back of the tank, the operator can't be oblivious of their surroundings | + | * Armor protection is not very good |
| − | * Most of critical components and crew are located in the turret, meaning it can be destroyed or incapacitated in one good hit to the turret
| + | |
| − | * Turret is rather slow, though movements are mostly smooth
| + | * |
| − | * 12.7 mm rounds have no problem penetrating the front of the turret
| |
| − | * Noticeably bouncy when braking | |
| | | | |
| | == History == | | == History == |
| − | <!-- ''Describe the history of the creation and combat usage of the vehicle in more detail than in the introduction. If the historical reference turns out to be too long, take it to a separate article, taking a link to the article about the vehicle and adding a block "/History" (example: <nowiki>https://wiki.warthunder.com/(Vehicle-name)/History</nowiki>) and add a link to it here using the <code>main</code> template. Be sure to reference text and sources by using <code><nowiki><ref></ref></nowiki></code>, as well as adding them at the end of the article with <code><nowiki><references /></nowiki></code>. This section may also include the vehicle's dev blog entry (if applicable) and the in-game encyclopedia description (under <code><nowiki>=== In-game description ===</nowiki></code>, also if applicable).'' --> | + | <!--Describe the history of the creation and combat usage of the ground vehicle in more detail than in the introduction. If the historical reference turns out to be too long, take it to a separate article, taking a link to the article about the vehicle and adding a block "/ History" (example: <nowiki>https://wiki.warthunder.com/(Vehicle-name)/History</nowiki>) and add a link to it here using the <code>main</code> template. Be sure to reference text and sources by using <code><nowiki><ref></nowiki></code>, as well as adding them at the end of the article. This section may also include the vehicle's dev blog entry (if applicable) and the in-game encyclopedia description (under <code><nowiki>=== In-game description ===</nowiki></code>, also if applicable).--> |
| | Development of the Type 75 self-propelled howitzer began in the late 1960s, when Japan sought to procure a mobile self-propelled artillery unit alongside a smaller caliber SPG. This resulted in the creation of the Type 75 and Type 74, respectively. | | Development of the Type 75 self-propelled howitzer began in the late 1960s, when Japan sought to procure a mobile self-propelled artillery unit alongside a smaller caliber SPG. This resulted in the creation of the Type 75 and Type 74, respectively. |
| | | | |
| − | The Type 75's design was largely based on that of the existing Type 74 SPG and Type 73 APCs, sharing many components and even assembly lines, all in an effort to reduce costs and save resources. Development was split between two Japanese companies, with Mitsubishi Heavy Industries developing the chassis, while Japan Steel Works developed the turret and cannon. | + | The Type 75’s design was largely based on that of the existing Type 74 SPG and Type 73 APCs, sharing many components and even assembly lines, all in an effort to reduce costs and save resources. Development was split between two Japanese companies, with Mitsubishi Heavy Industries developing the chassis, while Japan Steel Works developed the turret and cannon. |
| | | | |
| | Two prototypes were ready by the early 1970s, differing only in the type of loading mechanism used. Trials of these prototypes were conducted between 1973 - 1974. In October 1975, based on the test results, the prototype with a drum-fed autoloading mechanism was picked for series production. | | Two prototypes were ready by the early 1970s, differing only in the type of loading mechanism used. Trials of these prototypes were conducted between 1973 - 1974. In October 1975, based on the test results, the prototype with a drum-fed autoloading mechanism was picked for series production. |
| Line 235: |
Line 60: |
| | | | |
| | == Media == | | == Media == |
| − | <!-- ''Excellent additions to the article would be video guides, screenshots from the game, and photos.'' -->
| + | ''Excellent additions to the article would be video guides, screenshots from the game, and photos.'' |
| | | | |
| − | ;Skins
| + | == See also == |
| | + | ''Links to the articles on the War Thunder Wiki that you think will be useful for the reader, for example:'' |
| | | | |
| − | * [https://live.warthunder.com/feed/camouflages/?vehicle=jp_type_75 Skins and camouflages for the {{PAGENAME}} from live.warthunder.com.]
| |
| − | {{Skin-gallery
| |
| − | |market|ugcitem_1000479|Type 75 SPH of the Fuji Artillery School Corps.png|Camo "Fuji Tank Instructor Corps"
| |
| − | |market|ugcitem_1001419|Type 75 SPH of the 7th Artillery Regiment.png|Camo "7th Artillery Regiment"
| |
| − | }}
| |
| − |
| |
| − | ;Videos
| |
| − | {{Youtube-gallery|ux3UJ8qg8Go|'''The Shooting Range #268''' - ''Round Study'' section at 06:45 compares the rounds of the {{PAGENAME}}.|e2VsOCEhzy4|'''The Shooting Range #170''' - ''Metal Beasts'' section at 00:32 discusses the Type 75 SPH.}}
| |
| − |
| |
| − | == See also ==
| |
| − | <!-- ''Links to the articles on the War Thunder Wiki that you think will be useful for the reader, for example:''
| |
| | * ''reference to the series of the vehicles;'' | | * ''reference to the series of the vehicles;'' |
| − | * ''links to approximate analogues of other nations and research trees.'' --> | + | * ''links to approximate analogues of other nations and research trees.'' |
| − | | |
| − | * [[2S3M]]
| |
| − | * [[Bkan 1C]]
| |
| | | | |
| | == External links == | | == External links == |
| − | <!-- ''Paste links to sources and external resources, such as:'' | + | <!--Paste links to sources and external resources, such as: |
| | * ''topic on the official game forum;'' | | * ''topic on the official game forum;'' |
| − | * ''other literature.'' --> | + | * ''encyclopedia page on the tank;'' |
| | + | * ''other literature.''--> |
| | | | |
| − | * [[wt:en/news/6361-development-type-75-the-pulverizer-en/|[Development] Type 75: The Pulverizer]] | + | * [[wt:en/news/6361-development-type-75-the-pulverizer-en/|[Development<nowiki>]</nowiki> Type 75: The Pulverizer]] |
| | | | |
| − | {{Manufacturer MHI}}
| |
| | {{Japan tank destroyers}} | | {{Japan tank destroyers}} |
Type 75 SPH
Research:63 000 
Purchase:200 000 
Description
The Type 75 SPH is a rank IV Japanese tank destroyer
with a battle rating of 6.7 (AB) and 6.3 (RB/SB). It was introduced in Update 1.91 "Night Vision".
General info
Survivability and armour
Describe armour protection. Note the most well protected and key weak areas. Appreciate the layout of modules as well as the number and location of crew members. Is the level of armour protection sufficient, is the placement of modules helpful for survival in combat?
If necessary use a visual template to indicate the most secure and weak zones of the armour.
Mobility
- Write about the mobility of the ground vehicle. Estimate the specific power and manoeuvrability, as well as the maximum speed forwards and backwards.
Armaments
Main armament
Give the reader information about the characteristics of the main gun. Assess its effectiveness in a battle based on the reloading speed, ballistics and the power of shells. Do not forget about the flexibility of the fire, that is how quickly the cannon can be aimed at the target, open fire on it and aim at another enemy. Add a link to the main article on the gun: {{main|Name of the weapon}}. Describe in general terms the ammunition available for the main gun. Give advice on how to use them and how to fill the ammunition storage.
Machine guns
Offensive and anti-aircraft machine guns not only allow you to fight some aircraft but also are effective against lightly armoured vehicles. Evaluate machine guns and give recommendations on its use.
Usage in battles
Describe the tactics of playing in the vehicle, the features of using vehicles in the team and advice on tactics. Refrain from creating a "guide" - do not impose a single point of view but instead give the reader food for thought. Describe the most dangerous enemies and give recommendations on fighting them. If necessary, note the specifics of the game in different modes (AB, RB, SB).
Pros and cons
Summarise and briefly evaluate the vehicle in terms of its characteristics and combat effectiveness. Mark its pros and cons in a bulleted list. Try not to use more than 6 points for each of the characteristics. Avoid using categorical definitions such as "bad", "good" and the like - use substitutions with softer forms such as "inadequate" and "effective".
Pros:
- Large gun can devastate enemies in one shot
- Good mobility
- Unlike a lot of other SPGs, has access to a turret
- Has a .50 caliber machine gun for deterring aircraft and choppers
Cons:
- Armor protection is not very good
History
Development of the Type 75 self-propelled howitzer began in the late 1960s, when Japan sought to procure a mobile self-propelled artillery unit alongside a smaller caliber SPG. This resulted in the creation of the Type 75 and Type 74, respectively.
The Type 75’s design was largely based on that of the existing Type 74 SPG and Type 73 APCs, sharing many components and even assembly lines, all in an effort to reduce costs and save resources. Development was split between two Japanese companies, with Mitsubishi Heavy Industries developing the chassis, while Japan Steel Works developed the turret and cannon.
Two prototypes were ready by the early 1970s, differing only in the type of loading mechanism used. Trials of these prototypes were conducted between 1973 - 1974. In October 1975, based on the test results, the prototype with a drum-fed autoloading mechanism was picked for series production.
Production of the Type 75 commenced in 1975 and went on until 1988, when all of the initially ordered 201 units were built. Although the Type 75 is still in active service with the JGSDF since their initial introduction in 1975, the number of units has gradually been decreasing in recent years as the Type 75 is slowly being phased out and replaced by the Type 99 155mm self-propelled howitzer.
The Type 75 has not yet participated in any combat operations during its service life and has been exclusively operated by the JGSDF thus far.
- From Devblog
Media
Excellent additions to the article would be video guides, screenshots from the game, and photos.
See also
Links to the articles on the War Thunder Wiki that you think will be useful for the reader, for example:
- reference to the series of the vehicles;
- links to approximate analogues of other nations and research trees.
External links