Difference between revisions of "FV4005"
(→History) (Tag: Visual edit) |
m (Wikipedia link added / Link to Skins in WT Live) |
||
| (47 intermediate revisions by 18 users not shown) | |||
| Line 1: | Line 1: | ||
| − | {{Specs-Card | + | {{Specs-Card|code=uk_fv4005}} |
| − | |code=uk_fv4005 | ||
| − | |||
| − | }} | ||
== Description == | == Description == | ||
| − | <!-- ''In the description, the first part | + | <!--''In the description, the first part needs to be about the history of the creation and combat usage of the vehicle, as well as its key features. In the second part, tell the reader about the ground vehicle in the game. Insert the screenshot of the vehicle. If the novice player does not remember the vehicle by name, they will immediately understand what kind of vehicle it is talking about.''--> |
| − | + | [[File:GarageImage_{{PAGENAME}}.jpg|420px|thumb|left]] | |
| − | + | {{break}} | |
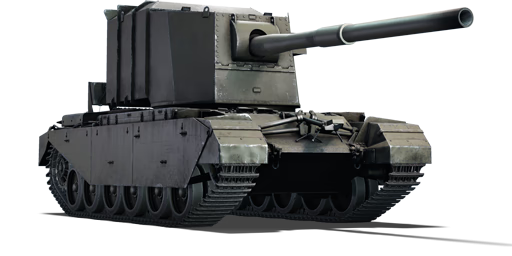
| − | + | The '''{{Specs|name}}''' is a Rank {{Specs|rank}} British tank destroyer {{Battle-rating}}. It was introduced in [[Update 1.67 "Assault"]]. | |
== General info == | == General info == | ||
=== Survivability and armour === | === Survivability and armour === | ||
| − | + | <!--''Describe armour protection. Note the most well protected and key weak areas. Appreciate the layout of modules as well as the number and location of crew members. Is the level of armour protection sufficient, is the placement of modules helpful for survival in combat?'' | |
| − | <!-- ''Describe armour protection. Note the most well protected and key weak areas. Appreciate the layout of modules as well as the number and location of crew members. Is the level of armour protection sufficient, is the placement of modules helpful for survival in combat? | ||
| − | |||
| − | + | ''If necessary use a visual template to indicate the most secure and weak zones of the armour.''--> | |
| + | With the turret armour at a laughable 14 mm of armour thickness all around, every tank and nearly every aircraft in the game poses a significant threat. If the enemy tank or aircraft has just one machine gun that fires bullets bigger than .30 caliber, they can easily kill this tank. | ||
'''Armour type:''' | '''Armour type:''' | ||
| − | * Rolled homogeneous armour | + | * Rolled homogeneous armour |
* Cast homogeneous armour (Gun mantlet) | * Cast homogeneous armour (Gun mantlet) | ||
| Line 29: | Line 25: | ||
| Hull || 76.2 mm (61°) ''Front glacis'' <br> 76.2 mm (44°) ''Lower glacis'' || 50.8 (12°) + 6 mm || 38 mm (6°) ''Top'' <br> 38 mm (13°) ''Bottom'' || 38 mm <br> 29 mm ''Engine deck'' | | Hull || 76.2 mm (61°) ''Front glacis'' <br> 76.2 mm (44°) ''Lower glacis'' || 50.8 (12°) + 6 mm || 38 mm (6°) ''Top'' <br> 38 mm (13°) ''Bottom'' || 38 mm <br> 29 mm ''Engine deck'' | ||
|- | |- | ||
| − | | Turret || 14 mm (10°) ''Turret front'' <br> 14 mm (12-61°) ''Gun mantlet'' || 14 mm (0-8°) || 14 mm (1°) || 14 mm | + | | Turret || 14 mm (10°) ''Turret front'' <br> 14 mm (12-61°) ''Gun mantlet'' || 14 mm (0-8°) || 14 mm (1°) || 14 mm |
|- | |- | ||
|} | |} | ||
'''Notes:''' | '''Notes:''' | ||
| − | * Tracks and suspension wheels are both 20 mm thick. | + | *Tracks and suspension wheels are both 20 mm thick. |
| − | * Spaced armour plates are placed on the side of the Centurion chassis, giving an additional 6 mm of side armour. | + | *Spaced armour plates are placed on the side of the Centurion chassis, giving an additional 6 mm of side armour. |
| − | * The rear has a steel rack providing an additional 15 mm of protection. | + | *The rear has a steel rack providing an additional 15 mm of protection. |
| − | + | ==== Crew ==== | |
* Commander | * Commander | ||
| Line 48: | Line 44: | ||
=== Mobility === | === Mobility === | ||
| − | + | <!--''Write about the mobility of the ground vehicle. Estimate the specific power and maneuverability as well as the maximum speed forward and backward.''--> | |
| − | <!-- ''Write about the mobility of the ground vehicle. Estimate the specific power and | + | {| class="wikitable" style="text-align:center" |
| − | + | |- | |
| − | { | + | ! colspan="3" | Mobility characteristic |
| − | + | |- | |
| − | + | ! Weight (tons) | |
| − | + | ! colspan="1" | Add-on Armour<br>weight (tons) | |
| − | + | ! colspan="1" | Max speed (km/h) | |
| − | + | |- | |
| − | + | | rowspan="2" | 59.5 || colspan="1" rowspan="2" | N/A || colspan="1" | 30 (AB) | |
| − | + | |- | |
| + | |28 (RB/SB) | ||
| + | |- | ||
| + | ! colspan="3" | Engine power (horsepower) | ||
| + | |- | ||
| + | ! colspan="1" | Mode | ||
| + | !Stock | ||
| + | !Upgraded | ||
| + | |- | ||
| + | |''Arcade'' | ||
| + | |923 | ||
| + | |1,137 | ||
| + | |- | ||
| + | |''Realistic/Simulator'' | ||
| + | |575 | ||
| + | |650 | ||
| + | |- | ||
| + | ! colspan="3" | Power-to-weight ratio (hp/ton) | ||
| + | |- | ||
| + | ! colspan="1" | Mode | ||
| + | !Stock | ||
| + | !Upgraded | ||
| + | |- | ||
| + | |''Arcade'' | ||
| + | |15.51 | ||
| + | |19.11 | ||
| + | |- | ||
| + | |''Realistic/Simulator'' | ||
| + | |9.66 | ||
| + | |12.92 | ||
| + | |- | ||
| + | |} | ||
== Armaments == | == Armaments == | ||
| − | |||
=== Main armament === | === Main armament === | ||
| − | + | <!--''Give the reader information about the characteristics of the main gun. Assess its effectiveness in a battle based on the reloading speed, ballistics and the power of shells. Do not forget about the flexibility of the fire, that is how quickly the cannon can be aimed at the target, open fire on it and aim at another enemy. Add a link to the main article on the gun: <code><nowiki>{{main|Name of the weapon}}</nowiki></code>. Describe in general terms the ammunition available for the main gun. Give advice on how to use them and how to fill the ammunition storage.''--> | |
| − | <!-- ''Give the reader information about the characteristics of the main gun. Assess its effectiveness in a battle based on the reloading speed, ballistics and the power of shells. Do not forget about the flexibility of the fire, that is how quickly the cannon can be aimed at the target, open fire on it and aim at another enemy. Add a link to the main article on the gun: <code><nowiki>{{main|Name of the weapon}}</nowiki></code>. Describe in general terms the ammunition available for the main gun. Give advice on how to use them and how to fill the ammunition storage.'' --> | + | {{main|Ordnance QF L4 (183 mm)}} |
| − | {{main|QF | ||
| − | + | {| class="wikitable" style="text-align:center" | |
| + | |- | ||
| + | ! colspan="6" | [[Ordnance QF L4 (183 mm)|183 mm QF L4A1]] | ||
| + | |- | ||
| + | ! colspan="3" rowspan="1" style="width:5em" |Capacity | ||
| + | ! rowspan="1" | Vertical <br> guidance | ||
| + | ! rowspan="1" | Horizontal <br> guidance | ||
| + | ! rowspan="1" | Stabilizer | ||
| + | |- | ||
| + | | colspan="3" | 12 || -7°/+15° || ±45° || N/A | ||
| + | |- | ||
| + | ! colspan="6" | Turret rotation speed (°/s) | ||
| + | |- | ||
| + | ! style="width:4em" |Mode | ||
| + | ! style="width:4em" |Stock | ||
| + | ! style="width:4em" |Upgraded | ||
| + | ! style="width:4em" |Prior + Full crew | ||
| + | ! style="width:4em" |Prior + Expert qualif. | ||
| + | ! style="width:4em" |Prior + Ace qualif. | ||
| + | |- | ||
| + | | ''Arcade'' || 15.9 || 21.94 || 26.64 || 29.46 || 31.34 | ||
| + | |- | ||
| + | | ''Realistic'' || 10.7 || 12.6 || 15.3 || 16.92 || 18.00 | ||
| + | |- | ||
| + | ! colspan="4" | Reloading rate (seconds) | ||
| + | |- | ||
| + | ! colspan="1" style="width:4em" |Stock | ||
| + | ! colspan="1" style="width:4em" |Prior + Full crew | ||
| + | ! colspan="1" style="width:4em" |Prior + Expert qualif. | ||
| + | ! colspan="1" style="width:4em" |Prior + Ace qualif. | ||
| + | |- | ||
| + | | 43.3 || 34.38 || 31.69 || 29.9 | ||
| + | |- | ||
| + | |} | ||
| − | + | ===== Ammunition ===== | |
| − | + | {| class="wikitable sortable" style="text-align:center" width="100%" | |
| − | + | ! colspan="8" | Penetration statistics | |
| − | + | |- | |
| − | + | ! rowspan="2" data-sort-type="text" | Ammunition | |
| − | + | ! rowspan="2" class="unsortable" | Type of <br /> warhead | |
| − | {| class="wikitable" style="text-align:center" width="100%" | + | ! colspan="6" | '''Penetration''' '''''in mm''''' '''@ 0° Angle of Attack''' |
| + | |- | ||
| + | ! 10m | ||
| + | ! 100m | ||
| + | ! 500m | ||
| + | ! 1000m | ||
| + | ! 1500m | ||
| + | ! 2000m | ||
| + | |- | ||
| + | | Shell L1 || HESH || 228 || 228 || 228 || 228 || 228 || 228 | ||
|- | |- | ||
| − | + | |} | |
| + | '''Important note:''' HESH penetrates better, when hits target at angle, but there is a limit to this effect, due to ricochet chance. In the case of this shell at 30 degrees penetration value is 240 mm, and at 60 degrees penetration value is 256 mm. | ||
| + | {| class="wikitable sortable" style="text-align:center" width="100%" | ||
| + | ! colspan="11" | Shell details | ||
|- | |- | ||
| − | ! | + | ! rowspan="2" data-sort-type="text" | Ammunition |
| − | ! | + | ! rowspan="2" class="unsortable" | Type of <br /> warhead |
| − | ! | + | ! rowspan="2" |Velocity <br /> in m/s |
| + | ! rowspan="2" |Projectile<br />Mass in kg | ||
| + | ! rowspan="2" | ''Fuse delay'' | ||
| + | ''in m:'' | ||
| + | ! rowspan="2" | ''Fuse sensitivity'' | ||
| + | ''in mm:'' | ||
| + | ! rowspan="2" | ''Explosive Mass in g<br /> (TNT equivalent):'' | ||
| + | ! rowspan="2" | ''Normalization At 30° <br> from horizontal:'' | ||
| + | ! colspan="3" | ''Ricochet:'' | ||
|- | |- | ||
| − | ! | + | ! 0% |
| − | + | ! 50% | |
| + | ! 100% | ||
|- | |- | ||
| − | + | | Shell L1 || HESH || 716 || 72 || 0.4 || 2.0 ||28,900|| +0° || 73° || 77° || 80° | |
| − | | | ||
|- | |- | ||
|} | |} | ||
| − | ==== | + | ===== [[Ammo racks|Ammo racks]] ===== |
| − | {{ | + | [[File:Ammoracks_{{PAGENAME}}.png|right|thumbnail|x250px|[[Ammo racks|Ammo racks]] of the FV4005.]] |
| − | + | {| class="wikitable sortable" style="text-align:center" | |
| − | |||
| − | |||
| − | |||
| − | |||
| − | {| class="wikitable" style="text-align:center" | ||
|- | |- | ||
| − | ! Full<br>ammo | + | ! class="wikitable unsortable" |Full<br /> ammo |
| − | ! Ammo<br> | + | ! class="wikitable unsortable" |Ammo<br /> part |
| − | ! 1st<br>rack empty | + | ! class="wikitable unsortable" |1st<br /> rack empty |
| − | ! 2nd<br>rack empty | + | ! class="wikitable unsortable" |2nd<br /> rack empty |
| − | ! 3rd<br>rack empty | + | ! class="wikitable unsortable" |3rd<br /> rack empty |
| − | ! 4th<br>rack empty | + | ! class="wikitable unsortable" |4th<br /> rack empty |
| − | ! | + | ! class="wikitable unsortable" |Visual<br /> discrepancy |
| − | |||
| − | |||
|- | |- | ||
| − | | '''12''' || ''Projectiles''<br>''Propellants'' || 7 ''(+5)''<br> 11 ''(+1)'' || 1 ''(+11)'' <br> 9 ''(+3)'' || | + | || '''12''' || ''Projectiles''<br />''Propellants'' || 7 ''(+5)''<br />11 ''(+1)'' || 1 ''(+11)''<br />9 ''(+3)'' || <br />5 ''(+7)'' || <br />1 ''(+11)'' || style="text-align:left" | yes |
|- | |- | ||
|} | |} | ||
| − | |||
| − | |||
| − | |||
| − | |||
| − | |||
| − | |||
=== Machine guns === | === Machine guns === | ||
| − | + | <!--''Offensive and anti-aircraft machine guns not only allow you to fight some aircraft, but also are effective against lightly armoured vehicles. Evaluate machine guns and give recommendations on its use.''--> | |
| − | <!-- ''Offensive and anti-aircraft machine guns not only allow you to fight some aircraft but also are effective against lightly armoured vehicles. Evaluate machine guns and give recommendations on its use.'' --> | ||
{{main|L3A1 (7.62 mm)}} | {{main|L3A1 (7.62 mm)}} | ||
| − | + | {| class="wikitable" style="text-align:center" | |
| − | + | |- | |
| − | {| class="wikitable" style="text-align:center" | + | ! colspan="7" | [[L3A1 (7.62 mm)|7.62 mm L3A1]] |
|- | |- | ||
| − | ! colspan=" | + | ! colspan="7" | ''Coaxial mount'' |
|- | |- | ||
| − | ! | + | ! colspan="4" rowspan="1" style="width:5em" |Capacity (Belt capacity) |
| + | ! rowspan="1" | Fire rate <br> (shots/minute) | ||
| + | ! rowspan="1" | Vertical <br> guidance | ||
| + | ! rowspan="1" | Horizontal <br> guidance | ||
|- | |- | ||
| − | | | + | | colspan="4" | 3,600 (250) || 500 || N/A || N/A |
|- | |- | ||
|} | |} | ||
== Usage in battles == | == Usage in battles == | ||
| − | <!-- ''Describe the tactics of playing in the vehicle, the features of using vehicles in the team and advice on tactics. Refrain from creating a "guide" - do not impose a single point of view but instead give the reader food for thought. Describe the most dangerous enemies and give recommendations on fighting them. If necessary, note the specifics of the game in different modes (AB, RB, SB).'' --> | + | <!--''Describe the tactics of playing in the vehicle, the features of using vehicles in the team and advice on tactics. Refrain from creating a "guide" - do not impose a single point of view but instead give the reader food for thought. Describe the most dangerous enemies and give recommendations on fighting them. If necessary, note the specifics of the game in different modes (AB, RB, SB).''--> |
| − | The main | + | The main ingame use of this tank is elimination of hulldown tanks (similar to [[T30]]), super-armoured heavy tanks in general (similar to [[IS-7]]), well armoured spg's (similiar to [[Ho-Ri_Production|Ho-Ri]]) and the likes of them. Meanwhile, you still can help your team by hiding around and eliminating reckless rushers in 1 hit, when they aren't looking. |
| − | Your main goal in between your hunts is to survive and stay hidden, as you only have enough armour to stop 7. | + | Your main goal in between your hunts is to survive and stay hidden, as you only have enough armour to stop 7.64 mm machineguns, and your reloading time is exceptionally long, especially if you lose either of the loaders. Contrary to popular belief, if you aim poorly with FV4005 it '''does not''' one shot anything out of existence anyway. You should first get out of your cover (or wait for enemy to get into your firing lines), then take aim at enemy, and '''only then''' fire. HESH shell will do the rest for you, if your aim and weakspot suggestion was correct. |
| − | + | Weakspots depend on mode you play in. As example, for most Soviet Union tanks the frontal weak spot is the left side of hull (for you - right side). It's also possible to target the back of their turrets in Realistic battle. However, if you fire at back of the turret of IS-2 in arcade mode, it may '''still''' survive with just 1 crew member (driver with very high "vitality" level), go into "last stand" mode, turn it's turret and fire back at you. As such, try to aim at places, from which spalling can definitely hit every last crew member. | |
| − | + | likewise, in arcade mode it's not enough to just eliminate crew in your turret, and your driver is hidden in decently armoured hull. However, if your gun breech got damaged, there is a chance, that the shell in it will also be destroyed, and you won't be able to avenge yourself. | |
| − | + | Going into sniper duels without preparations, like rangefinding and adjusting the gun beforehand, with this tank is ill advised, as any sniper tank needs significantly less time to aim at you, due to fact that your turret cannot turn freely, your enormous profile and different ammunition type. They also can destroy you in 1 hit as well, by hitting your ammo. | |
| − | + | ===Modules=== | |
| − | + | {| class="wikitable" | |
| − | + | ! Tier | |
| − | + | ! Mobility | |
| − | + | ! Protection | |
| − | + | ! Firepower | |
| − | + | |- | |
| + | | I | ||
| + | | Tracks | ||
| + | | Parts | ||
| + | | Horizontal drive | ||
| + | |- | ||
| + | | II | ||
| + | | Suspension, Brake system | ||
| + | | FPE | ||
| + | | Adjustment of fire | ||
| + | |- | ||
| + | | III | ||
| + | | Filters | ||
| + | | Crew replenishment | ||
| + | | Elevation mechanism | ||
| + | |- | ||
| + | | IV | ||
| + | | Transmission, Engine | ||
| + | | | ||
| + | | | ||
| + | |- | ||
| + | |} | ||
=== Pros and cons === | === Pros and cons === | ||
| − | <!-- '' | + | <!--''Summarize and briefly evaluate the vehicle in terms of its characteristics and combat effectiveness. Mark its pros and cons in a bulleted list. Try not to use more than 6 points for each of the characteristics. Avoid using categorical definitions such as "bad", "good" and the like - they can be substituted with softer forms such as "inadequate" and "effective".''--> |
| − | |||
'''Pros:''' | '''Pros:''' | ||
| − | * | + | * The FV4005 is armed with the gigantic 183mm cannon, which is the biggest and most powerful gun in the game. Even a shot from the gigantic 183mm shell that only hits the tracks of an enemy tank can create enough spalling, which travels into the hull of the enemies tank, can leave it severely crippled. |
| − | * | + | * 183mm HESH will cause the spalling of enemy armour that is 254 mm thick or less. Which give this gun enough penetrating power to potentially destroy a Maus or E-100 even when firing at the upper glacis plate of either tank. |
| + | * Has Centurion hull armour. | ||
* Large gun breech can potentially protect some of the turret crew from incoming fire and shrapnel. | * Large gun breech can potentially protect some of the turret crew from incoming fire and shrapnel. | ||
| − | * The co-axial machine gun has a very similar trajectory to the 183 mm gun, making it ideal for ranging | + | * The co-axial machine gun has a very similar trajectory to the 183 mm gun, making it ideal for ranging |
| − | |||
| − | |||
| − | |||
'''Cons:''' | '''Cons:''' | ||
| − | * | + | * A large weak turret with only 14mm of armour all around. |
| − | * Lots of ammo lining the entire turret which can be detonated with little effort | + | * Lots of ammo lining the entire turret which can be detonated with little effort. |
| − | * 4 | + | * 4/5 crew in turret. An APHE penetration or high calibre HE shell hit will likely one shot the tank. |
| − | + | * Carries only 12 shells. | |
| − | * Carries only 12 shells | ||
| − | |||
| − | |||
| − | |||
== History == | == History == | ||
| − | <!-- ''Describe the history of the creation and combat usage of the vehicle in more detail than in the introduction. If the historical reference turns out to be too | + | <!--''Describe the history of the creation and combat usage of the ground vehicle in more detail than in the introduction. If the historical reference turns out to be too big, take it to a separate article, taking a link to the article about the vehicle and adding a block "/ History" (example: <nowiki>https://wiki.warthunder.com/(Vehicle-name)/History</nowiki>) and add a link to it here using the <code>main</code> template. Be sure to reference text and sources by using <code><nowiki><ref></nowiki></code>, as well as adding them at the end of the article. This section may also include the vehicle's devblog entry (if applicable) and the ingame encyclopedia description (under <code><nowiki>=== Encyclopedia Info ===</nowiki></code>, also if applicable).''--> |
| − | + | Work started on a 180 mm self-propelled gun in the 1950 by Nuffield Mechanizations & Aero. Designated the ''FV215B'', the plan was to mount the gun onto the Conqueror hull.<ref name="Ware pg79">Ware 2012a, p. 79</ref> It was intended for the three trial vehicles to be built from the span of 1951-1955. The project was cancelled in early 1957 with no prototypes produced.<ref name="Ware pg80">Ware 2012a, p. 80</ref> | |
| − | Work started on a 180 mm self-propelled gun in 1950 by Nuffield Mechanizations & Aero. Designated the ''FV215B'', the plan was to mount the gun onto the Conqueror hull.<ref name="Ware pg79">Ware 2012a, p. 79</ref> It was intended for the three trial vehicles to be built from the span of 1951-1955. The project was cancelled in early 1957 with no prototypes produced.<ref name="Ware pg80">Ware 2012a, p. 80</ref> | ||
During the development phase of the FV215B, another project was done on the [[Centurion Mk 3|Centurion]].<ref name="Ware pg80" /> Labeled the '''FV4005''', it was an attempt to mount the 180 mm on the Centurion hull. The design phase is distinctive in two parts, Stage I and II. Stage I had the gun mounted on an open-topped hull. The gun had a concentric recoil system and an auto-loader. '''Stage II''' had the gun encased in a lightly armoured, splinter-proof turret with a conventional recoil system and manual loading.<ref name="Ware pg78">Ware 2012a, p. 78</ref><ref name="Ware pg109">Ware 2012b, p. 109</ref> | During the development phase of the FV215B, another project was done on the [[Centurion Mk 3|Centurion]].<ref name="Ware pg80" /> Labeled the '''FV4005''', it was an attempt to mount the 180 mm on the Centurion hull. The design phase is distinctive in two parts, Stage I and II. Stage I had the gun mounted on an open-topped hull. The gun had a concentric recoil system and an auto-loader. '''Stage II''' had the gun encased in a lightly armoured, splinter-proof turret with a conventional recoil system and manual loading.<ref name="Ware pg78">Ware 2012a, p. 78</ref><ref name="Ware pg109">Ware 2012b, p. 109</ref> | ||
| − | In December 1952, the 180 mm gun was increased into a 183 mm gun mounting. Though a single prototype was made for testing, the project never passed basic feasibility. In August 1957, the project was abandoned as well.<ref name="Ware pg78" /><ref name="Ware pg109" /> The lone prototype is currently at | + | In December 1952, the 180 mm gun was increased into a 183 mm gun mounting. Though a single prototype was made for testing, the project never passed basic feasibility. In August 1957, the project was abandoned as well.<ref name="Ware pg78" /><ref name="Ware pg109" /> The lone prototype is currently stationed outside at Bovington Tank Museum. |
== Media == | == Media == | ||
| − | + | Skin and Camouflages for the [https://live.warthunder.com/feed/camouflages/?vehicleCountry=britain&vehicleType=tank&vehicleClass=tank_destroyer&vehicle=uk_fv4005 FV4005 Stage II] in Warthunder Live. | |
| − | + | ==References== | |
| + | '''Citations''' | ||
| + | <references /> | ||
| − | + | '''Bibliography''' | |
| − | + | * Ware Pat. ''Images of War: British Tanks: 1945 to the Present Day'' Great Britain: Pen & Sword Military, 2012a | |
| − | + | * Ware Pat. ''Images of War Special: The Centurion Tank'' Great Britain: Pen & Sword Military, 2012b | |
| − | |||
== See also == | == See also == | ||
| − | <!-- ''Links to the articles on the War Thunder Wiki that you think will be useful for the reader, for example:'' | + | <!--''Links to the articles on the War Thunder Wiki that you think will be useful for the reader, for example:'' |
* ''reference to the series of the vehicles;'' | * ''reference to the series of the vehicles;'' | ||
| − | * ''links to approximate analogues of other nations and research trees.'' --> | + | * ''links to approximate analogues of other nations and research trees.''--> |
| − | |||
* [[Conway]] - A vehicle built under a similar principle of a large gun on a Centurion chassis. | * [[Conway]] - A vehicle built under a similar principle of a large gun on a Centurion chassis. | ||
== External links == | == External links == | ||
| − | <!-- ''Paste links to sources and external resources, such as:'' | + | <!--''Paste links to sources and external resources, such as:'' |
* ''topic on the official game forum;'' | * ''topic on the official game forum;'' | ||
| − | * ''other literature.'' --> | + | * ''encyclopedia page on the tank;'' |
| − | + | * ''other literature.''--> | |
| − | * [ | + | * [https://warthunder.com/en/news/4540-development-fv4005-big-box-surprise-en/ [Devblog<nowiki>]</nowiki> FV4005 - Big Box Surprise] |
| − | * [ | + | * [https://en.wikipedia.org/wiki/Centurion_(tank)#Prototypes [Wikipedia<nowiki>]</nowiki> Centurion (tank)] |
| − | |||
| − | |||
| − | |||
| − | |||
| − | |||
| − | |||
| − | |||
| − | |||
| − | |||
| − | |||
| − | |||
{{Britain tank destroyers}} | {{Britain tank destroyers}} | ||
Revision as of 09:49, 5 April 2019
Contents
Description

The FV4005 Stage II is a Rank IV British tank destroyer
with a battle rating of 6.3 (AB/RB) and 6.7 (SB). It was introduced in Update 1.67 "Assault".
General info
Survivability and armour
With the turret armour at a laughable 14 mm of armour thickness all around, every tank and nearly every aircraft in the game poses a significant threat. If the enemy tank or aircraft has just one machine gun that fires bullets bigger than .30 caliber, they can easily kill this tank.
Armour type:
- Rolled homogeneous armour
- Cast homogeneous armour (Gun mantlet)
| Armour | Front | Sides | Rear | Roof |
|---|---|---|---|---|
| Hull | 76.2 mm (61°) Front glacis 76.2 mm (44°) Lower glacis |
50.8 (12°) + 6 mm | 38 mm (6°) Top 38 mm (13°) Bottom |
38 mm 29 mm Engine deck |
| Turret | 14 mm (10°) Turret front 14 mm (12-61°) Gun mantlet |
14 mm (0-8°) | 14 mm (1°) | 14 mm |
Notes:
- Tracks and suspension wheels are both 20 mm thick.
- Spaced armour plates are placed on the side of the Centurion chassis, giving an additional 6 mm of side armour.
- The rear has a steel rack providing an additional 15 mm of protection.
Crew
- Commander
- Gunner
- Loader x2
- Driver
Total: 5 crew members
Mobility
| Mobility characteristic | ||
|---|---|---|
| Weight (tons) | Add-on Armour weight (tons) |
Max speed (km/h) |
| 59.5 | N/A | 30 (AB) |
| 28 (RB/SB) | ||
| Engine power (horsepower) | ||
| Mode | Stock | Upgraded |
| Arcade | 923 | 1,137 |
| Realistic/Simulator | 575 | 650 |
| Power-to-weight ratio (hp/ton) | ||
| Mode | Stock | Upgraded |
| Arcade | 15.51 | 19.11 |
| Realistic/Simulator | 9.66 | 12.92 |
Armaments
Main armament
| 183 mm QF L4A1 | |||||
|---|---|---|---|---|---|
| Capacity | Vertical guidance |
Horizontal guidance |
Stabilizer | ||
| 12 | -7°/+15° | ±45° | N/A | ||
| Turret rotation speed (°/s) | |||||
| Mode | Stock | Upgraded | Prior + Full crew | Prior + Expert qualif. | Prior + Ace qualif. |
| Arcade | 15.9 | 21.94 | 26.64 | 29.46 | 31.34 |
| Realistic | 10.7 | 12.6 | 15.3 | 16.92 | 18.00 |
| Reloading rate (seconds) | |||||
| Stock | Prior + Full crew | Prior + Expert qualif. | Prior + Ace qualif. | ||
| 43.3 | 34.38 | 31.69 | 29.9 | ||
Ammunition
| Penetration statistics | |||||||
|---|---|---|---|---|---|---|---|
| Ammunition | Type of warhead |
Penetration in mm @ 0° Angle of Attack | |||||
| 10m | 100m | 500m | 1000m | 1500m | 2000m | ||
| Shell L1 | HESH | 228 | 228 | 228 | 228 | 228 | 228 |
Important note: HESH penetrates better, when hits target at angle, but there is a limit to this effect, due to ricochet chance. In the case of this shell at 30 degrees penetration value is 240 mm, and at 60 degrees penetration value is 256 mm.
| Shell details | ||||||||||
|---|---|---|---|---|---|---|---|---|---|---|
| Ammunition | Type of warhead |
Velocity in m/s |
Projectile Mass in kg |
Fuse delay
in m: |
Fuse sensitivity
in mm: |
Explosive Mass in g (TNT equivalent): |
Normalization At 30° from horizontal: |
Ricochet: | ||
| 0% | 50% | 100% | ||||||||
| Shell L1 | HESH | 716 | 72 | 0.4 | 2.0 | 28,900 | +0° | 73° | 77° | 80° |
Ammo racks

| Full ammo |
Ammo part |
1st rack empty |
2nd rack empty |
3rd rack empty |
4th rack empty |
Visual discrepancy |
|---|---|---|---|---|---|---|
| 12 | Projectiles Propellants |
7 (+5) 11 (+1) |
1 (+11) 9 (+3) |
5 (+7) |
1 (+11) |
yes |
Machine guns
| 7.62 mm L3A1 | ||||||
|---|---|---|---|---|---|---|
| Coaxial mount | ||||||
| Capacity (Belt capacity) | Fire rate (shots/minute) |
Vertical guidance |
Horizontal guidance | |||
| 3,600 (250) | 500 | N/A | N/A | |||
Usage in battles
The main ingame use of this tank is elimination of hulldown tanks (similar to T30), super-armoured heavy tanks in general (similar to IS-7), well armoured spg's (similiar to Ho-Ri) and the likes of them. Meanwhile, you still can help your team by hiding around and eliminating reckless rushers in 1 hit, when they aren't looking.
Your main goal in between your hunts is to survive and stay hidden, as you only have enough armour to stop 7.64 mm machineguns, and your reloading time is exceptionally long, especially if you lose either of the loaders. Contrary to popular belief, if you aim poorly with FV4005 it does not one shot anything out of existence anyway. You should first get out of your cover (or wait for enemy to get into your firing lines), then take aim at enemy, and only then fire. HESH shell will do the rest for you, if your aim and weakspot suggestion was correct.
Weakspots depend on mode you play in. As example, for most Soviet Union tanks the frontal weak spot is the left side of hull (for you - right side). It's also possible to target the back of their turrets in Realistic battle. However, if you fire at back of the turret of IS-2 in arcade mode, it may still survive with just 1 crew member (driver with very high "vitality" level), go into "last stand" mode, turn it's turret and fire back at you. As such, try to aim at places, from which spalling can definitely hit every last crew member.
likewise, in arcade mode it's not enough to just eliminate crew in your turret, and your driver is hidden in decently armoured hull. However, if your gun breech got damaged, there is a chance, that the shell in it will also be destroyed, and you won't be able to avenge yourself.
Going into sniper duels without preparations, like rangefinding and adjusting the gun beforehand, with this tank is ill advised, as any sniper tank needs significantly less time to aim at you, due to fact that your turret cannot turn freely, your enormous profile and different ammunition type. They also can destroy you in 1 hit as well, by hitting your ammo.
Modules
| Tier | Mobility | Protection | Firepower |
|---|---|---|---|
| I | Tracks | Parts | Horizontal drive |
| II | Suspension, Brake system | FPE | Adjustment of fire |
| III | Filters | Crew replenishment | Elevation mechanism |
| IV | Transmission, Engine |
Pros and cons
Pros:
- The FV4005 is armed with the gigantic 183mm cannon, which is the biggest and most powerful gun in the game. Even a shot from the gigantic 183mm shell that only hits the tracks of an enemy tank can create enough spalling, which travels into the hull of the enemies tank, can leave it severely crippled.
- 183mm HESH will cause the spalling of enemy armour that is 254 mm thick or less. Which give this gun enough penetrating power to potentially destroy a Maus or E-100 even when firing at the upper glacis plate of either tank.
- Has Centurion hull armour.
- Large gun breech can potentially protect some of the turret crew from incoming fire and shrapnel.
- The co-axial machine gun has a very similar trajectory to the 183 mm gun, making it ideal for ranging
Cons:
- A large weak turret with only 14mm of armour all around.
- Lots of ammo lining the entire turret which can be detonated with little effort.
- 4/5 crew in turret. An APHE penetration or high calibre HE shell hit will likely one shot the tank.
- Carries only 12 shells.
History
Work started on a 180 mm self-propelled gun in the 1950 by Nuffield Mechanizations & Aero. Designated the FV215B, the plan was to mount the gun onto the Conqueror hull.[1] It was intended for the three trial vehicles to be built from the span of 1951-1955. The project was cancelled in early 1957 with no prototypes produced.[2]
During the development phase of the FV215B, another project was done on the Centurion.[2] Labeled the FV4005, it was an attempt to mount the 180 mm on the Centurion hull. The design phase is distinctive in two parts, Stage I and II. Stage I had the gun mounted on an open-topped hull. The gun had a concentric recoil system and an auto-loader. Stage II had the gun encased in a lightly armoured, splinter-proof turret with a conventional recoil system and manual loading.[3][4]
In December 1952, the 180 mm gun was increased into a 183 mm gun mounting. Though a single prototype was made for testing, the project never passed basic feasibility. In August 1957, the project was abandoned as well.[3][4] The lone prototype is currently stationed outside at Bovington Tank Museum.
Media
Skin and Camouflages for the FV4005 Stage II in Warthunder Live.
References
Citations
Bibliography
- Ware Pat. Images of War: British Tanks: 1945 to the Present Day Great Britain: Pen & Sword Military, 2012a
- Ware Pat. Images of War Special: The Centurion Tank Great Britain: Pen & Sword Military, 2012b
See also
- Conway - A vehicle built under a similar principle of a large gun on a Centurion chassis.
External links
| Britain tank destroyers | |
|---|---|
| Infantry tank derivatives | Archer · Gun Carrier (3-in) |
| Light tank derivatives | Alecto I |
| M10 Achilles | Achilles · Achilles (65 Rg.) |
| Centurion derivatives | FV4005 · Conway |
| ATGM | Swingfire · Striker |
| Other | Tortoise · ▄M109A1 |
| Canada | QF 3.7 Ram · ADATS (M113) |
| South Africa | G6 · ZT3A2 |
