Difference between revisions of "ARL-44 (ACL-1)"
(→Main armament) (Tag: Visual edit) |
Colok76286 (talk | contribs) (→Usage in battles: Completed section) |
||
| Line 146: | Line 146: | ||
== Usage in battles == | == Usage in battles == | ||
| − | <!--''Describe the tactics of playing in the vehicle, the features of using vehicles in the team and advice on tactics. Refrain from creating a "guide" - do not impose a single point of view but instead give the reader food for thought. Describe the most dangerous enemies and give recommendations on fighting them. If necessary, note the specifics of the game in different modes (AB, RB, SB).''--> | + | <!-- ''Describe the tactics of playing in the vehicle, the features of using vehicles in the team and advice on tactics. Refrain from creating a "guide" - do not impose a single point of view but instead give the reader food for thought. Describe the most dangerous enemies and give recommendations on fighting them. If necessary, note the specifics of the game in different modes (AB, RB, SB).'' --> |
| − | |||
| − | + | ;Combat tactics | |
| + | The {{PAGENAME}} is a relatively well armoured vehicle and should be played as a support tank: take advantage of your strong armour to shrug enemy fire off from a distance while answering with well placed shots. Your frontal glacis and turret armour are strong enough to resist most enemy guns beyond 500 m. But there are weak spots your opponents will prioritize: the cupola and the turret cheeks. Refrain from rushing towards the frontline: your sides are weak and your turret traverse speed is slow so avoid close combat. Staying at a distance from the frontline will also prevent from being taken in a pincer move. | ||
| + | Your gun has a good penetration power allowing you to stay at a distance but the lack of explosive filler is detrimental to your performance as you'll need two to three shells to take down enemies. Your reload time is a bit longer than most opponents, so aim precisely and make every shot count. | ||
| + | Your mobility is rather poor, with a rigid suspension, outdated tracks and a long and cumbersome chassis. Terrain irregularities will make you slow down and hinder your progress. Position your hull carefully when getting to a shooting spot to avoid hull twitching that will impact your targeting process. | ||
| + | |||
| + | ;Notable enemies | ||
| + | * Tank destroyers with powerful guns that can penetrate you from afar: M10, StuG III F, YaG-10 (29-K), ASU-57, SU-85A, Achilles, Na-To, 90/53 M41M, Breda 501, Pvkv II and Pvkv m/43 (1946). You can add the Pz.IV F2, the Pz.IV G to the list as they sport powerful cannons too. | ||
| + | * Tanks firing HEAT shells that can defeat your frontal glacis: 75/34 M43, P40, | ||
| + | * Tanks whose cannon is powerful enough when in close proximity: any M24, any Sherman (M4, M4A1, M4A2, M4A4, M4A5), any T-34 (1941, 1942, 1943, E STz), any KV-2 (1939, 1940, 754), the Chi-Nu and the AMX-13 (FL11). | ||
| + | * Heavy tank able to resist your fire and get close enough to damage you: KV-1S, MK-II "Matilda" | ||
| + | |||
| + | ;How to defeat a {{PAGENAME}} | ||
| + | * Do not attack the {{PAGENAME}} frontally unless you have enough armour to afford it. | ||
| + | * Sneak around it and target the turret from the back or the side. The {{PAGENAME}} has a slow turret traverse and flat side and rear armour, making it especially vulnerable to flanking. | ||
| + | * If you have no other option than to attack it frontally, blind it with smoke before closing the gap. Target either the turret cheeks or the cupola as they are weak spots. | ||
=== Modules === | === Modules === | ||
Revision as of 16:16, 12 November 2020
Contents
| This page is about the heavy tank ARL-44 (ACL-1). For the tank destroyer version, see ARL-44. |
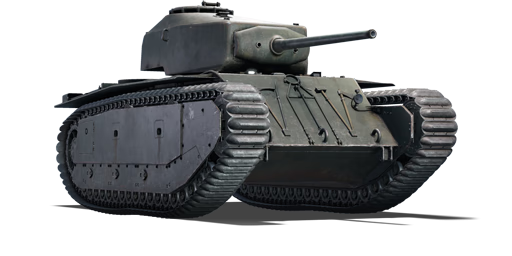
Description
.jpg)
The ARL-44 (ACL-1) is a Rank III French heavy tank
with a battle rating of 3.7 (AB/RB/SB). It was introduced in Update 1.75 "La Résistance". The ARL-44 (ACL-1) is the second heavy tank in the French tree. It is a well-rounded foe more suited for a medium tank role than an heavy one due to lacking armour (which is still very good). It distinguishes from previous French heavy tanks for having a potent gun. The ARL-44 (ACL-1) is a prototype design that would be finalized as the ARL-44.
The ARL-44 (ACL-1) bears very distinctive characteristics, with a WWI-style track system (similar to the Churchill) which runs across the whole side of its chassis. This tank is a mix of different inspirations, mainly late war German tank technology such as the Panther series or the Tiger II, from which it takes its slope frontal armour and tall profile. As France was reviving from WW2, its engineers were hard at work to catch up with tank technology, the ARL-44 series was a training ground for them. This is why this tank has rather weird design choices, coming from both experience and experimentation.
General info
Survivability and armour
The armour on this version of the ARL-44 is subpar as it can be penetrated by most foes it encounter from the front: with only 60 mm at 48°, it is weaker than a stock M4A3 Sherman (not even the Jumbo version). With that in mind, this tank should be kept a fair distance from the frontline. In order to put this "land battleship" to good use, it should be angled at about 25° facing towards the enemy. An even better way to maximise its armour is by keeping an hull-down position, using its -10° depression : turret armour is ~100 mm thick, with a bit of distance and angle, most rounds will not penetrate.
Be advised that this tank has 3 main ammo racks: between driver and machinegunner, in the turret's back and in the plain middle of the right track, shooting them down can be an easy ammo-rack explosion. Another thing to consider is this tank's large elevation mechanism, a penetrating shot to the tank's center of mass may damage/disable it, making it very hard for this foe to return fire.
Armour type:
| Armour | Front (Slope angle) | Sides | Rear | Roof |
|---|---|---|---|---|
| Hull | 60 mm (48°) Front glacis 60 mm (63°) Lower glacis 100 mm (1-80°) Machine gun port |
50 + (25-50) + 50 mm | 20 mm (72°) Top 35 mm (32°) Bottom |
20 mm |
| Turret | 100 mm (0-44°) Turret front 80 (0-79°) + 30 mm Gun mantlet |
60 mm (3-44°) | 30 mm (0-51°) 38 mm (0-21°) Rear hatch |
10 mm |
| Armour | Sides | Roof | ||
| Cupola | 60 mm | 10 mm |
Notes:
- Suspension wheel are 15 mm thick while tracks are 20 mm thick.
- 25 mm RHA plate separate the engine from the crew compartment.
- Turret ring is 55 mm thick, with an additional 20 mm armour behind it.
Mobility
| Game Mode | Max Speed (km/h) | Weight (tons) | Engine power (horsepower) | Power-to-weight ratio (hp/ton) | |||
|---|---|---|---|---|---|---|---|
| Forward | Reverse | Stock | Upgraded | Stock | Upgraded | ||
| Arcade | 40 | 9 | 47 | 775 | 1,145 | 16.49 | 24.36 |
| Realistic | 38 | 8 | 531 | 600 | 11.3 | 12.77 | |
At 47 tons, this is not a light tank, even more so that its tracks have bad ground traction. What saves this vehicles from feeling too slow is its 954 HP engine, capable of maintaining its top speed even when climbing slight hills. Do not expect too much from this tank, especially in highly inclined and soft terrains. Don't forget its reverse speed of only -4 km/h won't get you out quick of the situations: don't overextend.
Armaments
Main armament
| 75 mm SA44 | Turret rotation speed (°/s) | Reloading rate (seconds) | |||||||||||
|---|---|---|---|---|---|---|---|---|---|---|---|---|---|
| Mode | Capacity | Vertical | Horizontal | Stabilizer | Stock | Upgraded | Full | Expert | Aced | Stock | Full | Expert | Aced |
| Arcade | 37 | -10°/+20° | ±180° | N/A | 12.1 | 16.8 | 20.4 | 22.6 | 24.0 | 9.75 | 8.63 | 7.95 | 7.50 |
| Realistic | 8.9 | 10.5 | 12.8 | 14.1 | 15.0 | ||||||||
When compared to other tanks at the same battle rating, it has the same characteristics as other medium tanks' gun, the weak points being its lack of explosive filler and the long reload time.
Ammunition
| Penetration statistics | |||||||
|---|---|---|---|---|---|---|---|
| Ammunition | Type of warhead |
Penetration @ 0° Angle of Attack (mm) | |||||
| 10 m | 100 m | 500 m | 1,000 m | 1,500 m | 2,000 m | ||
| 75 mm OR Mle.44 | APC | 111 | 108 | 96 | 82 | 71 | 61 |
| 75 mm OE Mle.28 | HE | 10 | 10 | 10 | 10 | 10 | 10 |
| Shell details | |||||||||
|---|---|---|---|---|---|---|---|---|---|
| Ammunition | Type of warhead |
Velocity (m/s) |
Projectile Mass (kg) |
Fuse delay (m) |
Fuse sensitivity (mm) |
Explosive Mass (TNT equivalent) (g) |
Ricochet | ||
| 0% | 50% | 100% | |||||||
| 75 mm OR Mle.44 | APC | 700 | 6.5 | N/A | N/A | N/A | 48° | 63° | 71° |
| 75 mm OE Mle.28 | HE | 700 | 6.2 | 0.4 | 0.1 | 675 | 79° | 80° | 81° |
Ammo racks
.png)
| Full ammo |
1st rack empty |
2nd rack empty |
3rd rack empty |
Visual discrepancy |
|---|---|---|---|---|
| 37 | 25 (+12) | 13 (+24) | 1 (+36) | No |
Notes:
- Shells are modeled individually and disappear after having been shot or loaded.
- Turret empty: 25 (+12) shells
Machine guns
| 7.5 mm MAC 31 | ||||||
|---|---|---|---|---|---|---|
| Coaxial mount | ||||||
| Capacity (Belt capacity) | Fire rate (shots/minute) |
Vertical guidance |
Horizontal guidance | |||
| 5,000 (150) | 1,350 | N/A | N/A | |||
Usage in battles
- Combat tactics
The ARL-44 (ACL-1) is a relatively well armoured vehicle and should be played as a support tank: take advantage of your strong armour to shrug enemy fire off from a distance while answering with well placed shots. Your frontal glacis and turret armour are strong enough to resist most enemy guns beyond 500 m. But there are weak spots your opponents will prioritize: the cupola and the turret cheeks. Refrain from rushing towards the frontline: your sides are weak and your turret traverse speed is slow so avoid close combat. Staying at a distance from the frontline will also prevent from being taken in a pincer move. Your gun has a good penetration power allowing you to stay at a distance but the lack of explosive filler is detrimental to your performance as you'll need two to three shells to take down enemies. Your reload time is a bit longer than most opponents, so aim precisely and make every shot count. Your mobility is rather poor, with a rigid suspension, outdated tracks and a long and cumbersome chassis. Terrain irregularities will make you slow down and hinder your progress. Position your hull carefully when getting to a shooting spot to avoid hull twitching that will impact your targeting process.
- Notable enemies
- Tank destroyers with powerful guns that can penetrate you from afar: M10, StuG III F, YaG-10 (29-K), ASU-57, SU-85A, Achilles, Na-To, 90/53 M41M, Breda 501, Pvkv II and Pvkv m/43 (1946). You can add the Pz.IV F2, the Pz.IV G to the list as they sport powerful cannons too.
- Tanks firing HEAT shells that can defeat your frontal glacis: 75/34 M43, P40,
- Tanks whose cannon is powerful enough when in close proximity: any M24, any Sherman (M4, M4A1, M4A2, M4A4, M4A5), any T-34 (1941, 1942, 1943, E STz), any KV-2 (1939, 1940, 754), the Chi-Nu and the AMX-13 (FL11).
- Heavy tank able to resist your fire and get close enough to damage you: KV-1S, MK-II "Matilda"
- How to defeat a ARL-44 (ACL-1)
- Do not attack the ARL-44 (ACL-1) frontally unless you have enough armour to afford it.
- Sneak around it and target the turret from the back or the side. The ARL-44 (ACL-1) has a slow turret traverse and flat side and rear armour, making it especially vulnerable to flanking.
- If you have no other option than to attack it frontally, blind it with smoke before closing the gap. Target either the turret cheeks or the cupola as they are weak spots.
Modules
| Tier | Mobility | Protection | Firepower | |
|---|---|---|---|---|
| I | Tracks | Parts | Horizontal Drive | |
| II | Suspension | Brake System | FPE | Adjustment of Fire |
| III | Filters | Crew Replenishment | Elevation Mechanism | |
| IV | Transmission | Engine | ||
Pros and cons
Pros:
- Good gun
- Okay mobility for a heavy tank, suited with a powerful engine
- Hull turning is fast due to wide hull
- 5 crew members for increased internal survivability
- Thick side armour enables strong angling
- Complex side armour can negate HEAT round effectiveness
- -10° of gun depression
Cons:
- Large profile makes it a well-known battlefield target
- Many tanks can reliably penetrate its frontal armour.
- No explosives in APC shots
- Large elevation mechanism, often get damaged
- Bad ammo storage layout makes ammo rack shots frequent
- Track traction is subpar (pre-war track pattern)
- Thin roof armour
- Many shot traps
- Long reload time
- Only 2 shell choices
- Weak 20 mm plate in turret back protects one of the main ammo racks.
- Subpar reverse speed
History
Development
The ARL-44 (ACL-1) was the initial variant of the ARL-44 in 1944, with a 75 mm SA 44 gun, a 60 mm sloped front plate and an ACL1 turret designed by the shipyard "Ateliers et Chantiers de la Loire". Isolated from the latest evolutions of tank design, the tank was deemed too weak and sent back to the drawing board to equip the tank with better armour and firepower. The design evolved towards the known version of the ARL-44: a 90 mm gun, a Schneider turret and a 120 mm sloped front plate. While 60 ACL1 turrets were ordered, the ARL-44 (ACL-1) never made it past the prototype stage.
Combat usage
The ARL-44 (ACL-1) saw no service or combat action.
Media
- Skins
- Videos
See also
- Vehicles equipped with the same chassis
- Other vehicles of similar configuration and role
External links
| France heavy tanks | |
|---|---|
| B1 | B1 bis · B1 ter |
| 2C | 2C · 2C bis |
| ARL-44 | ARL-44 (ACL-1) |
| AMX-50 | Somua SM · AMX-50 Surbaissé · AMX-50 Surblindé |
| USA | ▄M4A3E2 |
