Difference between revisions of "M10 GMC (France)"
(→Description) |
TheMeanLemon (talk | contribs) (Edited the paragraph on survivability and armour, the main armament, copied the usage in battles paragraph from the American tree M10, updated penetration values) (Tag: Visual edit) |
||
| (35 intermediate revisions by 10 users not shown) | |||
| Line 1: | Line 1: | ||
| + | {{Specs-Card|code=fr_m10}} | ||
{{About | {{About | ||
| − | | about = tank destroyer '''{{PAGENAME}}''' | + | |about=French tank destroyer '''{{PAGENAME}}''' |
| − | + | |usage=other uses | |
| − | + | |link=M10 (Disambiguation) | |
| − | |||
| − | |usage | ||
| − | |link | ||
| − | |||
| − | |||
| − | |||
| − | |||
}} | }} | ||
== Description == | == Description == | ||
| − | <!-- ''In the description, the first part should be about the history of the creation and combat usage of the vehicle, as well as its key features. In the second part, tell the reader about the ground vehicle in the game. Insert a screenshot of the vehicle, so that if the novice player does not remember the vehicle by name, he will immediately understand what kind of vehicle the article is talking about.'' --> | + | <!-- ''In the description, the first part should be about the history of the creation and combat usage of the vehicle, as well as its key features. In the second part, tell the reader about the ground vehicle in the game. Insert a screenshot of the vehicle, so that if the novice player does not remember the vehicle by name, he will immediately understand what kind of vehicle the article is talking about.''--> |
| − | + | [[File:GarageImage_{{PAGENAME}}.jpg|420px|thumb|left]] | |
| + | {{break}} | ||
| + | The '''{{Specs|name}}''' ('''{{Specs|pseudonym}}''') is a Rank {{Specs|rank}} French tank destroyer {{Battle-rating}}. It was introduced in [[Update 1.75 "La Résistance"]]. | ||
| − | + | The M10 GMC takes much from the [[M4A2|M4A2 Sherman]] which it was derived from. The drivetrain is identical with the drive shaft running from the engine in the rear to the front transmission and sprockets. The hull is sloped to a larger degree. The [[M7 (76 mm)|3-inch (76 mm) cannon]] originally mounted on the experimental M6 Heavy Tank lacks the muzzle brake of the 76 mm M1A2 gun used on the later Rank III Sherman's and the [[M18 Hellcat]]. The turret is a pentagonal shaped M5 Mount type. | |
== General info == | == General info == | ||
=== Survivability and armour === | === Survivability and armour === | ||
| − | + | <!--''Describe armour protection. Note the most well protected and key weak areas. Appreciate the layout of modules as well as the number and location of crew members. Is the level of armour protection sufficient, is the placement of modules helpful for survival in combat?'' | |
| − | <!-- ''Describe armour protection. Note the most well protected and key weak areas. Appreciate the layout of modules as well as the number and location of crew members. Is the level of armour protection sufficient, is the placement of modules helpful for survival in combat? If necessary use a visual template to indicate the most secure and weak zones of the armour.'' --> | + | |
| + | ''If necessary use a visual template to indicate the most secure and weak zones of the armour.''--> | ||
| − | The armour of the M10 GMC is | + | The armour of the M10 GMC is essencially decent for the rank, and with proper angling is able to ricochet a lot of shells, however, the armour is not thick enough to resist any of the stronger tank weapons of Rank II and above. The sides and back are quite thin and are not able to resist most weapons stronger than a 12.7 machine gun. The front of the turret can often eat shells as the shell will fragment on the initial armour, and the massive breach of the 76mm cannon will often absorb most if not all of the fragmentation, leaving the crew untouched, allowing for a retreat and repair without crew losses. The turret's top is open and because it that it is quite vanurable to HE shells and planes, being able to survive artillery barrages that fall nearby due to the fact that the crew is protected by the angled sides of the turret. |
| − | '''Armour | + | '''Armour Type:''' |
*Rolled homogeneous armour | *Rolled homogeneous armour | ||
| − | *Cast homogeneous armour (Gun mantlet, Transmission | + | *Cast homogeneous armour (Gun mantlet, Transmission area) |
*Structural steel (Counterweight) | *Structural steel (Counterweight) | ||
| Line 35: | Line 32: | ||
! Armour !! Front (Slope angle) !! Sides !! Rear !! Roof | ! Armour !! Front (Slope angle) !! Sides !! Rear !! Roof | ||
|- | |- | ||
| − | | Hull || 38.1 mm (55°) | + | | Hull || 38.1 mm (55°) <br> 50.8 mm (7-55°) ''Transmission area'' || 19.05 mm (38°) ''Top'' <br> 25.4 mm ''Bottom'' || 19.05 mm (28°) ''Top'' <br> 25.4 mm (7-52°) ''Bottom'' || 19.05 mm ''Front'' <br> 9.5 mm ''Rear'' |
|- | |- | ||
| − | | Turret || 25.4 mm (68-89°) ''Turret front'' <br> 57.15 mm ( | + | | Turret || 25.4 mm (68-89°) ''Turret front'' <br> 57.15 mm (0-47°) ''Gun mantlet'' || 25.4 mm (24-47°) || 25.4 mm (30-47°) ''Turret rear'' <br> 50 mm (0-50°) ''Counterweight'' || N/A |
|- | |- | ||
|} | |} | ||
'''Notes:''' | '''Notes:''' | ||
| − | * Suspensions wheels | + | * Suspensions wheels are 20 mm thick, bogies are 10 mm thick, and tracks are 20 mm thick. |
* Belly armour is 12.7 mm thick. | * Belly armour is 12.7 mm thick. | ||
| − | + | * Hull rear sides are protected by attached grousers that gives 20 mm of extra armour. | |
| − | |||
| − | |||
| − | * Hull sides are protected by | ||
=== Mobility === | === Mobility === | ||
| − | + | <!--''Write about the mobility of the ground vehicle. Estimate the specific power and manoeuvrability, as well as the maximum speed forwards and backwards.''--> | |
| − | <!-- ''Write about the mobility of the ground vehicle. Estimate the specific power and manoeuvrability, as well as the maximum speed forwards and backwards.'' --> | + | {| class="wikitable" style="text-align:center" |
| − | + | |- | |
| − | + | ! colspan="3" | Mobility characteristic | |
| − | + | |- | |
| − | The | + | ! Weight (tons) |
| − | + | ! colspan="1" | Add-on Armor<br>weight (tons) | |
| − | + | ! colspan="1" | Max speed (km/h) | |
| − | + | |- | |
| − | + | | rowspan="2" | 29.6 || colspan="1" rowspan="2" | 0.5 || colspan="1" | 45 (AB) | |
| − | + | |- | |
| + | |41 (RB/SB) | ||
| + | |- | ||
| + | ! colspan="3" | Engine power (horsepower) | ||
| + | |- | ||
| + | ! colspan="1" | Mode | ||
| + | !Stock | ||
| + | !Upgraded | ||
| + | |- | ||
| + | |''Arcade'' | ||
| + | |582 | ||
| + | |717 | ||
| + | |- | ||
| + | |''Realistic/Simulator'' | ||
| + | |363 | ||
| + | |410 | ||
| + | |- | ||
| + | ! colspan="3" | Power-to-weight ratio (hp/ton) | ||
| + | |- | ||
| + | ! colspan="1" | Mode | ||
| + | !Stock | ||
| + | !Upgraded | ||
| + | |- | ||
| + | |''Arcade'' | ||
| + | |19.66 | ||
| + | |24.22 | ||
| + | |- | ||
| + | |''Realistic/Simulator'' | ||
| + | |12.26 | ||
| + | |13.85 | ||
| + | |- | ||
| + | |} | ||
| + | The M10 GMC has essencially the same mobility features as the M4 Sherman tank. When spaded, the tank is able to more quite fast in a straight line, going slightly below or even up to it's max speed. The turning speed is not that great and the reverse speed does not have much going for it either. The tank struggles while driving on inclines due to it's narrow tracks. In conclusion, the mobility of the M10 GMC is moderate and it is able to reach wanted positions reasonably fast. | ||
== Armaments == | == Armaments == | ||
| − | |||
=== Main armament === | === Main armament === | ||
| − | + | <!--''Give the reader information about the characteristics of the main gun. Assess its effectiveness in a battle based on the reloading speed, ballistics and the power of shells. Do not forget about the flexibility of the fire, that is how quickly the cannon can be aimed at the target, open fire on it and aim at another enemy. Add a link to the main article on the gun: <code><nowiki>{{main|Name of the weapon}}</nowiki></code>. Describe in general terms the ammunition available for the main gun. Give advice on how to use them and how to fill the ammunition storage.''--> | |
| − | <!-- ''Give the reader information about the characteristics of the main gun. Assess its effectiveness in a battle based on the reloading speed, ballistics and the power of shells. Do not forget about the flexibility of the fire, that is how quickly the cannon can be aimed at the target, open fire on it and aim at another enemy. Add a link to the main article on the gun: <code><nowiki>{{main|Name of the weapon}}</nowiki></code>. Describe in general terms the ammunition available for the main gun. Give advice on how to use them and how to fill the ammunition storage.'' --> | ||
{{main|M7 (76 mm)}} | {{main|M7 (76 mm)}} | ||
| − | The 3-inch (76 mm) cannon is a wonderful and powerful gun. | + | The 3-inch (76 mm) cannon is a wonderful and powerful gun. APCBC ammo can penetrate any tank on the battlefield even from long range. Because APCBC has enough penetration, the AP ammo is less useful. It is not a bad idea to carry HE ammo as well to fight lightly armoured and open top tanks like the [[M16 MGMC|M16 SPAA]]. The powerful gun and potent ammunition make the M10 a good sniper vehicle at it's battle rating, especially with its -10° gun depression, giving the M10 the ability to maximize a hull-down position. Unfortunately, even though this tank destroyer does feature a turret, its turret rotation speed is extremely slow (< 4.0°/s) due to its historic configuration of only possessing a hand crank for the turret traverse. |
| − | {| class="wikitable" style="text-align:center" width=" | + | {| class="wikitable" style="text-align:center" |
| + | |- | ||
| + | ! colspan="6" | [[M7_(76_mm)|76 mm M7]] | ||
| + | |- | ||
| + | ! colspan="3" rowspan="1" style="width:5em" |Capacity | ||
| + | ! rowspan="1" | Vertical <br> guidance | ||
| + | ! rowspan="1" | Horizontal <br> guidance | ||
| + | ! rowspan="1" | Stabilizer | ||
|- | |- | ||
| − | + | | colspan="3" | 54 || -10°/+30° || ±180° || N/A | |
|- | |- | ||
| − | ! | + | ! colspan="6" | Turret rotation speed (°/s) |
| − | |||
| − | |||
|- | |- | ||
| − | ! | + | ! style="width:4em" |Mode |
| − | + | ! style="width:4em" |Stock | |
| + | ! style="width:4em" |Upgraded | ||
| + | ! style="width:4em" |Prior + Full crew | ||
| + | ! style="width:4em" |Prior + Expert qualif. | ||
| + | ! style="width:4em" |Prior + Ace qualif. | ||
|- | |- | ||
| − | + | | ''Arcade'' || 2.70 || 3.70 || 4.50 || __._ || __._ | |
| − | | 2. | + | |- |
| + | | ''Realistic'' || 2.70 || 3.10 || 3.77 || 4.23 || 4.50 | ||
| + | |- | ||
| + | ! colspan="4" | Reloading rate (seconds) | ||
| + | |- | ||
| + | ! colspan="1" style="width:4em" |Stock | ||
| + | ! colspan="1" style="width:4em" |Prior + Full crew | ||
| + | ! colspan="1" style="width:4em" |Prior + Expert qualif. | ||
| + | ! colspan="1" style="width:4em" |Prior + Ace qualif. | ||
| + | |- | ||
| + | | 8.10 || 7.15 || 6.68 || 6.30 | ||
|- | |- | ||
|} | |} | ||
| − | ==== Ammunition ==== | + | ===== Ammunition ===== |
| − | {{: | + | {| class="wikitable sortable" style="text-align:center" width="100%" |
| + | ! colspan="8" | Penetration statistics | ||
| + | |- | ||
| + | ! rowspan="2" data-sort-type="text" | Ammunition | ||
| + | ! rowspan="2" class="unsortable" | Type of <br /> warhead | ||
| + | ! colspan="6" | '''Penetration''' '''''in mm''''' '''@ 90°''' | ||
| + | |- | ||
| + | ! 10m | ||
| + | ! 100m | ||
| + | ! 500m | ||
| + | ! 1000m | ||
| + | ! 1500m | ||
| + | ! 2000m | ||
| + | |- | ||
| + | | M62 Shell || APCBC || 149 ||146||133||119||106||95 | ||
| + | |- | ||
| + | | M42A1 Shell || HE || 7 || 7 || 7 || 7 || 7 || 7 | ||
| + | |- | ||
| + | | M79 Shot || AP ||134||132||121||109||99||89 | ||
| + | |- | ||
| + | |} | ||
| + | {| class="wikitable sortable" style="text-align:center" width="100%" | ||
| + | ! colspan="11" | Shell details | ||
| + | |- | ||
| + | ! rowspan="2" data-sort-type="text" | Ammunition | ||
| + | ! rowspan="2" class="unsortable" | Type of <br /> warhead | ||
| + | ! rowspan="2" |Velocity <br /> in m/s | ||
| + | ! rowspan="2" |Projectile<br />Mass in kg | ||
| + | ! rowspan="2" | ''Fuse delay'' | ||
| + | ''in m:'' | ||
| + | ! rowspan="2" | ''Fuse sensitivity'' | ||
| + | ''in mm:'' | ||
| + | ! rowspan="2" | ''Explosive Mass in g<br /> (TNT equivalent):'' | ||
| + | ! rowspan="2" | ''Normalization At 30° <br> from horizontal:'' | ||
| + | ! colspan="3" | ''Ricochet:'' | ||
| + | |- | ||
| + | ! 0% | ||
| + | ! 50% | ||
| + | ! 100% | ||
| + | |- | ||
| + | | M62 Shell || APCBC || 792 || 7 || 1.2 ||14|| 63.7 || +4° || 48° || 63° || 71° | ||
| + | |- | ||
| + | | M42A1 Shell || HE || 800 ||5.84|| 0.1 || 0.5 || 390 || +0° || 79° || 80° || 81° | ||
| + | |- | ||
| + | | M79 Shot || AP || 792 || 6.8 || N/A || N/A || N/A || -1° || 47° || 60° || 65° | ||
| + | |- | ||
| + | |} | ||
| − | ==== [[Ammo racks]] ==== | + | ===== [[Ammo racks|Ammo racks]] ===== |
| − | [[File:Ammoracks_M10_GMC.png|right| | + | [[File:Ammoracks_M10_GMC.png|right|thumbnail|Ammo racks of the M10|300px]] |
| − | + | {| class="wikitable sortable" style="text-align:center" | |
| − | {| class="wikitable" style="text-align:center" | ||
|- | |- | ||
| − | ! Full<br>ammo | + | ! class="wikitable unsortable" |Full<br /> ammo |
| − | ! 1st<br>rack empty | + | ! class="wikitable unsortable" |1st<br /> rack empty |
| − | ! 2nd<br>rack empty | + | ! class="wikitable unsortable" |2nd<br /> rack empty |
| − | ! 3rd<br>rack empty | + | ! class="wikitable unsortable" |3rd<br /> rack empty |
| − | ! 4th<br>rack empty | + | ! class="wikitable unsortable" |4th<br /> rack empty |
| − | ! 5th<br>rack empty | + | ! class="wikitable unsortable" |5th<br /> rack empty |
| − | ! Visual<br>discrepancy | + | ! class="wikitable unsortable" |6th<br /> rack empty |
| + | ! class="wikitable unsortable" |Visual<br /> discrepancy | ||
|- | |- | ||
| − | | '''54''' || 49 ''(+5)'' || 37 ''(+17)'' || 25 ''(+29)'' || 13 ''(+41)'' || 1 ''(+53)'' || No | + | || '''54''' || 52 ''(+2)'' || 49 ''(+5)'' || 37 ''(+17)'' || 25 ''(+29)'' || 13 ''(+41)'' || 1 ''(+53)'' || style="text-align:center" | No |
|- | |- | ||
|} | |} | ||
| − | |||
| − | |||
| − | |||
=== Machine guns === | === Machine guns === | ||
| − | + | <!--''Offensive and anti-aircraft machine guns not only allow you to fight some aircraft but also are effective against lightly armoured vehicles. Evaluate machine guns and give recommendations on its use.''--> | |
| − | <!-- ''Offensive and anti-aircraft machine guns not only allow you to fight some aircraft but also are effective against lightly armoured vehicles. Evaluate machine guns and give recommendations on its use.'' --> | + | {{main|Browning M2 (12.7 mm)}} |
| − | {{main| | ||
| − | {| class="wikitable" style="text-align:center | + | {| class="wikitable" style="text-align:center" |
|- | |- | ||
| − | ! colspan=" | + | ! colspan="7" | [[Browning M2 (12.7 mm)|12.7 mm M2HB]] |
|- | |- | ||
| − | ! | + | ! colspan="7" | ''Pintle mount'' |
|- | |- | ||
| − | | | + | ! colspan="4" rowspan="1" style="width:5em" |Capacity (Belt capacity) |
| + | ! rowspan="1" | Fire rate <br> (shots/minute) | ||
| + | ! rowspan="1" | Vertical <br> guidance | ||
| + | ! rowspan="1" | Horizontal <br> guidance | ||
| + | |- | ||
| + | | colspan="4" | 300 (200) || 576 || -10°/+28° || ±60° | ||
|- | |- | ||
|} | |} | ||
| − | |||
== Usage in battles == | == Usage in battles == | ||
| − | + | ''The M10 is a support vehicle. Find a good sniping position and lay behind the team taking out enemy tanks from a distance. Try to stay away from enemy tanks to avoid getting destroyed quickly.'' | |
| − | The | + | ''The best way to survive combat situations is to find a hull down location. The M10 has enough gun depression to use many hull down locations, and it has a strong enough turret front and mantlet to consistently cause ricochets. From there, well aimed shots should be able to knock out most enemy tanks at the battle-rating range from long range.'' |
| − | + | ''If fighting in a close quarter’s environment, do not try to push forward without support. Stay behind friendly tanks in order to support them without being shot at. If in an urban scenario on maps like [[Poland (Ground Forces)|Poland]] or [[Normandy (Ground Forces)|Normandy]], utilize the tank's turning speed to rotate the turret to the right angle. But, the best option is still to find a hull down location. For example, in [[Normandy (Ground Forces)|Normandy]], the best location is towards the C point, where there are hills and dips that can be used to hide the hull, while giving a good view of the battlefield.'' | |
| − | |||
| − | |||
| − | |||
| − | + | ''The M10 has a very slow turret rotation speed, but the M10 can traverse faster than it can rotate its turret and use its high speed when at high gear to produce some interesting skids via the physics engine to swerve the M10 and angle its gun at an enemy tank around the corner. It is recommended to understand and get a good feel of the M10's mobility and horsepower on dirt and paved roads before attempting this stunt. The low turret rotation speed means that a M10 player must always be aware of where the enemy tanks are, because they will not be able to turn the turret quickly if the enemy is able to flank the M10. In addition, the M10's side armour is weak, and the ammunition storage is in the hull sides, so if the enemy is able to shoot the M10 at that location, it is very likely to explode the ammo rack and destroy the tank with one shot.'' | |
| − | |||
| − | |||
| − | |||
| − | The M10 has a very slow turret rotation speed, but the M10 can traverse faster than it can rotate its turret and use its high speed when at high gear to produce some interesting skids via the physics engine to swerve the M10 and angle its gun at an enemy tank around the corner. It is recommended to understand and get a good feel of the M10's mobility and horsepower on dirt and paved roads before attempting this stunt. The low turret rotation speed means that a M10 player must always be aware of where the enemy tanks are, because they will not be able to turn the turret quickly if the enemy is able to flank the M10. In addition, the M10's side armour is weak, and the ammunition storage is in the hull sides, so if the enemy is able to shoot the M10 at that location, it is very likely to explode the ammo rack and destroy the tank with one shot. | ||
| − | |||
| − | '' | ||
| − | |||
| − | |||
| − | |||
| − | |||
=== Pros and cons === | === Pros and cons === | ||
| − | <!-- '' | + | <!--''Summarize and briefly evaluate the vehicle in terms of its characteristics and combat effectiveness. Mark its pros and cons in a bulleted list. Try not to use more than 6 points for each of the characteristics. Avoid using categorical definitions such as "bad", "good" and the like - use substitutions with softer forms such as "inadequate" and "effective".''--> |
'''Pros:''' | '''Pros:''' | ||
| − | * Main cannon penetration and damage is very good for the rank, can knock out many tanks in one hit. | + | * Main cannon penetration and damage is very good for the rank, can knock out many tanks in one hit. |
| − | * Good gun depression of -10°, perfect for hull-down positions | + | * Good gun depression of -10°, perfect for hull-down positions. |
| − | * Front armour can resist certain shots | + | * Front armour profile can resist certain shots, with front glacis steeply sloped and the gun mantlet thick enough to absorb shots |
| − | * 5 crew members, plus one more with [[Crew Replenishment]] modification | + | * 5 crew members to replace 3 incapacitated crew members, plus one more with [[Crew Replenishment]] modification. |
| − | * Turreted purpose-built tank destroyer allows for wide field of fire compared to casemate designs | + | * Turreted purpose-built tank destroyer allows for wide field of fire compared to casemate designs. |
| − | * Pintle | + | * Pintle mounted HMG can offer effective anti-aircraft fire. |
| − | * Access to | + | * Access to modification "[[Add-on Armor|Add-on Armour]]", that actually helps a lot. |
| − | * Has relatively no problem when getting uptiered | + | * Has relatively no problem when getting uptiered. |
'''Cons:''' | '''Cons:''' | ||
| − | * | + | * One of the slowest turret traverse in the game. |
| − | * | + | * Top hull armour is extremely thin. |
| − | * | + | * Easy to one-shot from the side by exploding the ammo rack. |
| − | * | + | * Poor turning abilities, especially while not in motion. |
| + | * Narrow tracks, which offer poor off-road performance. | ||
| + | * Turret crew is exposed, leaving the vehicle is vulnerable when targeted by aerial attacks such as artillery or planes | ||
| + | * Below average reverse speed | ||
== History == | == History == | ||
| − | + | ''Main article: '''[[M10 GMC/History|History of the M10 GMC]]''''' | |
| − | |||
| − | |||
| − | |||
| − | |||
| − | |||
== Media == | == Media == | ||
| − | + | ''Excellent additions to the article would be video guides, screenshots from the game, and photos.'' | |
| − | + | == See also == | |
| + | ''Links to the articles on the War Thunder Wiki that you think will be useful for the reader, for example:'' | ||
| − | |||
| − | |||
| − | |||
| − | |||
* ''reference to the series of the vehicles;'' | * ''reference to the series of the vehicles;'' | ||
| − | * ''links to approximate analogues of other nations and research trees.'' | + | * ''links to approximate analogues of other nations and research trees.'' |
| − | + | == External links == | |
| − | + | ''Paste links to sources and external resources, such as:'' | |
| − | |||
| − | |||
| − | |||
| − | |||
* ''topic on the official game forum;'' | * ''topic on the official game forum;'' | ||
| − | * ''other literature.'' | + | * ''encyclopedia page on the tank;'' |
| − | + | * ''other literature.'' | |
| − | |||
| − | |||
| − | |||
{{France tank destroyers}} | {{France tank destroyers}} | ||
Revision as of 13:12, 18 March 2020
Contents
| This page is about the French tank destroyer M10 GMC (France). For other uses, see M10 (Disambiguation). |
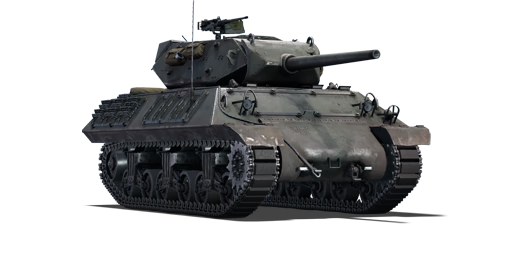
Description
.jpg)
The ▄3-inch Gun Motor Carriage M10 (▄M10 GMC) is a Rank II French tank destroyer
with a battle rating of 3.7 (AB) and 3.3 (RB/SB). It was introduced in Update 1.75 "La Résistance".
The M10 GMC takes much from the M4A2 Sherman which it was derived from. The drivetrain is identical with the drive shaft running from the engine in the rear to the front transmission and sprockets. The hull is sloped to a larger degree. The 3-inch (76 mm) cannon originally mounted on the experimental M6 Heavy Tank lacks the muzzle brake of the 76 mm M1A2 gun used on the later Rank III Sherman's and the M18 Hellcat. The turret is a pentagonal shaped M5 Mount type.
General info
Survivability and armour
The armour of the M10 GMC is essencially decent for the rank, and with proper angling is able to ricochet a lot of shells, however, the armour is not thick enough to resist any of the stronger tank weapons of Rank II and above. The sides and back are quite thin and are not able to resist most weapons stronger than a 12.7 machine gun. The front of the turret can often eat shells as the shell will fragment on the initial armour, and the massive breach of the 76mm cannon will often absorb most if not all of the fragmentation, leaving the crew untouched, allowing for a retreat and repair without crew losses. The turret's top is open and because it that it is quite vanurable to HE shells and planes, being able to survive artillery barrages that fall nearby due to the fact that the crew is protected by the angled sides of the turret.
Armour Type:
- Rolled homogeneous armour
- Cast homogeneous armour (Gun mantlet, Transmission area)
- Structural steel (Counterweight)
| Armour | Front (Slope angle) | Sides | Rear | Roof |
|---|---|---|---|---|
| Hull | 38.1 mm (55°) 50.8 mm (7-55°) Transmission area |
19.05 mm (38°) Top 25.4 mm Bottom |
19.05 mm (28°) Top 25.4 mm (7-52°) Bottom |
19.05 mm Front 9.5 mm Rear |
| Turret | 25.4 mm (68-89°) Turret front 57.15 mm (0-47°) Gun mantlet |
25.4 mm (24-47°) | 25.4 mm (30-47°) Turret rear 50 mm (0-50°) Counterweight |
N/A |
Notes:
- Suspensions wheels are 20 mm thick, bogies are 10 mm thick, and tracks are 20 mm thick.
- Belly armour is 12.7 mm thick.
- Hull rear sides are protected by attached grousers that gives 20 mm of extra armour.
Mobility
| Mobility characteristic | ||
|---|---|---|
| Weight (tons) | Add-on Armor weight (tons) |
Max speed (km/h) |
| 29.6 | 0.5 | 45 (AB) |
| 41 (RB/SB) | ||
| Engine power (horsepower) | ||
| Mode | Stock | Upgraded |
| Arcade | 582 | 717 |
| Realistic/Simulator | 363 | 410 |
| Power-to-weight ratio (hp/ton) | ||
| Mode | Stock | Upgraded |
| Arcade | 19.66 | 24.22 |
| Realistic/Simulator | 12.26 | 13.85 |
The M10 GMC has essencially the same mobility features as the M4 Sherman tank. When spaded, the tank is able to more quite fast in a straight line, going slightly below or even up to it's max speed. The turning speed is not that great and the reverse speed does not have much going for it either. The tank struggles while driving on inclines due to it's narrow tracks. In conclusion, the mobility of the M10 GMC is moderate and it is able to reach wanted positions reasonably fast.
Armaments
Main armament
The 3-inch (76 mm) cannon is a wonderful and powerful gun. APCBC ammo can penetrate any tank on the battlefield even from long range. Because APCBC has enough penetration, the AP ammo is less useful. It is not a bad idea to carry HE ammo as well to fight lightly armoured and open top tanks like the M16 SPAA. The powerful gun and potent ammunition make the M10 a good sniper vehicle at it's battle rating, especially with its -10° gun depression, giving the M10 the ability to maximize a hull-down position. Unfortunately, even though this tank destroyer does feature a turret, its turret rotation speed is extremely slow (< 4.0°/s) due to its historic configuration of only possessing a hand crank for the turret traverse.
| 76 mm M7 | |||||
|---|---|---|---|---|---|
| Capacity | Vertical guidance |
Horizontal guidance |
Stabilizer | ||
| 54 | -10°/+30° | ±180° | N/A | ||
| Turret rotation speed (°/s) | |||||
| Mode | Stock | Upgraded | Prior + Full crew | Prior + Expert qualif. | Prior + Ace qualif. |
| Arcade | 2.70 | 3.70 | 4.50 | __._ | __._ |
| Realistic | 2.70 | 3.10 | 3.77 | 4.23 | 4.50 |
| Reloading rate (seconds) | |||||
| Stock | Prior + Full crew | Prior + Expert qualif. | Prior + Ace qualif. | ||
| 8.10 | 7.15 | 6.68 | 6.30 | ||
Ammunition
| Penetration statistics | |||||||
|---|---|---|---|---|---|---|---|
| Ammunition | Type of warhead |
Penetration in mm @ 90° | |||||
| 10m | 100m | 500m | 1000m | 1500m | 2000m | ||
| M62 Shell | APCBC | 149 | 146 | 133 | 119 | 106 | 95 |
| M42A1 Shell | HE | 7 | 7 | 7 | 7 | 7 | 7 |
| M79 Shot | AP | 134 | 132 | 121 | 109 | 99 | 89 |
| Shell details | ||||||||||
|---|---|---|---|---|---|---|---|---|---|---|
| Ammunition | Type of warhead |
Velocity in m/s |
Projectile Mass in kg |
Fuse delay
in m: |
Fuse sensitivity
in mm: |
Explosive Mass in g (TNT equivalent): |
Normalization At 30° from horizontal: |
Ricochet: | ||
| 0% | 50% | 100% | ||||||||
| M62 Shell | APCBC | 792 | 7 | 1.2 | 14 | 63.7 | +4° | 48° | 63° | 71° |
| M42A1 Shell | HE | 800 | 5.84 | 0.1 | 0.5 | 390 | +0° | 79° | 80° | 81° |
| M79 Shot | AP | 792 | 6.8 | N/A | N/A | N/A | -1° | 47° | 60° | 65° |
Ammo racks

| Full ammo |
1st rack empty |
2nd rack empty |
3rd rack empty |
4th rack empty |
5th rack empty |
6th rack empty |
Visual discrepancy |
|---|---|---|---|---|---|---|---|
| 54 | 52 (+2) | 49 (+5) | 37 (+17) | 25 (+29) | 13 (+41) | 1 (+53) | No |
Machine guns
| 12.7 mm M2HB | ||||||
|---|---|---|---|---|---|---|
| Pintle mount | ||||||
| Capacity (Belt capacity) | Fire rate (shots/minute) |
Vertical guidance |
Horizontal guidance | |||
| 300 (200) | 576 | -10°/+28° | ±60° | |||
Usage in battles
The M10 is a support vehicle. Find a good sniping position and lay behind the team taking out enemy tanks from a distance. Try to stay away from enemy tanks to avoid getting destroyed quickly.
The best way to survive combat situations is to find a hull down location. The M10 has enough gun depression to use many hull down locations, and it has a strong enough turret front and mantlet to consistently cause ricochets. From there, well aimed shots should be able to knock out most enemy tanks at the battle-rating range from long range.
If fighting in a close quarter’s environment, do not try to push forward without support. Stay behind friendly tanks in order to support them without being shot at. If in an urban scenario on maps like Poland or Normandy, utilize the tank's turning speed to rotate the turret to the right angle. But, the best option is still to find a hull down location. For example, in Normandy, the best location is towards the C point, where there are hills and dips that can be used to hide the hull, while giving a good view of the battlefield.
The M10 has a very slow turret rotation speed, but the M10 can traverse faster than it can rotate its turret and use its high speed when at high gear to produce some interesting skids via the physics engine to swerve the M10 and angle its gun at an enemy tank around the corner. It is recommended to understand and get a good feel of the M10's mobility and horsepower on dirt and paved roads before attempting this stunt. The low turret rotation speed means that a M10 player must always be aware of where the enemy tanks are, because they will not be able to turn the turret quickly if the enemy is able to flank the M10. In addition, the M10's side armour is weak, and the ammunition storage is in the hull sides, so if the enemy is able to shoot the M10 at that location, it is very likely to explode the ammo rack and destroy the tank with one shot.
Pros and cons
Pros:
- Main cannon penetration and damage is very good for the rank, can knock out many tanks in one hit.
- Good gun depression of -10°, perfect for hull-down positions.
- Front armour profile can resist certain shots, with front glacis steeply sloped and the gun mantlet thick enough to absorb shots
- 5 crew members to replace 3 incapacitated crew members, plus one more with Crew Replenishment modification.
- Turreted purpose-built tank destroyer allows for wide field of fire compared to casemate designs.
- Pintle mounted HMG can offer effective anti-aircraft fire.
- Access to modification "Add-on Armour", that actually helps a lot.
- Has relatively no problem when getting uptiered.
Cons:
- One of the slowest turret traverse in the game.
- Top hull armour is extremely thin.
- Easy to one-shot from the side by exploding the ammo rack.
- Poor turning abilities, especially while not in motion.
- Narrow tracks, which offer poor off-road performance.
- Turret crew is exposed, leaving the vehicle is vulnerable when targeted by aerial attacks such as artillery or planes
- Below average reverse speed
History
Main article: History of the M10 GMC
Media
Excellent additions to the article would be video guides, screenshots from the game, and photos.
See also
Links to the articles on the War Thunder Wiki that you think will be useful for the reader, for example:
- reference to the series of the vehicles;
- links to approximate analogues of other nations and research trees.
External links
Paste links to sources and external resources, such as:
- topic on the official game forum;
- encyclopedia page on the tank;
- other literature.
| France tank destroyers | |
|---|---|
| Lorraine 40t derivatives | CA Lorraine · Lorraine 155 Mle.50 |
| ATGM | MEPHISTO · AMX-10M |
| Other | AMR.35 ZT3 · Lorraine 37L · SAu 40 · ARL-44 · ELC bis · AMX-50 Foch · AuF1 |
| USA | ▄M10 GMC · ▄M36B2 |
