|
|
| (25 intermediate revisions by 10 users not shown) |
| Line 1: |
Line 1: |
| − | {{Specs-Card | + | {{Specs-Card|code=sw_udes_33}} |
| − | |code=sw_udes_33 | |
| − | |images={{Specs-Card-Image|GarageImage_{{PAGENAME}}.jpg}}
| |
| − | }} | |
| | | | |
| | == Description == | | == Description == |
| | <!-- ''In the description, the first part should be about the history of the creation and combat usage of the vehicle, as well as its key features. In the second part, tell the reader about the ground vehicle in the game. Insert a screenshot of the vehicle, so that if the novice player does not remember the vehicle by name, he will immediately understand what kind of vehicle the article is talking about.'' --> | | <!-- ''In the description, the first part should be about the history of the creation and combat usage of the vehicle, as well as its key features. In the second part, tell the reader about the ground vehicle in the game. Insert a screenshot of the vehicle, so that if the novice player does not remember the vehicle by name, he will immediately understand what kind of vehicle the article is talking about.'' --> |
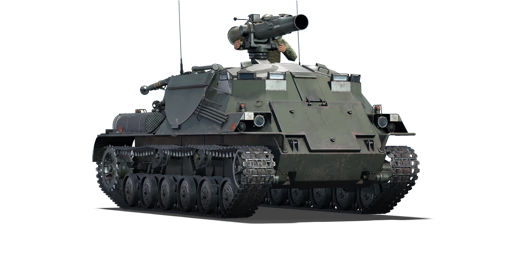
| − | The '''{{Specs|name}}''' (shortened to '''UDES 33''', literally ''Ground Group Direct Fire Combat Vehicle 33'') was a prototype Swedish ATGM and SAM carrier developed during the Cold War around the mid 1970s. The UDES 33 was envisioned by the Swedish Army as a way to reuse the decommissioned [[Ikv 103]] when they were replaced with the newer and more modern [[Ikv 91]], they wanted an vehicle to fill in a gap that were left in terms of giving anti-air and anti-tank support units a vehicle capable of giving protection, improved mobility in rough terrain and improved ability to keep pace with main battle tanks and other armoured units. There were two prototypes produced and delivered in 1978, one was fitted with the [[Rbs 55]] ATGM the other were fitted with an [[Rbs 70]] SAM, through extensive trials in the early 1980s which would conclude that the vehicles were seen in a positive light and they would be approved for production, but some alteration to the chassis mainly and some components would be changed to the vehicle and the {{PAGENAME}} would be the foundation for the end productions that would be later designated as [[Lvrbv 701]] and [[Pvrbv 551]] in the Swedish Army. | + | [[File:GarageImage_{{PAGENAME}}.jpg|420px|thumb|left]] |
| − | | + | {{Break}} |
| − | It was introduced in [[Update 1.97 "Viking Fury"]]. The UDES 33 is a very interesting tank destroyer for its BR, comparable to other ATGM carriers like the M113A1 TOW in Italy and China. The armour is non-existent and is not even capable of stopping 12.7 mm shots, in some cases 7.62 mm LMGs can penetrate the weak sides of the vehicle. The armament is the Rbs 55 ATGM, which, while decent, its not capable of consistently dealing with some tanks like the T-55AMD-1, especially since it has an APS system. Compared to other ATGM carriers it is very standard, ambushing enemy tanks or staying very far away from the frontline are both good choices, especially since the Rbs 55 out-ranges most cannons. | + | The '''{{Specs|name}}''' is a rank {{Specs|rank}} Swedish tank destroyer {{Battle-rating}}. It was introduced in [[Update 1.97 "Viking Fury"]]. |
| | | | |
| | == General info == | | == General info == |
| | === Survivability and armour === | | === Survivability and armour === |
| − | {{Specs-Tank-Armour}}
| + | ''Describe armour protection. Note the most well protected and key weak areas. Appreciate the layout of modules as well as the number and location of crew members. Is the level of armour protection sufficient, is the placement of modules helpful for survival in combat? If necessary use a visual template to indicate the most secure and weak zones of the armour.'' |
| − | <!-- ''Describe armour protection. Note the most well protected and key weak areas. Appreciate the layout of modules as well as the number and location of crew members. Is the level of armour protection sufficient, is the placement of modules helpful for survival in combat? If necessary use a visual template to indicate the most secure and weak zones of the armour.'' -->
| |
| | | | |
| − | The thickest plate on the UDES 33 front is 18.5 mm, and all armour plates are rolled homogeneous steel. However, the sides are only 7 mm thick, meaning that the hull will not stand up to anything, not even LMG or distant artillery hits. The sides will also detonate light tank APHE on glancing hit.
| |
| − |
| |
| − | Due to the lack of a roof, survivability is very poor. Furthermore, the gunner is completely exposed from the waist up. Not only that, but he is standing right next to the rest of the crew, so it is possible to take out everyone by shooting him with HE-I, making even random hits from SPAA fatal. Due to the open-topped nature of the tank it is ill-adviced to directly attack any HEAT or HEAT-FS armed sniper tanks (like the [[Leopard 1]]), as they are basically expected to use it all the time and have zero tolerance for ATGM carriers.
| |
| − | [[File:UDES 33 cover control.jpg|thumb|right|Self-control is required in a street battle, but it is possible to hide behind an ally (or their husk) to deny area access for a while]]
| |
| − | Since the armour cannot be relied on, the stealth and terrain compatibility is all the UDES 33 has. In a straight fight, the hull can be hidden behind any medium tank hull or a rock, the gunner is standing on the left side and can be hidden behind tank turret or a tall rock. The carrier must attack from behind cover, by only exposing the launcher (going to the right out of cover) without exposing the hull if possible. In that case, only the launcher is momentarily visible and the opponent might not immediately fire MG or explosives at it. In the case APHE or APDS is fired, the gunner still immediately gets knocked out and the launcher is broken, but the carrier might live on and retreat.
| |
| − | {{Clear}}
| |
| | === Mobility === | | === Mobility === |
| − | {{Specs-Tank-Mobility}}
| |
| | <!-- ''Write about the mobility of the ground vehicle. Estimate the specific power and manoeuvrability, as well as the maximum speed forwards and backwards.'' --> | | <!-- ''Write about the mobility of the ground vehicle. Estimate the specific power and manoeuvrability, as well as the maximum speed forwards and backwards.'' --> |
| | | | |
| − | {{tankMobility|abMinHp=213|rbMinHp=133}} | + | {{tankMobility|abMinHp= 213|rbMinHp= 133}} |
| − | [[File:UDES 33 attacks from rocks.jpg|thumb|right|UDES 33 is unwieldy and clumsy, but it can even climb some rocks to attack. Check aim before firing!]]
| |
| − | The carrier is not too fast and is more in line with a medium tank in terms of speed, which is serviceable.
| |
| − | | |
| − | One of the strong sides of UDES 33 is the 3D mobility. While this is not enough to compensate for visibility mechanics in AB, if used to the limit, it might allow to climb up a tall hill or a rock nobody is currently looking at and cause disbelief in enemy mind for long enough to launch the missile and disappear before getting shot.
| |
| − | {{Clear}}
| |
| − | === Modifications and economy ===
| |
| − | {{Specs-Economy}}
| |
| | | | |
| | == Armaments == | | == Armaments == |
| − | {{Specs-Tank-Armaments}}
| |
| | === Main armament === | | === Main armament === |
| − | {{Specs-Tank-Weapon|1}}
| + | ''Give the reader information about the characteristics of the main gun. Assess its effectiveness in a battle based on the reloading speed, ballistics and the power of shells. Do not forget about the flexibility of the fire, that is how quickly the cannon can be aimed at the target, open fire on it and aim at another enemy. Add a link to the main article on the gun: <code><nowiki>{{main|Name of the weapon}}</nowiki></code>. Describe in general terms the ammunition available for the main gun. Advise about how to use them and how to fill the ammunition storage.'' |
| − | <!-- ''Give the reader information about the characteristics of the main gun. Assess its effectiveness in a battle based on the reloading speed, ballistics and the power of shells. Do not forget about the flexibility of the fire, that is how quickly the cannon can be aimed at the target, open fire on it and aim at another enemy. Add a link to the main article on the gun: <code><nowiki>{{main|Name of the weapon}}</nowiki></code>. Describe in general terms the ammunition available for the main gun. Give advice on how to use them and how to fill the ammunition storage.'' -->
| |
| − | {{main|Rbs 55}}
| |
| − | | |
| − | The Rbs 55 is a rather weak ATGM in terms of penetration and the reload rate also leaves something to be desired. The ATGM is often blocked by fuel tanks and often cannot even scratch tanks like the [[T-55AMD-1]]. The time it takes to reload the ATGM will also allow many of foes to replace their crew members before launcher is ready to fire again. Generally it is best to retreat back into cover if the missile only knocks out an opponent's gunner, rather than dealing sufficient damage to their gun breech or barrel, even if the enemy tank does not have machine guns.
| |
| − | | |
| − | Additionally, the UDES 33 can only carry a maximum of 10 missiles, so they must be used sparingly. Taking a full ammo load is recommended. The speed at which the missile launcher can be aimed at a target is decent, however do not expect to be able to quickly return fire at an opponent should you manage to survive a shot from them. The launcher is restricted in horizontal movement to approximately the 3 and 9 o'clock positions.
| |
| − | [[File:UDES trades shot with light tank.jpg|thumb|right|In AB, UDES can easily trade the gunner to destroy some tanks, as it can still control the launched missile even without him.]]
| |
| − | Until the "parts" are researched, avoid taking damage to the launcher, as it will be impossible to fire until the launcher is completely repaired - the field repair does not help.
| |
| − | | |
| − | As an upside, the launcher depression allows to aim the missile straight at enemy tanks even at very awkward angles and it isn't impossible to use against helicopters as well. However, most of the tanks at the battle-rating also have roof-mounted MG and should be able to hard counter UDES 33 if they see it first. Fortunately, the missiles have enough explosive mass to overpressurize plates of 20 mm RHA, which means that it can, with some effort, implode tanks like the [[SU-122-54]] or [[Leopard 1]] by attacking their roof (directly or by hitting the commander cupola) and will annihilate many light tanks by just hitting their ATGM launchers or turrets. The overpressure damage can also be used against most tanks with weak bottom armour by hitting the track wheels from underneath the tank.
| |
| − | | |
| − | The missile starting speed is about 150 m/s, but it will accelerate towards 300 m/s in a second, at 300 m the time of arrival is about 2 seconds, at 900 m it is 4 seconds. This makes the carrier fighting style more long-range centric.
| |
| | | | |
| − | {| class="wikitable" style="text-align:center" width="100%"
| + | === Additional armament === |
| − | |-
| + | ''Some tanks are armed with several guns in one or more turrets. Evaluate the additional weaponry and give advice on its use. Describe the ammunition available for additional weaponry. Give advice on about how to use them and how to fill the ammunition storage. If there is no additional weaponry remove this subsection.'' |
| − | ! colspan="5" | [[Rbs 55]] missile || colspan="5" | Turret rotation speed (°/s) || colspan="4" | Reloading rate (seconds)
| |
| − | |-
| |
| − | ! Mode !! Capacity !! Vertical !! Horizontal !! Stabilizer
| |
| − | ! Stock !! Upgraded !! Full !! Expert !! Aced
| |
| − | ! Stock !! Full !! Expert !! Aced
| |
| − | |-
| |
| − | ! ''Arcade''
| |
| − | | rowspan="2" | 10 || rowspan="2" | -20°/+25° || rowspan="2" | -100°/+120° || rowspan="2" | N/A || 15.8 || 21.9 || 26.6 || 29.5 || 31.3 || rowspan="2" | 13.00 || rowspan="2" | 11.50 || rowspan="2" | 10.60 || rowspan="2" | 10.00
| |
| − | |-
| |
| − | ! ''Realistic''
| |
| − | | 10.7 || 12.6 || 15.3 || 16.9 || 18.0
| |
| − | |-
| |
| − | |}
| |
| | | | |
| − | ==== Ammunition ==== | + | === Machine guns === |
| − | {{:Rbs 55/Ammunition|RB 55B, RB 55C}}
| + | ''Offensive and anti-aircraft machine guns not only allow you to fight some aircraft but also are effective against lightly armoured vehicles. Evaluate machine guns and give recommendations on its use.'' |
| − | | |
| − | ==== [[Ammo racks]] ====
| |
| − | <!-- [[File:Ammoracks_{{PAGENAME}}.png|right|thumb|x250px|[[Ammo racks]] of the {{PAGENAME}}]] -->
| |
| − | <!-- '''Last updated:''' -->
| |
| − | {| class="wikitable" style="text-align:center"
| |
| − | |-
| |
| − | ! Full<br>ammo
| |
| − | ! 1st<br>rack empty
| |
| − | ! 2nd<br>rack empty
| |
| − | ! 3rd<br>rack empty
| |
| − | ! 4th<br>rack empty
| |
| − | ! 5th<br>rack empty
| |
| − | ! 6th<br>rack empty
| |
| − | ! Visual<br>discrepancy
| |
| − | |-
| |
| − | | '''10''' || __ ''(+__)'' || __ ''(+__)'' || __ ''(+__)'' || __ ''(+__)'' || __ ''(+__)'' || __ ''(+__)'' || __
| |
| − | |-
| |
| − | |}
| |
| | | | |
| | == Usage in battles == | | == Usage in battles == |
| − | <!-- ''Describe the tactics of playing in the vehicle, the features of using vehicles in the team and advice on tactics. Refrain from creating a "guide" - do not impose a single point of view but instead give the reader food for thought. Describe the most dangerous enemies and give recommendations on fighting them. If necessary, note the specifics of the game in different modes (AB, RB, SB).'' -->
| + | ''Describe the tactics of playing in the vehicle, the features of using vehicles in the team and advice on tactics. Refrain from creating a "guide" - do not impose a single point of view but instead give the reader food for thought. Describe the most dangerous enemies and give recommendations on fighting them. If necessary, note the specifics of the game in different modes (AB, RB, SB).'' |
| − | [[File:UDES 33 countersnipes.jpg|thumb|right|Try to pick off any sniper that isn't paying attention. In AB, You can double down on their tunnel vision by firing from generally impossible spots.]]
| |
| − | The UDES 33 performs best when using natural terrain cover, as it cannot take any punishment. It is advisable to sit behind the primary lines of the allied team, and pick enemies off when they expose themselves in the distance. Try to get the most out of relatively high ATGM speed - by firing from the sides and changing positions you can maximize the time it takes for enemies to notice the giant fireball flying towards them, sometimes long enough to get hit by them.
| |
| − | [[File:UDES fires over wall.jpg|thumb|right|The mediocre launch speed is not always a downside, as it might allow to hit enemy tanks over certain walls.]]
| |
| − | It's not impossible to sneak closer to the enemy, but be wary of IFVs and SPAAs (or any vehicle with a high rate of fire), as well as the machine guns mounted on any vehicle, as the gunner is exposed entirely, the entire crew is next to him and the hull armour is very weak. The missile starting speed of 150 m/s also means that almost all light tanks have the upper hand at close range. By hiding behind rocks or dead tanks and quickly pushing the launcher out of cover it becomes possible to sneak a shot in when the enemy is not focused.
| |
| − | | |
| − | You will only have one chance of destroying any given tank, as once you miss or fail they will not let you go and will pursue you until you are annihilated, better tankers might even fire back before the ATGM lands on them, resulting in a double KO. However, some heavy tanks have an irrational fear of ATGM and will not push even when they clearly have an advantage, as long as you don't push your luck as well.
| |
| − | | |
| − | '''Notable enemies''':
| |
| − | | |
| − | *Autocannon tanks: Most lethal opponents include the [[M3 Bradley]], [[M163]], [[Gepard]], [[BMP-2]], [[ZSU-57-2]], [[ZSU-23-4]], [[Warrior]], [[Falcon]], [[WZ305]], [[AMX-30 DCA]] and even the [[SIDAM 25]].
| |
| − | | |
| − | *Heavy tanks: The UDES 33 can perform well at 6.7-7.3, but the angle of armour on many German tanks should be considered before engaging. At a higher BR, the missile will only penetrate if hit them as flat as possible.
| |
| − | | |
| − | [[File:UDES 33 stuck in a draw.jpg|thumb|right|On one hand UDES 33 is a decent ambush tank. On other hand, if you meet one of these and fail to destroy them on the first launch, you become a sitting duck since you can't just trade the gunner to remove it.]]
| |
| − | | |
| − | *Soviet medium tanks: Attack their left side (right side for you) to deal guaranteed damage, the fuel tank on the other side is way too good at blocking Rbs 55 despite potential of fatal damage. It might force some opponent to stop and use FPE, but any reasonable person will first destroy the UDES 33 and only then start repairing. Needless to say, some enemies might not even have FPE and it will set them into berserker mode, then they will simply rush forward to end you specifically, as they have nothing to lose. If enemy is exposed entirely, you can hit the inner side of their tracks (aim for the wheels) to instantly destroy them via overpressure. This does not work if you hit the tracks from outside or hit the ground under the tank, so make the shot count.
| |
| − | | |
| − | *HEAT tanks, Artillery tanks, HEAT-FS oriented sniper tanks: Since UDES 33 is open-topped, one hit from these will destroy it. Artillery tanks generally ignore UDES, but will shell it with HE-VT if you provoke them or will stand in their way for too long. HEAT tanks like [[M-51]] are clumsy but will attack immediately if you stare at them. Sniper tanks have zero tolerance for ATGM tanks and will chase you to the end of the map if they can, but it's possible to ambush them or blindside them when they don't know where you are. Either way, you will only have one chance to destroy them.
| |
| − | | |
| − | *[[T-55AMD-1]]: From the front - effectively impossible on flat ground, even with ambush tactics the APS reacts faster than their owners themselves. You may have some chance if firing over cover or at their LFP, but the chances are slim. From 90 degrees on the side - try to ammo rack it immediately, as if it manages to turn the turret towards you it is over.
| |
| | | | |
| | === Pros and cons === | | === Pros and cons === |
| − | <!-- ''Summarise and briefly evaluate the vehicle in terms of its characteristics and combat effectiveness. Mark its pros and cons in a bulleted list. Try not to use more than 6 points for each of the characteristics. Avoid using categorical definitions such as "bad", "good" and the like - use substitutions with softer forms such as "inadequate" and "effective".'' -->
| + | ''Summarise and briefly evaluate the vehicle in terms of its characteristics and combat effectiveness. Mark its pros and cons in a bulleted list. Try not to use more than 6 points for each of the characteristics. Avoid using categorical definitions such as "bad", "good" and the like - use substitutions with softer forms such as "inadequate" and "effective".'' |
| | | | |
| | '''Pros:''' | | '''Pros:''' |
| | | | |
| − | * Rather agile for its tonnage, and when upgraded is surprisingly quick and nimble, easily allowing for moving from cover to cover | + | * Rather agile for its tonnage, when upgraded it's surprisingly quick and nimble, easily allowing moving from cover to cover |
| − | * Unnoticeable when standing still (RB only) | + | * Low profile, not a very large target nor very noticeable when standing still - use shadows and foliage to your advantage to stay undetected |
| − | * ATGM speed might catch some snipers off guard if used correctly | + | * ATGM penetration is good - though not ''great'' - for its BR |
| − | * Great gun depression, allowing the vehicle to fire from behind cover by simply exposing the ATGM launcher
| + | |
| − | * Technically can destroy many tanks through roof with overpressure before they can even attack it, but hitting such weak spots is difficult | + | * |
| | | | |
| | '''Cons:''' | | '''Cons:''' |
| | | | |
| − | * Open-topped tank, the gunner is exposed to direct MG fire, shrapnel from gunner hit can enter the interior as well | + | * Gunner is largely exposed; his whole torso is above the turret ring, leaving him vulnerable to MG fire, shrapnel, and aircraft guns |
| − | * Somewhat long reload time when compared to tanks | + | * While the launcher has a nice degree of upwards elevation, its depression is frankly horrible - making it hard to go hull-down behind hilltops, bunkers, and other cover |
| − | * The missile sometimes goes lower than expected on launch | + | * Somewhat long reload time |
| | + | |
| | + | * |
| | | | |
| | == History == | | == History == |
| Line 132: |
Line 52: |
| | | | |
| | == Media == | | == Media == |
| − | <!-- ''Excellent additions to the article would be video guides, screenshots from the game, and photos.'' -->
| + | ''Excellent additions to the article would be video guides, screenshots from the game, and photos.'' |
| | | | |
| − | ;Skins
| + | == See also == |
| | + | ''Links to the articles on the War Thunder Wiki that you think will be useful for the reader, for example:'' |
| | | | |
| − | * [https://live.warthunder.com/feed/camouflages/?vehicle=sw_udes_33 Skins and camouflages for the {{PAGENAME}} from live.warthunder.com.]
| |
| − |
| |
| − | ;Videos
| |
| − | {{Youtube-gallery|4_cJ1CpEatw|'''Best gun depression''' discusses the {{PAGENAME}} at 3:43 - ''War Thunder Official Channel''}}
| |
| − |
| |
| − | == See also ==
| |
| − | <!-- ''Links to the articles on the War Thunder Wiki that you think will be useful for the reader, for example:''
| |
| | * ''reference to the series of the vehicles;'' | | * ''reference to the series of the vehicles;'' |
| − | * ''links to approximate analogues of other nations and research trees.'' --> | + | * ''links to approximate analogues of other nations and research trees.'' |
| − | | |
| − | * [[RakJPz 2]]
| |
| − | * [[RakJPz 2 (HOT)]]
| |
| − | * [[M113A1 (TOW)]]
| |
| − | * [[Pvrbv 551]]
| |
| | | | |
| | == External links == | | == External links == |
| Line 155: |
Line 64: |
| | | | |
| | * ''topic on the official game forum;'' | | * ''topic on the official game forum;'' |
| | + | * ''encyclopedia page on the tank;'' |
| | * ''other literature.'' | | * ''other literature.'' |
| | | | |
| − | {{TankManufacturer Hagglund}}
| |
| | {{Sweden tank destroyers}} | | {{Sweden tank destroyers}} |
UDES 33
Research:135 000 
Purchase:380 000 
Description
The Underlagsgrupp Direkt Eld Stridsfordon 33 is a rank VI Swedish tank destroyer
with a battle rating of 8.3 (AB/RB/SB). It was introduced in Update 1.97 "Viking Fury".
General info
Survivability and armour
Describe armour protection. Note the most well protected and key weak areas. Appreciate the layout of modules as well as the number and location of crew members. Is the level of armour protection sufficient, is the placement of modules helpful for survival in combat? If necessary use a visual template to indicate the most secure and weak zones of the armour.
Mobility
| Game Mode
|
Max Speed (km/h)
|
Weight (tons)
|
Engine power (horsepower)
|
Power-to-weight ratio (hp/ton)
|
| Forward
|
Reverse
|
Stock
|
Upgraded
|
Stock
|
Upgraded
|
| Arcade
|
58
|
14
|
8.6
|
213
|
286
|
24.77
|
33.26
|
| Realistic
|
53
|
12
|
133
|
150
|
15.47
|
17.44
|
Armaments
Main armament
Give the reader information about the characteristics of the main gun. Assess its effectiveness in a battle based on the reloading speed, ballistics and the power of shells. Do not forget about the flexibility of the fire, that is how quickly the cannon can be aimed at the target, open fire on it and aim at another enemy. Add a link to the main article on the gun: {{main|Name of the weapon}}. Describe in general terms the ammunition available for the main gun. Advise about how to use them and how to fill the ammunition storage.
Additional armament
Some tanks are armed with several guns in one or more turrets. Evaluate the additional weaponry and give advice on its use. Describe the ammunition available for additional weaponry. Give advice on about how to use them and how to fill the ammunition storage. If there is no additional weaponry remove this subsection.
Machine guns
Offensive and anti-aircraft machine guns not only allow you to fight some aircraft but also are effective against lightly armoured vehicles. Evaluate machine guns and give recommendations on its use.
Usage in battles
Describe the tactics of playing in the vehicle, the features of using vehicles in the team and advice on tactics. Refrain from creating a "guide" - do not impose a single point of view but instead give the reader food for thought. Describe the most dangerous enemies and give recommendations on fighting them. If necessary, note the specifics of the game in different modes (AB, RB, SB).
Pros and cons
Summarise and briefly evaluate the vehicle in terms of its characteristics and combat effectiveness. Mark its pros and cons in a bulleted list. Try not to use more than 6 points for each of the characteristics. Avoid using categorical definitions such as "bad", "good" and the like - use substitutions with softer forms such as "inadequate" and "effective".
Pros:
- Rather agile for its tonnage, when upgraded it's surprisingly quick and nimble, easily allowing moving from cover to cover
- Low profile, not a very large target nor very noticeable when standing still - use shadows and foliage to your advantage to stay undetected
- ATGM penetration is good - though not great - for its BR
Cons:
- Gunner is largely exposed; his whole torso is above the turret ring, leaving him vulnerable to MG fire, shrapnel, and aircraft guns
- While the launcher has a nice degree of upwards elevation, its depression is frankly horrible - making it hard to go hull-down behind hilltops, bunkers, and other cover
- Somewhat long reload time
History
Describe the history of the creation and combat usage of the vehicle in more detail than in the introduction. If the historical reference turns out to be too long, take it to a separate article, taking a link to the article about the vehicle and adding a block "/History" (example: https://wiki.warthunder.com/(Vehicle-name)/History) and add a link to it here using the main template. Be sure to reference text and sources by using <ref></ref>, as well as adding them at the end of the article with <references />. This section may also include the vehicle's dev blog entry (if applicable) and the in-game encyclopedia description (under === In-game description ===, also if applicable).
Media
Excellent additions to the article would be video guides, screenshots from the game, and photos.
See also
Links to the articles on the War Thunder Wiki that you think will be useful for the reader, for example:
- reference to the series of the vehicles;
- links to approximate analogues of other nations and research trees.
External links
Paste links to sources and external resources, such as:
- topic on the official game forum;
- encyclopedia page on the tank;
- other literature.