Difference between revisions of "IJN Haruna"
(→Media: added media (history and game)) |
(→Pros and cons) (Tag: Visual edit) |
||
| (29 intermediate revisions by 8 users not shown) | |||
| Line 1: | Line 1: | ||
{{Specs-Card | {{Specs-Card | ||
|code=jp_battlecruiser_haruna | |code=jp_battlecruiser_haruna | ||
| − | |images={{Specs-Card-Image|GarageImage_{{PAGENAME}}.jpg | + | |images={{Specs-Card-Image|GarageImage_{{PAGENAME}}.jpg}} |
|market=id50192_ijn_haruna_japan | |market=id50192_ijn_haruna_japan | ||
}} | }} | ||
| Line 7: | Line 7: | ||
== Description == | == Description == | ||
<!-- ''In the first part of the description, cover the history of the ship's creation and military application. In the second part, tell the reader about using this ship in the game. Add a screenshot: if a beginner player has a hard time remembering vehicles by name, a picture will help them identify the ship in question.'' --> | <!-- ''In the first part of the description, cover the history of the ship's creation and military application. In the second part, tell the reader about using this ship in the game. Add a screenshot: if a beginner player has a hard time remembering vehicles by name, a picture will help them identify the ship in question.'' --> | ||
| − | The '''{{Specs|name}}''' (榛名, [[Abbreviations#.28JP.29_Naval|namesake]]: Mount Haruna) was | + | The '''{{Specs|name}}''' (榛名, [[Abbreviations#.28JP.29_Naval|namesake]]: Mount Haruna) is a gift rank {{Specs|rank}} Japanese battleship {{Battle-rating}}. It was introduced during [[Update "Danger Zone"]] as a reward for the [[wt:en/news/7796-event-summer-quest-en|2022 Summer Quest event]]. |
| − | Haruna | + | Haruna is the fourth and last of the [[Kongo (Family)|Kongō-class Battlecruiser (later Fast-Battleship)]], being commissioned in 1915 on the same day as her sister ship, Kirishima. |
| + | |||
| + | Seeing almost every major naval action in the Pacific conflict, She sailed with the southern fleet in prepration of the battle of Singapore, covered the Japanese landings in Malaya and Dutch East Indies, engaged in the battle of midway and fought in the Guadalcanal Campaign. From 1943 onward she would primarily move between bases as escort and cover for withdrawals and transfers. | ||
| + | |||
| + | She would sink in the port of Kure Naval Base after several days of bombarding by Task Force 38 on 28 July 1945. | ||
== General info == | == General info == | ||
| Line 15: | Line 19: | ||
{{Specs-Fleet-Armour}} | {{Specs-Fleet-Armour}} | ||
<!-- ''Talk about the vehicle's armour. Note the most well-defended and most vulnerable zones, e.g. the ammo magazine. Evaluate the composition of components and assemblies responsible for movement and manoeuvrability. Evaluate the survivability of the primary and secondary armaments separately. Don't forget to mention the size of the crew, which plays an important role in fleet mechanics. Save tips on preserving survivability for the "Usage in battles" section. If necessary, use a graphical template to show the most well-protected or most vulnerable points in the armour.'' --> | <!-- ''Talk about the vehicle's armour. Note the most well-defended and most vulnerable zones, e.g. the ammo magazine. Evaluate the composition of components and assemblies responsible for movement and manoeuvrability. Evaluate the survivability of the primary and secondary armaments separately. Don't forget to mention the size of the crew, which plays an important role in fleet mechanics. Save tips on preserving survivability for the "Usage in battles" section. If necessary, use a graphical template to show the most well-protected or most vulnerable points in the armour.'' --> | ||
| − | At first glance, Haruna's protection is similar to that of her sister ship [[IJN Kongo|Kongo]]. Being originally commissioned as a battlecruiser, Haruna's armour is quite underwhelming for a capital ship | + | At the first glance, the Haruna's protection is similar to that of her sister ship [[IJN Kongo|Kongo]]. Being originally commissioned as a battlecruiser, the Haruna's armour is quite underwhelming for a capital ship, thought still offers reasonable protection against cruiser. However, the devil hides within the details, as the Haruna has a different crew distribution compared to the Kongo, with roughtly 80% of her crew being located in the midship section, and 40% of them were positioned inside a vulnerable deck of the ship. This resulted into her being more vulnerable to concentrated fire from enemy ship, including cruisers that can chip a significant portion of the crew away if not taken care of soon enough. |
| − | |||
| − | |||
| − | |||
| − | |||
| − | |||
=== Mobility === | === Mobility === | ||
{{Specs-Fleet-Mobility}} | {{Specs-Fleet-Mobility}} | ||
<!-- ''Write about the ship's mobility. Evaluate its power and manoeuvrability, rudder rerouting speed, stopping speed at full tilt, with its maximum forward and reverse speed.'' --> | <!-- ''Write about the ship's mobility. Evaluate its power and manoeuvrability, rudder rerouting speed, stopping speed at full tilt, with its maximum forward and reverse speed.'' --> | ||
| − | + | ''Write about the ship's mobility. Evaluate its power and manoeuvrability, rudder rerouting speed, stopping speed at full tilt, with its maximum forward and reverse speed.'' | |
{{NavalMobility}} | {{NavalMobility}} | ||
| Line 38: | Line 37: | ||
{{main|36 cm/45 Type 41 (356 mm)}} | {{main|36 cm/45 Type 41 (356 mm)}} | ||
| − | + | {| class="wikitable sortable" style="text-align:center" width="100%" | |
| + | ! colspan="8" | Penetration statistics | ||
| + | |- | ||
| + | ! rowspan="2" data-sort-type="text" | Ammunition | ||
| + | ! rowspan="2" | Type of<br>warhead | ||
| + | ! colspan="6" | Penetration @ 0° Angle of Attack (mm) | ||
| + | |- | ||
| + | ! 1,000 m !! 2,500 m !! 5,000 m !! 7,500 m !! 10,000 m !! 15,000 m | ||
| + | |- | ||
| + | | Ordinary SAP || SAPCBC || 301 || 280 || 248 || 222 || 199 || 168 | ||
| + | |- | ||
| + | | Type 91 APC || APCBC || 635 || 593 || 476 || 476 || 431 || 366 | ||
| + | |- | ||
| + | | Type 0 Common || HE || 85 || 85 || 85 || 85 || 85 || 85 | ||
| + | |- | ||
| + | |} | ||
| − | { | + | {| class="wikitable sortable" style="text-align:center" width="100%" |
| + | ! colspan="10" | Shell details | ||
| + | |- | ||
| + | ! rowspan="2" data-sort-type="text" | Ammunition | ||
| + | ! rowspan="2" | Type of<br>warhead | ||
| + | ! rowspan="2" | Velocity<br>(m/s) | ||
| + | ! rowspan="2" | Projectile<br>Mass (kg) | ||
| + | ! rowspan="2" | Fuse delay<br>(m) | ||
| + | ! rowspan="2" | Fuse sensitivity<br>(mm) | ||
| + | ! rowspan="2" | Explosive Mass<br>(TNT equivalent) (g) | ||
| + | ! colspan="3" | Ricochet | ||
| + | |- | ||
| + | ! 0% !! 50% !! 100% | ||
| + | |- | ||
| + | | Ordinary SAP || SAPCBC || 780 || 635.6 || 0 || 12 || 68,640 || 48° || 63° || 71° | ||
| + | |- | ||
| + | | Type 91 APC || APCBC || 771 || 671.3 || 18 || 12 || 12,210 || 48° || 63° || 71° | ||
| + | |- | ||
| + | | Type 0 Common || HE || 805 || 621.0 || 0 || 0.1 || 32,450 || 79° || 80° || 81° | ||
| + | |- | ||
| + | |} | ||
=== Secondary armament === | === Secondary armament === | ||
| Line 47: | Line 81: | ||
{{main|15 cm/50 Type 41 (152 mm)}} | {{main|15 cm/50 Type 41 (152 mm)}} | ||
| − | + | {| class="wikitable sortable" style="text-align:center" width="100%" | |
| − | + | ! colspan="8" | Penetration statistics | |
| − | { | + | |- |
| + | ! rowspan="2" data-sort-type="text" | Ammunition | ||
| + | ! rowspan="2" | Type of<br>warhead | ||
| + | ! colspan="6" | Penetration @ 0° Angle of Attack (mm) | ||
| + | |- | ||
| + | ! 1,000 m !! 2,500 m !! 5,000 m !! 7,500 m !! 10,000 m !! 15,000 m | ||
| + | |- | ||
| + | | Type 0 HE || HE || 35 || 35 || 35 || 35 || 35 || 35 | ||
| + | |- | ||
| + | | Type 4 SAP || SAP || 81 || 68 || 52 || 40 || 34 || 34 | ||
| + | |- | ||
| + | |} | ||
| + | {| class="wikitable sortable" style="text-align:center" width="100%" | ||
| + | ! colspan="10" | Shell details | ||
| + | |- | ||
| + | ! rowspan="2" data-sort-type="text" | Ammunition | ||
| + | ! rowspan="2" | Type of<br>warhead | ||
| + | ! rowspan="2" | Velocity<br>(m/s) | ||
| + | ! rowspan="2" | Projectile<br>Mass (kg) | ||
| + | ! rowspan="2" | Fuse delay<br>(m) | ||
| + | ! rowspan="2" | Fuse sensitivity<br>(mm) | ||
| + | ! rowspan="2" | Explosive Mass<br>(TNT equivalent) (g) | ||
| + | ! colspan="3" | Ricochet | ||
| + | |- | ||
| + | ! 0% !! 50% !! 100% | ||
| + | |- | ||
| + | | Type 0 HE || HE || 850 || 45.26 || 0 || 0.1 || 3,170 || 79° || 80° || 81° | ||
| + | |- | ||
| + | | Type 4 SAP || SAP || 850 || 45.26 || 8 || 7 || 2,920 || 47° || 60° || 65° | ||
| + | |- | ||
| + | |} | ||
=== Anti-aircraft armament === | === Anti-aircraft armament === | ||
| Line 56: | Line 120: | ||
{{main|5 inch/40 Type 89 (127 mm)|25 mm/60 Type 96 (25 mm)}} | {{main|5 inch/40 Type 89 (127 mm)|25 mm/60 Type 96 (25 mm)}} | ||
| − | + | ''An important part of the ship's armament responsible for air defence. Anti-aircraft armament is defined by the weapon chosen with the control <code>Select anti-aircraft weapons</code>. Talk about the ship's anti-air cannons and machine guns, the number of guns and their positions, their effective range, and about their overall effectiveness – including against surface targets. If there are no anti-aircraft armaments, remove this section.'' | |
| − | |||
| − | |||
| − | |||
| − | |||
=== Scout plane === | === Scout plane === | ||
| − | {{ | + | {{main|Aichi E13A1}} |
| − | |||
| − | |||
== Usage in battles == | == Usage in battles == | ||
| Line 71: | Line 129: | ||
''Describe the technique of using this ship, the characteristics of her use in a team and tips on strategy. Abstain from writing an entire guide – don't try to provide a single point of view, but give the reader food for thought. Talk about the most dangerous opponents for this vehicle and provide recommendations on fighting them. If necessary, note the specifics of playing with this vehicle in various modes (AB, RB, SB).'' | ''Describe the technique of using this ship, the characteristics of her use in a team and tips on strategy. Abstain from writing an entire guide – don't try to provide a single point of view, but give the reader food for thought. Talk about the most dangerous opponents for this vehicle and provide recommendations on fighting them. If necessary, note the specifics of playing with this vehicle in various modes (AB, RB, SB).'' | ||
| − | === Pros and cons === | + | === Pros and cons=== |
<!-- ''Summarise and briefly evaluate the vehicle in terms of its characteristics and combat effectiveness. Mark its pros and cons in the bulleted list. Try not to use more than 6 points for each of the characteristics. Avoid using categorical definitions such as "bad", "good" and the like - use substitutions with softer forms such as "inadequate" and "effective".'' --> | <!-- ''Summarise and briefly evaluate the vehicle in terms of its characteristics and combat effectiveness. Mark its pros and cons in the bulleted list. Try not to use more than 6 points for each of the characteristics. Avoid using categorical definitions such as "bad", "good" and the like - use substitutions with softer forms such as "inadequate" and "effective".'' --> | ||
| − | |||
'''Pros:''' | '''Pros:''' | ||
| − | * Exceptional | + | * Exceptional 14" guns with a very potent SAP round and comfortable gun arcs |
* Very fast for her size | * Very fast for her size | ||
| − | * Good AA protection | + | * Good AA protection, 25 mm AA guns don't cost crew count (the animated crew models don't affect the gameplay) |
* Workable armour above waterline; turtleback around the magazines | * Workable armour above waterline; turtleback around the magazines | ||
* Access to floatplanes | * Access to floatplanes | ||
| Line 84: | Line 141: | ||
'''Cons:''' | '''Cons:''' | ||
| − | * Crew is more concentrated around the midship section compared to the sister ship, thus making them vulnerable to concentrated fire | + | * Crew is more concentrated around the midship section compared to the sister ship, thus making them vulnerable to concentrated fire |
* Extremely weak underwater protection, vulnerable to large calibre diving shots from heavy cruisers or above | * Extremely weak underwater protection, vulnerable to large calibre diving shots from heavy cruisers or above | ||
* Third turret ammo rack can be detonated in a prolonged fire | * Third turret ammo rack can be detonated in a prolonged fire | ||
* Subject to flooding and capsizing in addition due to aforementioned weakness | * Subject to flooding and capsizing in addition due to aforementioned weakness | ||
* 127 mm batteries are categorized into AAA group and hence no combined manual control or ammo options | * 127 mm batteries are categorized into AAA group and hence no combined manual control or ammo options | ||
| + | * If you take on enough water and youre pumping it out a 40 second countdown will kill you and cost you 33,000 SL | ||
== History == | == History == | ||
| Line 102: | Line 160: | ||
* [https://live.warthunder.com/feed/camouflages/?vehicle=jp_battlecruiser_haruna Skins and camouflages for the {{PAGENAME}} from live.warthunder.com.] | * [https://live.warthunder.com/feed/camouflages/?vehicle=jp_battlecruiser_haruna Skins and camouflages for the {{PAGENAME}} from live.warthunder.com.] | ||
| − | |||
| − | |||
| − | |||
| − | |||
== See also == | == See also == | ||
| Line 121: | Line 175: | ||
* [[wt:en/news/7800-development-ijn-haruna-en|[Devblog] IJN Haruna]] | * [[wt:en/news/7800-development-ijn-haruna-en|[Devblog] IJN Haruna]] | ||
| − | |||
{{Japan battleships}} | {{Japan battleships}} | ||
Revision as of 09:32, 7 September 2022

Contents
Description
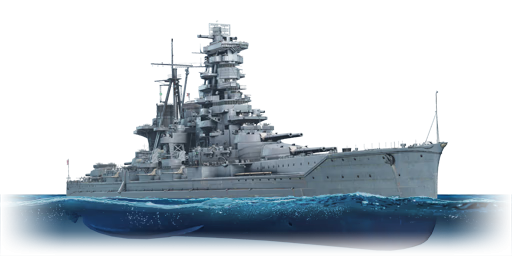
The Kongo-class, IJN Haruna, 1945 (榛名, namesake: Mount Haruna) is a gift rank V Japanese battleship with a battle rating of 7.0 (AB/RB/SB). It was introduced during Update "Danger Zone" as a reward for the 2022 Summer Quest event.
Haruna is the fourth and last of the Kongō-class Battlecruiser (later Fast-Battleship), being commissioned in 1915 on the same day as her sister ship, Kirishima.
Seeing almost every major naval action in the Pacific conflict, She sailed with the southern fleet in prepration of the battle of Singapore, covered the Japanese landings in Malaya and Dutch East Indies, engaged in the battle of midway and fought in the Guadalcanal Campaign. From 1943 onward she would primarily move between bases as escort and cover for withdrawals and transfers.
She would sink in the port of Kure Naval Base after several days of bombarding by Task Force 38 on 28 July 1945.
General info
Survivability and armour
At the first glance, the Haruna's protection is similar to that of her sister ship Kongo. Being originally commissioned as a battlecruiser, the Haruna's armour is quite underwhelming for a capital ship, thought still offers reasonable protection against cruiser. However, the devil hides within the details, as the Haruna has a different crew distribution compared to the Kongo, with roughtly 80% of her crew being located in the midship section, and 40% of them were positioned inside a vulnerable deck of the ship. This resulted into her being more vulnerable to concentrated fire from enemy ship, including cruisers that can chip a significant portion of the crew away if not taken care of soon enough.
Mobility
Write about the ship's mobility. Evaluate its power and manoeuvrability, rudder rerouting speed, stopping speed at full tilt, with its maximum forward and reverse speed.
| Mobility Characteristics | |||
|---|---|---|---|
| Game Mode | Upgrade Status | Maximum Speed (km/h) | |
| Forward | Reverse | ||
| AB | |||
| Upgraded | 66 | 29 | |
| RB/SB | |||
| Upgraded | 57 | 25 | |
Modifications and economy
| Seakeeping | Unsinkability | Firepower | ||||||||||||||||||||||||
|---|---|---|---|---|---|---|---|---|---|---|---|---|---|---|---|---|---|---|---|---|---|---|---|---|---|---|
|
|
|
Armament
Primary armament
| Penetration statistics | |||||||
|---|---|---|---|---|---|---|---|
| Ammunition | Type of warhead |
Penetration @ 0° Angle of Attack (mm) | |||||
| 1,000 m | 2,500 m | 5,000 m | 7,500 m | 10,000 m | 15,000 m | ||
| Ordinary SAP | SAPCBC | 301 | 280 | 248 | 222 | 199 | 168 |
| Type 91 APC | APCBC | 635 | 593 | 476 | 476 | 431 | 366 |
| Type 0 Common | HE | 85 | 85 | 85 | 85 | 85 | 85 |
| Shell details | |||||||||
|---|---|---|---|---|---|---|---|---|---|
| Ammunition | Type of warhead |
Velocity (m/s) |
Projectile Mass (kg) |
Fuse delay (m) |
Fuse sensitivity (mm) |
Explosive Mass (TNT equivalent) (g) |
Ricochet | ||
| 0% | 50% | 100% | |||||||
| Ordinary SAP | SAPCBC | 780 | 635.6 | 0 | 12 | 68,640 | 48° | 63° | 71° |
| Type 91 APC | APCBC | 771 | 671.3 | 18 | 12 | 12,210 | 48° | 63° | 71° |
| Type 0 Common | HE | 805 | 621.0 | 0 | 0.1 | 32,450 | 79° | 80° | 81° |
Secondary armament
| Penetration statistics | |||||||
|---|---|---|---|---|---|---|---|
| Ammunition | Type of warhead |
Penetration @ 0° Angle of Attack (mm) | |||||
| 1,000 m | 2,500 m | 5,000 m | 7,500 m | 10,000 m | 15,000 m | ||
| Type 0 HE | HE | 35 | 35 | 35 | 35 | 35 | 35 |
| Type 4 SAP | SAP | 81 | 68 | 52 | 40 | 34 | 34 |
| Shell details | |||||||||
|---|---|---|---|---|---|---|---|---|---|
| Ammunition | Type of warhead |
Velocity (m/s) |
Projectile Mass (kg) |
Fuse delay (m) |
Fuse sensitivity (mm) |
Explosive Mass (TNT equivalent) (g) |
Ricochet | ||
| 0% | 50% | 100% | |||||||
| Type 0 HE | HE | 850 | 45.26 | 0 | 0.1 | 3,170 | 79° | 80° | 81° |
| Type 4 SAP | SAP | 850 | 45.26 | 8 | 7 | 2,920 | 47° | 60° | 65° |
Anti-aircraft armament
An important part of the ship's armament responsible for air defence. Anti-aircraft armament is defined by the weapon chosen with the control Select anti-aircraft weapons. Talk about the ship's anti-air cannons and machine guns, the number of guns and their positions, their effective range, and about their overall effectiveness – including against surface targets. If there are no anti-aircraft armaments, remove this section.
Scout plane
Usage in battles
Describe the technique of using this ship, the characteristics of her use in a team and tips on strategy. Abstain from writing an entire guide – don't try to provide a single point of view, but give the reader food for thought. Talk about the most dangerous opponents for this vehicle and provide recommendations on fighting them. If necessary, note the specifics of playing with this vehicle in various modes (AB, RB, SB).
Pros and cons
Pros:
- Exceptional 14" guns with a very potent SAP round and comfortable gun arcs
- Very fast for her size
- Good AA protection, 25 mm AA guns don't cost crew count (the animated crew models don't affect the gameplay)
- Workable armour above waterline; turtleback around the magazines
- Access to floatplanes
Cons:
- Crew is more concentrated around the midship section compared to the sister ship, thus making them vulnerable to concentrated fire
- Extremely weak underwater protection, vulnerable to large calibre diving shots from heavy cruisers or above
- Third turret ammo rack can be detonated in a prolonged fire
- Subject to flooding and capsizing in addition due to aforementioned weakness
- 127 mm batteries are categorized into AAA group and hence no combined manual control or ammo options
- If you take on enough water and youre pumping it out a 40 second countdown will kill you and cost you 33,000 SL
History
Devblog
The battlecruiser Haruna of the Kongō class was laid down in 1912 and commissioned in 1915. During the First World War, she did not see active combat. Before the start of World War II, the ship went through two modernization programs, during which Haruna was reclassified as a fast battleship, the combat potential of the ship was significantly increased and it became possible to use it to escort Japanese aircraft carriers. During the invasion of mainland China in 1937, the battleship Haruna was used to transport troops. The battleship fought the first battle of World War II in December 1941 in the Battle of Kuantan against the Royal Navy. She then was active in the area of the Malay Archipelago in operations to invade Borneo and the Dutch East Indies, going on to participate in the attack on Ceylon. In May 1942, after serving in dock, she joined the carrier group in the Battle of Midway, after which the ship took part in the Battle of Guadalcanal. During all the time of intense fighting, Haruna did not receive any significant damage. In October 1943, the battleship was sent to defend Wake Island from American attacks. In the Battle of the Philippine Sea, Haruna received two hits with armor-piercing bombs, repairs lasted until the autumn of 1944. After the Battle of Leyte Gulf, the battleship was damaged when running aground on a coral reef. While docking at the naval arsenal in Kure in July 1945, the ship participated in the defense of the base, but as a result of air raids, Haruna received several hits from American bombers in a few days and sank.
Media
- Skins
See also
External links
| Japan battleships | |
|---|---|
| Kawachi-class | IJN Settsu |
| Fusō-class | IJN Fuso · IJN Yamashiro |
| Ise-class | IJN Ise · IJN Hyuga |
| Kongō-class | IJN Kongo · IJN Haruna |
| Nagato-class | IJN Mutsu |
