Difference between revisions of "CCKW 353 (M45)"
Colok76286 (talk | contribs) (Added About template) |
Colok76286 (talk | contribs) (Edits) |
||
| (10 intermediate revisions by 7 users not shown) | |||
| Line 11: | Line 11: | ||
== Description == | == Description == | ||
<!-- ''In the description, the first part should be about the history of the creation and combat usage of the vehicle, as well as its key features. In the second part, tell the reader about the ground vehicle in the game. Insert a screenshot of the vehicle, so that if the novice player does not remember the vehicle by name, he will immediately understand what kind of vehicle the article is talking about.'' --> | <!-- ''In the description, the first part should be about the history of the creation and combat usage of the vehicle, as well as its key features. In the second part, tell the reader about the ground vehicle in the game. Insert a screenshot of the vehicle, so that if the novice player does not remember the vehicle by name, he will immediately understand what kind of vehicle the article is talking about.'' --> | ||
| − | The ' | + | The CCKW 353 (M45), where the truck platform was known as the 季姆西十輪大卡車 (GMC 10-wheeled truck) by the NRA during 2nd Sino-Japanese War, was the attempt by the ROCA to built domestic SPAA. The CCKW-353 2 1/2 ton truck manufactured by GMC has been a staple of ROCA during both the Civil War and the Taiwan Strait Crisis as ROCA's utility trucks; due to the spares information on the modification, it was very likely that ROCA assembled CCKW-353 truck with a M45 quad-mount turret as placeholders or mock-ups for the ROC Year 50 (1961) parade in Taipei to show the strength of the armed forces. After M35 trucks and new SAM systems were introduced, these trucks were likely been abandoned and were lost in history, with only very sparse images during the parade that shown their existence. |
| + | |||
| + | Introduced in Update "Hot Tracks", ROCA adopted the CCKW chassis with a M45 quad-mount turret for air-defense purposes. Although it doesn't have the relatively protected scheme like its US equivalent [[M16 MGMC]], the M45 turret is still rather devastating at its tier thanks to its varieties of belts and easy-to-learn ballistics, making it a much needed SPAA for Chinese tech-tree at low rank with high ammo count. | ||
== General info == | == General info == | ||
| Line 18: | Line 20: | ||
<!-- ''Describe armour protection. Note the most well protected and key weak areas. Appreciate the layout of modules as well as the number and location of crew members. Is the level of armour protection sufficient, is the placement of modules helpful for survival in combat? If necessary use a visual template to indicate the most secure and weak zones of the armour.'' --> | <!-- ''Describe armour protection. Note the most well protected and key weak areas. Appreciate the layout of modules as well as the number and location of crew members. Is the level of armour protection sufficient, is the placement of modules helpful for survival in combat? If necessary use a visual template to indicate the most secure and weak zones of the armour.'' --> | ||
| − | The CCKW 353 (M45) suffers from | + | The CCKW 353 (M45) suffers from poor survivability and has less armor than many of its SPAA counterparts at a similar BR. The truck's engine and cabin provide almost no protection for the two crewmembers in the front of the vehicle. Being almost entirely exposed, they can be easily knocked out by any weapon available to the enemy. The only crew member of the vehicle with slight protection is the gunner inside of the M45 turret with a 12.7mm plate covering his position. This small gun shield was only designed to protect against rifle calibre rounds at a distance. It goes without saying that critical components like the engine, transmission and turret traverse drives are all poorly protected. Taking all of this into account, it is highly recommended to stay as far away from the front lines or areas with artillery fire as anything can destroy the vehicle easily. |
'''Armour type:''' <!-- The types of armour present on the vehicle and their general locations --> | '''Armour type:''' <!-- The types of armour present on the vehicle and their general locations --> | ||
| Line 45: | Line 47: | ||
{{tankMobility|abMinHp=134|rbMinHp=83}} | {{tankMobility|abMinHp=134|rbMinHp=83}} | ||
| − | The CCKW 353 (M45)'s mobility is average. Its top speed on hard surfaces (e.g. city road, dry dirt) is quite fast, at ~60 km/h, though it does need a few seconds to accelerate to that speed. It responds well in turns | + | The CCKW 353 (M45)'s mobility is average. Its top speed on hard surfaces (e.g. city road, dry dirt) is quite fast, at ~60 km/h, though it does need a few seconds to accelerate to that speed. It responds well in turns which allows it to navigate through urban environments with relative ease, as a truck would. |
| − | Just like every other wheeled vehicle | + | Just like every other wheeled vehicle however, it is sluggish on soft terrain such as snow or mud, especially when it is just starting to accelerate. Its reverse speed is poor (only -5 km/h) which is something to note when peeking out of cover. It also has low engine power and light weight, making it very difficult to crush obstacles like metal fences, light poles or even wooden barrels, thus it is recommended to select routes in maps to avoid driving into obstacles scattered across the area. Maps with urban cities or roads will usually have a lot of such obstacles. In maps with a lot of trees, mud, snow, or sand, it is recommended to choose a route that follows roads as much as possible, whether it be a concrete road or a dirt path as they will increase the vehicle's mobility when travelled on. |
=== Modifications and economy === | === Modifications and economy === | ||
{{Specs-Economy}} | {{Specs-Economy}} | ||
| − | # Parts is recommended to be researched first. Although this SPAA is fragile and seems to not be able to survive any damaging hits, its modules (e.g. transmission, turret drives) are actually frequently damaged by bullets, shrapnels, and over-penetrations | + | |
| − | # Horizontal | + | # Parts is recommended to be researched first. Although this SPAA is fragile and seems to not be able to survive any damaging hits, its modules (e.g. transmission, turret drives) are actually frequently damaged by bullets, shrapnels, and over-penetrations that do not destroy the vehicle. Thus it is crucial to be able to repair them to return to action as soon as possible. |
| − | # | + | # Horizontal Drive. It is important to be able to keep your guns on target when fighting aircraft, or to quickly swing them around deadzones when encountering ground vehicles. |
| − | # | + | # APIT Ammunition. The Default belt is already potent against ground and air targets, so the API belt doesn't have to be researched first. However, it adds an admirable incendiary ability to the .50 cal rounds, allowing you to more frequently set aircraft on fire. |
| + | # Engine and general mobility modifications. They will help the CCKW 353 (M45) to drive faster. | ||
# Other modules. | # Other modules. | ||
| Line 64: | Line 67: | ||
{{main|M2HB (12.7 mm)}} | {{main|M2HB (12.7 mm)}} | ||
| − | The firepower of the CCKW 353 (M45) is very effective, but only | + | The firepower of the CCKW 353 (M45) is very effective, but only against aircraft and lightly armoured ground vehicles. The 4 x 12.7 mm M2HB machine guns have adequate fire rate, great fire density, consistent trajectories and good round velocity, which makes it fairly easy to lead an aerial target and score constant hits. A few hits will usually damage components like cooling systems and skin, but a good hit near the cockpit may knock out the pilot, causing the entire aircraft to go down. The 12.7 mm AP bullets can go through most aircraft armour plates and continue through to hit modules behind them. Incendiary rounds have a high chance of setting fuel tanks on fire. |
| − | + | The traverse/elevation speed of the gun mount is quite fast, and has great elevation & depression angles of -10/+90 degrees, allowing the player to track fast targets or to combat in hilly battlefield well. It is important to note that there is a deadzone in the front of the vehicle where the cabin is located which prevents the turret from aiming directly forward. | |
| − | + | Against ground targets, the only recommended targets are wheeled vehicles (e.g. [[Sd.Kfz.234/2]]), SPAA (e.g. [[M16 MGMC]]) and certain light tanks (e.g. [[A13 (Family)|A13]]<nowiki/>s). The great fire density of the bullets can easily wipe out multiple crew members immediately upon penetration. However, common tanks with slightly more armor (e.g. [[Pz.IV C]], [[M3A3 (Italy)|M3A3]]) are very hard if not impossible to penetrate frontally or even from their side. | |
{| class="wikitable" style="text-align:center" width="100%" | {| class="wikitable" style="text-align:center" width="100%" | ||
| Line 89: | Line 92: | ||
* '''Common:''' {{Annotation|API-T|M20 armour-piercing incendiary tracer}}{{-}}{{Annotation|I|M1 incendiary}}{{-}}{{Annotation|AP|M2 armour-piercing}}{{-}}{{Annotation|API-T|M20 armour-piercing incendiary tracer}}: These rounds work well until the others are researched. | * '''Common:''' {{Annotation|API-T|M20 armour-piercing incendiary tracer}}{{-}}{{Annotation|I|M1 incendiary}}{{-}}{{Annotation|AP|M2 armour-piercing}}{{-}}{{Annotation|API-T|M20 armour-piercing incendiary tracer}}: These rounds work well until the others are researched. | ||
| − | * '''API:''' {{Annotation|API-T|M20 armour-piercing incendiary tracer}}{{-}}{{Annotation|AP-I|M8 armour-piercing incendiary}}{{-}}{{Annotation|API-T|M20 armour-piercing incendiary tracer}}: These are | + | * '''API:''' {{Annotation|API-T|M20 armour-piercing incendiary tracer}}{{-}}{{Annotation|AP-I|M8 armour-piercing incendiary}}{{-}}{{Annotation|API-T|M20 armour-piercing incendiary tracer}}: These are devastating in the AA role with slightly less performance against enemy tanks than AP. |
| − | * '''AP:''' {{Annotation|AP|M2 armour-piercing}}{{-}}{{Annotation|AP|M2 armour-piercing}}{{-}}{{Annotation|API-T|M20 armour-piercing incendiary tracer}}: These | + | * '''AP:''' {{Annotation|AP|M2 armour-piercing}}{{-}}{{Annotation|AP|M2 armour-piercing}}{{-}}{{Annotation|API-T|M20 armour-piercing incendiary tracer}}: These can be used against enemy tanks at close range and do good damage to planes, passing easily through armor and modules. |
| − | * '''APIT:''' {{Annotation|API-T|M20 armour-piercing incendiary tracer}}: | + | * '''APIT:''' {{Annotation|API-T|M20 armour-piercing incendiary tracer}}: A combination of the traits of AP and API rounds with a tracer component. It is not as good against armor as AP, however this usually the belt of choice in almost all situations. Since every bullet has a tracer, it makes for leading aircraft much easier. Detectability is not greatly increased over API, however it is increased a bit over AP. |
| − | { | + | {{:M2HB (12.7 mm)/Ammunition|AP, I, API-T, AP-I}} |
| − | |||
| − | |||
| − | |||
| − | |||
| − | | | ||
| − | |||
| − | |||
| − | |||
| − | |||
| − | |||
| − | |||
| − | |||
| − | |||
| − | |||
| − | |||
| − | |||
| − | |||
| − | |||
| − | |||
| − | |||
| − | |||
| − | |||
| − | |||
| − | |||
| − | |||
| − | |||
| − | |||
| − | |||
| − | |||
| − | |||
| − | |||
| − | |||
| − | |||
==== [[Ammo racks]] ==== | ==== [[Ammo racks]] ==== | ||
| Line 149: | Line 119: | ||
<!-- ''Describe the tactics of playing in the vehicle, the features of using vehicles in the team and advice on tactics. Refrain from creating a "guide" - do not impose a single point of view but instead give the reader food for thought. Describe the most dangerous enemies and give recommendations on fighting them. If necessary, note the specifics of the game in different modes (AB, RB, SB).'' --> | <!-- ''Describe the tactics of playing in the vehicle, the features of using vehicles in the team and advice on tactics. Refrain from creating a "guide" - do not impose a single point of view but instead give the reader food for thought. Describe the most dangerous enemies and give recommendations on fighting them. If necessary, note the specifics of the game in different modes (AB, RB, SB).'' --> | ||
| − | + | Like most SPAAs, it is not recommended to bring out the CCKW 353 (M45) at the beginning of the match due to its vulnerability and limited effectiveness against armored ground vehicles. | |
| + | |||
| + | For anti-air duty, it is recommended to find a spot somewhere between a friendly spawn and a cap point, preferably on higher ground with some cover. This way you can react to unexpected situations effectively: if frontline teammates collapse, you can quickly retreat. If teammates advance, you can follow them as they continue forward which allows you to cover them. It is not recommended to attempt to utilize the CCKW 353 (M45) in front-line combat. Unlike the similar [[M16 MGMC]] which has light armor that can resist rifle-calibre bullets, the CCKW 353 does not offer any protection for its crewmembers front. A strategy used to protect the two exposed crewmembers in the driver's compartment is to find hard cover to hide behind and expose the turret only. This can prevent the vehicle from being destroyed as the gunner has a light gun shield, | ||
| − | + | Once enemy aircraft spawn, you can use a specific strategy for SPAAs outlined as follows. The first step in this strategy is to fire sparse salvos towards the enemy to entice them into coming closer. You can also fire in a random direction away from the enemy while keeping an eye on them in order to trick the pilot into thinking that you have not seen them yet. Upon seeing your tracers, most pilots will choose to go for a head-on with you, knowing that most SPAAs are easy targets. As they dive towards you, fire a long burst and lay a stream of bullets in their flight path, accounting for leading and bullet drop. A few hits from the .50 cals is enough to damage critical components such as engines, cooling systems and control surfaces. Incendiary ammunition easily sets fuel tanks on fire, and armor piercing ammunition can easily punch through aircraft windshields and knock out the pilot. Keep firing prolonged bursts even when the target aircraft banks away, as they are now an even easier target to hit, being lower and slower than before. Be mindful of aircraft equipped with cannons, bombs, and rockets and be prepared to run and duck behind cover if they utilize such weapons. Do note that the CCKW 353 (M45) is unable to aim direcly forward through the driver's compartment. While this is not usually an issue due to aircraft almost always being above, it is recommended to position so that aircraft cannot fly low enough to take advantage of this deadzone. | |
| − | + | Regardless of strategy, one of the most important things to look out for out for remaining ammunition. The CCKW 353 (M45) has 200 round belts for each of the four guns but reloading the magazines is very slow, making the CCKW 353 (M45) and the rest of the team vulnerable during this period. It is recommended to fire the rest of the ammunition if there are less than 100 rounds each so that the turret can be reloaded with full magazines. In order to ensure they do not run out of ammo completely, players can sit on or near their team's capture points so that they can reload after firing at the enemy. | |
| − | For anti | + | For anti-ground vehicle duty, it is only recommended to target the vehicles that you can penetrate, including other SPAAs, armored cars, light tanks with thin armor, and tank destroyers. With the quad .50 cals can be easy to wipe out these targets with a short burst. Against tanks, with average to significant armor, the CCKW 353 (M45) is mostly defenceless. However, in a position with cover, players can take the opportunity shoot at enemy vehicle's tracks or gun barrels. Although this might not damage anything, the hits may grant assists when they are destroyed by teammates. It is highly recommended to always face the side of the truck towards the direction where enemies are most likely to appear, since the CCKW 353 (M45) cannot aim directly forwards. |
| − | + | It is highly recommended to relocate immediately if the red "artillery fire" notification flashes or orange smoke markers land nearby. Shrapnel from any size of explosion can badly damage the vehicle's modules and crew. | |
=== Enemies worth noting: === | === Enemies worth noting: === | ||
| − | * [[Staghound AA]]: | + | ===== Ground Vehicles ===== |
| − | * [[M3 Stuart (Family)|M3]]/[[M5 Stuart (Family)|M5]]: the | + | |
| + | * [[Staghound AA]]: Players using the CCKW 353 (M45) should be wary of any anti-aircraft vehicle as they will have fast firing weapons that can destroy their exposed crew members in seconds. However, the Staghound AA stands out in comparison to other SPAA vehicles as it is both relatively armored and mobile. Its frontal hull glacis is sloped 22 mm armour, and the turret is all-round 31 mm thick, meaning the .50 cal machine guns will likely not penetrating the Staghound AA in those areas. On the front of the vehicle, the .50 cal machine guns can only reliably penetrate the Staghound on the unsloped driver's port which is only 15 mm thick or through open slits on the front of the gunshield. To defeat this vehicle, it is recommended to aim for weak spots and turn the truck around so the driver's compartment deadzone doesn't obstruct the turret. If possible, it is also highly recommended to manoeuvre to the sides of the Staghound AA, as the side armor is able to be penetrated by the .50 cal ammunition easily. | ||
| + | * [[M3 Stuart (Family)|M3]]/[[M5 Stuart (Family)|M5]]: Tanks should be considered very large threats to the CCKW 353 (M45), especially light tanks such as the Stuart series. M3 and M5 Stuart tanks can usually get to positions quickly with their great on and off road speed, meaning they are usually on the flanks of the battlefield. A good way for players to avoid encountering them is to stay around friendly points and teammates. In order to combat the Stuart tanks, it is important to note that their frontal hull and turret armour which have ~50 mm of effective thickness. The only viable way to destroy them is from the sides or rear where the armour is around 25-28 mm, which is usually penetrable by the .50 cals within 100 m. The Stuart tanks' 37 mm cannon might overpenetrate the truck and not destroy modules, but their coaxial and roof mounted 2 x 7.62 mm MGs that can easily knock out the CCKW's unprotected crew members. | ||
| + | |||
| + | ===== Aircraft ===== | ||
| + | |||
| + | * [[IL-2 (Family)]] While the CCKW 353 (M45) was specifically designed to destroy aircraft, any plane should be considered the greatest threat to the vehicle. Aircraft are generally nimble, carry fast firing machine guns or cannons, and can carry high explosive ordnance such as bombs and rockets. The Soviet IL-2 series of strike aircraft specifically are one of the most dangerous aircraft that the CCKW 353 (M45) can face as it features all of the above powerful weaponry. In addition to its offensive capabilities, its cockpit and airframe are armored and very durable compared to most aircraft. When facing an IL-2, it is important to note that pilots are likely to begin attacking SPAAs from a distance, usually by launching a salvo of rockets at long range, firing machine guns and cannons at medium range, and then dropping bombs at close range. It is recommended for players using CCKW 353 (M45) to be constantly monitoring the skies for aircraft and attempt to engage them first. Pilots unaware of the vehicle's presence on the ground will likely fly in straight lines closer in proximity to the battlefield. When firing at aircraft, it is important to note that the tracer ammunition used by the .50 cal machine guns are very visible from the air and on the ground. Therefore, it is recommended to reposition the vehicle after firing for extended periods of time, as enemy vehicles will likely be searching for the CCKW 353 (M45) in the spot where tracers were last seen coming from. | ||
=== Pros and cons === | === Pros and cons === | ||
| Line 169: | Line 147: | ||
'''Pros:''' | '''Pros:''' | ||
| − | * Powerful quad | + | * Powerful and accurate quad machine guns |
| − | * AP | + | * AP ammunition is powerful enough to damage or destroy enemy light tanks and other SPAAs |
| − | * | + | * Incendiary ammunition easily lights aircraft components on fire |
| − | * | + | * Excellent vertical traverse of -10/+90 degrees |
| − | + | * Fast overall turret traverse which allows following aircraft easily | |
| − | + | * Large ammo reserve | |
| − | + | * Vehicle accelerates quickly and can reach high speeds on roads and flat surfaces | |
| − | * Fast turret traverse allows following aircraft easily | + | * Has a relativley narrow chassis which can allow it to squeeze into tight spots |
| − | * | + | * Relatively civilian appearance of the truck chassis can trick players into ignoring this vehicle in urban areas |
| − | * | ||
'''Cons:''' | '''Cons:''' | ||
| − | * Extremely low survivability | + | * Extremely low survivability |
| − | * Open topped design makes | + | * Open-topped design makes this vehicle vulnerable to strafing planes, machine guns, bombs, rockets, and artillery |
| − | * | + | * Small crew count |
| − | * | + | * Long reload time |
| − | * | + | * Reduced mobility on soft terrain such as mud, sand, and snow |
| − | * | + | * Large turn radius |
| − | * | + | * Frontal deadzone caused by the driver's compartment; the turret cannot depress enough to fire directly forward |
| − | * | + | * Relatively large profile can make this vehicle easy to spot |
| − | + | * Relatively low engine power which can make it difficult to tow vehicles or break map obstacles | |
| − | |||
| − | * | ||
== History == | == History == | ||
<!-- ''Describe the history of the creation and combat usage of the vehicle in more detail than in the introduction. If the historical reference turns out to be too long, take it to a separate article, taking a link to the article about the vehicle and adding a block "/History" (example: <nowiki>https://wiki.warthunder.com/(Vehicle-name)/History</nowiki>) and add a link to it here using the <code>main</code> template. Be sure to reference text and sources by using <code><nowiki><ref></ref></nowiki></code>, as well as adding them at the end of the article with <code><nowiki><references /></nowiki></code>. This section may also include the vehicle's dev blog entry (if applicable) and the in-game encyclopedia description (under <code><nowiki>=== In-game description ===</nowiki></code>, also if applicable).'' --> | <!-- ''Describe the history of the creation and combat usage of the vehicle in more detail than in the introduction. If the historical reference turns out to be too long, take it to a separate article, taking a link to the article about the vehicle and adding a block "/History" (example: <nowiki>https://wiki.warthunder.com/(Vehicle-name)/History</nowiki>) and add a link to it here using the <code>main</code> template. Be sure to reference text and sources by using <code><nowiki><ref></ref></nowiki></code>, as well as adding them at the end of the article with <code><nowiki><references /></nowiki></code>. This section may also include the vehicle's dev blog entry (if applicable) and the in-game encyclopedia description (under <code><nowiki>=== In-game description ===</nowiki></code>, also if applicable).'' --> | ||
| − | The GMC CCKW-353 was a 2 1/2 ton six-axle truck operated by the US and other Allied forces during WW2. It was the second most produced US truck, with only the MB Willy Jeep beating it in production numbers. The CCKW series as a whole had a wide array of variants and models produced, with over 520,000 units produced between 1940 and 1946. | + | The GMC CCKW-353 was a 2 1/2 ton six-axle truck operated by the US and other Allied forces during WW2. It was the second most produced US truck, with only the MB Willy Jeep beating it in production numbers. The CCKW series as a whole had a wide array of variants and models produced, with over 520,000 units produced between 1940 and 1946. The Republic of China specifically would have the open cab CCKW-353 variant used in a wide variety of roles, from general transport, artillery towing, and fuel trucks, to mounting the M45 Quadmount in the rear bed as a self-propelled anti-aircraft gun. |
| + | |||
| + | The M45 Quadmount was a powered turret containing four 12.7 mm M2 Browning machine guns and was introduced in 1943. The M45 was most commonly found mounted on dedicated SPAAG platforms like the [[M16 MGMC|M16]] and M17 halftracks, or the M51 and M55 towed trailers. The M45 could be mounted anywhere including truck beds, trailers, and static positions. | ||
| + | |||
| + | Both the CCKW-353 and the M45 Quadmount's service in the Republic of China are poorly documented, and it is likely that both were received during or shortly after WW2. The combination of a CCKW truck with an M45 mounted in the bed was seen during the 1961 National Day parade. The CCKW-353 truck was likely phased out by the larger M35 2 1/2 ton truck during the mid to late 1960's, while the M45 Quadmount was phased out of service by the T-81 20 mm anti-aircraft gun in the 1980s. It is not known if the M45 or the T-81 has been mounted on the bed of the M35 2 1/2 ton truck in ROCA service.<ref>https://forum.warthunder.com/index.php?/topic/470621-gmc-cckw-353-2-12-ton-truck-with-m45-quadmount-republic-of-china/</ref> | ||
== Media == | == Media == | ||
| Line 208: | Line 187: | ||
<!-- ''Links to the articles on the War Thunder Wiki that you think will be useful for the reader, for example:'' | <!-- ''Links to the articles on the War Thunder Wiki that you think will be useful for the reader, for example:'' | ||
* ''reference to the series of the vehicles;'' | * ''reference to the series of the vehicles;'' | ||
| − | * ''links to approximate analogues of other nations and research trees.'' --> | + | * ''links to approximate analogues of other nations and research trees.'' -->Vehicles with the same weapon systems: |
* [[M16 MGMC]] | * [[M16 MGMC]] | ||
| + | * [[M16 MGMC (Japan)|▅M16 MGMC]] | ||
| + | * [[CM52]] | ||
| + | |||
| + | Vehicles with the same chassis: | ||
| + | |||
* [[CCKW 353 AA]] | * [[CCKW 353 AA]] | ||
| Line 221: | Line 205: | ||
<references /> | <references /> | ||
| + | {{TankManufacturer GM}} | ||
{{China anti-aircraft vehicles}} | {{China anti-aircraft vehicles}} | ||
[[Category:Wheeled ground vehicles]] | [[Category:Wheeled ground vehicles]] | ||
Latest revision as of 16:22, 23 February 2024
| This page is about the Chinese SPAA CCKW 353 (M45). For the other CCKW 353, see CCKW 353 AA. |
.jpg)
Contents
Description
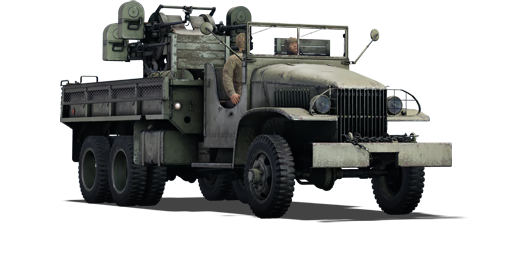
The CCKW 353 (M45), where the truck platform was known as the 季姆西十輪大卡車 (GMC 10-wheeled truck) by the NRA during 2nd Sino-Japanese War, was the attempt by the ROCA to built domestic SPAA. The CCKW-353 2 1/2 ton truck manufactured by GMC has been a staple of ROCA during both the Civil War and the Taiwan Strait Crisis as ROCA's utility trucks; due to the spares information on the modification, it was very likely that ROCA assembled CCKW-353 truck with a M45 quad-mount turret as placeholders or mock-ups for the ROC Year 50 (1961) parade in Taipei to show the strength of the armed forces. After M35 trucks and new SAM systems were introduced, these trucks were likely been abandoned and were lost in history, with only very sparse images during the parade that shown their existence.
Introduced in Update "Hot Tracks", ROCA adopted the CCKW chassis with a M45 quad-mount turret for air-defense purposes. Although it doesn't have the relatively protected scheme like its US equivalent M16 MGMC, the M45 turret is still rather devastating at its tier thanks to its varieties of belts and easy-to-learn ballistics, making it a much needed SPAA for Chinese tech-tree at low rank with high ammo count.
General info
Survivability and armour
The CCKW 353 (M45) suffers from poor survivability and has less armor than many of its SPAA counterparts at a similar BR. The truck's engine and cabin provide almost no protection for the two crewmembers in the front of the vehicle. Being almost entirely exposed, they can be easily knocked out by any weapon available to the enemy. The only crew member of the vehicle with slight protection is the gunner inside of the M45 turret with a 12.7mm plate covering his position. This small gun shield was only designed to protect against rifle calibre rounds at a distance. It goes without saying that critical components like the engine, transmission and turret traverse drives are all poorly protected. Taking all of this into account, it is highly recommended to stay as far away from the front lines or areas with artillery fire as anything can destroy the vehicle easily.
Armour type:
| Armour | Front (Slope angle) | Sides | Rear | Roof |
|---|---|---|---|---|
| Hull | ___ mm | ___ mm Top ___ mm Bottom |
___ mm | ___ - ___ mm |
| Turret | ___ - ___ mm Turret front ___ mm Gun mantlet |
___ - ___ mm | ___ - ___ mm | ___ - ___ mm |
| Cupola | ___ mm | ___ mm | ___ mm | ___ mm |
Notes:
Mobility
| Game Mode | Max Speed (km/h) | Weight (tons) | Engine power (horsepower) | Power-to-weight ratio (hp/ton) | |||
|---|---|---|---|---|---|---|---|
| Forward | Reverse | Stock | Upgraded | Stock | Upgraded | ||
| Arcade | 70 | 10 | 8 | 134 | 179 | 16.75 | 22.38 |
| Realistic | 65 | 9 | 83 | 94 | 10.38 | 11.75 | |
The CCKW 353 (M45)'s mobility is average. Its top speed on hard surfaces (e.g. city road, dry dirt) is quite fast, at ~60 km/h, though it does need a few seconds to accelerate to that speed. It responds well in turns which allows it to navigate through urban environments with relative ease, as a truck would.
Just like every other wheeled vehicle however, it is sluggish on soft terrain such as snow or mud, especially when it is just starting to accelerate. Its reverse speed is poor (only -5 km/h) which is something to note when peeking out of cover. It also has low engine power and light weight, making it very difficult to crush obstacles like metal fences, light poles or even wooden barrels, thus it is recommended to select routes in maps to avoid driving into obstacles scattered across the area. Maps with urban cities or roads will usually have a lot of such obstacles. In maps with a lot of trees, mud, snow, or sand, it is recommended to choose a route that follows roads as much as possible, whether it be a concrete road or a dirt path as they will increase the vehicle's mobility when travelled on.
Modifications and economy
| Mobility | Protection | Firepower | ||||||||||||||||||||
|---|---|---|---|---|---|---|---|---|---|---|---|---|---|---|---|---|---|---|---|---|---|---|
|
|
|
- Parts is recommended to be researched first. Although this SPAA is fragile and seems to not be able to survive any damaging hits, its modules (e.g. transmission, turret drives) are actually frequently damaged by bullets, shrapnels, and over-penetrations that do not destroy the vehicle. Thus it is crucial to be able to repair them to return to action as soon as possible.
- Horizontal Drive. It is important to be able to keep your guns on target when fighting aircraft, or to quickly swing them around deadzones when encountering ground vehicles.
- APIT Ammunition. The Default belt is already potent against ground and air targets, so the API belt doesn't have to be researched first. However, it adds an admirable incendiary ability to the .50 cal rounds, allowing you to more frequently set aircraft on fire.
- Engine and general mobility modifications. They will help the CCKW 353 (M45) to drive faster.
- Other modules.
Armaments
Main armament
The firepower of the CCKW 353 (M45) is very effective, but only against aircraft and lightly armoured ground vehicles. The 4 x 12.7 mm M2HB machine guns have adequate fire rate, great fire density, consistent trajectories and good round velocity, which makes it fairly easy to lead an aerial target and score constant hits. A few hits will usually damage components like cooling systems and skin, but a good hit near the cockpit may knock out the pilot, causing the entire aircraft to go down. The 12.7 mm AP bullets can go through most aircraft armour plates and continue through to hit modules behind them. Incendiary rounds have a high chance of setting fuel tanks on fire.
The traverse/elevation speed of the gun mount is quite fast, and has great elevation & depression angles of -10/+90 degrees, allowing the player to track fast targets or to combat in hilly battlefield well. It is important to note that there is a deadzone in the front of the vehicle where the cabin is located which prevents the turret from aiming directly forward.
Against ground targets, the only recommended targets are wheeled vehicles (e.g. Sd.Kfz.234/2), SPAA (e.g. M16 MGMC) and certain light tanks (e.g. A13s). The great fire density of the bullets can easily wipe out multiple crew members immediately upon penetration. However, common tanks with slightly more armor (e.g. Pz.IV C, M3A3) are very hard if not impossible to penetrate frontally or even from their side.
| 12.7 mm M2HB (x4) | Turret rotation speed (°/s) | Reloading rate (seconds) | ||||||||||||
|---|---|---|---|---|---|---|---|---|---|---|---|---|---|---|
| Mode | Capacity (Belt) | Fire rate | Vertical | Horizontal | Stabilizer | Stock | Upgraded | Full | Expert | Aced | Stock | Full | Expert | Aced |
| Arcade | 3,200 (200) | 576 | -10°/+90° | ±180° | N/A | 52.8 | 73.1 | 88.8 | 98.2 | 104.5 | 18.20 | 16.10 | 14.84 | 14.00 |
| Realistic | 35.7 | 42.0 | 51.0 | 56.4 | 60.0 | |||||||||
Ammunition
- Common: API-T · I · AP · API-T: These rounds work well until the others are researched.
- API: API-T · AP-I · API-T: These are devastating in the AA role with slightly less performance against enemy tanks than AP.
- AP: AP · AP · API-T: These can be used against enemy tanks at close range and do good damage to planes, passing easily through armor and modules.
- APIT: API-T: A combination of the traits of AP and API rounds with a tracer component. It is not as good against armor as AP, however this usually the belt of choice in almost all situations. Since every bullet has a tracer, it makes for leading aircraft much easier. Detectability is not greatly increased over API, however it is increased a bit over AP.
| Penetration statistics | |||||||
|---|---|---|---|---|---|---|---|
| Ammunition | Penetration @ 0° Angle of Attack (mm) | ||||||
| 10 m | 100 m | 500 m | 1,000 m | 1,500 m | 2,000 m | ||
| AP | 31 | 29 | 21 | 14 | 9 | 6 | |
| I | 7 | 7 | 6 | 5 | 3 | 3 | |
| API-T | 29 | 27 | 19 | 12 | 7 | 5 | |
| AP-I | 30 | 27 | 19 | 12 | 8 | 5 | |
| Shell details | ||||||||||||
|---|---|---|---|---|---|---|---|---|---|---|---|---|
| Ammunition | Velocity (m/s) |
Projectile mass (kg) |
Fuse delay | Fuse sensitivity (mm) |
Explosive mass (TNT equivalent) (g) |
Ricochet | ||||||
| 0% | 50% | 100% | ||||||||||
| AP | 894 | 0.05 | - | - | - | 47° | 56° | 65° | ||||
| I | 944 | 0.04 | 0 | 3 | 0 | 47° | 56° | 65° | ||||
| API-T | 929 | 0.04 | - | - | - | 47° | 56° | 65° | ||||
| AP-I | 929 | 0.04 | - | - | - | 47° | 56° | 65° | ||||
Ammo racks
| Full ammo |
1st rack empty |
2nd rack empty |
3rd rack empty |
4th rack empty |
5th rack empty |
6th rack empty |
Visual discrepancy |
|---|---|---|---|---|---|---|---|
| 16 | __ (+__) | __ (+__) | __ (+__) | __ (+__) | __ (+__) | __ (+__) | __ |
Usage in battles
Like most SPAAs, it is not recommended to bring out the CCKW 353 (M45) at the beginning of the match due to its vulnerability and limited effectiveness against armored ground vehicles.
For anti-air duty, it is recommended to find a spot somewhere between a friendly spawn and a cap point, preferably on higher ground with some cover. This way you can react to unexpected situations effectively: if frontline teammates collapse, you can quickly retreat. If teammates advance, you can follow them as they continue forward which allows you to cover them. It is not recommended to attempt to utilize the CCKW 353 (M45) in front-line combat. Unlike the similar M16 MGMC which has light armor that can resist rifle-calibre bullets, the CCKW 353 does not offer any protection for its crewmembers front. A strategy used to protect the two exposed crewmembers in the driver's compartment is to find hard cover to hide behind and expose the turret only. This can prevent the vehicle from being destroyed as the gunner has a light gun shield,
Once enemy aircraft spawn, you can use a specific strategy for SPAAs outlined as follows. The first step in this strategy is to fire sparse salvos towards the enemy to entice them into coming closer. You can also fire in a random direction away from the enemy while keeping an eye on them in order to trick the pilot into thinking that you have not seen them yet. Upon seeing your tracers, most pilots will choose to go for a head-on with you, knowing that most SPAAs are easy targets. As they dive towards you, fire a long burst and lay a stream of bullets in their flight path, accounting for leading and bullet drop. A few hits from the .50 cals is enough to damage critical components such as engines, cooling systems and control surfaces. Incendiary ammunition easily sets fuel tanks on fire, and armor piercing ammunition can easily punch through aircraft windshields and knock out the pilot. Keep firing prolonged bursts even when the target aircraft banks away, as they are now an even easier target to hit, being lower and slower than before. Be mindful of aircraft equipped with cannons, bombs, and rockets and be prepared to run and duck behind cover if they utilize such weapons. Do note that the CCKW 353 (M45) is unable to aim direcly forward through the driver's compartment. While this is not usually an issue due to aircraft almost always being above, it is recommended to position so that aircraft cannot fly low enough to take advantage of this deadzone.
Regardless of strategy, one of the most important things to look out for out for remaining ammunition. The CCKW 353 (M45) has 200 round belts for each of the four guns but reloading the magazines is very slow, making the CCKW 353 (M45) and the rest of the team vulnerable during this period. It is recommended to fire the rest of the ammunition if there are less than 100 rounds each so that the turret can be reloaded with full magazines. In order to ensure they do not run out of ammo completely, players can sit on or near their team's capture points so that they can reload after firing at the enemy.
For anti-ground vehicle duty, it is only recommended to target the vehicles that you can penetrate, including other SPAAs, armored cars, light tanks with thin armor, and tank destroyers. With the quad .50 cals can be easy to wipe out these targets with a short burst. Against tanks, with average to significant armor, the CCKW 353 (M45) is mostly defenceless. However, in a position with cover, players can take the opportunity shoot at enemy vehicle's tracks or gun barrels. Although this might not damage anything, the hits may grant assists when they are destroyed by teammates. It is highly recommended to always face the side of the truck towards the direction where enemies are most likely to appear, since the CCKW 353 (M45) cannot aim directly forwards.
It is highly recommended to relocate immediately if the red "artillery fire" notification flashes or orange smoke markers land nearby. Shrapnel from any size of explosion can badly damage the vehicle's modules and crew.
Enemies worth noting:
Ground Vehicles
- Staghound AA: Players using the CCKW 353 (M45) should be wary of any anti-aircraft vehicle as they will have fast firing weapons that can destroy their exposed crew members in seconds. However, the Staghound AA stands out in comparison to other SPAA vehicles as it is both relatively armored and mobile. Its frontal hull glacis is sloped 22 mm armour, and the turret is all-round 31 mm thick, meaning the .50 cal machine guns will likely not penetrating the Staghound AA in those areas. On the front of the vehicle, the .50 cal machine guns can only reliably penetrate the Staghound on the unsloped driver's port which is only 15 mm thick or through open slits on the front of the gunshield. To defeat this vehicle, it is recommended to aim for weak spots and turn the truck around so the driver's compartment deadzone doesn't obstruct the turret. If possible, it is also highly recommended to manoeuvre to the sides of the Staghound AA, as the side armor is able to be penetrated by the .50 cal ammunition easily.
- M3/M5: Tanks should be considered very large threats to the CCKW 353 (M45), especially light tanks such as the Stuart series. M3 and M5 Stuart tanks can usually get to positions quickly with their great on and off road speed, meaning they are usually on the flanks of the battlefield. A good way for players to avoid encountering them is to stay around friendly points and teammates. In order to combat the Stuart tanks, it is important to note that their frontal hull and turret armour which have ~50 mm of effective thickness. The only viable way to destroy them is from the sides or rear where the armour is around 25-28 mm, which is usually penetrable by the .50 cals within 100 m. The Stuart tanks' 37 mm cannon might overpenetrate the truck and not destroy modules, but their coaxial and roof mounted 2 x 7.62 mm MGs that can easily knock out the CCKW's unprotected crew members.
Aircraft
- IL-2 (Family) While the CCKW 353 (M45) was specifically designed to destroy aircraft, any plane should be considered the greatest threat to the vehicle. Aircraft are generally nimble, carry fast firing machine guns or cannons, and can carry high explosive ordnance such as bombs and rockets. The Soviet IL-2 series of strike aircraft specifically are one of the most dangerous aircraft that the CCKW 353 (M45) can face as it features all of the above powerful weaponry. In addition to its offensive capabilities, its cockpit and airframe are armored and very durable compared to most aircraft. When facing an IL-2, it is important to note that pilots are likely to begin attacking SPAAs from a distance, usually by launching a salvo of rockets at long range, firing machine guns and cannons at medium range, and then dropping bombs at close range. It is recommended for players using CCKW 353 (M45) to be constantly monitoring the skies for aircraft and attempt to engage them first. Pilots unaware of the vehicle's presence on the ground will likely fly in straight lines closer in proximity to the battlefield. When firing at aircraft, it is important to note that the tracer ammunition used by the .50 cal machine guns are very visible from the air and on the ground. Therefore, it is recommended to reposition the vehicle after firing for extended periods of time, as enemy vehicles will likely be searching for the CCKW 353 (M45) in the spot where tracers were last seen coming from.
Pros and cons
Pros:
- Powerful and accurate quad machine guns
- AP ammunition is powerful enough to damage or destroy enemy light tanks and other SPAAs
- Incendiary ammunition easily lights aircraft components on fire
- Excellent vertical traverse of -10/+90 degrees
- Fast overall turret traverse which allows following aircraft easily
- Large ammo reserve
- Vehicle accelerates quickly and can reach high speeds on roads and flat surfaces
- Has a relativley narrow chassis which can allow it to squeeze into tight spots
- Relatively civilian appearance of the truck chassis can trick players into ignoring this vehicle in urban areas
Cons:
- Extremely low survivability
- Open-topped design makes this vehicle vulnerable to strafing planes, machine guns, bombs, rockets, and artillery
- Small crew count
- Long reload time
- Reduced mobility on soft terrain such as mud, sand, and snow
- Large turn radius
- Frontal deadzone caused by the driver's compartment; the turret cannot depress enough to fire directly forward
- Relatively large profile can make this vehicle easy to spot
- Relatively low engine power which can make it difficult to tow vehicles or break map obstacles
History
The GMC CCKW-353 was a 2 1/2 ton six-axle truck operated by the US and other Allied forces during WW2. It was the second most produced US truck, with only the MB Willy Jeep beating it in production numbers. The CCKW series as a whole had a wide array of variants and models produced, with over 520,000 units produced between 1940 and 1946. The Republic of China specifically would have the open cab CCKW-353 variant used in a wide variety of roles, from general transport, artillery towing, and fuel trucks, to mounting the M45 Quadmount in the rear bed as a self-propelled anti-aircraft gun.
The M45 Quadmount was a powered turret containing four 12.7 mm M2 Browning machine guns and was introduced in 1943. The M45 was most commonly found mounted on dedicated SPAAG platforms like the M16 and M17 halftracks, or the M51 and M55 towed trailers. The M45 could be mounted anywhere including truck beds, trailers, and static positions.
Both the CCKW-353 and the M45 Quadmount's service in the Republic of China are poorly documented, and it is likely that both were received during or shortly after WW2. The combination of a CCKW truck with an M45 mounted in the bed was seen during the 1961 National Day parade. The CCKW-353 truck was likely phased out by the larger M35 2 1/2 ton truck during the mid to late 1960's, while the M45 Quadmount was phased out of service by the T-81 20 mm anti-aircraft gun in the 1980s. It is not known if the M45 or the T-81 has been mounted on the bed of the M35 2 1/2 ton truck in ROCA service.[1]
Media
- Skins
See also
Vehicles with the same weapon systems:
Vehicles with the same chassis:
External links
References
| General Motors Company (GM) | |
|---|---|
| MBTs | |
| MBT-70 | MBT-70* · XM803 |
| XM-1 | XM1 (GM) |
| *Designed in collaboration with the Deutsche Entwicklungsgesellschaft. | |
| Tank Destroyers | T114 |
| Export | |
| GMC CCKW | CCKW 353 (M45) · CCKW 353 AA |
| Note | General Motors has several divisions, including Buick, Cadillac, and Chevrolet. |
| China anti-aircraft vehicles | |
|---|---|
| Radar SPAAG | PGZ09 |
| Gun and Missile SPAAG | PGZ04A |
| Other | ZSD63/PG87 · WZ305 |
| Germany | ␗Sd.Kfz.222 |
| North Vietnam | Phòng không T-34 |
| USA | CCKW 353 (M45) · ␗M42 |
| USSR | Tor-M1 |
