Difference between revisions of "AMX-30B2"
m (Minor updates) (Tag: Visual edit) |
(History and overall description of the vehicle) (Tag: Visual edit) |
||
| (27 intermediate revisions by 8 users not shown) | |||
| Line 1: | Line 1: | ||
| + | {{Specs-Card|code=fr_amx_30_b2}} | ||
{{About | {{About | ||
| − | | about = | + | |about=medium tank '''{{PAGENAME}}''' |
| − | | usage = other | + | |usage=other uses |
| − | | link = AMX-30 (Family) | + | |link=AMX-30 (Family) |
| − | |||
| − | |||
| − | |||
| − | |||
}} | }} | ||
== Description == | == Description == | ||
| − | <!-- ''In the description, the first part should be about the history of the creation and combat usage of the vehicle, as well as its key features. In the second part, tell the reader about the ground vehicle in the game. Insert a screenshot of the vehicle, so that if the novice player does not remember the vehicle by name, he will immediately understand what kind of vehicle the article is talking about.'' --> | + | <!--''In the description, the first part should be about the history of the creation and combat usage of the vehicle, as well as its key features. In the second part, tell the reader about the ground vehicle in the game. Insert a screenshot of the vehicle, so that if the novice player does not remember the vehicle by name, he will immediately understand what kind of vehicle the article is talking about.''--> |
| − | The ''' | + | [[File:GarageImage_{{PAGENAME}}.jpg|420px|thumb|left]] |
| + | {{break}} | ||
| + | The '''{{specs|name}}''' is a Rank {{specs|rank}} French medium tank {{Battle-rating}}. It was introduced in [[Update 1.75 "La Résistance"]]. | ||
| + | |||
| + | The vehicle follows the conventional western tank design of the mid Cold War with four crew members and a 105 mm gun. It has good armour on the UFP that can bounce some weaker shells but the sides, rear and top are very weak, making the vehicle highly vulnerable to air attacks and SPAA fire even from a distance. It has good acceleration, mobility, and firepower. Its turret resembles that of the T-54 series from the sides due to its rounded shape, so be careful in SB and check twice before firing at this tank because you may hit your ally if you do not pay enough attention... This can prove both to be an up and a downside depending on who's actually making the mistake. | ||
| − | + | This vehicle has the particularity to throw the usual 7.62 or .50 co-axial MG away for a powerful rapid firing 20 mm autocanon that can be elevated up to 40° that fires HEIT and APIT projectiles with a penetration up to 40 mm at close range and against straight armor. This weapon is very useful to deal with light ennemy tanks that are rushing you since this gun will simply wreck them, especially if they show their flanks. This gun is also very effective at taking down attacking aircraft that would be crazy enough to rush straight at you or pass you by at low altitude and low speed. At last, this gun can destroy walls, trees and every obstacles you may encounter. The AMX-30B2 also has an unmatched firepower at it's BR. Its 105 mm gun fires both the OCC 105 G1 shell found on the first AMX-30, but also the dreaded and powerful OFL 105 F1 which is nothing less than the second most powerful APFSDS shell in the BR bracket. The AMX 30B2 is also the only MBT that has access to thermal imaging device at this BR. Unlike passive IR sight that can only be used during night times, thermal imaging allows you too see within the infrared spectrum even during bright day conditions ! Even though its device is a first generation one, every ennemy tanks will be glaring in your sight and all you will have to do is to pick them off with your powerful gun. Thermals Imaging System is a very powerful tool and at this BR, gives it's users a tremendous advantage. This particular configuration simply tells you all about this tank, just like in real life where it used it's superior detection and acquisition devices to engage and destroy targets from afar, you should simply do the same in the game by staying back and supporting your team from afar using your laser rangefinder, thermal imaging system and your powerful APFSDS to outrange and delete enemies from a distance. | |
== General info == | == General info == | ||
=== Survivability and armour === | === Survivability and armour === | ||
| − | + | <!--''Describe armour protection. Note the most well protected and key weak areas. Appreciate the layout of modules as well as the number and location of crew members. Is the level of armour protection sufficient, is the placement of modules helpful for survival in combat?'' | |
| − | <!-- ''Describe armour protection. Note the most well protected and key weak areas. Appreciate the layout of modules as well as the number and location of crew members. Is the level of armour protection sufficient, is the placement of modules helpful for survival in combat? | ||
| + | ''If necessary use a visual template to indicate the most secure and weak zones of the armour.''--> | ||
'''Armour type:''' | '''Armour type:''' | ||
| − | * Cast homogeneous armour | + | * Cast homogeneous armour |
| − | * Rolled homogeneous armour ( | + | * Rolled homogeneous armour (Hull roof, Hull sides) |
{| class="wikitable" | {| class="wikitable" | ||
| Line 29: | Line 30: | ||
! Armour !! Front (Slope angle) !! Sides !! Rear !! Roof | ! Armour !! Front (Slope angle) !! Sides !! Rear !! Roof | ||
|- | |- | ||
| − | | Hull || | + | | Hull || 79 mm (57-68°), 50 mm (52-76°) ''Front glacis'' <br> 79 mm (0-57°), 30 mm (75°) ''Lower glacis'' || 35-57 mm (0-35) <br> 30 mm ''Bottom'' <br> 25 mm (70°) ''Belly'' || 30 mm (10°) ''Top'' <br> 30 mm ''Center'' <br> 25 mm (70°) ''Bottom'' || 15 mm <br> 8 mm ''Engine grille'' |
|- | |- | ||
| − | | Turret || 30-150 mm (0-79°) ''Gun mantlet'' <br> 30 mm (61-75°) ''Turret front top'' || 41.5 mm (19-47°) | + | | Turret || 30-150 mm (0-79°) ''Gun mantlet'' <br> 30 mm (61-75°) ''Turret front top'' || 41.5 mm (19-47°) || 30 mm (1-64°) <br> 20 mm (54-64°) ''Turret underside'' || 20 mm |
|- | |- | ||
| − | + | ! Armour !! Sides !! Roof | |
|- | |- | ||
| + | | Cupola || 60 mm || 20 mm | ||
|} | |} | ||
'''Notes:''' | '''Notes:''' | ||
| Line 41: | Line 43: | ||
=== Mobility === | === Mobility === | ||
| − | + | <!--''Write about the mobility of the ground vehicle. Estimate the specific power and manoeuvrability, as well as the maximum speed forwards and backwards.''--> | |
| − | <!-- ''Write about the mobility of the ground vehicle. Estimate the specific power and manoeuvrability, as well as the maximum speed forwards and backwards.'' --> | + | {| class="wikitable" style="text-align:center" |
| − | + | |- | |
| − | + | ! colspan="3" | Mobility characteristic | |
| − | + | |- | |
| − | === | + | ! Weight (tons) |
| − | + | ! colspan="1" | Add-on Armour<br>weight (tons) | |
| + | ! colspan="1" | Max speed (km/h) | ||
| + | |- | ||
| + | | rowspan="2" | 37.0 || colspan="1" rowspan="2" | N/A || colspan="1" | 72 (AB) | ||
| + | |- | ||
| + | |65 (RB/SB) | ||
| + | |- | ||
| + | ! colspan="3" | Engine power (horsepower) | ||
| + | |- | ||
| + | ! colspan="1" | Mode | ||
| + | !Stock | ||
| + | !Upgraded | ||
| + | |- | ||
| + | |''Arcade'' | ||
| + | |1,054 | ||
| + | |_,___ | ||
| + | |- | ||
| + | |''Realistic/Simulator'' | ||
| + | |601 | ||
| + | |680 | ||
| + | |- | ||
| + | ! colspan="3" | Power-to-weight ratio (hp/ton) | ||
| + | |- | ||
| + | ! colspan="1" | Mode | ||
| + | !Stock | ||
| + | !Upgraded | ||
| + | |- | ||
| + | |''Arcade'' | ||
| + | |28.49 | ||
| + | |__.__ | ||
| + | |- | ||
| + | |''Realistic/Simulator'' | ||
| + | |16.24 | ||
| + | |18.38 | ||
| + | |- | ||
| + | |} | ||
== Armaments == | == Armaments == | ||
| − | |||
=== Main armament === | === Main armament === | ||
| − | + | <!--''Give the reader information about the characteristics of the main gun. Assess its effectiveness in a battle based on the reloading speed, ballistics and the power of shells. Do not forget about the flexibility of the fire, that is how quickly the cannon can be aimed at the target, open fire on it and aim at another enemy. Add a link to the main article on the gun: <code><nowiki>{{main|Name of the weapon}}</nowiki></code>. Describe in general terms the ammunition available for the main gun. Give advice on how to use them and how to fill the ammunition storage.''--> | |
| − | <!-- ''Give the reader information about the characteristics of the main gun. Assess its effectiveness in a battle based on the reloading speed, ballistics and the power of shells. Do not forget about the flexibility of the fire, that is how quickly the cannon can be aimed at the target, open fire on it and aim at another enemy. Add a link to the main article on the gun: <code><nowiki>{{main|Name of the weapon}}</nowiki></code>. Describe in general terms the ammunition available for the main gun. Give advice on how to use them and how to fill the ammunition storage.'' --> | ||
{{main|CN-105-F1 (105 mm)}} | {{main|CN-105-F1 (105 mm)}} | ||
| − | {| class="wikitable" style="text-align:center" width=" | + | {| class="wikitable" style="text-align:center" |
| + | |- | ||
| + | ! colspan="6" | [[CN-105-F1 (105 mm)|105 mm CN-105-F1]] | ||
| + | |- | ||
| + | ! colspan="3" rowspan="1" style="width:5em" |Capacity | ||
| + | ! rowspan="1" | Vertical <br> guidance | ||
| + | ! rowspan="1" | Horizontal <br> guidance | ||
| + | ! rowspan="1" | Stabilizer | ||
|- | |- | ||
| − | + | | colspan="3" | 47 || -8°/+20° || ±180° || N/A | |
|- | |- | ||
| − | ! | + | ! colspan="6" | Turret rotation speed (°/s) |
| − | |||
| − | |||
|- | |- | ||
| − | ! | + | ! style="width:4em" |Mode |
| − | + | ! style="width:4em" |Stock | |
| + | ! style="width:4em" |Upgraded | ||
| + | ! style="width:4em" |Prior + Full crew | ||
| + | ! style="width:4em" |Prior + Expert qualif. | ||
| + | ! style="width:4em" |Prior + Ace qualif. | ||
|- | |- | ||
| − | + | | ''Arcade'' || 28.6 || __.__ || __.__ || __.__ || __.__ | |
| − | | 17.9 || | + | |- |
| + | | ''Realistic'' || 17.9 || 22.1 || 25.7 || 28.4 || 30.0 | ||
| + | |- | ||
| + | ! colspan="4" | Reloading rate (seconds) | ||
| + | |- | ||
| + | ! colspan="1" style="width:4em" |Stock | ||
| + | ! colspan="1" style="width:4em" |Prior + Full crew | ||
| + | ! colspan="1" style="width:4em" |Prior + Expert qualif. | ||
| + | ! colspan="1" style="width:4em" |Prior + Ace qualif. | ||
| + | |- | ||
| + | | 8.7 || 7.7 || 7.1 || 6.7 | ||
|- | |- | ||
|} | |} | ||
| − | ==== Ammunition ==== | + | ===== Ammunition ===== |
| − | { | + | {| class="wikitable sortable" style="text-align:center" width="100%" |
| − | + | ! colspan="8" | Penetration statistics | |
| − | ==== | + | |- |
| − | + | ! rowspan="2" data-sort-type="text" | Ammunition | |
| − | + | ! rowspan="2" class="unsortable" | Type of <br /> warhead | |
| − | + | ! colspan="6" | '''Penetration''' '''''in mm''''' '''@ 0° Angle of Attack''' | |
| + | |- | ||
| + | ! 10m | ||
| + | ! 100m | ||
| + | ! 500m | ||
| + | ! 1000m | ||
| + | ! 1500m | ||
| + | ! 2000m | ||
|- | |- | ||
| − | + | | OCC 105 F1 || HEAT || 400 || 400 || 400 || 400 || 400 || 400 | |
| − | |||
| − | |||
| − | |||
| − | |||
| − | |||
|- | |- | ||
| − | | | + | | OE 105 F1 Mle.60 || HE || 26 || 26 || 25 || 25 || 25 || 25 |
| + | |- | ||
| + | | OFL 105 F1 || APFSDS || 361 || 358 || 350 || 341 || 332 || 322 | ||
|- | |- | ||
|} | |} | ||
| − | + | {| class="wikitable sortable" style="text-align:center" width="100%" | |
| − | + | ! colspan="11" | Shell details | |
| − | + | |- | |
| − | + | ! rowspan="2" data-sort-type="text" | Ammunition | |
| − | + | ! rowspan="2" class="unsortable" | Type of <br /> warhead | |
| − | + | ! rowspan="2" |Velocity <br /> in m/s | |
| − | + | ! rowspan="2" |Projectile<br />Mass in kg | |
| − | + | ! rowspan="2" | ''Fuse delay'' | |
| − | <! | + | ''in m:'' |
| − | + | ! rowspan="2" | ''Fuse sensitivity'' | |
| − | + | ''in mm:'' | |
| − | ! colspan=" | + | ! rowspan="2" | ''Explosive Mass in g<br /> (TNT equivalent):'' |
| + | ! rowspan="2" | ''Normalization At 30° <br> from horizontal:'' | ||
| + | ! colspan="3" | ''Ricochet:'' | ||
|- | |- | ||
| − | ! | + | ! 0% |
| − | ! | + | ! 50% |
| − | ! | + | ! 100% |
|- | |- | ||
| − | + | | OCC 105 F1 || HEAT || 1,000 || 11 || 0.0 || 0.1 || 1,020 || +0° || 62° || 69° || 73° | |
| − | |||
| − | |||
|- | |- | ||
| − | + | | OE 105 F1 Mle.60 || HE || 700 || 12 || 0.1 || 0.1 || 2,000 || +0° || 79° || 80° || 81° | |
| − | + | |- | |
| − | + | | OFL 105 F1 || APFSDS || 1,525 || 3.8 || N/A || N/A || N/A || ° || 78° || 80° || 81° | |
|- | |- | ||
| − | + | |} | |
| − | | | + | {| class="wikitable sortable" style="text-align:center" |
| + | ! colspan="7" | Smoke characteristic | ||
|- | |- | ||
| − | ! | + | ! Ammunition |
| − | + | ! Velocity <br /> in m/s | |
| + | ! Projectile<br />Mass in kg | ||
| + | ! ''Screen radius <br /> in m'' | ||
| + | ! ''Screen time <br /> in s'' | ||
| + | ! ''Screen hold time <br /> in s:'' | ||
| + | ! ''Explosive Mass in g<br /> (TNT equivalent):'' | ||
|- | |- | ||
| − | + | | OFPH 105 F1 || 700 || 11 || 20 || 5 || 25 || 50 | |
| − | | | ||
|- | |- | ||
| − | |}--> | + | |} |
| + | |||
| + | ===== [[Ammo racks|Ammo racks]] ===== | ||
| + | [[File:Ammoracks_{{PAGENAME}}.png|right|thumbnail|x250px|Ammo racks of the {{PAGENAME}}.]] | ||
| + | {| class="wikitable sortable" style="text-align:center" | ||
| + | |- | ||
| + | ! class="wikitable unsortable" |Full<br /> ammo | ||
| + | ! class="wikitable unsortable" |1st<br /> rack empty | ||
| + | ! class="wikitable unsortable" |2nd<br /> rack empty | ||
| + | ! class="wikitable unsortable" |3rd<br /> rack empty | ||
| + | ! class="wikitable unsortable" |4th<br /> rack empty | ||
| + | ! class="wikitable unsortable" |5th<br /> rack empty | ||
| + | ! class="wikitable unsortable" |6th<br /> rack empty | ||
| + | ! class="wikitable unsortable" |Visual<br /> discrepancy | ||
| + | |- | ||
| + | || '''50''' || XX ''(X+)'' || ''(+)'' || ''(+)'' || ''(+)'' || ''(+)'' || ''(+)'' || style="text-align:left" | no | ||
| + | |- | ||
| + | |} | ||
=== Machine guns === | === Machine guns === | ||
| − | + | <!--''Offensive and anti-aircraft machine guns not only allow you to fight some aircraft but also are effective against lightly armoured vehicles. Evaluate machine guns and give recommendations on its use.''--> | |
| − | + | {{main|M693 (20 mm)|AAN-F1 (7.62 mm)}} | |
| − | <!-- ''Offensive and anti-aircraft machine guns not only allow you to fight some aircraft but also are effective against lightly armoured vehicles. Evaluate machine guns and give recommendations on its use.'' --> | ||
| − | {{main| | ||
| − | + | {| class="wikitable" style="text-align:center" | |
| − | + | |- | |
| − | {| class="wikitable" style="text-align:center" | + | ! colspan="7" | [[M693 (20 mm)|20 mm M693]] |
|- | |- | ||
| − | ! colspan=" | + | ! colspan="7" | ''Coaxial mount'' |
|- | |- | ||
| − | ! | + | ! colspan="4" rowspan="1" style="width:5em" |Capacity (Belt capacity) |
| + | ! rowspan="1" | Fire rate <br> (shots/minute) | ||
| + | ! rowspan="1" | Vertical <br> guidance | ||
| + | ! rowspan="1" | Horizontal <br> guidance | ||
|- | |- | ||
| − | | | + | | colspan="4" | 1,000 (500) || 740 || -0°/+20° || N/A |
|- | |- | ||
|} | |} | ||
| − | + | {| class="wikitable" style="text-align:center" | |
| − | + | |- | |
| − | + | ! colspan="7" | [[AAN-F1 (7.62 mm)|7.62 mm AAN-F1]] | |
| − | {| class="wikitable" style="text-align:center" | ||
|- | |- | ||
| − | ! colspan=" | + | ! colspan="7" | ''Pintle mount'' |
|- | |- | ||
| − | ! | + | ! colspan="4" rowspan="1" style="width:5em" |Capacity (Belt capacity) |
| + | ! rowspan="1" | Fire rate <br> (shots/minute) | ||
| + | ! rowspan="1" | Vertical <br> guidance | ||
| + | ! rowspan="1" | Horizontal <br> guidance | ||
|- | |- | ||
| − | | | + | | colspan="4" | 2,000 (100) || 900 || -10°/+45° || ±120° |
|- | |- | ||
|} | |} | ||
== Usage in battles == | == Usage in battles == | ||
| − | <!-- ''Describe the tactics of playing in the vehicle, the features of using vehicles in the team and advice on tactics. Refrain from creating a "guide" - do not impose a single point of view but instead give the reader food for thought. Describe the most dangerous enemies and give recommendations on fighting them. If necessary, note the specifics of the game in different modes (AB, RB, SB).'' --> | + | <!--''Describe the tactics of playing in the vehicle, the features of using vehicles in the team and advice on tactics. Refrain from creating a "guide" - do not impose a single point of view but instead give the reader food for thought. Describe the most dangerous enemies and give recommendations on fighting them. If necessary, note the specifics of the game in different modes (AB, RB, SB).''--> |
French AMX-30B2 needs to be played more carefully than its other NATO counterparts such as the M60A1 (A0S) or the Leopard A1A1 due to the lack of a stabilizer, hence making firing on the move and/or after short stop more risky than if you were playing a T-62 in the case of a sudden frontal encounter. As a result the French AMX-30B2 is the best played as a second line support tank, a long range sniper or a flanker. You cannot expect to drive straight into battle and come out victorious in this tank. | French AMX-30B2 needs to be played more carefully than its other NATO counterparts such as the M60A1 (A0S) or the Leopard A1A1 due to the lack of a stabilizer, hence making firing on the move and/or after short stop more risky than if you were playing a T-62 in the case of a sudden frontal encounter. As a result the French AMX-30B2 is the best played as a second line support tank, a long range sniper or a flanker. You cannot expect to drive straight into battle and come out victorious in this tank. | ||
| − | This tank is, above everything, a sniper tank. The lack of a stabilizer will restrict your playstyle on most city or clustered maps. In these kinds of environment, you will have to play much more slowly and carefully than the other tanks because most tanks amongst other nations come with a stabilizer such as the | + | This tank is, above everything, a sniper tank. The lack of a stabilizer will restrict your playstyle on most city or clustered maps. In these kinds of environment, you will have to play much more slowly and carefully than the other tanks because most tanks amongst other nations come with a stabilizer such as the Cheiftain, the T-62 or the T-10M. Just advance slowly and try to be as much aware of your surroundings as you can be because this will prove to be a real life saver in this kind of environment. You can also simply lay ambushes to your enemy by patiently waiting for someone to come in front of your gun, destroy this enemy and quickly relocate using the tank's good mobility. |
On big maps however, this tank can unleash all of its potential as the lack of a stabilizer won't be a problem on big maps, find a good location with a clear line-of-sight of commonly used routes to the capture zones and use the binoculars, thermal imaging system as well as the laser rangefinder to snipe your enemies from long distance, they simply wont be able to return fire soon or well enough before a final blow (if it's not done already) achieved through a AMX-30B2's perfectly ranged and aimed shot. | On big maps however, this tank can unleash all of its potential as the lack of a stabilizer won't be a problem on big maps, find a good location with a clear line-of-sight of commonly used routes to the capture zones and use the binoculars, thermal imaging system as well as the laser rangefinder to snipe your enemies from long distance, they simply wont be able to return fire soon or well enough before a final blow (if it's not done already) achieved through a AMX-30B2's perfectly ranged and aimed shot. | ||
| Line 168: | Line 251: | ||
In terms of enemies: every stabilized tank can prove extremely dangerous to you in CQC. Also due to your lack of armour, any tank you can encounter in your BR bracket can and will penetrate you frontally if they lay their gun on you. The best method is often to avoid direct combat or, if you have to do it, make sure that you will do it where you'll have the advantage also known as range. | In terms of enemies: every stabilized tank can prove extremely dangerous to you in CQC. Also due to your lack of armour, any tank you can encounter in your BR bracket can and will penetrate you frontally if they lay their gun on you. The best method is often to avoid direct combat or, if you have to do it, make sure that you will do it where you'll have the advantage also known as range. | ||
| − | German cannon CAS is also the bane of this tank due to its very thin roof armour. If a player decides to hop into their Me 262 A1/U4 for a payback, it'd be very wise to find a hard cover or a very dense forest in the next 30 seconds because 30 and/or 30 mm | + | German cannon CAS is also the bane of this tank due to its very thin roof armour. If a player decides to hop into their Me 262 A1/U4 for a payback, it'd be very wise to find a hard cover or a very dense forest in the next 30 seconds because 30 and/or 30 mm canons loaded with AP shells will be on their way with the AMX-30B2 as a priority target. |
=== Pros and cons === | === Pros and cons === | ||
| − | <!-- '' | + | <!--''Summarize and briefly evaluate the vehicle in terms of its characteristics and combat effectiveness. Mark its pros and cons in a bulleted list. Try not to use more than 6 points for each of the characteristics. Avoid using categorical definitions such as "bad", "good" and the like - use substitutions with softer forms such as "inadequate" and "effective".''--> |
| − | |||
'''Pros:''' | '''Pros:''' | ||
| Line 193: | Line 275: | ||
== History == | == History == | ||
| − | + | The AMX 30B2 is the second and most noticeable version of the AMX 30. Most of the improvements found in these vehicles had first been successfully tested on the AMX 32 export MBT which found no buyers most important changes were : | |
| − | + | - Improved firepower with the introduction of the OFL 105 F1 APFSDS | |
| − | + | - Improved firing control system with the COTAC digital firing control system | |
| − | |||
| − | |||
| − | |||
| − | |||
| − | + | - Improved mobility by replacing the original transmission by a semi-automatic gearbox incorporating a torque converter as well as the installation of reinforced torsion bars and shock absorbers | |
| − | + | - Improved night fighting capabilites with the installation of a second generation light intensification device | |
| − | + | - A new hydrostatic steering mechanism. | |
| − | |||
| − | + | The first vehicles were delivered to the "Armée de terre" in 1981. In 1985 the light intensification device got replaced by a CASTOR thermal camera, the vehicle depicted in the game is therefore an AMX 30B2 as it came out of the factory in 1985. The AMX 30B2 was also meant to receive either a stabilized electro-hydraulic turret and weaponry drive unit designed by the SAMM (Société d'Application des Machines Motrices) or a stabilized comander periscopic panoramic sight interlocked with the turret drive unit through the priority controls of the commander over the turret (This system is what got used on the AMX 32 and AMX 40 to ensure a firing on the move capability). Neither of these two solutions were chosen due to the cost of such systems coupled to cuts in the defense budget. Therefore the AMX 30B2 remained one of the rare 80's MBT that was not able to fire on the move. Despite this fact, all the improvements incorporated into the design made that the AMX 30B2 was still a formidable 2nd generation MBT in the early 80's. | |
| − | + | AMX 30B2 had the opportunity to fire in anger during the first Gulf War in 1991 where they outperformed Irakis modified and modernized T55 and T62 as well as BMP's. However at that point in time, even though it performed admirably well, the AMX 30B2 was simply obsolete and was about to be replaced with the AMX Leclerc and even if the latter began to rapidly replace the AMX 30B2 in every cavalry regiments, it's not until the early 2000's that the AMX 30B2 stopped being in active service and fully decomissionned. Most of them were destroyed but some were still used until very recently by the FORAD whose the point is to simulate ennemy tanks during exercises. In 2018 after more than 50 years of service, the AMX 30B2 used by the FORAD got definitely scrapped. | |
| − | + | == Media == | |
| − | + | <!--''Excellent additions to the article would be video guides, screenshots from the game, and photos.''--> | |
| + | [https://live.warthunder.com/feed/camouflages/?vehicleCountry=france&vehicleType=tank&vehicleClass=medium_tank&vehicle=fr_amx_30b2 '''Skins''' and '''camouflages''' for the AMX-30B2 from live.warthunder.com.] | ||
== See also == | == See also == | ||
| − | + | ''Links to the articles on the War Thunder Wiki that you think will be useful for the reader, for example:'' | |
| + | |||
* ''reference to the series of the vehicles;'' | * ''reference to the series of the vehicles;'' | ||
| − | * ''links to approximate analogues of other nations and research trees.'' | + | * ''links to approximate analogues of other nations and research trees.'' |
| − | + | == External links == | |
| − | + | ''Paste links to sources and external resources, such as:'' | |
| − | |||
| − | |||
| − | |||
| − | |||
| − | |||
| − | |||
| − | |||
* ''topic on the official game forum;'' | * ''topic on the official game forum;'' | ||
| − | * ''other literature.'' | + | * ''encyclopedia page on the tank;'' |
| − | + | * ''other literature.'' | |
| − | |||
| − | |||
| − | |||
{{France medium tanks}} | {{France medium tanks}} | ||
Revision as of 22:12, 22 February 2020
Contents
| This page is about the medium tank AMX-30B2. For other uses, see AMX-30 (Family). |
Description

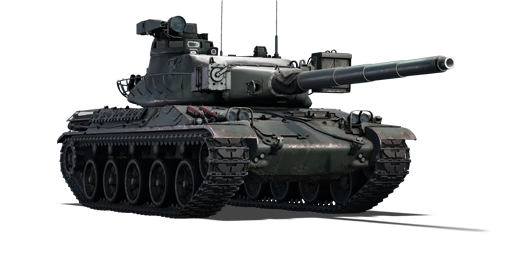
The AMX-30B2 is a Rank VI French medium tank
with a battle rating of 8.7 (AB/RB/SB). It was introduced in Update 1.75 "La Résistance".
The vehicle follows the conventional western tank design of the mid Cold War with four crew members and a 105 mm gun. It has good armour on the UFP that can bounce some weaker shells but the sides, rear and top are very weak, making the vehicle highly vulnerable to air attacks and SPAA fire even from a distance. It has good acceleration, mobility, and firepower. Its turret resembles that of the T-54 series from the sides due to its rounded shape, so be careful in SB and check twice before firing at this tank because you may hit your ally if you do not pay enough attention... This can prove both to be an up and a downside depending on who's actually making the mistake.
This vehicle has the particularity to throw the usual 7.62 or .50 co-axial MG away for a powerful rapid firing 20 mm autocanon that can be elevated up to 40° that fires HEIT and APIT projectiles with a penetration up to 40 mm at close range and against straight armor. This weapon is very useful to deal with light ennemy tanks that are rushing you since this gun will simply wreck them, especially if they show their flanks. This gun is also very effective at taking down attacking aircraft that would be crazy enough to rush straight at you or pass you by at low altitude and low speed. At last, this gun can destroy walls, trees and every obstacles you may encounter. The AMX-30B2 also has an unmatched firepower at it's BR. Its 105 mm gun fires both the OCC 105 G1 shell found on the first AMX-30, but also the dreaded and powerful OFL 105 F1 which is nothing less than the second most powerful APFSDS shell in the BR bracket. The AMX 30B2 is also the only MBT that has access to thermal imaging device at this BR. Unlike passive IR sight that can only be used during night times, thermal imaging allows you too see within the infrared spectrum even during bright day conditions ! Even though its device is a first generation one, every ennemy tanks will be glaring in your sight and all you will have to do is to pick them off with your powerful gun. Thermals Imaging System is a very powerful tool and at this BR, gives it's users a tremendous advantage. This particular configuration simply tells you all about this tank, just like in real life where it used it's superior detection and acquisition devices to engage and destroy targets from afar, you should simply do the same in the game by staying back and supporting your team from afar using your laser rangefinder, thermal imaging system and your powerful APFSDS to outrange and delete enemies from a distance.
General info
Survivability and armour
Armour type:
- Cast homogeneous armour
- Rolled homogeneous armour (Hull roof, Hull sides)
| Armour | Front (Slope angle) | Sides | Rear | Roof |
|---|---|---|---|---|
| Hull | 79 mm (57-68°), 50 mm (52-76°) Front glacis 79 mm (0-57°), 30 mm (75°) Lower glacis |
35-57 mm (0-35) 30 mm Bottom 25 mm (70°) Belly |
30 mm (10°) Top 30 mm Center 25 mm (70°) Bottom |
15 mm 8 mm Engine grille |
| Turret | 30-150 mm (0-79°) Gun mantlet 30 mm (61-75°) Turret front top |
41.5 mm (19-47°) | 30 mm (1-64°) 20 mm (54-64°) Turret underside |
20 mm |
| Armour | Sides | Roof | ||
| Cupola | 60 mm | 20 mm |
Notes:
- Suspension wheels are 15 mm thick while tracks are 20 mm thick.
Mobility
| Mobility characteristic | ||
|---|---|---|
| Weight (tons) | Add-on Armour weight (tons) |
Max speed (km/h) |
| 37.0 | N/A | 72 (AB) |
| 65 (RB/SB) | ||
| Engine power (horsepower) | ||
| Mode | Stock | Upgraded |
| Arcade | 1,054 | _,___ |
| Realistic/Simulator | 601 | 680 |
| Power-to-weight ratio (hp/ton) | ||
| Mode | Stock | Upgraded |
| Arcade | 28.49 | __.__ |
| Realistic/Simulator | 16.24 | 18.38 |
Armaments
Main armament
| 105 mm CN-105-F1 | |||||
|---|---|---|---|---|---|
| Capacity | Vertical guidance |
Horizontal guidance |
Stabilizer | ||
| 47 | -8°/+20° | ±180° | N/A | ||
| Turret rotation speed (°/s) | |||||
| Mode | Stock | Upgraded | Prior + Full crew | Prior + Expert qualif. | Prior + Ace qualif. |
| Arcade | 28.6 | __.__ | __.__ | __.__ | __.__ |
| Realistic | 17.9 | 22.1 | 25.7 | 28.4 | 30.0 |
| Reloading rate (seconds) | |||||
| Stock | Prior + Full crew | Prior + Expert qualif. | Prior + Ace qualif. | ||
| 8.7 | 7.7 | 7.1 | 6.7 | ||
Ammunition
| Penetration statistics | |||||||
|---|---|---|---|---|---|---|---|
| Ammunition | Type of warhead |
Penetration in mm @ 0° Angle of Attack | |||||
| 10m | 100m | 500m | 1000m | 1500m | 2000m | ||
| OCC 105 F1 | HEAT | 400 | 400 | 400 | 400 | 400 | 400 |
| OE 105 F1 Mle.60 | HE | 26 | 26 | 25 | 25 | 25 | 25 |
| OFL 105 F1 | APFSDS | 361 | 358 | 350 | 341 | 332 | 322 |
| Shell details | ||||||||||
|---|---|---|---|---|---|---|---|---|---|---|
| Ammunition | Type of warhead |
Velocity in m/s |
Projectile Mass in kg |
Fuse delay
in m: |
Fuse sensitivity
in mm: |
Explosive Mass in g (TNT equivalent): |
Normalization At 30° from horizontal: |
Ricochet: | ||
| 0% | 50% | 100% | ||||||||
| OCC 105 F1 | HEAT | 1,000 | 11 | 0.0 | 0.1 | 1,020 | +0° | 62° | 69° | 73° |
| OE 105 F1 Mle.60 | HE | 700 | 12 | 0.1 | 0.1 | 2,000 | +0° | 79° | 80° | 81° |
| OFL 105 F1 | APFSDS | 1,525 | 3.8 | N/A | N/A | N/A | ° | 78° | 80° | 81° |
| Smoke characteristic | ||||||
|---|---|---|---|---|---|---|
| Ammunition | Velocity in m/s |
Projectile Mass in kg |
Screen radius in m |
Screen time in s |
Screen hold time in s: |
Explosive Mass in g (TNT equivalent): |
| OFPH 105 F1 | 700 | 11 | 20 | 5 | 25 | 50 |
Ammo racks

| Full ammo |
1st rack empty |
2nd rack empty |
3rd rack empty |
4th rack empty |
5th rack empty |
6th rack empty |
Visual discrepancy |
|---|---|---|---|---|---|---|---|
| 50 | XX (X+) | (+) | (+) | (+) | (+) | (+) | no |
Machine guns
| 20 mm M693 | ||||||
|---|---|---|---|---|---|---|
| Coaxial mount | ||||||
| Capacity (Belt capacity) | Fire rate (shots/minute) |
Vertical guidance |
Horizontal guidance | |||
| 1,000 (500) | 740 | -0°/+20° | N/A | |||
| 7.62 mm AAN-F1 | ||||||
|---|---|---|---|---|---|---|
| Pintle mount | ||||||
| Capacity (Belt capacity) | Fire rate (shots/minute) |
Vertical guidance |
Horizontal guidance | |||
| 2,000 (100) | 900 | -10°/+45° | ±120° | |||
Usage in battles
French AMX-30B2 needs to be played more carefully than its other NATO counterparts such as the M60A1 (A0S) or the Leopard A1A1 due to the lack of a stabilizer, hence making firing on the move and/or after short stop more risky than if you were playing a T-62 in the case of a sudden frontal encounter. As a result the French AMX-30B2 is the best played as a second line support tank, a long range sniper or a flanker. You cannot expect to drive straight into battle and come out victorious in this tank.
This tank is, above everything, a sniper tank. The lack of a stabilizer will restrict your playstyle on most city or clustered maps. In these kinds of environment, you will have to play much more slowly and carefully than the other tanks because most tanks amongst other nations come with a stabilizer such as the Cheiftain, the T-62 or the T-10M. Just advance slowly and try to be as much aware of your surroundings as you can be because this will prove to be a real life saver in this kind of environment. You can also simply lay ambushes to your enemy by patiently waiting for someone to come in front of your gun, destroy this enemy and quickly relocate using the tank's good mobility.
On big maps however, this tank can unleash all of its potential as the lack of a stabilizer won't be a problem on big maps, find a good location with a clear line-of-sight of commonly used routes to the capture zones and use the binoculars, thermal imaging system as well as the laser rangefinder to snipe your enemies from long distance, they simply wont be able to return fire soon or well enough before a final blow (if it's not done already) achieved through a AMX-30B2's perfectly ranged and aimed shot.
To sum it short, this tank plays very differently than other MBTS from all nations. It's not as versatile or flexible as other vehicles, but is extremely good at what it does the best due to top notch gun and ammunition as well as range-finding device.
In terms of enemies: every stabilized tank can prove extremely dangerous to you in CQC. Also due to your lack of armour, any tank you can encounter in your BR bracket can and will penetrate you frontally if they lay their gun on you. The best method is often to avoid direct combat or, if you have to do it, make sure that you will do it where you'll have the advantage also known as range.
German cannon CAS is also the bane of this tank due to its very thin roof armour. If a player decides to hop into their Me 262 A1/U4 for a payback, it'd be very wise to find a hard cover or a very dense forest in the next 30 seconds because 30 and/or 30 mm canons loaded with AP shells will be on their way with the AMX-30B2 as a priority target.
Pros and cons
Pros:
- Very powerful 105 mm APFSDS.
- Thermal Imaging System for the gunner
- Fast turret traverse system.
- Big ready rack allowing a good sustained RoF of 9 shots per minute
- Coaxial 20 mm autocannon with 40° of elevation to deal with thinly armoured vehicles and CAS aircrafts.
- Good survivability when being hit in the turret front as the massive 105 breech and the 20 mm breech will absorb a lot of damages.
- Smoke shells and grenades are available.
- Average -8 degree gun depression.
- Laser rangefinder being a great help to snipe over long distances accurately.
Cons:
- No stabilizers, which restricts the play style of the vehicle.
- Inadequate hull armour against other Rank VI vehicles.
- 15-20 mm roof armour can be exploited by aerial attacks.
- high cupola that can be exploited by enemies when behind a cover.
History
The AMX 30B2 is the second and most noticeable version of the AMX 30. Most of the improvements found in these vehicles had first been successfully tested on the AMX 32 export MBT which found no buyers most important changes were :
- Improved firepower with the introduction of the OFL 105 F1 APFSDS
- Improved firing control system with the COTAC digital firing control system
- Improved mobility by replacing the original transmission by a semi-automatic gearbox incorporating a torque converter as well as the installation of reinforced torsion bars and shock absorbers
- Improved night fighting capabilites with the installation of a second generation light intensification device
- A new hydrostatic steering mechanism.
The first vehicles were delivered to the "Armée de terre" in 1981. In 1985 the light intensification device got replaced by a CASTOR thermal camera, the vehicle depicted in the game is therefore an AMX 30B2 as it came out of the factory in 1985. The AMX 30B2 was also meant to receive either a stabilized electro-hydraulic turret and weaponry drive unit designed by the SAMM (Société d'Application des Machines Motrices) or a stabilized comander periscopic panoramic sight interlocked with the turret drive unit through the priority controls of the commander over the turret (This system is what got used on the AMX 32 and AMX 40 to ensure a firing on the move capability). Neither of these two solutions were chosen due to the cost of such systems coupled to cuts in the defense budget. Therefore the AMX 30B2 remained one of the rare 80's MBT that was not able to fire on the move. Despite this fact, all the improvements incorporated into the design made that the AMX 30B2 was still a formidable 2nd generation MBT in the early 80's.
AMX 30B2 had the opportunity to fire in anger during the first Gulf War in 1991 where they outperformed Irakis modified and modernized T55 and T62 as well as BMP's. However at that point in time, even though it performed admirably well, the AMX 30B2 was simply obsolete and was about to be replaced with the AMX Leclerc and even if the latter began to rapidly replace the AMX 30B2 in every cavalry regiments, it's not until the early 2000's that the AMX 30B2 stopped being in active service and fully decomissionned. Most of them were destroyed but some were still used until very recently by the FORAD whose the point is to simulate ennemy tanks during exercises. In 2018 after more than 50 years of service, the AMX 30B2 used by the FORAD got definitely scrapped.
Media
Skins and camouflages for the AMX-30B2 from live.warthunder.com.
See also
Links to the articles on the War Thunder Wiki that you think will be useful for the reader, for example:
- reference to the series of the vehicles;
- links to approximate analogues of other nations and research trees.
External links
Paste links to sources and external resources, such as:
- topic on the official game forum;
- encyclopedia page on the tank;
- other literature.
| France medium tanks | |
|---|---|
| M4 Derivatives | M4A1 (FL10) · M4A4 (SA50) |
| AMX-50 | AMX M4 · AMX-50 (TOA100) · AMX-50 (TO90/930) |
| AMX-30 | AMX-30 · AMX-30 (1972) · AMX-30B2 · AMX-30B2 BRENUS · AMX-30 ACRA · AMX-30 Super |
| AMX-32/40 | AMX-32 · AMX-32 (105) · AMX-40 |
| Leclerc | Leclerc · Leclerc S2 · Leclerc SXXI · Leclerc AZUR |
| Other | D2 · S.35 · Lorraine 40t |
| Germany | Panther "Dauphiné" |
| USA | ▄M4A1 · ▄M4A3 (105) · ▄M4A4 · ▄M26 |
