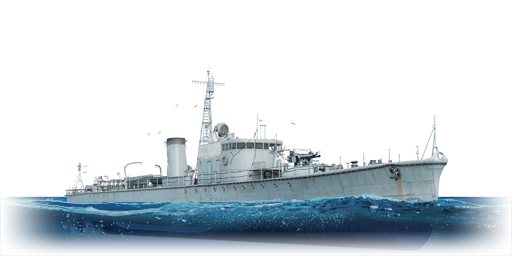
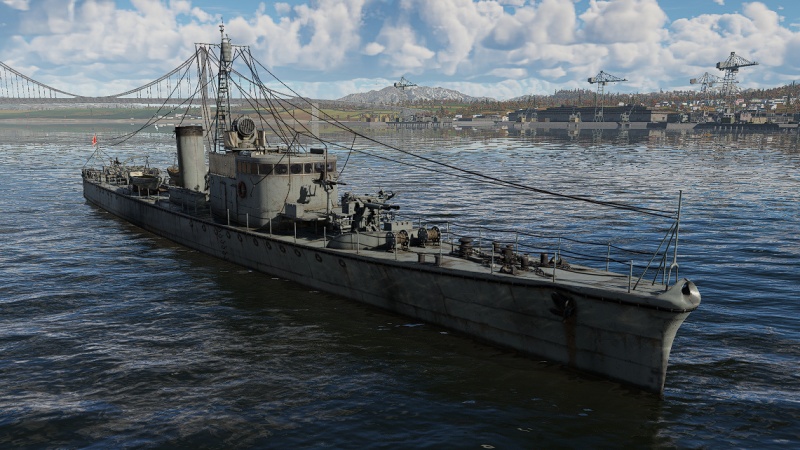
Type K-7 No.4
Contents
Description
The Type K-7 No.4, Kusentei is a rank III Japanese sub-chaser with a battle rating of 3.0 (AB/RB/SB). It was introduced in Update 1.89 "Imperial Navy".
General info
Survivability and armour
The K-7 is unarmoured apart from the 6mm of steel making up the hull, it does have a total of 59 crew members however which does buff its survivability somewhat, as lower calibre guns will struggle to quickly sweep this ship of its crew. However the large size of the vessel does artificially lower its survivability, as this makes it much easier to hit at all ranges, on top of this its also not the fastest vessel around, so it will catch a lot of damage. Overall though it's one of the more survivable vessels around its battle rating.
Mobility
For its size the K-7 isn't exactly slow, at 37 km/h in RB modes, and 56 km/h in AB modes. It's nowhere close to the speed of many smaller vessels, but for a large sub-chaser it can make its way around the map fairly easily, and despite its size has enough reactive mobility to dodge enemy torpedoes if noticed early enough, it can quite easily change direction at speed but due to the size, does take a while to decelerate to a stop.
| Mobility Characteristics | |||
|---|---|---|---|
| Game Mode | Upgrade Status | Maximum Speed (km/h) | |
| Forward | Reverse | ||
| AB | |||
| Upgraded | 56 | 22 | |
| RB/SB | |||
| Upgraded | 37 | 14 | |
Modifications and economy
Armament
Primary armament
The K-7 is equipped with a twin mounting of the 40 mm Vickers autocannon, which is an exceptionally powerful and versatile weapon, it has a very fast fire rate and high damage output, in tandem with a very fast traverse rate, this makes reacting to enemy vessels and aircraft very easy, and because of the fast fire rate the damage output is very consistent.
The K-7 has a lot of viable options for for the 40 mm cannons, the HE-DF belt acts essentially as a full HE belt, so it will damage enemy aircraft and boats very efficiently, however it contains no APHE rounds so this belt cannot damage armoured vessels, but as the reload speed is fairly short, it is a viable to consider taking a full HE-DF belt, and a second belt containing APHE rounds to switch to if an armoured vessel needs to be engaged. Another somewhat overlooked advantage of taking HE-DF rounds is that when detonating on an enemy vessel, they create a large cloud of smoke and shake the enemy players screen slightly, which can be fairly useful for temporarily panicking or disorienting your enemies.
- Universal: HEF · APHE · HEF · APHE
- 40 mm HE clips: HEF · HEF · HEF · APHE
- 40 mm AP clips: APHE · APHE · APHE · HEF- Armour piercing shells, good at damaging interior modules and armoured ships
- 40 mm HE-TF clips: HE-TF · HE-TF · HE-TF · HE-TF- Dual-fuze HE shells, meaning they are effective against both boats and aircraft, generally superior to the HEF clip
| Penetration statistics | |||||||
|---|---|---|---|---|---|---|---|
| Ammunition | Penetration @ 0° Angle of Attack (mm) | ||||||
| 10 m | 100 m | 500 m | 1,000 m | 1,500 m | 2,000 m | ||
| APHE | 36 | 35 | 29 | 22 | 18 | 14 | |
| HEF | 3 | 3 | 3 | 3 | 3 | 3 | |
| HE-TF | 3 | 3 | 3 | 3 | 3 | 3 | |
| Shell details | ||||||||||||
|---|---|---|---|---|---|---|---|---|---|---|---|---|
| Ammunition | Velocity (m/s) |
Projectile mass (kg) |
Fuse delay (m) |
Fuse sensitivity (mm) |
Explosive mass (TNT equivalent) (g) |
Ricochet | ||||||
| 0% | 50% | 100% | ||||||||||
| APHE | 600 | 0.78 | 1 | 3 | 23 | 47° | 60° | 65° | ||||
| HEF | 600 | 0.79 | 0 | 0.1 | 70 | 79° | 80° | 81° | ||||
| HE-TF | 600 | 0.79 | 0 | 0.1 | 70 | 79° | 80° | 81° | ||||
Secondary armament
The K-7 is equipped with three single mountings of the 25 mm Type 96 autocannon, which makes for a very potent secondary weapon. The HE type rounds this gun fires will have no trouble knocking out PT boats and even larger support vessels, sometimes even wiping out an enemy boat in one magazine all together. The cannons can cover a fairly wide area together, they all individually have blind-spots but there's no total deadzone for all the cannons, which makes knocking out ships sneaking up on your rear a lot easier. Additionally due to the HE these cannons can engage targets at range and still do damage. This cannon can also cause critical damage to aircraft with only a single hit. The cannon comes with three belts: universal, APT belts and HEI belts.
- Universal: HEF-T* · HEF · AP-T · HEI
- 25 mm APT belt: AP-T · AP-T · AP-T · HEF
- 25 mm HEIT belts: HEF-T* · HEI · HEI · HEI
| Penetration statistics | |||||||
|---|---|---|---|---|---|---|---|
| Ammunition | Penetration @ 0° Angle of Attack (mm) | ||||||
| 10 m | 100 m | 500 m | 1,000 m | 1,500 m | 2,000 m | ||
| HEF-T* | 2 | 2 | 2 | 2 | 2 | 2 | |
| HEI | 2 | 2 | 2 | 2 | 2 | 2 | |
| HEF | 2 | 2 | 2 | 2 | 2 | 2 | |
| AP-T | 55 | 53 | 43 | 33 | 25 | 19 | |
| Shell details | ||||||||||||
|---|---|---|---|---|---|---|---|---|---|---|---|---|
| Ammunition | Velocity (m/s) |
Projectile mass (kg) |
Fuse delay (m) |
Fuse sensitivity (mm) |
Explosive mass (TNT equivalent) (g) |
Ricochet | ||||||
| 0% | 50% | 100% | ||||||||||
| HEF-T* | 900 | 0.24 | 0 | 0.1 | 8.5 | 79° | 80° | 81° | ||||
| HEI | 900 | 0.26 | 0 | 0.1 | 5.52 | 79° | 80° | 81° | ||||
| HEF | 900 | 0.25 | 0 | 0.1 | 23.93 | 79° | 80° | 81° | ||||
| AP-T | 900 | 0.28 | - | - | - | 47° | 60° | 65° | ||||
Additional armament
The K-7 can carry a total of 18 Type 95 depth charges which can be dropped to maim other naval targets. Four of the charges are placed in a mortar arrangement that fire off the sides of the vessel to engage targets at the sides at a further range. They have rather limited viability though as most MTBs will be able to outrun the explosion. However they are useful in the event of being rushed by a smaller naval vessel, as if the drop is timed right the depth charges can easily take out enemies performing this manoeuvre.
Usage in battles
The K-7 is a very functional vessel, it has the ability to effectively combat every type of vessel and aircraft, which can't be said about a lot of ships. The most important thing to keep in mind while playing the K-7 is to try and minimise taking damage, the vessel is very large, and if played in a location that's easily visible it will slowly take a large amount of damage, a good way to try and limit damage to the hull is to point the hull front directly at the vessel you're engaging, this way the compartments towards the back of the vessel are immune to damage, playing it in this way can be a detriment potentially though as this angle makes it much easier for enemies to knock out the 40 mm cannon mounting at the front, but it is the best way to position yourself to minimise damage.
Something else to be wary of are torpedo boats on your sides, as this vessel is very long and takes a while to adjust speed, an incoming torpedo from the side will be hard to doge, if you see an incoming enemy boat it's a good idea to immediately take evasive action to preemptively avoid a torpedo, this vessel is very narrow, so avoiding a torpedo from the front will be much easier. Be conscious of enemies trying to attack you from behind as well, and periodically check your surroundings just in case an enemy MTB is sneaking up on you, as if you notice too late, it will be quite hard to dodge a torpedo or a run of depth charges, this vessel is quite vulnerable to this kind of attack.
This vessel is somewhat limited to close-range engagements, the 40 mm guns have a fairly low velocity, so accurately landing shots past 2,000 m will be quite difficulty if your enemy is fairly mobile, at close range the rounds will be easy to aim, and can usually take out a small enemy vessel in just one sweep of rounds across the hull. A possible advantage to this is that the rounds can arc over cover to land on enemies hiding behind the terrain, it can be difficult to find the correct ranging but it is possible to take out enemies completely hidden behind cover, which is a fairly unique advantage to this vessel.
Pros and cons
Pros:
- Very effective primary weapon
- Versatile ammo options for attacking all types of vessel
- Fast traverse rate on the main cannons
- Versatile secondary armament
- HE-DF rounds are very useful against enemy vessels in close quarter battles
Cons:
- Relatively slow speed and low manoeuvrability
- Large target
History
The No.4-class submarine chasers (第四号型駆潜艇, Dai 4 Gō-gata Kusentei) were built under Maru 3 Keikaku programme, totaling 9 ships built in 1938 and 1939. The vessel was a direct improvement over the Type K-4 / No.3 Class (not present in the game, it was a less substantial upgrade of the Type K-3 No.1). The design called for an improved range by 25% over No.1 Class, while maintaining the same speed and improving its blue water stability. A major factor in improving stability was lowering a center of mass, which pulled a number of alterations, most notably: lowering the height of the superstructure and rising the freeboard. Ship's waterline length was 55.5 m, width 5.6 m for a total displacement of 296 tonnes. The crew consisted of 59 sailors.
Armament was identical to the No.1, however, a new class introduced one important innovation: Sonar. While its predecessor's mode of engagement was to spot submarine by visual means (which realistically was limited to the surfaced submarines), approach its last known location and drop depth charges in a semi-random pattern, No.4 would attempt to re-establish contact underwater and more precisely determine enemy's position before committing. This was still a flawed tactic, as early Japanese sonars struggled to detect submarines straight underneath the boat, it increased the chances of a successful attack.
The first ship of the class was launched on 10 June 1938 and completed 15 November 1938, it was designated No.7 and built by the Tsurumi Iron Works Dockyard (鶴見製鉄造船). The class was built by 4 different shipyards, hence the launch dates were not in order.
Ships of class
| Name | Completed | Fate at the end of the war | Dismantled post-war |
Notes | ||
|---|---|---|---|---|---|---|
| Status | By | Date | ||||
| No. 4 | 1938-12-28 | Severely Damaged | Struck a mine in Madura Strait, Java sea | 1945-08-13 | Unknown | Turned over to Allies and sold to an unknown party |
| No. 5 | 1938-12-06 | Damaged | Gunfire from surfaced submarines (USS Capitaine (SS-336) and USS Baya (SS-318)) | 1945-06-30 | 1946-07-11 | Turned over to British |
| No. 6 | 1939-05-20 | Sunk | Aircraft | 1944-06-30 | Sunk at anchorage during US operation Desecrate One | |
| No. 7 | 1938-11-15 | Sunk | Aircraft | 1945-04-11 | Sunk by a group of four Liberator VI's of No. 201 Squadron RAF near Nicobar Islands, Andaman Sea | |
| No. 8 | 1938-11-30 | Sunk | Gunfire from surfaced submarines (HMS Trenchant (P331) and HMS Terrapin (P323)) | 1945-03-04 | Sunk at Malacca Strait | |
| No. 9 | 1939-05-09 | Survived | 1960 | Turned over to Taiwan on 1947-10-03, served as a patrol vessel Hai Hong (海宏), later Ya Long (雅龍), finally Qu Jiang PC-107 (渠江) | ||
| No. 10 | 1939-06-15 | Grounded | 1944-05-01 | Abandoned after running ashore at the Angaur Island, Palau atoll. Currently sunk, scuba-diving attraction | ||
| No. 11 | 1939-02-02 | Sunk | Aircraft | 1943-11-06 | Sunk west of Buka Town by the B-25 of the USAAF Thirteenth Air Force | |
| No. 12 | 1939-05-09 | Sunk | Submarine, USS Bluegill (SS-242) | 1944-08-13 | Presumably sunk east of Mindanao, Philippines | |
Ships of the class had a very mixed-bag career, though they were certainly more successful than the Type K-3 No.1. One of the more notable events was an invasion of the Philippines, where ships No. 4, No. 5, No. 6, No. 10, No. 11 and No. 12 participated as a part of the Sub-chaser Division 21 and 31, within the 2nd Base Force, Third Fleet.
No. 4 damaged USS Tunny (SS-282) on 26 August 1943 forcing submarine back to the shipyard in San Francisco for 5 months of repairs.
On 15 July 1943 No. 8 met with German Type IXC U-boat U-511 on her mission to Japan, escorting the submarine to Penang in modern-day Malaysia. The submarine was later transferred to the Imperial Japanese Navy, however, she did not score any significant successes with Japanese crews. On 12 February 1944, No. 8 engaged HMS Stonehenge (P232) causing only minor damage. On 11 January 1945, it participated in an action that led to a sinking of the HMS Porpoise (N14), after it was detected by radio directional finding. The final kill was scored by the B6N2's direct hit on a surfaced submarine with the 60kg bomb. No. 8 later confirmed wreck with its sonar.
In the second year of No. 9's service, on 8 December 1941, she shot down an unspecified number of Hudson bombers protecting an invasion force during the Malayan campaign. The ship participated in other landings during the campaign, ending it with the Operation D - landings on the Andaman Islands in late March 1942. On 22 April 1944 at an anchorage near modern-day Vung Tau, No.9 found itself and its escorted merchant ships under a bombardment from B-24 bombers of the 14th Air Force's 308th Bomb Group, all merchant ships were sunk, with submarine chaser making a narrow escape. One of the hostile bombers was damaged by the gunfire. On the morning of 21 March 1945 USS Baya (SS-318) missed its torpedo attack against No.9 and No.20, in exchange No.9 dropped many depth charges, near-missing the target, with submarine suffering light damage, though it did not require any substantial repairs.
No. 10 narrowly escaped fate at the bottom of the ocean on 30 August 1943, when it was attacked by a group of US aircraft of the Thirteenth Air Force east of Bougainville that damaged its propulsion. It was towed to the port by one of the merchant ships she was escorting. In a rescue attempt, she was towed to Yokosuka in the convoy no. 4114, however bad luck struck again, as in the dead of night radar of the Gato-class submarine USS Harder (SS-257) found its mark. Harder approached submerged, narrowly eluding detection from the escorting Mutsuki-class destroyer Yūzuki, and fired a spread of six torpedoes at the convoy. At 04:15 two ships of the convoy were hit by 5 torpedoes, including Hokko Maru that towed No. 10. Escorts scrambled to destroy the submarine, dropping a total of 64 depth charges over 5 hours. Submarine hid below the thermocline layer, what reflected sonars and allowed her to avoid detection. Eventually, No. 10 reached shipyards for repairs.
In the afternoon of 10 January 1942 chasers No. 11 and No. 12 captured a dutch tug, Parsifal, as a prize ship during the invasion of Dutch Borneo. Just days later, in the early morning of the 24th January 1942, No. 12 spotted a torpedo running under the keel. It was II53 (533 mm) torpedo fired by the Dutch submarine HNLMS K XVIII, moments later crew spotted the periscope and proceeded with a counter-attack. The submarine suffered severe damage, including the destruction of its electric drive. It laid down on the ocean floor with desperate repairs by the crew. It wasn't until the evening that the submarine emerged and run on its diesel engines to the shipyard in the Soerabaja, Java. Due to the impending Japanese invasion, Dutch decided to scuttle the submarine on 2 Mar 1942.
This was the closest No. 4-class ever came to sinking the hostile submarine.
Media
- Skins
- Videos
See also
Links to articles on the War Thunder Wiki that you think will be useful for the reader, for example:
- reference to the series of the ship;
- links to approximate analogues of other nations and research trees.
External links
[Development] No.4 Type CH-8: Bomb truck
| Fujinagata Shipyards (藤永田造船所) | |
|---|---|
| Sub Chasers (駆潜艇) | |
| No.4 Type | Type K-7 No.4 |
| Destroyers (DD) | |
| Mutsuki-class | IJN Satsuki |
| Ayanami-class | IJN Ayanami |
| Japan sub-chasers | |
|---|---|


