Difference between revisions of "HMCS Brantford"
(Secondary armament; minor correction on primary armament) |
(Edits) |
||
| (24 intermediate revisions by 9 users not shown) | |||
| Line 1: | Line 1: | ||
| − | {{Specs-Card|code=uk_flower_class}} | + | {{Specs-Card |
| + | |code=uk_flower_class | ||
| + | |images={{Specs-Card-Image|GarageImage_{{PAGENAME}}.jpg}} | ||
| + | }} | ||
== Description == | == Description == | ||
| − | <!-- ''In the first part of the description, cover the history of the ship's creation and military application. In the second part, tell the reader about using this ship in the game. Add a screenshot | + | <!-- ''In the first part of the description, cover the history of the ship's creation and military application. In the second part, tell the reader about using this ship in the game. Add a screenshot: if a beginner player has a hard time remembering vehicles by name, a picture will help them identify the ship in question.'' --> |
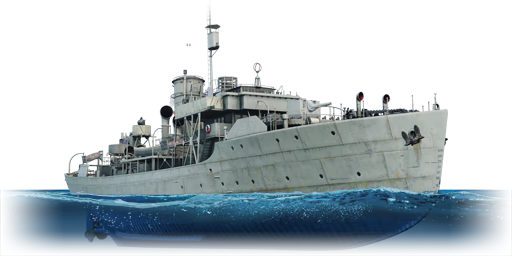
| − | + | The '''{{Specs|name}}''' was one of the 294 British ''Flower''-class corvettes, a class of British small convoy escort ship designed in 1939 based on an existing civilian whaler ship design in order to simplify and hastened the production in order to protect the Atlantic convoy from Germany's U-boat fleets. Due to the urgent need for an escort, the Admiralty also placed orders for a ''Flower''-class from a Canadian shipyard, of which some were later transferred back to the Royal Canadian Navy. After the war ended, several surplus ''Flower''-class were sold off either to the other navies or being converted into a civilian ship. | |
| − | + | ||
| − | The '''{{Specs|name}}''' | + | ''Brantford'' was laid down in 1941 and commissioned a year later. She would serve uneventfully as a part of the Atlantic convoy until 1944 when she was relegated into a training ship. After the war ended in 1945, ''Brantford'' was decommissioned and sold off as a civilian ship. In a rather amusing case of coming into full circle, ''Brantford'' was converted into a Honduran-flagged whaler ship ''Olympic Arrow''. She would later be sold in 1956 to Japanese whalers as ''Otori Maru No. 14'' and again as ''Kyo Maru No. 21'' before finally being scrapped in 1976. |
| + | |||
| + | The {{PAGENAME}} was introduced in [[Update 1.83 "Masters of the Sea"]] as part of the British fleet Closed Beta Test. The Brantford, like her predecessor [[HMS Liscomb]], is an unusually tough nut to crack even against higher-tier coastal boats due to her having a detailed damage model to absorb most machine guns and autocannons. The Brantford is a direct step up from the Liscomb in every aspect, featuring twice the crew count, much less vulnerable ammo storage, improved secondary armaments, and a higher (but still low) top speed. As such, the Brantford can be effectively used as a bullet sponge to push for the capture points. However, due to her slow speed and large profile, she is still highly vulnerable to torpedoes and artillery strikes, and often requires teammates to cover her flanks. | ||
== General info == | == General info == | ||
=== Survivability and armour === | === Survivability and armour === | ||
| − | <!--Talk about the vehicle's armour. Note the most well-defended and most vulnerable zones, e.g. the ammo magazine. Evaluate the composition of components and assemblies responsible for movement and manoeuvrability. Evaluate the survivability of the primary and secondary armaments separately. Don't forget to mention the size of the crew, which plays an important role in fleet mechanics. Save tips on preserving survivability for the "Usage in battles" section. If necessary, use a graphical template to show the most well-protected or most vulnerable points in the armour.--> | + | {{Specs-Fleet-Armour}} |
| + | <!-- ''Talk about the vehicle's armour. Note the most well-defended and most vulnerable zones, e.g. the ammo magazine. Evaluate the composition of components and assemblies responsible for movement and manoeuvrability. Evaluate the survivability of the primary and secondary armaments separately. Don't forget to mention the size of the crew, which plays an important role in fleet mechanics. Save tips on preserving survivability for the "Usage in battles" section. If necessary, use a graphical template to show the most well-protected or most vulnerable points in the armour.'' --> | ||
| + | |||
| + | [[File:Flower_class_(K-218)_internals.png|thumb|HMCS Brantford's internals (starboard side).]] | ||
| − | + | The {{PAGENAME}} has the following armour layout: | |
* [[BL Mark IX (102 mm)|102 mm BL Mark IX]] gunshield: 4.97 mm, antifragmentation armour | * [[BL Mark IX (102 mm)|102 mm BL Mark IX]] gunshield: 4.97 mm, antifragmentation armour | ||
| Line 19: | Line 27: | ||
* Superstructure: 4 mm, steel | * Superstructure: 4 mm, steel | ||
| − | + | As with her predecessor the [[HMS Liscomb|Liscomb]], the Brantford is notable for being one of only two rank 2 coastal vessels to have a "detailed" damage model, having separate crew compartments modelled instead of a simplified "hull section" like smaller coastal boat. This alone renders her hull completely immune to most low-calibre machine guns, and highly resilient against 20 mm autocannons that are quite common at her BR. | |
| − | + | With a crew complement of 85 distributed evenly along the ship, HMCS Brantford's overall survivability is unusually high, even when compared to the larger coastal vessels at rank 5. However, due to the lack of armouring on the hull, the Brantford's crew compartments and engines are still relatively vulnerable against 40 mm autocannons that have enough penetration to damage them. As such, avoid exposing your side profile when possible. | |
| − | + | While the gunshields may stop low-calibre machine guns, heavy machine guns and cannons will have no trouble with them at any range. The hull and superstructure are cannot stop gunfire of any sort. | |
| − | + | The Brantford has two types of ammunition storages: a "Shells room", located in the second hull compartment, and an "Ammunition storage", located in the fifth hull compartment. The "Shells room" contains ammunition for the 102 mm BL Mark IX cannon, and the "Ammunition storage" contains ammunition for both the 40 mm 2pdr QF Mk.VIII and 20 mm/70 Oerlikon Mk.II cannons. Destroying either will cause any remaining ammunition for the respective guns to be destroyed, but doing so will not immediately destroy the Brantford. | |
=== Mobility === | === Mobility === | ||
| − | <!--Write about the ship's mobility. Evaluate its power and manoeuvrability, rudder rerouting speed, stopping speed at full tilt, with its maximum forward and reverse speed.--> | + | {{Specs-Fleet-Mobility}} |
| + | <!-- ''Write about the ship's mobility. Evaluate its power and manoeuvrability, rudder rerouting speed, stopping speed at full tilt, with its maximum forward and reverse speed.'' --> | ||
| + | |||
| + | {{NavalMobility | ||
| + | |SpeedForwardStockAB = 33 | ||
| + | |SpeedBackStockAB = 16 | ||
| + | |TurnTimeStockAB = 100.25 | ||
| + | |TurnSpeedStockAB = 23 | ||
| + | |TurnTimeSpadedAB = 57.57 | ||
| + | |TurnSpeedSpadedAB = 23 | ||
| + | |||
| + | |SpeedForwardStockRB = 25 | ||
| + | |SpeedBackStockRB = 12 | ||
| + | |TurnTimeStockRB = 148.67 | ||
| + | |TurnSpeedStockRB = 18 | ||
| + | |TurnTimeSpadedRB = 100.43 | ||
| + | |TurnSpeedSpadedRB = 21 | ||
| + | }} | ||
| + | |||
| + | Although it is a step up from the Liscomb, the Brantford's mobility is still very poor. She still takes quite a long time to accelerate and decelerate and is quite difficult to turn at times. This often leaves her vulnerable to torpedoes, especially at close ranges. | ||
| − | {{ | + | === Modifications and economy === |
| + | {{Specs-Economy}} | ||
== Armament == | == Armament == | ||
| + | {{Specs-Fleet-Armaments}} | ||
=== Primary armament === | === Primary armament === | ||
| − | <!--Provide information about the characteristics of the primary armament. Evaluate their efficacy in battle based on their reload speed, ballistics and the capacity of their shells. Add a link to the main article about the weapon: <code><nowiki>{{main|Weapon name (calibre)}}</nowiki></code>. Broadly describe the ammunition available for the primary armament, and provide recommendations on how to use it and which ammunition to choose--> | + | {{Specs-Fleet-Primary}} |
| + | <!-- ''Provide information about the characteristics of the primary armament. Evaluate their efficacy in battle based on their reload speed, ballistics and the capacity of their shells. Add a link to the main article about the weapon: <code><nowiki>{{main|Weapon name (calibre)}}</nowiki></code>. Broadly describe the ammunition available for the primary armament, and provide recommendations on how to use it and which ammunition to choose.'' --> | ||
{{main|BL Mark IX (102 mm)}} | {{main|BL Mark IX (102 mm)}} | ||
| Line 48: | Line 78: | ||
|} | |} | ||
| − | There are three ammunition choices available: | + | There are three ammunition choices available: |
| − | |||
| − | |||
| − | |||
| − | |||
| − | |||
| − | |||
| − | |||
| − | |||
| − | |||
| − | |||
| − | |||
| − | |||
| − | |||
| − | |||
| − | |||
| − | |||
| − | |||
| − | |||
| − | |||
| − | |||
| − | |||
| − | { | + | {{:BL Mark IX (102 mm)/Ammunition|4 inch HE, 4 inch SAP, 102 mm shrapnel}} |
| − | |||
| − | |||
| − | |||
| − | |||
| − | |||
| − | |||
| − | |||
| − | |||
| − | |||
| − | |||
| − | |||
| − | |||
| − | |||
| − | |||
| − | |||
| − | | 4 inch HE | ||
| − | |||
| − | |||
| − | |||
| − | |||
| − | |||
| − | |||
=== Secondary armament === | === Secondary armament === | ||
| − | <!--Some ships are fitted with weapons of various calibres. Secondary armaments are defined as weapons chosen with the control <code>Select secondary weapon</code>. Evaluate the secondary armaments and give advice on how to use them. Describe the ammunition available for the secondary armament. Provide recommendations on how to use them and which ammunition to choose. Remember that any anti-air armament, even heavy calibre weapons, belong in the next section. If there is no secondary armament, remove this section.--> | + | {{Specs-Fleet-Secondary}} |
| + | <!-- ''Some ships are fitted with weapons of various calibres. Secondary armaments are defined as weapons chosen with the control <code>Select secondary weapon</code>. Evaluate the secondary armaments and give advice on how to use them. Describe the ammunition available for the secondary armament. Provide recommendations on how to use them and which ammunition to choose. Remember that any anti-air armament, even heavy calibre weapons, belong in the next section. If there is no secondary armament, remove this section.'' --> | ||
{{main|2pdr QF Mk.VIII (40 mm)}} | {{main|2pdr QF Mk.VIII (40 mm)}} | ||
| Line 110: | Line 98: | ||
|} | |} | ||
| − | There are three ammunition choices available: | + | There are three ammunition choices available: |
| + | |||
| + | * '''Universal:''' {{Annotation|HEF|High-explosive fragmentation}}{{-}}{{Annotation|AP-T|Armour-piercing tracer}}{{-}}{{Annotation|HEF|High-explosive fragmentation}}{{-}}{{Annotation|AP-T|Armour-piercing tracer}} | ||
| + | * '''40 mm HE:''' {{Annotation|HEF|High-explosive fragmentation}}{{-}}{{Annotation|HEF|High-explosive fragmentation}}{{-}}{{Annotation|HEF|High-explosive fragmentation}}{{-}}{{Annotation|AP-T|Armour-piercing tracer}} | ||
| + | * '''40 mm AP:''' {{Annotation|AP-T|Armour-piercing tracer}}{{-}}{{Annotation|AP-T|Armour-piercing tracer}}{{-}}{{Annotation|AP-T|Armour-piercing tracer}}{{-}}{{Annotation|HEF|High-explosive fragmentation}} | ||
| + | |||
| + | {{:2pdr QF Mk.VIII (40 mm)/Ammunition|HEF, AP-T}} | ||
| + | |||
| + | === Anti-aircraft armament === | ||
| + | {{Specs-Fleet-AA}} | ||
| + | <!-- ''An important part of the ship's armament responsible for air defence. Anti-aircraft armament is defined by the weapon chosen with the control <code>Select anti-aircraft weapons</code>. Talk about the ship's anti-air cannons and machine guns, the number of guns and their positions, their effective range, and about their overall effectiveness – including against surface targets. If there are no anti-aircraft armaments, remove this section.'' --> | ||
| + | {{main|20 mm/70 Oerlikon Mk.II (20 mm)}} | ||
| + | |||
| + | The anti-aircraft armament consists of two 20 mm/70 Oerlikon Mk.II cannons in single mounts, one on either side of the bridge. There are 2,400 rounds of ammunition available for each mount for a total of 4,800 rounds. There are no stated traverse rates for these mounts listed in-game, though they handle very similarly, if not identically, to other single 20 mm/70 Oerlikon Mk.II mounts in the game, all of which handle as follows: stock, they can traverse horizontally and vertically at a rate of 64°/s; upgraded (with the "Anti-Air Armament Targeting" installed in HMCS Brantford's case), they can traverse horizontally and vertically at a rate of 75°/s. Each gun has a belt capacity of 60 rounds and a stated rate of fire of 450 rounds/min, though in actuality, they fire at slightly different rates: the starboard gun fires at a slightly lower rate, around 420 rounds/min, while the port gun fires at a slightly high rate, around 480 rounds/min. With a stock crew, both guns can be reloaded in 5.2 seconds; with an aced crew, they can be reloaded in 4 seconds. | ||
| − | + | {{Notice|Turrets are named sequentially, clockwise, starting at the bow.}} | |
| − | |||
| − | |||
| − | {| class="wikitable | + | {| class="wikitable" style="text-align:center" width="50%" |
| − | ! colspan=" | + | ! colspan="8" | '''Anti-Aircraft Armament Guidance''' |
| − | |||
| − | |||
| − | |||
| − | |||
| − | |||
|- | |- | ||
| − | | | + | ! colspan="2" rowspan="1" | No.1 Turret (starboard) |
| + | ! colspan="2" rowspan="1" | No.2 Turret (port) | ||
|- | |- | ||
| − | + | ! Horizontal !! Vertical !! Horizontal !! Vertical | |
|- | |- | ||
| − | | | + | | -99°/+180° || -8°/+67° || -180°/+99° || -8°/+67° |
|- | |- | ||
|} | |} | ||
| − | === | + | There are no ammunition options available for this gun on the HMCS Brantford. No belt composition is stated in-game. |
| − | {{main| | + | |
| + | === Additional armament === | ||
| + | {{Specs-Fleet-Additional}} | ||
| + | <!-- ''Describe the available additional armaments of the ship: depth charges, mines, torpedoes. Talk about their positions, available ammunition and launch features such as dead zones of torpedoes. If there is no additional armament, remove this section.'' --> | ||
| + | {{main|Mk.VII depth charge|Y-gun Mk.VII depth charge}} | ||
| + | |||
| + | The {{PAGENAME}} has four loadout options: | ||
| − | + | # Without load | |
| + | # 20 x Mk.VII depth charges | ||
| + | # 4 x Y-gun Mk.VII depth charges | ||
| + | # 20 x Mk.VII depth charges, 4 x Y-gun depth charges | ||
| − | + | The Mk.VII depth charges are carried on the aft of the boat and are split into two chutes, each with 10 depth charges. The depth charges are dropped one at a time starting with the starboard chute, then continuing on to the port chute after all 10 in the starboard chute have been dropped. | |
| − | |||
| − | + | The Y-gun Mk.VII depth charges are fired from four depth charge throwers mounted amidships, two on either side facing outwards. These depth charges are fired depending on the direction the player is currently looking. Although the two depth charges on each side are usually both fired together, at certain camera angles, they can be fired independently. | |
| − | + | Before spawning, the detonation time delay for both types of depth charges can be set anywhere between 3 seconds and 10 seconds. | |
| − | |||
| − | + | {| class="wikitable" style="text-align:center" | |
| − | {| class="wikitable" | + | ! colspan="4" | '''Depth Charge Characteristics ([[Mk.VII depth charge]])''' |
| − | |||
| − | |||
| − | |||
| − | ! colspan=" | ||
|- | |- | ||
| − | + | ! Mass (kg) | |
| − | + | ! Explosive Type | |
| − | + | ! Explosive Mass (kg) | |
| − | + | ! TNT Equivalent (kg) | |
| − | |||
| − | |||
| − | |||
|- | |- | ||
| − | | | + | | 196 || TNT || 130 || 130 |
| − | | | + | |} |
| − | | | + | |
| − | | | + | {| class="wikitable" style="text-align:center" |
| − | | | + | ! colspan="4" | '''Depth Charge Characteristics ([[Y-gun Mk.VII depth charge]])''' |
| − | | | ||
| − | | | ||
| − | | | ||
| − | |||
| − | |||
| − | |||
| − | | | ||
| − | | Depth | ||
| − | |||
| − | |||
|- | |- | ||
| − | + | ! Mass (kg) | |
| − | + | ! Explosive Type | |
| − | + | ! Explosive Mass (kg) | |
| − | + | ! TNT Equivalent (kg) | |
| − | |||
| − | |||
| − | |||
|- | |- | ||
| + | | 196 || TNT || 130 || 130 | ||
|} | |} | ||
| + | |||
| + | == Usage in battles == | ||
| + | <!-- ''Describe the technique of using this ship, the characteristics of her use in a team and tips on strategy. Abstain from writing an entire guide – don't try to provide a single point of view, but give the reader food for thought. Talk about the most dangerous opponents for this vehicle and provide recommendations on fighting them. If necessary, note the specifics of playing with this vehicle in various modes (AB, RB, SB).'' --> | ||
| + | |||
| + | ;Ammunition | ||
| + | |||
| + | For the 102 mm BL Mark IX cannon, the best round for general use is the 4 inch HE round because, of the three rounds available, it has the highest explosive mass, making the most versatile round against the majority of opponents. With that in mind, be sure to still carry small amounts each of the 4 inch SAP and 102 mm shrapnel rounds for specialized use. | ||
| + | |||
| + | The 4 inch SAP rounds should be reserved only for armoured boats that the HE round fails to penetrate. To trigger its fuze, the SAP round must penetrate at least 3 mm of armour, which the vast amount of enemies lack. Because of this, if the enemy lacks armour, the SAP round will not detonate, dealing very minimal damage as a result. Always identify the enemy first and only use the SAP round if the other rounds are ineffective. | ||
| + | |||
| + | The 102 mm shrapnel should be used on large targets without armour such as large sub-chasers. Against these, the HE round will almost always fail to destroy the hull compartments in a single hit. In addition, because of their large size, internal components will rarely be damaged by the HE round. In contrast, the shrapnel round is able to consistently destroy, or at least heavily damage depending on the impact angle, the same compartments and produces spalling that travels further inside the hull. As a tradeoff though, the shrapnel round only has about 30% of the explosive mass as the HE round, and it will almost always be stopped by any kind of armour that it hits, making it a poor choice against smaller boats and armoured targets. The shrapnel round also has a timed fuze, though this isn't much more than a gimmick. The 102 mm BL Mark IX cannon's slow traverse and elevation rates, as well as its slow rate of fire, makes it an ineffective weapon against aircraft. Stick to targeting surface targets and leave anti-aircraft defence to the other weaponry. | ||
| + | |||
| + | For the 40 mm 2pdr QF Mk.VIII cannon, the best belt is the 40 mm HE belt because it has the highest ratio of HE rounds to AP rounds, making it the most effective against both aircraft and surface targets. Some 40 mm AP belts should also be taken for use against armoured targets. Alternatively, take only the Universal belt if you dislike micromanaging ammunition or want to avoid the reload between belt switches. This comes at the cost of less damage efficiency though, so it's up to personal preference. If you do not plan on manually controlling the 40 mm 2pdr QF Mk.VIII cannon at all, then take only the 40 mm HE belt to guarantee that the AI gunners always use the most effective belt. | ||
| + | |||
| + | ;Depth Charges | ||
| + | |||
| + | There is no practical reason to use depth charges on any naval vessel in the game. Although they usually result in a one-hit kill if landed properly, their usage is extremely situational, and they are actually a liability in most cases because, if they're not dropped, they act like exposed ammo racks. | ||
| + | |||
| + | This is especially so in the case of HMCS Brantford, since the Mk.VII depth charges drop off of the stern. Because of HMCS Brantford's poor mobility, there will almost never be an opportunity to use them, since it relies completely on the enemy being the right spot at the right time rather than anything the player's own positioning. The Y-gun Mk.VII depth charges are even worse in this regard because they have a long flight time and land some distance away from HMCS Brantford, making them very difficult to use. | ||
| + | |||
| + | The recommended loadout option is "Without load". | ||
=== Pros and cons === | === Pros and cons === | ||
| − | ''Summarise and briefly evaluate the vehicle in terms of its characteristics and combat effectiveness. Mark its pros and cons in the bulleted list. Try not to use more than 6 points for each of the characteristics. Avoid using categorical definitions such as "bad", "good" and the like - use substitutions with softer forms such as "inadequate" and "effective".'' | + | <!-- ''Summarise and briefly evaluate the vehicle in terms of its characteristics and combat effectiveness. Mark its pros and cons in the bulleted list. Try not to use more than 6 points for each of the characteristics. Avoid using categorical definitions such as "bad", "good" and the like - use substitutions with softer forms such as "inadequate" and "effective".'' --> |
'''Pros:''' | '''Pros:''' | ||
| − | * | + | * Incredible survivability especially for its BR due to detailed damage model and high crew count |
| + | * The hull is completely imprevious to most low-calibre machine guns it usually faces | ||
| + | * 102 mm gun offer decent damage output against most targets, with access to SAP rounds | ||
| + | * Has access to Pom-Pom and Oerlikon autocannons with good coverage and damage output | ||
| + | * Stable firing platform allows it to perform fire support duties at longer range | ||
'''Cons:''' | '''Cons:''' | ||
| − | * | + | * Poor top speed and very bad manoeuvrability |
| + | * Very susceptible to torpedoes and artillery strike due to the size and speed | ||
| + | * Side profile are vulnerable to large autocannons (40 mm+) | ||
| + | * Only one 102 mm gun that can be easily disabled and effectively cut off the damage output | ||
| + | * 102 mm gun has mediocre accuracy (especially at longer ranges) and shell filling, especially against larger targets | ||
| + | * Can be easily outclassed and outgunned by early destroyer it often faces | ||
== History == | == History == | ||
<!-- ''Describe the history of the creation and combat usage of the ship in more detail than in the introduction. If the historical reference turns out to be too long, take it to a separate article, taking a link to the article about the ship and adding a block "/History" (example: <nowiki>https://wiki.warthunder.com/(Ship-name)/History</nowiki>) and add a link to it here using the <code>main</code> template. Be sure to reference text and sources by using <code><nowiki><ref></ref></nowiki></code>, as well as adding them at the end of the article with <code><nowiki><references /></nowiki></code>. This section may also include the ship's dev blog entry (if applicable) and the in-game encyclopedia description (under <code><nowiki>=== In-game description ===</nowiki></code>, also if applicable).'' --> | <!-- ''Describe the history of the creation and combat usage of the ship in more detail than in the introduction. If the historical reference turns out to be too long, take it to a separate article, taking a link to the article about the ship and adding a block "/History" (example: <nowiki>https://wiki.warthunder.com/(Ship-name)/History</nowiki>) and add a link to it here using the <code>main</code> template. Be sure to reference text and sources by using <code><nowiki><ref></ref></nowiki></code>, as well as adding them at the end of the article with <code><nowiki><references /></nowiki></code>. This section may also include the ship's dev blog entry (if applicable) and the in-game encyclopedia description (under <code><nowiki>=== In-game description ===</nowiki></code>, also if applicable).'' --> | ||
| + | As the war started in 1939, the Royal Canadian Navy (RCN) had little preparation for their duty on the sea. Canada needed ships to protect its shore and transportation to the British Isles that would be simple enough to produce in civil shipyards for meeting the large requirement. Initially, the RCN sought to build ''Halcyon''-class sloops, an 850-ton minesweeper of the Royal Navy in the 1930s. However, ''Halcyon'' was designed under naval standards; shipbuilding in Canada, at that time, was unable to produce the material and turbine engines to naval standards<ref name="ZalogaLendLease_British">Halcyon Class Ships., Specifications Halcyon Minesweepers (halcyon-class.co.uk)</ref>. | ||
| + | |||
| + | Thus, the RCN turned to the 1939 Patrol Vessel of Whaler Type or the Flower class. Based on the civilian whaler Southern Pride, its production did not require sophisticated techniques used on military designs. Consequently, it provided a timely solution for the expansion of RCN. Starting from 1940, Canada launched 121 "Flowers" and modified Flowers in total. The Canadian-built units followed the basic design of Flower, with slight modifications in the position of firearms and boat carriage<ref name="ZalogaLendLease_M4Intro">Lambert, John; Brown, Les. Flower Class Corvettes (ShipCraft) (p. 33).</ref>. | ||
| + | |||
| + | HMCS ''Brantford'' (K218) was launched in September 1941 and commissioned in May 1942. She was the last Canadian-built Flower following the original drawing. The subsequent ships received an increased sheer and flare to improve their performance in high sea conditions. | ||
| + | |||
| + | When HMCS ''Brantford'' joined service, the German U-boat campaign against the convoys was in full swing. Just three days before the commission of the ''Brantford'', two cargo ships were sunk north of Cap Magdalen. HMCS ''Brantford'' was immediately used in convoy escorting from Quebec to Sydney until July 1942. | ||
| + | |||
| + | In July, HMCS ''Brantford'' became part of the Western Local Escort Force, of which RCN units formed up the majority. This force provided anti-submarine escorts for North American port cities to the Western Ocean Meeting Point near St John's. It handed the duty to the Mid-Ocean Escort Force and guarding the convoy from east. From 1942 to 1944, HMCS ''Brantford'' served in two forces interchangeably and protected merchants as well as their precious cargoes from submarine attacks<ref name="TankArchivesHVSS">Brief History of the HMCS Brantford., <nowiki>http://forposterityssake.ca/RCN-DOCS/BriefHistoryofHMCSBrantford.pdf</nowiki></ref>. | ||
| + | |||
| + | During her career, ''Brantford'' conducted two submarine attacks. The first engagement happened on 5 February 1943 when she accompanied convoy ON-162 about 150 miles east of Sable Island. Shortly after noon, she made a faint ASDIC contact and dropped a pattern of five charges, but scoring no kill<ref name="TankArchivesHVSS" />. Then, on 7 May 1944, when the frigate HMAS ''Valleyfield'' was sunk in the south of Cape Race, ''Brantford'' and two sister ships were ordered to support the rescue of the ''Valleyfield''<nowiki/>'s survivors. At local time 16:24, these corvettes made an ASDIC contact and engaged with depth charges. ''Brantford'' dropped 19 depth charges in total. Minutes later, traces of oil came to the surface. However, the contact was never confirmed as submarine. | ||
| + | |||
| + | On 26 September 1944, HMCS ''Brantford'' finished her duty as convoy escorting, and she was sailed to HMCS Cornwallis, where she was turned into a training ship for anti-submarine and escort tactics. In late 1945, she was disarmed and designated for disposal. But in 1950, George E. Irving of New Brunswick purchased her and sold her to a Honduran company, where she was refitted as whaler ''Olympic Arrow''<ref name="TankArchivesHVSS2">HMCS Brantford (K218)., <nowiki>https://www.canada.ca/en/navy/services/history/ships-histories/brantford.html</nowiki></ref>. Later sold to the Japanese, she was renamed ''Otori Maru No.14'' in 1956, and ''Kyo Maru No.21'' in 1961<ref name="TankArchivesHVSS3">HMCS Brantford (K218)., <nowiki>https://uboat.net/allies/warships/ship/859.html</nowiki></ref>. She last appeared in Lloyd's Register for disposal between 1972-1973. | ||
| + | |||
| + | === [[wt:en/news/5830-fleet-development-flower-class-corvette-the-convoy-guardian-en|Devblog]] === | ||
Just prior to WW2, it became apparent that German U-boats would present a serious threat to British transatlantic shipping in the event of an outbreak of hostilities. Realizing this, it became clear to the Royal Navy that they needed a large number of new small vessels that could cope with this threat, whilst being cheap, simple and quick to produce, without hindering the construction of larger warships. | Just prior to WW2, it became apparent that German U-boats would present a serious threat to British transatlantic shipping in the event of an outbreak of hostilities. Realizing this, it became clear to the Royal Navy that they needed a large number of new small vessels that could cope with this threat, whilst being cheap, simple and quick to produce, without hindering the construction of larger warships. | ||
| − | In response to the demand, the Smiths Dock Company proposed a modified version of one of their 700-ton whale catchers. The proposed ship virtually met all Royal Navy requirements and could even be built by smaller shipyards across the country, meaning that a large-scale production | + | In response to the demand, the Smiths Dock Company proposed a modified version of one of their 700-ton whale catchers. The proposed ship virtually met all Royal Navy requirements and could even be built by smaller shipyards across the country, meaning that a large-scale production wouldn't affect the construction of larger warships. The proposed design was accepted and the first orders for Flower-class corvettes came in as early as July 1939. |
Although initially only intended to operate along the British coast line, the large range and robust seaworthiness of the Flower-class corvettes soon saw ships of this class escorting Atlantic convoys to and from Great Britain. Their primary role was to fend off submarines, which is why ships of this class were relatively lightly armed and often specialized in anti-submarine warfare. | Although initially only intended to operate along the British coast line, the large range and robust seaworthiness of the Flower-class corvettes soon saw ships of this class escorting Atlantic convoys to and from Great Britain. Their primary role was to fend off submarines, which is why ships of this class were relatively lightly armed and often specialized in anti-submarine warfare. | ||
| Line 207: | Line 235: | ||
Apart from Great Britain, Flower-class corvettes were used extensively in various different roles by numerous other nations during WW2, including the United States, France, Canada, Greece, the Netherlands and many more. Ships of this class served right up until the end of WW2, even when more advanced designs began to replace them. | Apart from Great Britain, Flower-class corvettes were used extensively in various different roles by numerous other nations during WW2, including the United States, France, Canada, Greece, the Netherlands and many more. Ships of this class served right up until the end of WW2, even when more advanced designs began to replace them. | ||
| − | Whilst Spitfires and Hurricanes kept the Luftwaffe out of British skies, the venerable Flower-class corvettes ensured that vital supplies reached Great Britain, by fighting off the German submarine wolf-packs throughout the war. With over 260 ships built, the Flower-class corvette remains one of | + | Whilst Spitfires and Hurricanes kept the Luftwaffe out of British skies, the venerable Flower-class corvettes ensured that vital supplies reached Great Britain, by fighting off the German submarine wolf-packs throughout the war. With over 260 ships built, the Flower-class corvette remains one of Britain's most mass-produced wartime ship type, whose contribution to the war effort is highly obvious. |
| + | |||
| + | == Media == | ||
| + | <!-- ''Excellent additions to the article would be video guides, screenshots from the game, and photos.'' --> | ||
| + | |||
| + | ;Skins | ||
| − | + | * [https://live.warthunder.com/feed/camouflages/?vehicle=uk_flower_class Skins and camouflages for {{PAGENAME}} from live.warthunder.com.] | |
| − | == | + | ;Images |
| − | + | <gallery mode="packed" heights="200"> | |
| + | File:Flower class (K-218) WTWallpaper 001.jpg | ||
| + | File:Flower class (K-218) WTWallpaper 002.jpg | ||
| + | File:Flower class (K-218) WTWallpaper 003.jpg | ||
| + | File:Flower class (K-218) WTWallpaper 004.jpg | ||
| + | File:Flower class (K-218) WTWallpaper 005.jpg | ||
| + | File:Flower class (K-218) WTWallpaper 006.jpg | ||
| + | </gallery> | ||
== See also == | == See also == | ||
| − | ''Links to articles on the War Thunder Wiki that you think will be useful for the reader, for example:'' | + | <!-- ''Links to articles on the War Thunder Wiki that you think will be useful for the reader, for example:'' |
| + | * ''reference to the series of the ship;'' | ||
| + | * ''links to approximate analogues of other nations and research trees.'' --> | ||
| + | |||
| + | * {{Specs-Link|uk_isles_class_trawler}} | ||
| − | * | + | ;Other Canadian naval vehicles present in the game |
| − | * | + | * [[HMCS Haida]] |
| + | * [[HMCS Terra Nova]] | ||
== External links == | == External links == | ||
<!-- ''Paste links to sources and external resources, such as:'' | <!-- ''Paste links to sources and external resources, such as:'' | ||
* ''topic on the official game forum;'' | * ''topic on the official game forum;'' | ||
| − | |||
* ''other literature.'' --> | * ''other literature.'' --> | ||
* [[wt:en/news/5830-fleet-development-flower-class-corvette-the-convoy-guardian-en|[Devblog] Flower-class Corvette: The Convoy Guardian]] | * [[wt:en/news/5830-fleet-development-flower-class-corvette-the-convoy-guardian-en|[Devblog] Flower-class Corvette: The Convoy Guardian]] | ||
| + | === References: === | ||
| + | <references /> | ||
| + | |||
| + | {{ShipManufacturer Midland Shipyards}} | ||
{{Britain sub-chasers}} | {{Britain sub-chasers}} | ||
Latest revision as of 10:15, 21 April 2024

Contents
Description
The Flower-class, HMCS Brantford (K-218) was one of the 294 British Flower-class corvettes, a class of British small convoy escort ship designed in 1939 based on an existing civilian whaler ship design in order to simplify and hastened the production in order to protect the Atlantic convoy from Germany's U-boat fleets. Due to the urgent need for an escort, the Admiralty also placed orders for a Flower-class from a Canadian shipyard, of which some were later transferred back to the Royal Canadian Navy. After the war ended, several surplus Flower-class were sold off either to the other navies or being converted into a civilian ship.
Brantford was laid down in 1941 and commissioned a year later. She would serve uneventfully as a part of the Atlantic convoy until 1944 when she was relegated into a training ship. After the war ended in 1945, Brantford was decommissioned and sold off as a civilian ship. In a rather amusing case of coming into full circle, Brantford was converted into a Honduran-flagged whaler ship Olympic Arrow. She would later be sold in 1956 to Japanese whalers as Otori Maru No. 14 and again as Kyo Maru No. 21 before finally being scrapped in 1976.
The HMCS Brantford was introduced in Update 1.83 "Masters of the Sea" as part of the British fleet Closed Beta Test. The Brantford, like her predecessor HMS Liscomb, is an unusually tough nut to crack even against higher-tier coastal boats due to her having a detailed damage model to absorb most machine guns and autocannons. The Brantford is a direct step up from the Liscomb in every aspect, featuring twice the crew count, much less vulnerable ammo storage, improved secondary armaments, and a higher (but still low) top speed. As such, the Brantford can be effectively used as a bullet sponge to push for the capture points. However, due to her slow speed and large profile, she is still highly vulnerable to torpedoes and artillery strikes, and often requires teammates to cover her flanks.
General info
Survivability and armour
_internals.png)
The HMCS Brantford has the following armour layout:
- 102 mm BL Mark IX gunshield: 4.97 mm, antifragmentation armour
- 40 mm 2pdr QF Mk.VIII gunshield: 12.7 mm, hardened armour
- 20 mm/70 Oerlikon Mk.II gunshields: 12.7 mm, hardened armour
- Hull: 6 mm, steel
- Superstructure: 4 mm, steel
As with her predecessor the Liscomb, the Brantford is notable for being one of only two rank 2 coastal vessels to have a "detailed" damage model, having separate crew compartments modelled instead of a simplified "hull section" like smaller coastal boat. This alone renders her hull completely immune to most low-calibre machine guns, and highly resilient against 20 mm autocannons that are quite common at her BR.
With a crew complement of 85 distributed evenly along the ship, HMCS Brantford's overall survivability is unusually high, even when compared to the larger coastal vessels at rank 5. However, due to the lack of armouring on the hull, the Brantford's crew compartments and engines are still relatively vulnerable against 40 mm autocannons that have enough penetration to damage them. As such, avoid exposing your side profile when possible.
While the gunshields may stop low-calibre machine guns, heavy machine guns and cannons will have no trouble with them at any range. The hull and superstructure are cannot stop gunfire of any sort.
The Brantford has two types of ammunition storages: a "Shells room", located in the second hull compartment, and an "Ammunition storage", located in the fifth hull compartment. The "Shells room" contains ammunition for the 102 mm BL Mark IX cannon, and the "Ammunition storage" contains ammunition for both the 40 mm 2pdr QF Mk.VIII and 20 mm/70 Oerlikon Mk.II cannons. Destroying either will cause any remaining ammunition for the respective guns to be destroyed, but doing so will not immediately destroy the Brantford.
Mobility
| Mobility Characteristics | |||||
|---|---|---|---|---|---|
| Game Mode | Upgrade Status | Maximum Speed (km/h) | Turn Time (s) | Turn Radius (m) | |
| Forward | Reverse | ||||
| AB | Stock | 33 | 16 | ~100.25 | ~101.94 |
| Upgraded | 45 | 22 | ~57.57 | ~58.54 | |
| RB/SB | Stock | 25 | 12 | ~148.67 | ~118.31 |
| Upgraded | 30 | 14 | ~100.43 | ~93.24 | |
Although it is a step up from the Liscomb, the Brantford's mobility is still very poor. She still takes quite a long time to accelerate and decelerate and is quite difficult to turn at times. This often leaves her vulnerable to torpedoes, especially at close ranges.
Modifications and economy
| Seakeeping | Unsinkability | Firepower | ||||||||||||||||||||||||
|---|---|---|---|---|---|---|---|---|---|---|---|---|---|---|---|---|---|---|---|---|---|---|---|---|---|---|
|
|
|
Armament
Primary armament
The primary armament consists of a single 102 mm BL Mark IX cannon mounted on the bow. There are 150 rounds of ammunition available for it. Stock, the mount can traverse horizontally at a rate of 13°/s and vertically at a rate of 8.5°/s; with the "Primary Armament Targeting" modification installed, this is increased to 15°/s and 10°/s respectively. The gun is single-shot and has a nominal rate of fire of 12 rounds/min. With a stock crew, it can be reloaded in 6.5 seconds; with an aced crew, it can be reloaded in 5 seconds.
| Primary Armament Guidance | |
|---|---|
| Horizontal | Vertical |
| ±145° | -5°/+30° |
There are three ammunition choices available:
| Penetration statistics | |||||||
|---|---|---|---|---|---|---|---|
| Ammunition | Type of warhead |
Penetration @ 0° Angle of Attack (mm) | |||||
| 1,000 m | 2,500 m | 5,000 m | 7,500 m | 10,000 m | 15,000 m | ||
| 4 inch HE | HE | 11 | 11 | 11 | 11 | 11 | 11 |
| 4 inch SAP | SAP | 90 | 72 | 51 | 37 | 28 | 24 |
| 102 mm shrapnel | Shrapnel | 5 | 5 | 5 | 5 | 5 | 5 |
| Shell details | ||||||||||||
|---|---|---|---|---|---|---|---|---|---|---|---|---|
| Ammunition | Type of warhead |
Velocity (m/s) |
Projectile mass (kg) |
Fuse delay (s) |
Fuse sensitivity (mm) |
Explosive mass (TNT equivalent) (g) |
Ricochet | |||||
| 0% | 50% | 100% | ||||||||||
| 4 inch HE | HE | 805 | 14.06 | 0 | 0.1 | 721 | 79° | 80° | 81° | |||
| 4 inch SAP | SAP | 805 | 15.2 | 0.015 | 5 | 520 | 47° | 60° | 65° | |||
| 102 mm shrapnel | Shrapnel | 805 | 17.7 | 0 | 0.1 | 218 | 62° | 69° | 73° | |||
Secondary armament
The secondary armament consists of a single 40 mm 2pdr QF Mk.VIII cannon mounted aft. There are 3,920 rounds of ammunition available for it. Stock, the mount can traverse horizontally at a rate of 38°/s and vertically at a rate of 30°/s; with the "Auxiliary Armament Targeting" modification installed, this is increased to 45°/s and 35°/s respectively. The gun has a belt capacity of 56 rounds and a rate of fire of 200 rounds/min. With a stock crew, it can be reloaded in 6 seconds; with an aced crew it can be reloaded in 3 seconds.
| Secondary Armament Guidance | |
|---|---|
| Horizontal | Vertical |
| ±180° | -10°/+80° |
There are three ammunition choices available:
- Universal: HEF · AP-T · HEF · AP-T
- 40 mm HE: HEF · HEF · HEF · AP-T
- 40 mm AP: AP-T · AP-T · AP-T · HEF
| Penetration statistics | |||||||
|---|---|---|---|---|---|---|---|
| Ammunition | Penetration @ 0° Angle of Attack (mm) | ||||||
| 10 m | 100 m | 500 m | 1,000 m | 1,500 m | 2,000 m | ||
| HEF | 3 | 3 | 3 | 3 | 3 | 3 | |
| AP-T | 60 | 57 | 48 | 39 | 32 | 26 | |
| Shell details | ||||||||||||
|---|---|---|---|---|---|---|---|---|---|---|---|---|
| Ammunition | Velocity (m/s) |
Projectile mass (kg) |
Fuse delay (m) |
Fuse sensitivity (mm) |
Explosive mass (TNT equivalent) (g) |
Ricochet | ||||||
| 0% | 50% | 100% | ||||||||||
| HEF | 701 | 0.82 | 0 | 0.1 | 71 | 79° | 80° | 81° | ||||
| AP-T | 701 | 0.91 | - | - | - | 47° | 60° | 65° | ||||
Anti-aircraft armament
The anti-aircraft armament consists of two 20 mm/70 Oerlikon Mk.II cannons in single mounts, one on either side of the bridge. There are 2,400 rounds of ammunition available for each mount for a total of 4,800 rounds. There are no stated traverse rates for these mounts listed in-game, though they handle very similarly, if not identically, to other single 20 mm/70 Oerlikon Mk.II mounts in the game, all of which handle as follows: stock, they can traverse horizontally and vertically at a rate of 64°/s; upgraded (with the "Anti-Air Armament Targeting" installed in HMCS Brantford's case), they can traverse horizontally and vertically at a rate of 75°/s. Each gun has a belt capacity of 60 rounds and a stated rate of fire of 450 rounds/min, though in actuality, they fire at slightly different rates: the starboard gun fires at a slightly lower rate, around 420 rounds/min, while the port gun fires at a slightly high rate, around 480 rounds/min. With a stock crew, both guns can be reloaded in 5.2 seconds; with an aced crew, they can be reloaded in 4 seconds.
| Turrets are named sequentially, clockwise, starting at the bow. |
| Anti-Aircraft Armament Guidance | |||||||
|---|---|---|---|---|---|---|---|
| No.1 Turret (starboard) | No.2 Turret (port) | ||||||
| Horizontal | Vertical | Horizontal | Vertical | ||||
| -99°/+180° | -8°/+67° | -180°/+99° | -8°/+67° | ||||
There are no ammunition options available for this gun on the HMCS Brantford. No belt composition is stated in-game.
Additional armament
The HMCS Brantford has four loadout options:
- Without load
- 20 x Mk.VII depth charges
- 4 x Y-gun Mk.VII depth charges
- 20 x Mk.VII depth charges, 4 x Y-gun depth charges
The Mk.VII depth charges are carried on the aft of the boat and are split into two chutes, each with 10 depth charges. The depth charges are dropped one at a time starting with the starboard chute, then continuing on to the port chute after all 10 in the starboard chute have been dropped.
The Y-gun Mk.VII depth charges are fired from four depth charge throwers mounted amidships, two on either side facing outwards. These depth charges are fired depending on the direction the player is currently looking. Although the two depth charges on each side are usually both fired together, at certain camera angles, they can be fired independently.
Before spawning, the detonation time delay for both types of depth charges can be set anywhere between 3 seconds and 10 seconds.
| Depth Charge Characteristics (Mk.VII depth charge) | |||
|---|---|---|---|
| Mass (kg) | Explosive Type | Explosive Mass (kg) | TNT Equivalent (kg) |
| 196 | TNT | 130 | 130 |
| Depth Charge Characteristics (Y-gun Mk.VII depth charge) | |||
|---|---|---|---|
| Mass (kg) | Explosive Type | Explosive Mass (kg) | TNT Equivalent (kg) |
| 196 | TNT | 130 | 130 |
Usage in battles
- Ammunition
For the 102 mm BL Mark IX cannon, the best round for general use is the 4 inch HE round because, of the three rounds available, it has the highest explosive mass, making the most versatile round against the majority of opponents. With that in mind, be sure to still carry small amounts each of the 4 inch SAP and 102 mm shrapnel rounds for specialized use.
The 4 inch SAP rounds should be reserved only for armoured boats that the HE round fails to penetrate. To trigger its fuze, the SAP round must penetrate at least 3 mm of armour, which the vast amount of enemies lack. Because of this, if the enemy lacks armour, the SAP round will not detonate, dealing very minimal damage as a result. Always identify the enemy first and only use the SAP round if the other rounds are ineffective.
The 102 mm shrapnel should be used on large targets without armour such as large sub-chasers. Against these, the HE round will almost always fail to destroy the hull compartments in a single hit. In addition, because of their large size, internal components will rarely be damaged by the HE round. In contrast, the shrapnel round is able to consistently destroy, or at least heavily damage depending on the impact angle, the same compartments and produces spalling that travels further inside the hull. As a tradeoff though, the shrapnel round only has about 30% of the explosive mass as the HE round, and it will almost always be stopped by any kind of armour that it hits, making it a poor choice against smaller boats and armoured targets. The shrapnel round also has a timed fuze, though this isn't much more than a gimmick. The 102 mm BL Mark IX cannon's slow traverse and elevation rates, as well as its slow rate of fire, makes it an ineffective weapon against aircraft. Stick to targeting surface targets and leave anti-aircraft defence to the other weaponry.
For the 40 mm 2pdr QF Mk.VIII cannon, the best belt is the 40 mm HE belt because it has the highest ratio of HE rounds to AP rounds, making it the most effective against both aircraft and surface targets. Some 40 mm AP belts should also be taken for use against armoured targets. Alternatively, take only the Universal belt if you dislike micromanaging ammunition or want to avoid the reload between belt switches. This comes at the cost of less damage efficiency though, so it's up to personal preference. If you do not plan on manually controlling the 40 mm 2pdr QF Mk.VIII cannon at all, then take only the 40 mm HE belt to guarantee that the AI gunners always use the most effective belt.
- Depth Charges
There is no practical reason to use depth charges on any naval vessel in the game. Although they usually result in a one-hit kill if landed properly, their usage is extremely situational, and they are actually a liability in most cases because, if they're not dropped, they act like exposed ammo racks.
This is especially so in the case of HMCS Brantford, since the Mk.VII depth charges drop off of the stern. Because of HMCS Brantford's poor mobility, there will almost never be an opportunity to use them, since it relies completely on the enemy being the right spot at the right time rather than anything the player's own positioning. The Y-gun Mk.VII depth charges are even worse in this regard because they have a long flight time and land some distance away from HMCS Brantford, making them very difficult to use.
The recommended loadout option is "Without load".
Pros and cons
Pros:
- Incredible survivability especially for its BR due to detailed damage model and high crew count
- The hull is completely imprevious to most low-calibre machine guns it usually faces
- 102 mm gun offer decent damage output against most targets, with access to SAP rounds
- Has access to Pom-Pom and Oerlikon autocannons with good coverage and damage output
- Stable firing platform allows it to perform fire support duties at longer range
Cons:
- Poor top speed and very bad manoeuvrability
- Very susceptible to torpedoes and artillery strike due to the size and speed
- Side profile are vulnerable to large autocannons (40 mm+)
- Only one 102 mm gun that can be easily disabled and effectively cut off the damage output
- 102 mm gun has mediocre accuracy (especially at longer ranges) and shell filling, especially against larger targets
- Can be easily outclassed and outgunned by early destroyer it often faces
History
As the war started in 1939, the Royal Canadian Navy (RCN) had little preparation for their duty on the sea. Canada needed ships to protect its shore and transportation to the British Isles that would be simple enough to produce in civil shipyards for meeting the large requirement. Initially, the RCN sought to build Halcyon-class sloops, an 850-ton minesweeper of the Royal Navy in the 1930s. However, Halcyon was designed under naval standards; shipbuilding in Canada, at that time, was unable to produce the material and turbine engines to naval standards[1].
Thus, the RCN turned to the 1939 Patrol Vessel of Whaler Type or the Flower class. Based on the civilian whaler Southern Pride, its production did not require sophisticated techniques used on military designs. Consequently, it provided a timely solution for the expansion of RCN. Starting from 1940, Canada launched 121 "Flowers" and modified Flowers in total. The Canadian-built units followed the basic design of Flower, with slight modifications in the position of firearms and boat carriage[2].
HMCS Brantford (K218) was launched in September 1941 and commissioned in May 1942. She was the last Canadian-built Flower following the original drawing. The subsequent ships received an increased sheer and flare to improve their performance in high sea conditions.
When HMCS Brantford joined service, the German U-boat campaign against the convoys was in full swing. Just three days before the commission of the Brantford, two cargo ships were sunk north of Cap Magdalen. HMCS Brantford was immediately used in convoy escorting from Quebec to Sydney until July 1942.
In July, HMCS Brantford became part of the Western Local Escort Force, of which RCN units formed up the majority. This force provided anti-submarine escorts for North American port cities to the Western Ocean Meeting Point near St John's. It handed the duty to the Mid-Ocean Escort Force and guarding the convoy from east. From 1942 to 1944, HMCS Brantford served in two forces interchangeably and protected merchants as well as their precious cargoes from submarine attacks[3].
During her career, Brantford conducted two submarine attacks. The first engagement happened on 5 February 1943 when she accompanied convoy ON-162 about 150 miles east of Sable Island. Shortly after noon, she made a faint ASDIC contact and dropped a pattern of five charges, but scoring no kill[3]. Then, on 7 May 1944, when the frigate HMAS Valleyfield was sunk in the south of Cape Race, Brantford and two sister ships were ordered to support the rescue of the Valleyfield's survivors. At local time 16:24, these corvettes made an ASDIC contact and engaged with depth charges. Brantford dropped 19 depth charges in total. Minutes later, traces of oil came to the surface. However, the contact was never confirmed as submarine.
On 26 September 1944, HMCS Brantford finished her duty as convoy escorting, and she was sailed to HMCS Cornwallis, where she was turned into a training ship for anti-submarine and escort tactics. In late 1945, she was disarmed and designated for disposal. But in 1950, George E. Irving of New Brunswick purchased her and sold her to a Honduran company, where she was refitted as whaler Olympic Arrow[4]. Later sold to the Japanese, she was renamed Otori Maru No.14 in 1956, and Kyo Maru No.21 in 1961[5]. She last appeared in Lloyd's Register for disposal between 1972-1973.
Devblog
Just prior to WW2, it became apparent that German U-boats would present a serious threat to British transatlantic shipping in the event of an outbreak of hostilities. Realizing this, it became clear to the Royal Navy that they needed a large number of new small vessels that could cope with this threat, whilst being cheap, simple and quick to produce, without hindering the construction of larger warships.
In response to the demand, the Smiths Dock Company proposed a modified version of one of their 700-ton whale catchers. The proposed ship virtually met all Royal Navy requirements and could even be built by smaller shipyards across the country, meaning that a large-scale production wouldn't affect the construction of larger warships. The proposed design was accepted and the first orders for Flower-class corvettes came in as early as July 1939.
Although initially only intended to operate along the British coast line, the large range and robust seaworthiness of the Flower-class corvettes soon saw ships of this class escorting Atlantic convoys to and from Great Britain. Their primary role was to fend off submarines, which is why ships of this class were relatively lightly armed and often specialized in anti-submarine warfare.
Apart from Great Britain, Flower-class corvettes were used extensively in various different roles by numerous other nations during WW2, including the United States, France, Canada, Greece, the Netherlands and many more. Ships of this class served right up until the end of WW2, even when more advanced designs began to replace them.
Whilst Spitfires and Hurricanes kept the Luftwaffe out of British skies, the venerable Flower-class corvettes ensured that vital supplies reached Great Britain, by fighting off the German submarine wolf-packs throughout the war. With over 260 ships built, the Flower-class corvette remains one of Britain's most mass-produced wartime ship type, whose contribution to the war effort is highly obvious.
Media
- Skins
- Images
_WTWallpaper_001.jpg)
_WTWallpaper_002.jpg)
_WTWallpaper_003.jpg)
_WTWallpaper_004.jpg)
_WTWallpaper_005.jpg)
_WTWallpaper_006.jpg)
See also
- Other Canadian naval vehicles present in the game
External links
References:
- ↑ Halcyon Class Ships., Specifications Halcyon Minesweepers (halcyon-class.co.uk)
- ↑ Lambert, John; Brown, Les. Flower Class Corvettes (ShipCraft) (p. 33).
- ↑ 3.0 3.1 Brief History of the HMCS Brantford., http://forposterityssake.ca/RCN-DOCS/BriefHistoryofHMCSBrantford.pdf
- ↑ HMCS Brantford (K218)., https://www.canada.ca/en/navy/services/history/ships-histories/brantford.html
- ↑ HMCS Brantford (K218)., https://uboat.net/allies/warships/ship/859.html
| Midland Shipyards Limited | |
|---|---|
| Corvettes | |
| Flower-class | HMCS Brantford |
| Britain sub-chasers | |
|---|---|
